Quick Look
Grade Level: 7 (6-8)
Time Required: 2 hours
(can be split into two 60-minute sessions)
Expendable Cost/Group: US $1.00 This is the cost for dry spaghetti noodles; all other materials are readily avaliable in most classrooms or households.
Group Size: 3
Activity Dependency: None
Associated Informal Learning Activity: Spaghetti Bridges
Subject Areas: Science and Technology
NGSS Performance Expectations:

| MS-ETS1-4 |
Summary
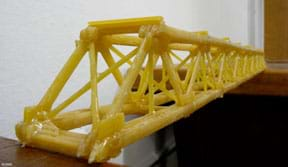
Civil engineers design structures such as buildings, dams, highways and bridges. Student teams explore the field of engineering by making bridges using spaghetti as their primary building material. Then they test their bridges to see how much weight they can carry before breaking.
Engineering Connection
Many people in different branches of engineering work to build bridges. Civil engineers are responsible for design and construction of such structures, however they also work with mechanical engineers and material engineers to design the most stable structures. These engineers must consider many variables when creating plans, such as the distance to be spanned, where the bridge is being built, the expected type of traffic it will have to withstand, materials available, budget and what the bridge will look like.
Learning Objectives
After this activity, students should be able to:
- Create a design method.
- Conduct group work and discussion.
- Build techniques that civil engineers use.
Educational Standards
Each TeachEngineering lesson or activity is correlated to one or more K-12 science,
technology, engineering or math (STEM) educational standards.
All 100,000+ K-12 STEM standards covered in TeachEngineering are collected, maintained and packaged by the Achievement Standards Network (ASN),
a project of D2L (www.achievementstandards.org).
In the ASN, standards are hierarchically structured: first by source; e.g., by state; within source by type; e.g., science or mathematics;
within type by subtype, then by grade, etc.
Each TeachEngineering lesson or activity is correlated to one or more K-12 science, technology, engineering or math (STEM) educational standards.
All 100,000+ K-12 STEM standards covered in TeachEngineering are collected, maintained and packaged by the Achievement Standards Network (ASN), a project of D2L (www.achievementstandards.org).
In the ASN, standards are hierarchically structured: first by source; e.g., by state; within source by type; e.g., science or mathematics; within type by subtype, then by grade, etc.
NGSS: Next Generation Science Standards - Science
| NGSS Performance Expectation | ||
|---|---|---|
|
MS-ETS1-4. Develop a model to generate data for iterative testing and modification of a proposed object, tool, or process such that an optimal design can be achieved. (Grades 6 - 8) Do you agree with this alignment? |
||
| Click to view other curriculum aligned to this Performance Expectation | ||
| This activity focuses on the following Three Dimensional Learning aspects of NGSS: | ||
| Science & Engineering Practices | Disciplinary Core Ideas | Crosscutting Concepts |
| Develop a model to generate data to test ideas about designed systems, including those representing inputs and outputs. Alignment agreement: | Models of all kinds are important for testing solutions. Alignment agreement: The iterative process of testing the most promising solutions and modifying what is proposed on the basis of the test results leads to greater refinement and ultimately to an optimal solution.Alignment agreement: | |
Common Core State Standards - Math
-
Display numerical data in plots on a number line, including dot plots, histograms, and box plots.
(Grade
6)
More Details
Do you agree with this alignment?
-
Draw (freehand, with ruler and protractor, and with technology) geometric shapes with given conditions. Focus on constructing triangles from three measures of angles or sides, noticing when the conditions determine a unique triangle, more than one triangle, or no triangle.
(Grade
7)
More Details
Do you agree with this alignment?
-
Solve problems involving scale drawings of geometric figures, including computing actual lengths and areas from a scale drawing and reproducing a scale drawing at a different scale.
(Grade
7)
More Details
Do you agree with this alignment?
-
Construct and interpret scatter plots for bivariate measurement data to investigate patterns of association between two quantities. Describe patterns such as clustering, outliers, positive or negative association, linear association, and nonlinear association.
(Grade
8)
More Details
Do you agree with this alignment?
-
Use the equation of a linear model to solve problems in the context of bivariate measurement data, interpreting the slope and intercept.
(Grade
8)
More Details
Do you agree with this alignment?
International Technology and Engineering Educators Association - Technology
-
Students will develop an understanding of the attributes of design.
(Grades
K -
12)
More Details
Do you agree with this alignment?
-
Students will develop an understanding of engineering design.
(Grades
K -
12)
More Details
Do you agree with this alignment?
-
There is no perfect design.
(Grades
6 -
8)
More Details
Do you agree with this alignment?
-
Make two-dimensional and three-dimensional representations of the designed solution.
(Grades
6 -
8)
More Details
Do you agree with this alignment?
-
Engage in a research and development process to simulate how inventions and innovations have evolved through systematic tests and refinements.
(Grades
6 -
8)
More Details
Do you agree with this alignment?
-
Illustrate the benefits and opportunities associated with different approaches to design.
(Grades
6 -
8)
More Details
Do you agree with this alignment?
-
Apply the technology and engineering design process.
(Grades
6 -
8)
More Details
Do you agree with this alignment?
-
Create solutions to problems by identifying and applying human factors in design.
(Grades
6 -
8)
More Details
Do you agree with this alignment?
State Standards
Massachusetts - Math
-
Display numerical data in plots on a number line, including dot plots, histograms, and box plots.
(Grade
6)
More Details
Do you agree with this alignment?
-
Draw (freehand, with ruler and protractor, and with technology) two-dimensional geometric shapes with given conditions. Focus on constructing triangles from three measures of angles or sides, noticing when the conditions determine a unique triangle, more than one triangle, or no triangle.
(Grade
7)
More Details
Do you agree with this alignment?
-
Solve problems involving scale drawings of geometric figures, such as computing actual lengths and areas from a scale drawing and reproducing a scale drawing at a different scale.
(Grade
7)
More Details
Do you agree with this alignment?
-
Construct and interpret scatter plots for bivariate measurement data to investigate patterns of association between two quantities. Describe patterns such as clustering, outliers, positive or negative association, linear association, and nonlinear association.
(Grade
8)
More Details
Do you agree with this alignment?
-
Use the equation of a linear model to solve problems in the context of bivariate measurement data, interpreting the slope and intercept.
(Grade
8)
More Details
Do you agree with this alignment?
Massachusetts - Science
-
Demonstrate methods of representing solutions to a design problem, e.g., sketches, orthographic projections, multiview drawings.
(Grades
6 -
8)
More Details
Do you agree with this alignment?
-
Explain how such design features as size, shape, weight, function, and cost limitations would affect the construction of a given prototype.
(Grades
6 -
8)
More Details
Do you agree with this alignment?
-
Identify and describe three major types of bridges (e.g., arch, beam, and suspension) and their appropriate uses (e.g., site, span, resources, and load).
(Grades
6 -
8)
More Details
Do you agree with this alignment?
Materials List
- 1 pound dry spaghetti
- glue gun
- glue sticks, 1 package
- various weights from 5 to 50 pounds
- large tub (or newspapers to spread out), to make clean-up easier
- 2 tables (place 1 foot apart)
- metal strip (to serve as the road)
- chain (to hold the weights)
Introduction/Motivation
Who do you think creates the human-made structures in our town? Who makes sure they are safe for us to use? (Listen to student ideas.) It is civil engineers who design and create structures such as buildings, dams, highways, skyscrapers and bridges. Engineering use the engineering design process to design successful bridges.
We can explore the field of engineering and follow some of the engineering design process steps by making bridges. Your engineering design challenge is to design a bridge that can hold the most weight before breaking. Like engineers, you will be given constraints- in this case, you can only use spaghetti and glue to construct your bridges in the time allotted. We can then test them by applying weights to see when they break. Let's get started!
Procedure
- Show students the available "building materials," including the metal strip "road," chain and weights that will be used for testing.
- Divide the class into teams of students.
- Have teams draw their bridge designs on paper to scale. Ensure students draw trusses constructed of individual triangles and identify angles and side lengths of triangles. Make sure that bridges are long enough to span a specified distance between two tables.
- Create the bridge using hot glue to hold it together.
- When the bridges are complete, test their strength. Place a bridge so it spans across the gap between two tables. Place a tub or spread-out newspapers under the bridge to catch falling debris and make clean-up easier.
- Put the strip of metal on the bridge (as the road). Then apply weights on the chain, starting with 5 pounds and working up to 50 pounds, or until the bridge breaks.
- Allow students time to re-design and re-test.
- Conclude with a class discussion to compare results and draw conclusions. Use the Investigating Questions as a concluding assessment.
Assessment
Questions: Assign the Investigation Questions as a test, quiz or homework. Review students' answers to gauge their comprehension.
Graphing: Have students record how much weight their bridges withstood before they failed. Discuss which design was able to carry the most weight and why (materials, geometry, use of glue, etc.). Then, as a class, create a histogram showing how much weight each bridge held. Also, have students plot the weight of each bridge (independent variable) vs. its corresponding maximum load (dependent variable). Students can then sketch a line of best fit and interpret the meaning of the slope and y-intercept.
Investigating Questions
- What happened when you added more weights? What does the bridge look like?
- Does adding more height to the bridge make it stronger?
- What are some ways to further improve your design?
Safety Issues
- Be careful not to get burned from the hot glue and hot glue guns.
- Wear safety glasses.
- Beware of falling weights.
Activity Scaling
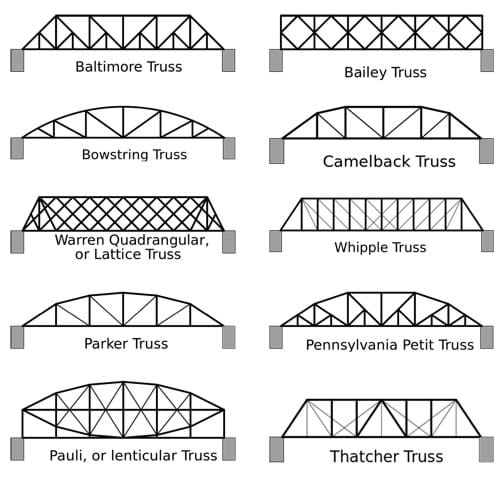
For higher grades, add the additional requirement to incorporate into the design a truss system to strengthen the bridge structure. Incorporating a construction/assembly pattern makes the bridge sides and bottoms stronger. To help generate ideas, show students the example truss bridge designs in Figure 1. Point out how the designs are made from short straight pieces put together in patterns that often include triangles.

Subscribe
Get the inside scoop on all things TeachEngineering such as new site features, curriculum updates, video releases, and more by signing up for our newsletter!Copyright
© 2013 by Regents of the University of Colorado; original © 2005 Worcester Polytechnic InstituteSupporting Program
K-12 Outreach Office, Worcester Polytechnic InstituteLast modified: January 28, 2020


User Comments & Tips