Quick Look
Grade Level: 10 (9-12)
Time Required: 45 minutes
Lesson Dependency: None
Subject Areas: Science and Technology

Summary
Students are introduced to detail drawings and the importance of clearly documenting and communicating their designs. They are introduced to the American National Standards Institute (ANSI) Y14.5 standard, which controls how engineers communicate and archive design information. They are introduced to standard paper sizes and drawing view conventions, which are major components of the Y14.5 standard. They can then practice their drawing skills by completing the associated activity to meet engineering standards.Engineering Connection
A revolutionary idea has value only if it can be effectively communicated. For engineers to imagine, create and design the products, devices and systems that have lasting impact on society, they must know how to present and archive their designs in a manner that is understood by all engineers across cultural and geographical boundaries. Given proper detail drawings, manufacturers know exactly how parts are created without the need for additional verbal explanation from engineers. A detail drawing stands on its own, so to speak, and provides a record or archive of the engineer's precise intent. Well-crafted detail drawings preserve creative work from one generation to the next.
Learning Objectives
After this lesson, students should be able to:
- Identify seven views of a detail drawing.
- List the important components of a detail drawing.
- List the paper sizes used for a detail drawing.
- Explain the role of standards in the preservation of technology.
Educational Standards
Each TeachEngineering lesson or activity is correlated to one or more K-12 science,
technology, engineering or math (STEM) educational standards.
All 100,000+ K-12 STEM standards covered in TeachEngineering are collected, maintained and packaged by the Achievement Standards Network (ASN),
a project of D2L (www.achievementstandards.org).
In the ASN, standards are hierarchically structured: first by source; e.g., by state; within source by type; e.g., science or mathematics;
within type by subtype, then by grade, etc.
Each TeachEngineering lesson or activity is correlated to one or more K-12 science, technology, engineering or math (STEM) educational standards.
All 100,000+ K-12 STEM standards covered in TeachEngineering are collected, maintained and packaged by the Achievement Standards Network (ASN), a project of D2L (www.achievementstandards.org).
In the ASN, standards are hierarchically structured: first by source; e.g., by state; within source by type; e.g., science or mathematics; within type by subtype, then by grade, etc.
International Technology and Engineering Educators Association - Technology
-
Discuss that all designs have different characteristics that can be described.
(Grades
Pre-K -
2)
More Details
Do you agree with this alignment?
-
Use various approaches to communicate processes and procedures for using, maintaining, and assessing technological products and systems.
(Grades
9 -
12)
More Details
Do you agree with this alignment?
Worksheets and Attachments
Visit [www.teachengineering.org/lessons/view/cub_detdrawings_lesson01] to print or download.Introduction/Motivation
Engineers do not manufacture their own creative work, but typically communicate their ideas to highly trained machinists and manufacturers, who then construct the various components that make up the designs. Engineers also must present their designs in a way that is understood by engineers in different countries and cultures. Engineers also leave a legacy of creative thought through their designs. To preserve this technology from one generation to the next, it must be well-documented. How would you do this? How do engineers do this? A detail drawing is a tool used by engineers to communicate their designs to manufacturers and to preserve their work for future generations.
To facilitate the sharing of design information, engineers have created uniform standards, protocols and tools. One of these standards is called the ANSI Y14.5, which is a description for how to create a "detail drawing." A detail drawing is a two-dimensional representation of an engineer's design that contains all the information needed to precisely reproduce it. Detail drawings are especially useful when an engineer wants to manufacture their design. Given a proper detail drawing, a manufacturer knows exactly how to create a part without the need for additional verbal explanation from the engineer. The detail drawing stands on its own, so to speak, and provides a record or archive of the engineer's precise intent.
(Show students example detail drawings and describe information from the Lesson Background section. Use the Detail Drawing Visual Aids, which provides Figures 1-3, in a format suitable for overhead projection or handouts. Then administer the attached quiz and conduct the associated activity.)
Lesson Background and Concepts for Teachers
A "detail drawing" is a drawing of a single component, assembly of multiple parts, or an entire system of assemblies. A detail drawing provides complete and precise descriptions of a part's dimensions, shape and how it is manufactured. A detail drawing should be concise, in that it conveys only the information needed to create the part. Information such as the exact size, type of material, finish, tolerance and any special shop instructions that are necessary to create the part are included its detail drawing.
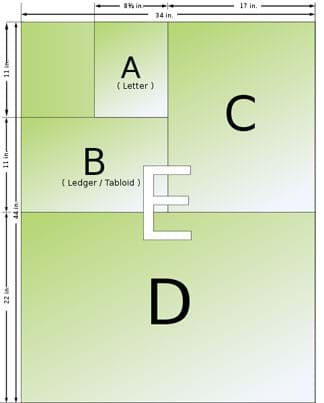
Detail drawings are created on standard paper sizes. The "North American Standard Paper Size" is specified by the ANSI Y14.5 standard and is used in the US. Figure 1 shows the different North American Standard paper sizes. The smallest size is designated by the letter "A" and is the size of a typical sheet of notebook paper (8 ½ x 11 inch). The largest size is "E," which is equivalent to 16 sheets of notebook paper.

An engineer "scales" very large or small objects in their drawings. For example, the components that make up a 1-inch microrobot are too small to draw to scale due to feature sizes that are not easily seen unmagnified. An appropriate scale, say 1/10 inch = 1 inch, is chosen to convey the necessary details, and then an appropriate paper size is chosen. The scale of the drawing is noted in the title block.
The following information should be present on a detail drawing:
- engineer's name
- part name
- material type
- drawing scale
- date and/or revision
- necessary views (front, left side, right side, top, bottom, and/or back)
- isometric view
- all necessary dimensions (width, depth, height, size, etc.)
- all dimension tolerances

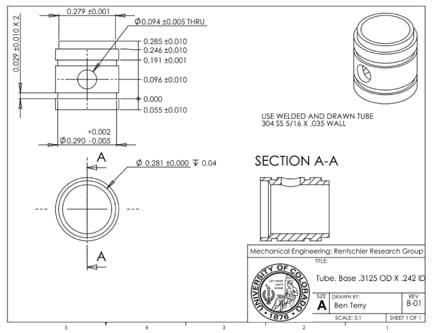
Figure 2 is an example of a detail drawing that contains all the necessary information to create this component. Note the following from this drawing:
- the engineer's name (Ben Terry)
- part name (Tube, Base .3125 OD X .242 ID)
- part name (Tube, Base .3125 OD X .242 ID)
- scale (5:1)
- revision (B-01)
- the paper size: (A)
- the isometric view (upper right corner)
- the front view (upper left corner)
- bottom view (lower left corner)
- right view—in this case a section view (SECTION A-A)
- dimensions and allowable tolerances
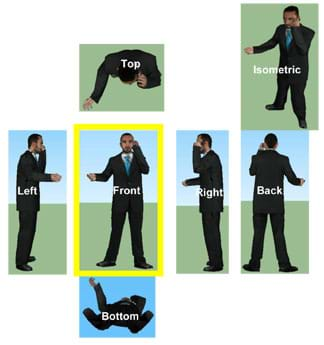
In a detail drawing, views are included to clearly describe a three-dimensional object through the medium of two-dimensional paper. The front view is the first view that is chosen and is the only view that is arbitrary, that is, the engineer defines (decides) which view will be the front view. All other views are based off of the chosen front view. Views are positioned on the paper according to the convention illustrated by Figure 3.

Note that the views are obtained by rotating the front view. For example, the front view is rotated 90° to the left to obtain the left view, the front view is rotated 90° to the right to obtain the right view, the right view is rotated 90° to the right to obtain the back view, and so on. Note that the isometric view is obtained by considering the component within a cubical room looking towards the opposite, lower corner from an upper corner. Views need not be labeled as they are in Figure 3; their locations in the detail drawing relative to the front view defines each view. Sketching the views by hands takes practice. The associated Drawing Designs in Detail activity provides an opportunity for students to practice drawing the standard views.
The convention used in Figure 3 is called "third angle projection," which is used by North American manufacturers. Another convention, called "first angle projection," is used in Europe and Asia.
Associated Activities
- Drawing Designs in Detail - Students practice creating rudimentary detail drawings. They learn how engineers communicate the technical information about their designs using the basic components of detail drawings. They also practice creating their own drawings of a 3D block.
Vocabulary/Definitions
ANSI: Acronym for American National Standards Institute.
drawing view: A two-dimensional line drawing of an object as seen from a particular angle. The seven standard views are: front, back, top, bottom, left side, right side, and isometric.
scale: The scale of a drawing is defined as the ratio of a distance on the drawing to the corresponding distance on the actual object.
third angle projection: The convention for drawing views used in North America. A simple way to visualize third angle projection is to place the object in the bottom of an imaginary bowl. Sliding the object up the right edge of the bowl reveals the right side view, sliding up the left edge of the bowl reveals the left side view, and so on.
tolerance: The acceptable deviation of the actual value from a specified value.
Assessment
Lesson Summary Assessment
Quiz: After the lesson, administer the attached Detail Drawings Quiz to students, which asks them to identify drawing view perspectives and explain why the rules and procedures for creating detail drawings are so comprehensive and thorough. Review their answers to gauge their comprehension of the subject matter.
Subscribe
Get the inside scoop on all things TeachEngineering such as new site features, curriculum updates, video releases, and more by signing up for our newsletter!More Curriculum Like This

Students practice creating rudimentary detail drawings. They practice creating their own drawings of a three-dimensional block and a special LEGO piece, and then make 3D sketches of an unknown object using only the information provided in its detail drawing.

Students learn how to create two-dimensional representations of three-dimensional objects by utilizing orthographic projection techniques. They build shapes using cube blocks and then draw orthographic and isometric views of those shapes—which are the side views, such as top, front, right—with no de...

Students learn about isometric drawings and practice sketching on triangle-dot paper the shapes they make using multiple simple cubes. They also learn how to use coded plans to envision objects and draw them on triangle-dot paper.

During this lesson, students discover the journey that a Mars rover embarks upon after being designed by engineers and before being prepared for launch. Students investigate the fabrication techniques, tolerance concepts, assembly and field-testing associated with a Mars exploratory rover.
Copyright
© 2010 by Regents of the University of Colorado.Contributors
Benjamin S. Terry; Stephanie Rivale; Denise W. CarlsonSupporting Program
Integrated Teaching and Learning Program, College of Engineering, University of Colorado BoulderAcknowledgements
The contents of this digital library curriculum were developed under a grant from the Fund for the Improvement of Postsecondary Education (FIPSE), U.S. Department of Education and National Science Foundation GK-12 grant no. 0338326. However, these contents do not necessarily represent the policies of the Department of Education or National Science Foundation, and you should not assume endorsement by the federal government.
Last modified: November 3, 2020


User Comments & Tips