Quick Look
Grade Level: 8 (6-8)
Time Required: 1 hours 15 minutes
Expendable Cost/Group: US $5.00 This activity also uses some non-expendable (reusable) supplies such as a suction pump; see the Materials List for details.
Group Size: 3
Activity Dependency: None
Subject Areas: Physics, Problem Solving, Science and Technology
NGSS Performance Expectations:

| MS-ETS1-1 |
Summary
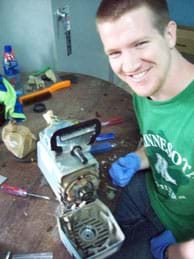
Students learn how biomedical engineers work with engineers and other professionals to develop dependable medical devices. Specifically, they learn about suction pumps, which are important devices to keep in good repair, especially when they are used in remote locations. Student teams ask, research, imagine, plan, create, test, and improve prototypes of suction pump protection devices to keep fluid from backing up and ruining the pump motors. Using a real suction pump, they conduct repeated trials to test their devices for reliability, making improvements as necessary.Engineering Connection
Biomedical engineers design a wide variety of medical equipment used in hospitals, from stretchers and gurneys to surgical equipment and imaging devices. The best medical equipment has built-in safety features that prevent users from damaging the equipment, such as the safety mechanisms in suction pumps that prevent fluid from overflowing into the motor and ruining the pump. In the event that these safety mechanisms fail, repairs must be made. For example, Engineering World Health, a nonprofit biomedical engineering organization, repairs such devices in hospitals that serve resource-poor communities in Nicaragua, Tanzania and Rwanda. In this activity, students act as engineers and follow the steps of the engineering design process to ask, research, imagine, plan, prototype, test, and improve their prototype designs for suction pump protection devices.
Learning Objectives
After this activity, students should be able to:
- Explain the purpose of the safety feature on a suction pump.
- Describe the role that biomedical engineers play in developing medical devices.
- List the steps of the engineering design process.
- Explain the concepts of reliability and repeatability.
- Describe the concept of a vacuum and how it relates to a suction pump.
Educational Standards
Each TeachEngineering lesson or activity is correlated to one or more K-12 science,
technology, engineering or math (STEM) educational standards.
All 100,000+ K-12 STEM standards covered in TeachEngineering are collected, maintained and packaged by the Achievement Standards Network (ASN),
a project of D2L (www.achievementstandards.org).
In the ASN, standards are hierarchically structured: first by source; e.g., by state; within source by type; e.g., science or mathematics;
within type by subtype, then by grade, etc.
Each TeachEngineering lesson or activity is correlated to one or more K-12 science, technology, engineering or math (STEM) educational standards.
All 100,000+ K-12 STEM standards covered in TeachEngineering are collected, maintained and packaged by the Achievement Standards Network (ASN), a project of D2L (www.achievementstandards.org).
In the ASN, standards are hierarchically structured: first by source; e.g., by state; within source by type; e.g., science or mathematics; within type by subtype, then by grade, etc.
NGSS: Next Generation Science Standards - Science
| NGSS Performance Expectation | ||
|---|---|---|
|
MS-ETS1-1. Define the criteria and constraints of a design problem with sufficient precision to ensure a successful solution, taking into account relevant scientific principles and potential impacts on people and the natural environment that may limit possible solutions. (Grades 6 - 8) Do you agree with this alignment? |
||
| Click to view other curriculum aligned to this Performance Expectation | ||
| This activity focuses on the following Three Dimensional Learning aspects of NGSS: | ||
| Science & Engineering Practices | Disciplinary Core Ideas | Crosscutting Concepts |
| Define a design problem that can be solved through the development of an object, tool, process or system and includes multiple criteria and constraints, including scientific knowledge that may limit possible solutions. Alignment agreement: | The more precisely a design task's criteria and constraints can be defined, the more likely it is that the designed solution will be successful. Specification of constraints includes consideration of scientific principles and other relevant knowledge that is likely to limit possible solutions. Alignment agreement: | All human activity draws on natural resources and has both short and long-term consequences, positive as well as negative, for the health of people and the natural environment. Alignment agreement: The uses of technologies and any limitations on their use are driven by individual or societal needs, desires, and values; by the findings of scientific research; and by differences in such factors as climate, natural resources, and economic conditions.Alignment agreement: |
International Technology and Engineering Educators Association - Technology
-
Advances and innovations in medical technologies are used to improve healthcare.
(Grades
6 -
8)
More Details
Do you agree with this alignment?
State Standards
North Carolina - Science
-
Explain how energy can be transformed from one form to another (specifically potential energy and kinetic energy) using a model or diagram of a moving object (roller coaster, pendulum, or cars on ramps as examples).
(Grade
7)
More Details
Do you agree with this alignment?
Materials List
Each group needs:
- 1 round, 16-ounce (~475-ml) plastic container with lid, to assemble the protection device; such as Tupperware®; see Figure 4
- 2 pieces of clear plastic tubing, to assemble the prototype protection device; each ~8-10 inches (20-25 cm) long and a bit smaller in diameter than the tubes from the pump and collection jar; see Figures 3 and 4
- Protect the Pump! Worksheet, one per student
To share with the entire class:
- access to a suction pump for testing; either purchase a suction pump similar to this Drive Medical heavy duty suction pump machine at https://www.medicaldepartmentstore.com/Heavy-Duty-Suction-Pump-Machine-p/18600.htm (~$210; prices vary) or borrow one from a home medical supply store; a suction pump usually includes a collection jar and tubing (see Figure 3); if located in the triangle area of North Carolina or near a university with an EWH chapter, contact STEMhealth@ewh.org to inquire if EWH can provide volunteers and/or supplies
- 12-24 inch (30-60 cm) clear plastic tubing with one-quarter-inch inner diameter (ID), from which to cut two pieces that will be re-used each time a different group's prototype protection device is attached to the pump and protection device for testing (see Figure 3); in most cases, expect the one-quarter-inch ID tubing to fit the existing pump and protection device tubes; just slide the smaller tubes from the group's device into the one-quarter-inch ID tubes; otherwise, obtain tubing that fits the pump and collection jar connections
- assorted building materials for teams to fabricate pump protection devices, such as balloons, wooden balls, ping pong balls, plastic eggs, pipe cleaners, wooden craft sticks, rubber bands, wire mesh, moldable putty, such as Silly Putty® or Play-Doh®
- tools and adhesives such as scissors, masking tape, glue sticks, hot glue gun/glue sticks
- computer with Internet access to show a short online video clip
- (optional) small, handheld drill, for the teacher to cut holes in the container lids
Worksheets and Attachments
Visit [www.teachengineering.org/activities/view/ewh_pump_activity1] to print or download.Pre-Req Knowledge
Students should have a basic understanding of the concepts of suction and vacuum. See Figure 1. 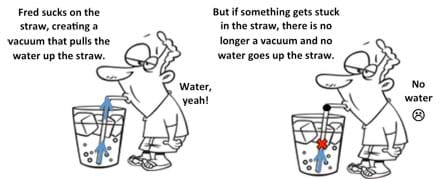
Introduction/Motivation
Biomedical engineers design and create medical devices to help people who are sick or have special needs. They develop new drugs, prosthetic devices (such as replacement arms and legs), surgical tools, and even medical implants like heart valves and pacemakers. Suction pumps are devices developed by engineers that are used in hospitals such as during surgeries and to care for premature babies. Many materially poor hospitals around the world cannot afford to buy new medical equipment, including suction pumps, or the parts necessary to make repairs on their equipment.
Because suction pumps are critical medical devices, it is important that they do not fail! Can you imagine what a disaster it would be if a suction pump failed during surgery? But, if suction pumps are not used carefully, the collection jar can overflow into the motor, spraying fluid out of the outlet valve on the motor, destroying the seal in the motor, and making the pump useless until it can be repaired.
Take a look at this suction pump demo video to see what happens when fluid overflows into the motor. (Show students this eight-second video at https://www.youtube.com/watch?v=3kNK9c-pQ8k&feature=youtu.be. Replay as necessary, making sure students watch the motor on the left side of the image.) Imagine if the water in the video was blood spraying across an operating room during surgery!
(Direct students to look at a photograph on page 2 of their worksheets, which is the same as Figure 2.) Take a look at this photograph. This is a suction pump in Nicaragua that Engineering World Health took apart and repaired. The black stuff you see in the motor is dried blood! It got in the motor because the collection jar overfilled and flooded the motor. Some suction pumps have a protection device that seals off the motor if fluid overflows. Even so, if the fluid overflows just once, the protection device must be replaced before the pump will work again. Consequently, resource-poor hospitals often have clogged or broken suction pumps that they cannot use.
So this is your engineering challenge: We need you to design a protection device that will keep the suction pump from clogging. Your designs may even be used by Engineering World Health in countries such as Nicaragua, Tanzania or Rwanda. Help these hospitals protect their pumps!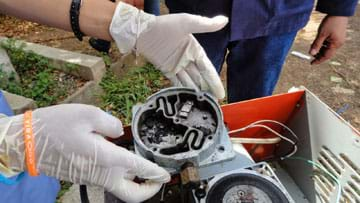
While you plan your protection device design, remember that suction pumps work like straws; the motor creates a vacuum that draws fluid up through the tubing. Think about how a straw works as you look at the diagram of a medical suction pump on page 2 of your worksheet (same as Figure 3). 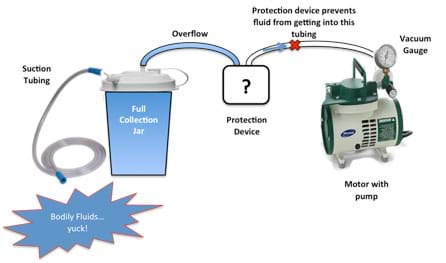
The protection device that your team designs and builds must attach to tubing that connects it to the collection jar and motor, just like in the diagram (Figure 3). Once fluid overflows from the collection jar, it enters your protection device. Design your protection device so it does not interfere with the vacuum while the collection jar is filling, and shuts off the vacuum once fluid reaches the protection device. (Show students the suction pump diagram and explain the setup. Demonstrate how the suction pump works without a protection device.)
Reliability is a critical design feature for all medical equipment, including suction pumps. If the protection device fails (even one time!), the entire pump can be ruined.
We will test your protection device three times on the suction pump to see if your device is reliable. Does your protection device successfully stop the fluid from getting to the motor every time? You must disconnect your protection device from the pump to empty the fluid between each trial and then reconnect it; make sure that your device is durable to withstand rough handling!
Procedure
Before the Activity
- Gather materials and make copies of the Protect the Pump! Worksheet, one per student.
- Consider pre-cutting or drilling two holes in the lid of each group's plastic protection device container, just large enough to fit the tubing that you make available to connect the protection devices to the pump. Alternately, make the holes during the activity and permit each team to decide where to place the holes.
- Obtain a suction pump, verify that it is working correctly and make sure that the plastic tubing fits the pump connections.
- Be ready to show a short online video clip.
With the Students—Challenge Introduction/Design/Build/Improvement Iterations
- Hand out the worksheets.
- Present the Introduction/Motivation content to the class. This includes showing a short online video clip of a suction pump in use.
- Divide the class into groups of three students each.
- Conduct the pre-assessment brainstorming, as described in the Assessment section.
- Explain how the suction pump works and the importance of the safety feature. Demonstrate the use of the suction pump with some water so that students have a better idea of how it operates.
- Hand out the plastic protection device containers to each group and let students examine the available building materials.
- Once groups have brainstormed and developed plans, direct them to gather their materials. Make sure students draws their group designs on the worksheets before fabrication begins.
- Give students 30-40 minutes to build.
- Let groups test their devices and redesign with improvements as time permits or until they develop successful devices that completely block fluid from reaching the motor. Explain to students that this is the "improve" step of the engineering design cycle.
With the Students—Formal Testing/Presentations/Analysis
Have each group test its protection device with the suction pump three times and calculate the reliability of the device as described on the worksheet. Steps:
- After connecting the protection device to the suction pump with the clear plastic tubing, turn on the pump and suction water into the collection jar until it begins to overflow into the prototype protection device.
- Carefully observe as water fills the protection device. If water begins to enter the tubing between the protection device and motor, immediately shut off the pump; this is considered a device failure because the pump had to be shut off in order to keep fluid from getting to the motor. The prototype device is successful if you do not have to shut off the motor even after the protection device has filled with water.
- After each run, completely detach the protection device from the suction pump, empty the water from the protection device and then reattach the device to the suction pump.
- Permit students to make improvements and redesign as many times as possible
To conclude, have teams present their final designs to the class. Discuss which design(s) worked well and why.
Vocabulary/Definitions
biomedical engineering: The application of engineering principles and design concepts to medicine and biology for healthcare purposes.
prototype: The first, or preliminary model of something, from which other forms or designs are developed.
suction: The production of a partial vacuum by the removal of air in order to force fluid into a vacant space.
vacuum: An enclosed space where matter, especially air, has been removed so that the pressure is less than atmospheric pressure.
Assessment
Pre-Activity Assessment
Imagining and Brainstorming: Have students brainstorm within their groups. Encourage participation from all group members and encourage them to write down all their ideas on their worksheets.
- How does the suction pump work? (Example answer: The motor creates suction, just like you create suction when you suck on the straw of a milkshake. In order for the suction pump to work, the tubing must be completely clear of blockages and free of any holes or leaks. Similarly, if your straw has a hole, you won't be able to suck up your milkshake. And, if an Oreo® gets stuck in the straw, you won't be able to suck up any milkshake either.)
- At what point do you need to shut off the vacuum? (Example answer: The suction pump works normally until the collection jar fills up. Then, once fluid overflows from the collection jar to the protection device, something must stop the fluid from reaching the motor; this is when you want to shut off the vacuum (think about the Oreo® getting stuck in the straw).
- How do you plan to shut off the vacuum? (Example answer: Designs usually include some sort of float ball device in which the rising water in the protection device floats an object that rises to seal off the tubing to the motor. The trick is to get a good seal between the tubing and the floating object.)
- Will your device be able to work multiple times in a row? (Example answer: A suction pump is a critical medical device often used in surgeries. It is important that it works correctly every time. Therefore, you want your protection device to be able to work effectively for repeated trials. Once you have a successful design, test the device three times and calculate reliability as described on the worksheet.)
Activity Embedded Assessment
Worksheet: Direct students to fill out the Protect the Pump! Worksheet as they follow along with the procedure. Review their data, drawings and answers to gauge their engagement and comprehension.
Post-Activity Assessment
Reflection: Have student groups discuss the performance of their protection devices and changes they would make if they did the activity again. Suggested questions to prompt the discussion:
- Did your device successfully prevent fluid from getting to the motor? Was it reliable? (Listen to students' various answers.)
- How did designs differ between the groups? Which designs worked the best? (Answer: Expect most designs to employ some variation of a float ball device, while the best designs are the ones that create a good seal with the tubing and work consistently.)
- Why is this protection device important for the suction pump? Could your device be used in a hospital in Africa or Central America where the healthcare workers have limited financial resources and no one is specially trained to make repairs? (Answer: A protection device is necessary to prevent the failure of a suction pump, which is often used in critical surgeries. Encourage students to think about the resources needed to create their protection devices and if they would be easy to repair or recreate with little training.)
- What other types of medical devices might biomedical engineers help design and build? (Answer: Biomedical engineers work on a vast number of medical devices including prosthetics, medical imaging devices, heart valves, stents and surgical equipment.)
Investigating Questions
What other devices work through the use of a vacuum? (Possible answers: Straws, vacuum cleaners, your lungs during inhalation.)
How do suction pumps work and what happens if something gets stuck in them? (Answer: Get students to think about the mechanism of a vacuum and how they can use that knowledge to shut off the vacuum of the suction pump at a certain time.)
Safety Issues
Consider pre-cutting the two holes through the lids of the plastic protection device containers; this can be tricky, depending on the available tools. A small, handheld drill is easiest and most precise, but you can also make a small hole and twist the blade of a scissor into that hole until you widen it to the appropriate diameter (don't make it too wide).
Most suction pumps have a safety feature, either a float ball mechanism or a square device connected to the tubing that looks like a filter. Be sure to connect the prototype devices in between the collection jar and this safety feature. To prevent motor damage when using the suction pump, keep a close eye on the fluid; immediately shut off the pump if fluid gets past the prototypes and into the secondary safety feature.
Troubleshooting Tips
- Do not make the holes on the lid of the protection device container too big; a tight seal around the tubing is necessary so that the pump can maintain a vacuum. Applying hot glue at the holes ensures a tight seal (see Figure 4).
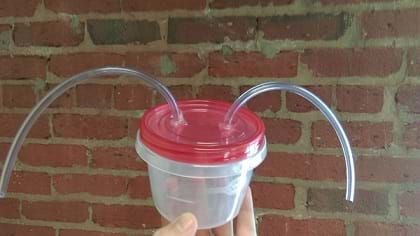
Figure 4. Protection device setup. - Make sure that the lids to the plastic protection device containers are on tight. If any air leaks between the container and the tubing, no suction will be created. In order to create suction, you must have a continuous path with no holes or blockages.
- When you turn on the suction pump, it pulls fluid through the tubing and fills the collection jar. When the collection jar overflows, the fluid begins to fill the protection device. Think about how the rising water creates a change in the protection device that blocks off the tubing (like Oreo® cookie crumbs getting stuck in a milkshake straw), stopping the suction and preventing the fluid from reaching the motor. If you see student teams start to put things inside the tubing, have them test the device and see what happens when the suction pump is turned on. Will it suck up any fluid at all?
Activity Scaling
- For lower grades, give students more assistance with their protection device designs. Show them the ball and float protection device on most suction pumps. Describe how it operates. This demonstration and explanation helps students generate ideas for their own protection devices.
- For higher grades, add a cost analysis aspect to the project. Some materially poor hospitals have limited access to resources, making it important that engineering solutions are affordable. Have students research or brainstorm about the materials that might be readily available in remote African or Central American communities. Assign a cost to each material (tip: make the ping pong ball and/or other hard-to-find materials the most expensive). Encourage students to design their protection devices with cost and likely availability in mind, aiming to create the most cost-effective solutions.
Additional Multimedia Support
During the Introduction/Motivation section, show students an eight-second video clip of a working suction pump to see what happens when fluid overflows into the motor; see https://youtu.be/3kNK9c-pQ8k.
Subscribe
Get the inside scoop on all things TeachEngineering such as new site features, curriculum updates, video releases, and more by signing up for our newsletter!References
Dictionary.com. Lexico Publishing Group, LLC. Accessed March 4, 2015. (Source of vocabulary definitions, with some adaptation) http://www.dictionary.com
Copyright
© 2016 by Regents of the University of Colorado; original © 2015 Engineering World HealthContributors
Ben Fleishman and Michaela Rikard, Engineering World Health; Leyf Starling, The Engineering Place, North Carolina State UniversitySupporting Program
STEM Programs, Engineering World HealthAcknowledgements
This activity was developed by Engineering World Health with support from the Biogen Foundation and The Engineering Place, College of Engineering, North Carolina State University.
Last modified: September 1, 2020


User Comments & Tips