Quick Look
Grade Level: 11 (9-12)
Time Required: 3 hours
(can be split into three 60-minute sessions)
Expendable Cost/Group: US $1.00 This activity also uses some non-expendable (reusable) items such as Arduino® microcontrollers and temperature sensors, although they are optional; simple thermometers may be used instead.
Group Size: 4
Activity Dependency: None
Subject Areas: Algebra, Chemistry, Data Analysis and Probability
NGSS Performance Expectations:

| HS-ETS1-2 |
| HS-ETS1-3 |
Summary
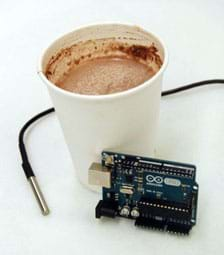
Students act as food science engineers as they explore and apply their understanding of cooling rate and specific heat capacity by completing two separate, but interconnected, tasks. In Part 1, student groups conduct an experiment to explore the cooling rate of a cup of hot chocolate. They collect and graph data to create a mathematical model that represents the cooling rate, and use an exponential decay regression to determine how long a person should wait to drink the cup of hot chocolate at an optimal temperature. In Part 2, students investigate the specific heat capacity of the hot chocolate. They determine how much energy is needed to heat the hot chocolate to an optimal temperature after it has cooled to room temperature. Two activity-guiding worksheets are included.Engineering Connection
The concepts of heat exchange and cooling rates are applicable to a wide range of engineering fields including heating and cooling systems, microprocessors, internal combustion engines, and food industry engineering, to name a few. For example, knowledge of the heat capacity and cooling rates of chocolate is required for engineers to design production machinery and storage equipment—as well as to determine processing times—for the manufacture of chocolate. Because food's physical properties and conditions vary greatly, engineers also make mathematical models for food properties in order to predict the effects of changing chemical composition and temperature on food. Acting as engineers, students apply math skills, an understanding of the concepts of cooling rates and heat capacity, and technological tools to cups of hot chocolate as they determine the time to reach optimal drinking temperature and the energy needed to heat the liquid beverage to an optimal temperature.
Learning Objectives
After this activity, students should be able to:
- Explain the significance of exponential decay and how it relates to cooling liquids.
- Determine a mathematical model for a real-world scenario involving exponential decay.
- Calculate the specific heat capacity of a liquid.
- Determine the amount of energy required to heat a liquid to a particular temperature.
Educational Standards
Each TeachEngineering lesson or activity is correlated to one or more K-12 science,
technology, engineering or math (STEM) educational standards.
All 100,000+ K-12 STEM standards covered in TeachEngineering are collected, maintained and packaged by the Achievement Standards Network (ASN),
a project of D2L (www.achievementstandards.org).
In the ASN, standards are hierarchically structured: first by source; e.g., by state; within source by type; e.g., science or mathematics;
within type by subtype, then by grade, etc.
Each TeachEngineering lesson or activity is correlated to one or more K-12 science, technology, engineering or math (STEM) educational standards.
All 100,000+ K-12 STEM standards covered in TeachEngineering are collected, maintained and packaged by the Achievement Standards Network (ASN), a project of D2L (www.achievementstandards.org).
In the ASN, standards are hierarchically structured: first by source; e.g., by state; within source by type; e.g., science or mathematics; within type by subtype, then by grade, etc.
NGSS: Next Generation Science Standards - Science
| NGSS Performance Expectation | ||
|---|---|---|
|
HS-ETS1-2. Design a solution to a complex real-world problem by breaking it down into smaller, more manageable problems that can be solved through engineering. (Grades 9 - 12) Do you agree with this alignment? |
||
| Click to view other curriculum aligned to this Performance Expectation | ||
| This activity focuses on the following Three Dimensional Learning aspects of NGSS: | ||
| Science & Engineering Practices | Disciplinary Core Ideas | Crosscutting Concepts |
| Design a solution to a complex real-world problem, based on scientific knowledge, student-generated sources of evidence, prioritized criteria, and tradeoff considerations. Alignment agreement: | Criteria may need to be broken down into simpler ones that can be approached systematically, and decisions about the priority of certain criteria over others (trade-offs) may be needed. Alignment agreement: | |
| NGSS Performance Expectation | ||
|---|---|---|
|
HS-ETS1-3. Evaluate a solution to a complex real-world problem based on prioritized criteria and trade-offs that account for a range of constraints, including cost, safety, reliability, and aesthetics, as well as possible social, cultural, and environmental impacts. (Grades 9 - 12) Do you agree with this alignment? |
||
| Click to view other curriculum aligned to this Performance Expectation | ||
| This activity focuses on the following Three Dimensional Learning aspects of NGSS: | ||
| Science & Engineering Practices | Disciplinary Core Ideas | Crosscutting Concepts |
| Evaluate a solution to a complex real-world problem, based on scientific knowledge, student-generated sources of evidence, prioritized criteria, and tradeoff considerations. Alignment agreement: | When evaluating solutions it is important to take into account a range of constraints including cost, safety, reliability and aesthetics and to consider social, cultural and environmental impacts. Alignment agreement: | New technologies can have deep impacts on society and the environment, including some that were not anticipated. Analysis of costs and benefits is a critical aspect of decisions about technology. Alignment agreement: |
Common Core State Standards - Math
-
Build a function that models a relationship between two quantities
(Grades
9 -
12)
More Details
Do you agree with this alignment?
International Technology and Engineering Educators Association - Technology
-
Students will develop an understanding of and be able to select and use energy and power technologies.
(Grades
K -
12)
More Details
Do you agree with this alignment?
-
Energy can be grouped into major forms: thermal, radiant, electrical, mechanical, chemical, nuclear, and others.
(Grades
9 -
12)
More Details
Do you agree with this alignment?
State Standards
New York - Math
-
Determine the function for the regression model, using appropriate technology, and use the regression function to interpolate and extrapolate from the data
(Grades
9 -
12)
More Details
Do you agree with this alignment?
New York - Science
-
Design a solution to a complex real-world problem by breaking it down into smaller, more manageable problems that can be solved through engineering.
(Grades
9 -
12)
More Details
Do you agree with this alignment?
-
Evaluate a solution to a complex real-world problem based on prioritized criteria and trade-offs that account for a range of constraints, including cost, safety, reliability, and aesthetics, as well as possible social, cultural, and environmental impacts.
(Grades
9 -
12)
More Details
Do you agree with this alignment?
Materials List
Each student needs:
- graphing calculator, such as a TI-84 or similar model
- lab apron, insulated gloves and safety goggles
- Hot Chocolate Worksheet
- Specific Heat Capacity Handout
For Parts 1 and 2, each group needs a thermometer (the simpler and less-costly option) OR the Arduino and temperature sensor-related items listed below:
- (optional) 1 computer with open-source Arduino Software (IDE) installed
- (optional) 1 Arduino board, such as the assembled Arduino Uno R3 for $24.95 at Adafruit
- (optional) 1 breadboard, such as the half-size breadboard for $5.00 at Adafruit
- (optional) 1 DS18B20 digital temperature sensor and 4.7k Ω resistor, such as the waterproof DS18B20 digital temperature sensor + extras for $9.95 at Adafruit
- (optional) Thermal Sensor Program, downloaded via links in the Arduino software
- (optional) One Wire Arduino Library, installed via Arduino software
For Part 1: Cooling Rate, each group needs:
- 1 cup, 8-ounce paper or Styrofoam
- boiling water, 6 fluid ounces, made with an electric kettle or on a lab hot plate
- liquid measuring cup, for the teacher to use for all groups
- 1 instant hot chocolate packet, such as a .71-ounce packet of Nestle® Hot Cocoa Mix
- a way to measure time, up to 13 minutes, such as a stopwatch, wristwatch or wall clock
For Part 2: Specific Heat Capacity, each group needs:
- 2 8-ounce Styrofoam coffee cups
- 1 plastic coffee cup lid
- scissors or utility knife, something to make small holes in the plastic lid
- 1 stirring rod, such as coffee stirrers or lab glass stirrers
- ~50 ml (1.69 fluid ounces) of room temperature hot chocolate liquid; save and re-use the cooled hot chocolate liquid from Part 1
- 100 g piece of iron, such as from this hooked weight set for $38.95 at Home Science Tools
- beaker; size may vary; in which to heat a 100 g piece of iron in boiling water
- water, to half-fill the beaker
- hot plate
- tongs
- digital scale
- (optional) clamp or ring stand to steady the cup
- Arduino and temperature sensor (same as above) OR thermometer
- lab safety gear (same as above)
Worksheets and Attachments
Visit [www.teachengineering.org/activities/view/nyu_hotchocolate_activity1] to print or download.Pre-Req Knowledge
Students should:
- Have an understanding of how to graph data, including the correct scaling of axes.
- Be familiar with exponential functions.
- Have a conceptual understanding of a regression equation and how it models a given set of data; this includes the definition of a correlation coefficient and how it relates to a regression.
- Know how to calculate exponential regression equations using a graphing calculator.
If using Arduinos and thermal sensors to make temperature readings (optional), it is best if the teacher is confident in the use of Arduinos, their components and the serial monitor. No prior student knowledge of microcontrollers or programming is required since they only use the Arduino as a measurement tool.
Introduction/Motivation
Imagine you sit down after a long day of school to drink a cup of hot chocolate. As soon as you mix the chocolate powder with the boiling water, you take a sip and burn your tongue because it's too hot. You decide to let it cool down for 10 minutes. But, when you sip the hot chocolate 10 minutes later, it's too cold—and no one likes a cup of cold chocolate! So you pop it in the microwave for 30 seconds to warm it back up, and now it's just right. In this scenario, without realizing it, you experienced the science behind cooling rate and specific heat capacity. Understanding these two concepts is important to engineers who work with any material that is intended to change in temperature or retain thermal energy, such as devices that involve heating and cooling systems, internal combustion engines, microprocessors and food industry equipment.
The hot chocolate liquid cools at a specific rate, which can be determined by Newton's law of cooling. The amount of energy required to heat the hot chocolate is dependent upon its specific heat capacity. Today you are going to learn the science and math behind cooling rate and specific heat capacity. You will act as food science engineers as you experiment with hot chocolate in order to answer the following questions:
- How long does it take for hot chocolate made with boiling water to cool to an optimal drinking temperature?
- How much energy is needed to heat room temperature hot chocolate to an optimal drinking temperature?
Engineers need to be able to obtain data, read and interpret graphs, and model data using mathematical equations. In today's activity, you will collect data and use it to determine a mathematical model for the cooling rate of hot chocolate. You will also use your data to mathematically calculate the specific heat of the hot chocolate and determine how much energy is required to heat it to a certain temperature.
Newton's law of cooling states that the rate of temperature change is proportional to the difference between the temperature of an object and its ambient, or surrounding, temperature. If a substance is much hotter than the ambient temperature, then it cools more rapidly; if a substance is much cooler than the ambient temperature, then it heats up more rapidly. If little difference exists between the ambient temperature and the substance's temperature, then it heats or cools more slowly. This rate of cooling is dependent on other factors, such as a substance's specific heat. In Part 1 of today's activity, you will use hot chocolate to collect data and experience Newton's law of cooling first-hand.
According to the law of conservation of energy, energy is never created or destroyed; it is only exchanged between objects. In Part 2 of today's activity, you will apply this concept by using a calorimeter to measure the amount of heat energy in the hot chocolate. In order to do this, you will measure the amount of heat transferred from a 100g sample of iron to the hot chocolate. So for Part 2, you will measure the change in temperature of the hot chocolate and iron using a temperature sensor, calculate the specific heat capacity of the hot chocolate, and then determine the amount of energy needed to heat it back up to a certain temperature.
Specific heat capacity is the amount of energy required to heat 1 gram of a substance by 1 degree Celsius. The higher the specific heat value of a substance, the more energy that is required to heat it up. For example, water has a higher specific heat capacity than oil, so we know it takes more energy to heat water to a given temperature than oil, and the water will heat up more slowly.
Today, we will use the following equation to calculate energy and specific heat capacity:
Q = mc∆T
where:
Q = energy in Joules
m = mass in grams
c = specific heat capacity
∆T = the change in temperature (final temperature minus initial temperature)
When using this equation, it is important not to confuse heat energy with temperature. Heat energy is the total kinetic energy of all the molecules moving inside an object, while temperature is the measure of the average energy within the object. In other words, the faster the molecules inside are moving (energy), the hotter the substance (temperature).
Procedure
Background
To determine the specific heat capacity of hot chocolate, students use the known specific heat of a 100 g sample of iron, which is 0.45 J/g °C. If desired, an alternative material with known mass and specific heat can be used in place of iron; in this case, either provide students with the specific heat value or have them research it on their own.
Before the Activity
- Gather materials and make copies of the Hot Chocolate Worksheet and Specific Heat Capacity Handout, one each per student.
- For Part 1, prepare boiling water, enough for 6 fluid ounces for each group.
- For Part 2, prepare room temperature hot chocolate, ~50 ml (1.69 fluid ounces) per group (or enough for each group to submerge its iron piece in the calorimeter). The easiest way to do this is to save and then reuse the now-cooled-to-room-temperature hot chocolate liquid from Part 1.
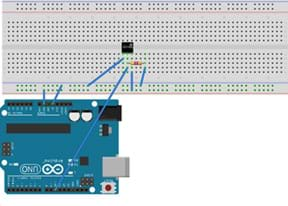
Figure 1. Arduino with DS18B20 thermal sensor. - (Note: Skip this step if you elect to have students use thermometers to make temperature measurements instead of Arduinos.) For each group, configure an Arduino with a temperature sensor; refer to Figures 1 and 2. The DS18B20 sensor has three cables: red, black and yellow. Configuration instructions:
- Connect the red cable to +5V.
- Connect the black cable to GND.
- Connect the yellow cable to digital pin D10.
- Put a 4.7k Ω resistor between the white wire and +5V.
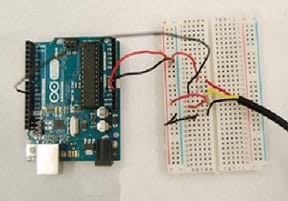
Figure 2. Example Arduino and thermal sensor configuration. 
Figure 3. Setup for collecting hot chocolate temperature readings.
With the Students—Part 1: Newton's Law of Cooling
- Present the Introduction/Motivation content to the class.
- Divide the class into groups of three or four students each. Assign group member roles: the time manager collects and calls out data from serial output on the computer monitor to the rest of the group; the technician(s) makes sure that the temperature sensor is correctly in place and that the computer is functioning; the handler retrieves and returns all materials used in the activity.
- (5 minutes) Hand out the worksheet and direct students' attention to the first page. For context, inform students that:
- Water boils at 100 °C (212 °F).
- Most hot tubs operate at a temperature range of 38 – 41 °C (100 – 105 °F).
- Lukewarm water averages 38 °C (100.4 °F).
- The average internal human body temperature is 37 °C (98.6 °F).
- Room temperature water averages 20 °C (68 °F).
- Convert Celsius and Fahrenheit temperatures using the following equation:

- Tell students: Imagine that you made a cup of hot chocolate using boiling water (100 °C). At what temperature would it be ideal for you to drink the hot chocolate? How long do you think it would take for the hot chocolate to reach that temperature? Why did you choose this time? What factors did you take into account? Then give students 1-2 minutes to write down their predictions and explanations on the worksheet. After they finish, have them share their predictions with their group members. Expect predictions to vary; build on this recognition of uncertainty to inform the class that next they will perform research and collect real-world data to determine the ideal temperature for drinking hot chocolate and how long it takes to reach that optimal temperature.
- (5 minutes) Explain how you want students to collect and record temperatures (either as shown in Figure 3 with the experimental setup using a microcontroller and thermal sensor, or using a thermometer). Have groups proceed to gather data, as described in step 4 on the worksheet. Remind them to record in the worksheet table their temperature data taken at specific times.
- (10 minutes; skip if not using Arudinos) Guide students to prepare the Arduino and sensor setup. Since students may have no understanding of Arduinos (or microcontrollers in general), be very clear in your instructions to help them confidently interact with the Arduino, its software and the sensor.
- Show students how to install a one-wire Arduino library. As necessary, use the 3:15-minute video tutorial, Installing a New Library in Arduino, at https://www.youtube.com/watch?v=HKT7sT6V7hw&feature=iv&src_vid=R-kWY6eSa64&annotation_id=annotation_3911994289).
- Show students how to download the Thermal Sensor Program by selecting "upload" from the File menu of the Arduino program.
- Point out that the Thermal Sensor Program displays temperature readings on the serial monitor from the Arduino (see Figure 4).
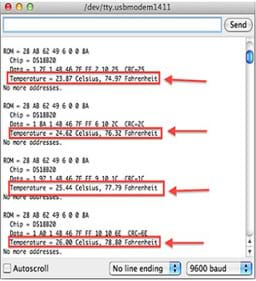
Figure 4. The Thermal Sensor Program running with example temperature readings.
- (10 minutes) Direct the group handlers to gather the activity materials, including: a configured Arduino and thermal sensor, a Styrofoam cup and a hot chocolate mix packet. Next, the instructor pours 6 ounces of boiling water into each group's Styrofoam cup.
- (15 minutes) Alert the time managers to get ready to keep track of time. Then direct the groups to mix the hot chocolate packet into the hot water and record the temperatures from the serial monitor at the time intervals indicated on the worksheet.
- (30 minutes) Continuing on the worksheet, direct students to graph their data and answer the questions that follow.
- Move on to inform students that research has shown that the ideal temperature for drinking hot chocolate is 57 °C (that's 134.6 °F). Expect students to discover that none of their temperature readings at any of the time intervals are exactly 57 °C. Engage the class in a discussion to emphasize this point. Then, discuss how the class can use a regression equation to model the data and find exactly when the hot chocolate is expected to reach 57 °C (this is called interpolation). As guided by the worksheet, have students:
- Use graphing calculators to write exponential regression equations that model the temperature of the hot chocolate over time.
- Find the correlation coefficient to determine the relationship between these two variables.
- Determine when (to the nearest second) they expect the hot chocolate to reach 57 °C.
- Collect and save the cooled hot chocolate liquid for Part 2 of the activity.
With the Students—Part 2: Specific Heat Capacity
- Pass out the handout.
- Have groups construct calorimeters using the following instructions (see Figure 5):
- Insert one Styrofoam cup into the other.
- Make two holes in the plastic lid for the thermometer and the stirring rod, respectively. In both cases, make the fit tight so no heat can escape through the holes. Position the thermometer sensor (or standard thermometer) so it reaches the bottom of the cup. Make the stirring rod fit snugly while also permitting it to move so you can stir the liquid inside the cup.
- Place the lid on top of the Styrofoam cup.
- If needed, use a clamp or ring stand to steady the cup.
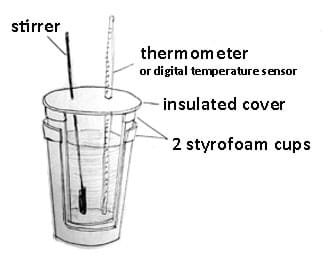
Figure 5. Constructing a calorimeter.
- Tell students: You will be using the known specific heat of a 100 g piece of iron to calculate the specific heat of the hot chocolate. The specific heat value of iron is 0.45 J/g °C.
- Direct students to put on their safety goggles, aprons and insulated gloves.
- Direct groups to place the iron piece into a beaker filled halfway with water and place the beaker onto the hot plate. Heat until the water is boiling. While the water is heating, have students continue with the next three steps.
- While waiting for the water to boil, use the digital scale to calculate the mass of the pre-made room temperature hot chocolate by subtracting the mass of one Styrofoam cup from the mass of the cup with the hot chocolate liquid inside.
- Direct students to pour the hot chocolate into the calorimeter's inner cup and record the starting temperature of the liquid in °C.
- Once the water with the iron sample is boiling, have students record the iron's temperature, which is expected to be about the same as the temperature of boiling water (100 °C). Remind students to turn off the hotplates.
- Using tongs, have students remove the iron piece from the boiling water and place it into the inner calorimeter cup with the hot chocolate liquid, immediately covering the calorimeter with the lid. Then, have students insert the stirring rods and thermometers into their respective lid holes and stir the mixture every few minutes.
- Direct students to watch the temperature change on the thermometer. Once the temperature stabilizes and does not change for a few minutes, record that as the final temperature of the hot chocolate and iron.
- Ask students to hypothesize why the temperature of the hot chocolate changed. Have a few students share their answers with the class. Explain that the heat from the iron piece was released to the surrounding hot chocolate, causing its temperature to increase. Once the temperature stabilized, heat energy was no longer being lost by the iron or gained by the hot chocolate.
- Continuing with the handout, direct students to use the equation for calculating specific heat (Q = mc∆T) to determine the specific heat of the hot chocolate by substituting in the known measured values of temperature and mass for the hot chocolate and the measured values of temperature, mass and specific heat of the iron. Expect the specific heat capacity of the hot chocolate to be close to that of water (4.179 J/g °C), so if the values are very far off, have students hypothesize on possible sources of error and ways to improve the experiment.
- As directed on the handout, once students have calculated the specific heat of the hot chocolate, have them use this number to determine the amount of energy needed to heat up the hot chocolate to the optimal temperature of 57 °C.
- As a class, share, compare and discuss the results. See the Assessment section for suggested discussion questions.
Vocabulary/Definitions
heat energy: The total kinetic energy of all the molecules moving inside an object.
Newton's law of cooling: The rate of heat loss of a body is proportional to the difference between the temperature of an object and the ambient (surrounding) temperature.
specific heat capacity: The amount of energy required to heat 1 gram of a substance by 1 degree Celsius
temperature: A measure of the average energy within an object.
Assessment
Pre-Activity Assessment
Multiple Entry Points: During the opening discussion, monitor student understanding by asking the given open-ended questions to students. Gauge their responses and use them to guide the discussion.
Activity Embedded Assessment
Collaboration: For both parts of the activity, have students work collaboratively to complete the Hot Chocolate Worksheet and Specific Heat Capacity Handout. Circulate the classroom to monitor student progress and provide necessary scaffolding.
Post-Activity Assessment
Class Discussion: At activity end, have students share and compare their group results, as well as brainstorm improvements and new ideas. Example discussion questions:
- Why might the results be different from group to group?
- What are possible sources of errors or other factors that might have yielded different outcomes? (During the activity procedure? In your calculations?)
- Brainstorm: What are some ideas to improve the experiment? What are some ideas to design a new experiment for testing heat capacity and cooling rate?
- How would you devise a new experiment to determine the specific heat of a solid substance, such as a marshmallow?
- Why might knowing an object's specific heat capacity be important for particular engineering designs? (Example answers: How can engineers design to prevent a computer or car from overheating? Understanding an object or material's specific heat capacity is critical for engineers designing countless products and systems, including heating and cooling systems, microprocessors, internal combustion engines, and food industry products. Using the chocolate example, in order to design manufacturing machinery, storage equipment, and determine production times to make chocolate with pleasing taste and texture, engineers must know the heat capacity and cooling rate of the chocolate!)
- Go over some of the handout analysis questions/answers.
Worksheets/Handouts: Collect students' completed worksheets and handouts. Review their individual data, graphing, calculations and answers to gauge their depth of comprehension of the subject matter.
Investigating Questions
- What temperature (in °C) do you think is optimal for drinking hot chocolate? (Answer: Expect students to suggest a range of temperatures. Remind them that water boils at 100 °C and has a freezing point of 0 °C.)
- Why do you think the hot chocolate temperature changed when the iron was placed inside? (Answer: The iron was hotter than the hot chocolate liquid so it lost heat [or energy], which was then gained by the surrounding hot chocolate, causing it to increase in temperature.)
Safety Issues
- Use aprons, insulated gloves and safety goggles.
- Use caution when removing the beakers from the hot plates.
- Have the teacher distribute the boiling water into the groups' cups.
- Have ready a safety protocol in case someone gets burned, including having ice packs on hand.
Troubleshooting Tips
Advise groups to have one student hold the thermal sensor while collecting temperatures because, depending on the cup, the thermal sensor could cause the cup to tip over.
If the calorimeter is not well insulated, potentially large heat losses can occur, which introduces a source of error into the experiment.
Activity Extensions
Have students test how the cooling rate of hot chocolate is affected by cooling in different containers such as Styrofoam, glass, metal and ceramic cups.
Have students test the cooling rate of different liquids and see how they compare, such as hot chocolate made with whole milk versus hot chocolate made with water.
Have students test the cooling rate and specific heat capacity of different soups such as vegetable, tomato, broccoli and cheese, and clam chowder.
Have students place various heated solids into water samples and see how they affect the temperatures of the water samples differently.
Activity Scaling
- For less advanced students, provide step-by-step instructions to complete the mathematical calculations for specific heat.
- For more advanced students, provide additional math problems for determining the specific heat capacities using new data.
Additional Multimedia Support
If using Arduinos, during Day 1 (see Procedure section), show students Brian Patton's 3:15-minute video, Installing a New Library in Arduino at https://www.youtube.com/watch?v=HKT7sT6V7hw&feature=iv&src_vid=R-kWY6eSa64&annotation_id=annotation_3911994289
If using Arduinos, as necessary during Day 1, provide students with Elcrow's spec sheet and help information about the One Wire Waterproof Temperature Sensor, at http://www.elecrow.com/wiki/index.php?title=One_Wire_Waterproof_Temperature_Sensor
Subscribe
Get the inside scoop on all things TeachEngineering such as new site features, curriculum updates, video releases, and more by signing up for our newsletter!More Curriculum Like This

Students learn the fundamental concepts of heat transfer and heat of reaction. This includes concepts such as physical chemistry, an equation for heat transfer, and a basic understanding of energy and heat transfer.

Students learn about the definition of heat as a form of energy and how it exists in everyday life. They learn about the three types of heat transfer—conduction, convection and radiation—as well as the connection between heat and insulation.
References
Brown, F. and Diller, K. R. "Calculating the Optimum Temperature for Serving Hot Beverages." Published August 2008. Journal of the International Society for Burn Injuries. 34(5), pp 648-54. http://www.ncbi.nlm.nih.gov/pubmed/18226454
Heat capacity rate. Last modified July 23, 2015. Wikipedia, The Free Encyclopedia. Accessed August 3, 2015. https://en.wikipedia.org/wiki/Heat_capacity_rate
Mohos, Ferenc. Confectionery and Chocolate Engineering Principles and Applications. West Sussex, UK: Wiley-Blackwell, 2010.
One Wire Waterproof Temperature Sensor. Last updated July 18, 2015. Elecrow. Accessed August 10, 2015. http://www.elecrow.com/wiki/index.php?title=One_Wire_Waterproof_Temperature_Sensor
Patton, Brian. Installing a New Library in Arduino. (video) Posted January 22, 2014. Accessed December 27, 2015. https://www.youtube.com/watch?v=HKT7sT6V7hw&feature=iv&src_vid=R-kWY6eSa64&annotation_id=annotation_3911994289
Copyright
© 2016 by Regents of the University of Colorado; original © 2015 Polytechnic Institute of New York UniversityContributors
Brian Palacios; Lauren SchulmanSupporting Program
SMARTER RET Program, School of Engineering, Polytechnic Institute of New York UniversityAcknowledgements
This activity was developed by the Science and Mechatronics Aided Research for Teachers with an Entrepreneurial ExpeRience (SMARTER): A Research Experience for Teachers (RET) Program in the School of Engineering funded by National Science Foundation RET grant no. 1132482. However, these contents do not necessarily represent the policies of the NSF, and you should not assume endorsement by the federal government.
Last modified: September 20, 2018





User Comments & Tips