Following is a list of materials needed for an instructor-led demonstration and the five activity stations.
Teacher Class Demo
- clear plastic tub, ~1 x 1 ft (~30 x 30 cm) in size, although almost any size plastic tub will work to drop a pebble or marble into it to demonstrate waves
- access to water
- pebble or marble
- roll/stack of paper towels
Station 1: Oobleck Dance
- 0.4 cup (96 ml) water
- 0.6 cups (144 ml) cornstarch
- plastic spoon
- roll/stack of paper towels
- disposable bowl for mixing oobleck, such as a 20-oz (~590-ml) paper bowl; most store-bought disposable paper or foam bowls work well
- stereo with good bass output, such as the AXESS MSBT3907 2.1 Mini Entertainment System at Amazon; suitable stereos are often available at second-hand and thrift stores for low cost
- full-range or subwoofer speakers; often available at second-hand and thrift stores; note that the speaker will not be reusable after the activity since it will be covered with the oobleck mixture (see Figure 1); the previously mentioned example mini entertainment system from Amazon includes speakers
- (optional) plastic bag, to put over the speaker to help keep it clean, although this dampens the signal, resulting in less visual impact
- 1 lawn-and-leaf bag or plastic sheeting to cover the table (placed under the speaker and stereo), such as from this box of 18 39-gallon-size, extra strong trash bags at Amazon
- laptop or other music source device capable of playing low-frequency sound input; either downloaded or streaming, such as the 30-60-hertz bass tests on YouTube
- auxiliary cord, to connect music device and stereo, such as the RCA stereo audio Y adapter cable at Amazon; often available at second-hand and thrift stores
Station 2: Sound Visualization
- stereo or DVD player*; excellent options are often available at second-hand and thrift stores such as Goodwill for a few dollars; choose a stereo or DVD player intended for home entertainment systems; see note below; most phones and computers do not have good enough output for adequate sound wave visualization
- speaker; most sizes work for the activity, but larger speakers (larger than small computer speakers) provide better visualization; make sure the speakers have a connection type that is compatible with your stereo or DVD player
- CD with kid-friendly music
- roll/stack of paper towels
- 2 cups (480 ml) of uncooked long grain rice or bulgur wheat
- 1 cup (240 ml) of water
- 2 large plastic petri dishes with lids, such as 150-mm size, although smaller petri dishes or plastic plates also work fairly well; petri dishes with lids better contain any mess
Station 3: Testing Homemade Speakers
- yogurt cup speaker; either make one on your own, or have groups use the ones they created during the Yogurt Cup Speakers activity
- stereo or DVD player*; often available at second-hand and thrift stores such as Goodwill for a few dollars; see note below
- CD with kid-friendly music
- various objects of different materials and shapes, such as Styrofoam, paper and plastic plates, cups and/or bowls; cardboard; foil; students will use these materials to amplify or distort the yogurt cup speaker sound output
- 12 inches (30 cm) of masking tape

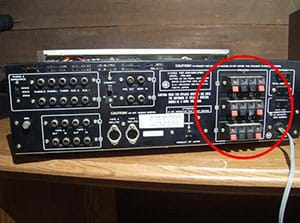
*Note: It is possible to use one stereo or DVD player for two stations (Sound Visualization and Testing Homemade Speakers) by using the left output for one station and the right output for the other station. But, if available, use separate stereos/DVD players, which also helps to minimize crowding at those stations. If separate systems are used, it is easier for the Sound Visualization station to use a stereo or DVD player with plugs for the speaker cables. However, for the Testing Homemade Speakers station, it is easier to use a system with spring-loaded terminals (circled in red in Figure 2).
Station 4: Practice Problems
- Seeing Sound Worksheet, one per student; this worksheet guides students through all five stations, including providing the four practice problems for this station
Station 5: How Do Stringed Instruments Make Sound?
- 6 ft (183 cm) of cotton string, cut into 2-foot (61-cm) lengths
- roll/stack of paper towels
- 1 petri dish (with lid), filled halfway with water; a 150-mm diameter plastic petri dish works well
- (optional) 1 ft (~30 cm) guitar wire
- (optional) guitar or other stringed instrument
