
Powering Up with Electromagnets
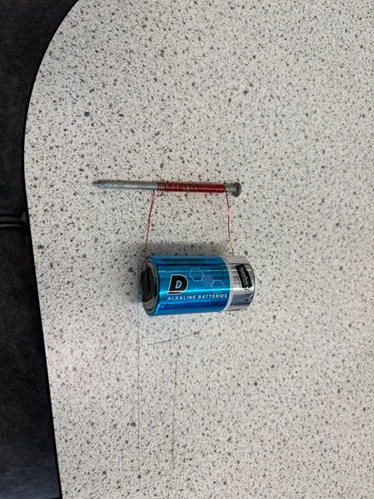 Homemade electromagnet with a D-cell battery.Copyright Peiran Zhang, CU
Students build a basic electromagnet and explore how it works by using a switch to turn the electric current on and off. They observe that the electromagnet can pick up paperclips when powered and drop them when the current is turned off. Students then use the engineering design process to build, test, and improve their own electromagnet designs. They investigate how changing the number of wire wraps affects electromagnet strength while keeping other variables, such as the battery, nail, and wire gauge, the same. Through repeated testing and comparison of results, students identify which design produces the strongest electromagnet and use evidence to consider how their designs could be improved.
Engineers apply their understanding of electricity, magnetism, and magnetic fields to design technologies such as wireless electric vehicle (EV) charging systems. At the Advancing Sustainability through Powered Infrastructure for Roadway Electrification (ASPIRE) Engineering Research Center, engineers are developing innovative wireless charging technologies that use large coils of wire to generate magnetic fields and transfer power through the air to electric vehicles. Engineers carefully control the electricity flowing through the coils and design their size and shape to produce the desired magnetic field. They also use specialized magnetic materials to guide and concentrate the magnetic field upward toward the vehicle rather than allowing it to spread into the ground or surrounding environment.
After this activity, students should be able to:
- Understand that magnets can be made using electricity.
- Explain that electric current flowing through a coiled wire creates a magnetic field.
- Recognize that this type of magnet is called an electromagnet, and that it works similarly to a permanent magnet but can be turned on and off.
- Design and build an electromagnet and explain how it works.
- STEL-1J Develop innovative products and systems that solve problems and extend capabilities based on individual or collective needs and wants.
Grades 6-8
Do you agree with this alignment? - STEL-7Q Apply the technology and engineering design process.
Grades 6-8
Do you agree with this alignment? - STEL-7T Assess design quality based upon established principles and elements of design.
Grades 6-8
Do you agree with this alignment?
- MS-ETS1-1 Define the criteria and constraints of a design problem with sufficient precision to ensure a successful solution, taking into account relevant scientific principles and potential impacts on people and the natural environment that may limit possible solutions.
Grades 6-8
This resource focuses on the following Three Dimensional Learning aspects of NGSS:
Science & Engineering Practices- Define a design problem that can be solved through the development of an object, tool, process or system and includes multiple criteria and constraints, including scientific knowledge that may limit possible solutions.Do you agree with this alignment?
Disciplinary Core Ideas- The more precisely a design task's criteria and constraints can be defined, the more likely it is that the designed solution will be successful. Specification of constraints includes consideration of scientific principles and other relevant knowledge that is likely to limit possible solutions.Do you agree with this alignment?
Crosscutting Concepts- The uses of technologies and any limitations on their use are driven by individual or societal needs, desires, and values; by the findings of scientific research; and by differences in such factors as climate, natural resources, and economic conditions.Do you agree with this alignment?
- All human activity draws on natural resources and has both short and long-term consequences, positive as well as negative, for the health of people and the natural environment.Do you agree with this alignment?
Do you agree with this alignment? - Define a design problem that can be solved through the development of an object, tool, process or system and includes multiple criteria and constraints, including scientific knowledge that may limit possible solutions.
- MS-ETS1-2 Evaluate competing design solutions using a systematic process to determine how well they meet the criteria and constraints of the problem.
Grades 6-8
This resource focuses on the following Three Dimensional Learning aspects of NGSS:
Science & Engineering Practices- Evaluate competing design solutions based on jointly developed and agreed-upon design criteria.Do you agree with this alignment?
Disciplinary Core Ideas- There are systematic processes for evaluating solutions with respect to how well they meet the criteria and constraints of a problem.Do you agree with this alignment?
Do you agree with this alignment? - Evaluate competing design solutions based on jointly developed and agreed-upon design criteria.
- MS-ETS1-4 Develop a model to generate data for iterative testing and modification of a proposed object, tool, or process such that an optimal design can be achieved.
Grades 6-8
This resource focuses on the following Three Dimensional Learning aspects of NGSS:
Science & Engineering Practices- Develop a model to generate data to test ideas about designed systems, including those representing inputs and outputs.Do you agree with this alignment?
Disciplinary Core Ideas- Models of all kinds are important for testing solutions.Do you agree with this alignment?
- The iterative process of testing the most promising solutions and modifying what is proposed on the basis of the test results leads to greater refinement and ultimately to an optimal solution.Do you agree with this alignment?
Do you agree with this alignment? - Develop a model to generate data to test ideas about designed systems, including those representing inputs and outputs.
- MS-PS2-3 Ask questions about data to determine the factors that affect the strength of electric and magnetic forces.
Grades 6-8
This resource focuses on the following Three Dimensional Learning aspects of NGSS:
Science & Engineering Practices- Ask questions that can be investigated within the scope of the classroom, outdoor environment, and museums and other public facilities with available resources and, when appropriate, frame a hypothesis based on observations and scientific principles.Do you agree with this alignment?
Disciplinary Core Ideas- Electric and magnetic (electromagnetic) forces can be attractive or repulsive, and their sizes depend on the magnitudes of the charges, currents, or magnetic strengths involved and on the distances between the interacting objects.Do you agree with this alignment?
Crosscutting Concepts- Cause and effect relationships may be used to predict phenomena in natural or designed systems.Do you agree with this alignment?
Do you agree with this alignment? - Ask questions that can be investigated within the scope of the classroom, outdoor environment, and museums and other public facilities with available resources and, when appropriate, frame a hypothesis based on observations and scientific principles.
- MS-PS2-5 Conduct an investigation and evaluate the experimental design to provide evidence that fields exist between objects exerting forces on each other even though the objects are not in contact.
Grades 6-8
This resource focuses on the following Three Dimensional Learning aspects of NGSS:
Science & Engineering Practices- Conduct an investigation and evaluate the experimental design to produce data to serve as the basis for evidence that can meet the goals of the investigation.Do you agree with this alignment?
Disciplinary Core Ideas- Forces that act at a distance (electric, magnetic, and gravitational) can be explained by fields that extend through space and can be mapped by their effect on a test object (a charged object, or a ball, respectively).Do you agree with this alignment?
Crosscutting Concepts- Cause and effect relationships may be used to predict phenomena in natural or designed systems.Do you agree with this alignment?
Do you agree with this alignment? - Conduct an investigation and evaluate the experimental design to produce data to serve as the basis for evidence that can meet the goals of the investigation.
- MS-PS3-4 Plan an investigation to determine the relationships among the energy transferred, the type of matter, the mass, and the change in the average kinetic energy of the particles as measured by the temperature of the sample.
Grades 6-8
This resource focuses on the following Three Dimensional Learning aspects of NGSS:
Science & Engineering Practices- Plan an investigation individually and collaboratively, and in the design: identify independent and dependent variables and controls, what tools are needed to do the gathering, how measurements will be recorded, and how many data are needed to support a claim.Do you agree with this alignment?
- Science knowledge is based upon logical and conceptual connections between evidence and explanations.Do you agree with this alignment?
Disciplinary Core Ideas- Temperature is a measure of the average kinetic energy of particles of matter. The relationship between the temperature and the total energy of a system depends on the types, states, and amounts of matter present.Do you agree with this alignment?
- The amount of energy transfer needed to change the temperature of a matter sample by a given amount depends on the nature of the matter, the size of the sample, and the environment.Do you agree with this alignment?
Crosscutting Concepts- Proportional relationships (e.g. speed as the ratio of distance traveled to time taken) among different types of quantities provide information about the magnitude of properties and processes.Do you agree with this alignment?
Do you agree with this alignment? - Plan an investigation individually and collaboratively, and in the design: identify independent and dependent variables and controls, what tools are needed to do the gathering, how measurements will be recorded, and how many data are needed to support a claim.
Homemade electromagnet with a D-cell battery.Copyright Peiran Zhang, CUActivity 1
Basic Electromagnet (per group):
- 1 uncoated iron 3.5" penny nail
- 1 D-cell battery or 9V battery
- 1 24" piece of 20-, 22-, or 24-gauge insulated copper wire (insulation keeps electricity in the wire)
- Not too thin to prevent the wire from overheating easily
- Not too thick, so the wire is easier to wrap around the nail
- 1 small piece of sandpaper or wire strippers (to peel the wire insulation off)
- electrical tape (to attach and cover wires on battery leads)
- 1 pair of scissors
- 1 wire cutter
- 1 container of small paperclips or staples (to test the electromagnet)
- Powering Up with Electromagnets Worksheet (PDF)
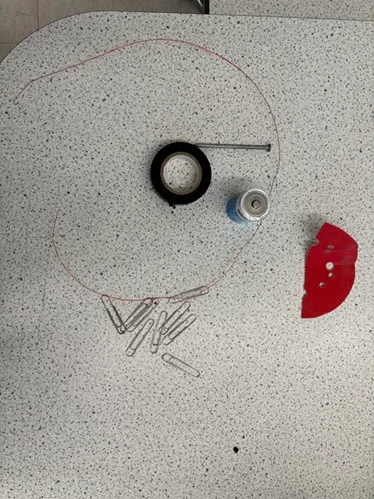 Basic materials to build an electromagnetCopyright Peiran Zhang, CU
Activity 2
Electromagnet Design Challenge (per group):
- 3 uncoated iron 5” penny nails
- 1 D-cell battery or 2AA battery pack with an on-off switch
- The switch turns the electromagnet on and off when pressed. Keep the electromagnet off when not in use to extend the battery life and prevent the wire from overheating.
- Housing (optional), a simple case, like a 3D‑printed one, to hold the battery pack and switch.
- For the D-cell battery, electrical tape to tape the nail-wrapped wire ends to the battery leads
- For the 2AA battery pack: alligator clips for quick connecting and disconnecting of the nail-wrapped wires
- 1 piece of 24’’ and 2 pieces of 36” 24-gauge insulated copper wire (insulation keeps electricity in the wire; 20-24 gauge wire works best)
- 1 small piece of sandpaper or wire strippers (to peel the wire insulation off)
- 1 pair of scissors
- 1 wire cutter
- 1 container of small paperclips or staples (to test the electromagnet)
(Hold up a common magnet.) Who has used a magnet before? Where have you seen magnets? (Allow students to respond. Possible answers: refrigerator magnets, speakers, toys, compasses, recycling centers, cranes.)
Magnets are all around us. Some magnets are permanent, meaning they are always magnetic. But today we're going to investigate a different kind of magnet. Can anyone guess what it might be called? (Allow students to respond if students know. Answer: an electromagnet.)
What do you think the word electromagnet tells us? (Allow students to respond. Possible answers: It uses electricity; it has something to do with electrical current.)
We're going to investigate how an electromagnet uses electricity to create magnetism and how it differs from a permanent magnet.
(Hold up a battery, a nail, and a piece of insulated copper wire.) Here's my challenge for you. Do you think I can turn this ordinary steel nail into a magnet using only this nail, wire, and battery? (Allow students to make predictions.)
What materials are needed to make an electromagnet, and what do you think each part does? (Allow students to respond. Possible answers: A battery provides electrical energy; copper wire carries electric current; the steel nail acts as the core that becomes temporarily magnetized.)
How do you think electricity can turn a metal nail into a magnet? (Allow students to respond. Possible answers: Electricity flowing through the wire creates a magnetic field that temporarily magnetizes the nail.)
What do you predict will happen when the wire is connected to the battery? (Allow students to respond. Possible answers: The nail will become magnetic and pick up paperclips; electricity will flow through the wire; disconnecting the battery will cause the magnetism to disappear.)
Let's find out! An electromagnet is a magnet created using electricity. When electric current flows through a coil of wire, it creates a magnetic field. Wrapping the coil around a steel nail causes the nail to become temporarily magnetized. Unlike a permanent magnet, an electromagnet can be turned on and off by controlling the electric current.
Why would engineers want a magnet they can turn on and off instead of using a regular magnet? (Allow students to respond. Possible answers: So it can pick things up and release them; so it can be controlled; so it only works when needed.)
That's exactly right. Electromagnets are incredibly useful because they can be controlled. They're found in junkyard cranes that lift heavy cars, as well as electric doorbells, speakers, MRI machines, electric motors, relays, and many other technologies we use every day.
Today you're going to become electrical engineers. Engineers rarely build something only once. Instead, they build a prototype, test it, collect data, analyze the results, and improve their design. That process is called the engineering design process.
During the first activity, every team will build the same basic electromagnet. You'll learn how each part works and test whether your electromagnet can pick up paperclips.
Then, during the second activity, you'll become the designers. You'll investigate one important design question: How does the number of wire wraps around the nail affect the strength of an electromagnet? Your team will need to create several electromagnets with different numbers of wire wraps, test each one several times, record data, calculate averages, and compare the results.
Remember that scientists and engineers don't rely on guesses: They rely on evidence. Even if your prediction turns out to be wrong, that's okay! Good engineering is about testing ideas and using data to improve designs.
Before we begin, let's review a few safety reminders:
- Handle the wire carefully. The ends can be sharp after the insulation is removed.
- Only connect the battery when you are actively testing your electromagnet.
- Disconnect the battery or switch it off immediately after each test. Leaving it connected too long can drain the battery and make the wire or nail become warm.
- Work carefully with your teammates and follow each step of the procedure before moving on.
As you work today, pay close attention to what makes one electromagnet stronger than another. By the end of the activity, you'll use your evidence to identify the strongest electromagnet design based on your test results.
Let's gather our materials and start building our first electromagnet!
Background
An electromagnet is a temporary magnet created when electric current flows through a coil of wire. Unlike a permanent magnet, an electromagnet can be turned on and off by controlling the flow of electricity. When the battery is disconnected or the switch is turned off, the magnetic field disappears and the iron or steel core loses most of its magnetism.
When electric current flows through a wire, it creates a magnetic field around the wire. Wrapping the wire into a coil causes the individual magnetic fields to combine, producing a much stronger magnetic field. Placing a ferromagnetic material, such as a steel nail, inside the coil further strengthens the magnetic field because the nail becomes temporarily magnetized.
Several factors affect the strength of an electromagnet, including:
- Number of wire coils (wraps): Increasing the number of coils generally increases the strength of the magnetic field because each loop contributes to the overall field. However, if the wire becomes excessively long while using the same battery, the increased electrical resistance can reduce the current and eventually limit or decrease the electromagnet's strength.
- Electric current: A greater current generally produces a stronger magnetic field. In this activity, students use the same battery for each design so current remains as consistent as possible.
- Core material: Ferromagnetic materials such as iron and steel greatly increase the magnetic field. Materials such as aluminum, copper, wood, or plastic do not become strongly magnetized.
- Coil quality: Even, tightly wound coils placed close together produce stronger magnetic fields than loose or crisscrossed coils.
In this activity, students investigate how changing the number of wire wraps affects the strength of an electromagnet while keeping the battery, nail, and wire gauge constant. This allows students to explore one engineering design variable at a time and determine its effect through experimentation.
Students measure the strength of each electromagnet by counting how many paperclips it can lift. Because small differences in wrapping technique, battery charge, and paperclip arrangement can affect results, students perform multiple trials and calculate an average. This models how engineers collect repeated measurements to make reliable, evidence-based design decisions.
Common Student Misconceptions
- Electricity creates magnetism only inside the battery.
Explain that electric current flowing through the wire creates the magnetic field, not the battery itself. - The nail becomes a permanent magnet.
The nail is only temporarily magnetized while current is flowing. A steel nail may retain a small amount of magnetism after use, but most of the magnetism disappears when the current stops. - More wire always makes a stronger electromagnet.
Adding coils generally strengthens the electromagnet, but eventually the longer wire increases electrical resistance, reducing current. Engineers must balance these competing effects when designing electromagnets. - Only the tip of the nail is magnetic.
Both ends of the nail act as magnetic poles while the electromagnet is energized.
Before the Activity
- Gather sufficient materials for students to work at each activity station, as outlined in the Materials section.
- Print one copy of the Powering Up with Electromagnets Worksheet (PDF) for each student team.
- Review the engineering connections, learning objectives, and background knowledge sections to become familiar with the electromagnet concepts students will explore.
During the Activity
Activity 1 (50 minutes)
Make a Basic Electromagnet:
- Go through the “Introduction and Motivation” script with the class.
- Create groups of 2-3 students.
- Explain the design challenge: Groups will work together to build and test a basic electromagnet design to understand its design and components.
- Distribute one Powering Up with Electromagnets Worksheet (PDF) to each team.
- Distribute materials to each group.
- Before students begin building, ask the class to predict what will happen.
- What materials are needed to make an electromagnet, and what do you think each part does? (Possible answers: A battery provides electrical energy; copper wire carries electric current; the steel nail acts as the core that becomes temporarily magnetized; electrical tape holds the wire in place.)
- How do you think electricity can turn a metal nail into a magnet? (Possible answers: Electricity flowing through the wire creates a magnetic field that temporarily magnetizes the nail.)
- What do you predict will happen when the wire is connected to the battery? (Possible answers: The nail will become magnetic and pick up paperclips; electricity will flow through the wire; disconnecting the battery will cause the magnetism to disappear.)
- Explain the process to create an electromagnet.
- Wrap the insulated copper wire tightly around a 3.5" penny nail in one direction for 30 wraps.
- Keep the coils as even, straight, and parallel to each other as possible.
- Avoid crisscrossing the wire too much, since crossing coils can weaken the magnetic field.
- A good method is to wrap one even layer down the nail, then wrap another layer back up.
- Secure the wire wraps in place with electrical tape to prevent them from unwinding.
- Leave 3-4" of loose wire at each end to attach to the battery source.
- Remove approximately ½ inch of insulation from both wire ends using sandpaper to expose the copper wire.
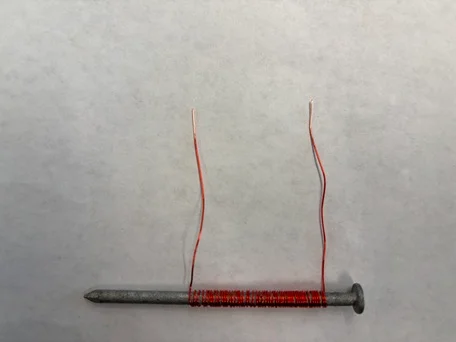 Nail tightly wrapped with insulated copper wire, and the coating on the ends of the wire lightly sanded off.Copyright Peiran Zhang, CU
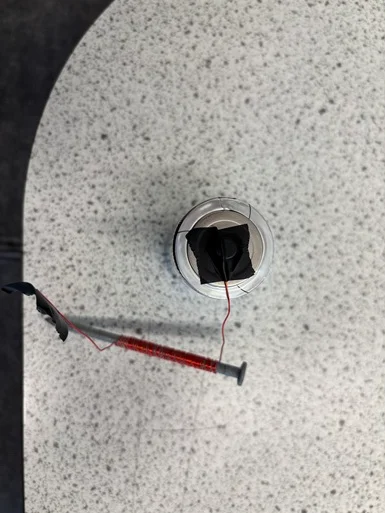 Tape each sanded wire lead of the wire-wrapped nail to one battery lead.Copyright Peiran Zhang, CU
Turn On the Electromagnet:
- Attach the bare ends of the nail-wrapped wire to the power source:
- For the D-cell battery: Tape one wire end to the positive (+) side of the battery, and tape the other wire end to the negative (–) side of the battery.
- For the 2AA battery pack: Use alligator clips or twisted bare wire covered with electrical tape to connect the battery pack. Turn the switch on to turn the electromagnet on and pick up paperclips, and turn the switch off to turn the electromagnet off and drop the paperclips.
- Test the electromagnet’s magnetism by trying to pick up a paperclip using both ends of the nail.
- Have each group draw and label a sketch of their basic electromagnet set up in the Activity 1 section of their Powering Up with Electromagnets Worksheet (PDF).
Turn Off the Electromagnet:
- For the D-cell battery: Disconnect one wire from the battery to turn off the electromagnet and drop the paperclip. For the 2AA battery pack: turn off the switch.
- Do not keep the wires connected to the battery to prevent draining the battery and overheating of the nail.
Test the Electromagnet Strength:
- Turn on the electromagnet by reattaching the disconnected wire to the battery, or turn on the 2AA battery switch.
- Use the electromagnet to pick up as many paperclips as possible with your design.
- Count the maximum number of paperclips the electromagnet can lift at one time. Use this value as a measure of its relative magnetic strength.
- Optional: Repeat Steps 11–13 two additional times so each electromagnet is tested three times.
- Record these values in the Activity 1 section of their Powering Up with Electromagnets Worksheet (PDF).
Summary and Conclusion
- Bring the class together for a brief discussion. Ask:
- What do you notice about how tightly and evenly the wire is wrapped around the nail? (Possible answers: The wire is wrapped in neat, even coils; the coils are close together and do not overlap much; tightly wrapped coils seem to produce a stronger electromagnet than loose or crisscrossed coils.)
- What happens when the wire stays connected to the battery versus when it is disconnected? (Possible answers: When the wire is connected to the battery, electric current flows and the nail becomes magnetic, allowing it to pick up paperclips. When the battery is disconnected, the current stops flowing, the magnetic field disappears, and the paperclips fall off. Leaving the battery connected for too long may also cause the wire or nail to become warm and drain the battery.)
- How many paperclips can the electromagnet pick up, and does this change when you test it again? (Possible answers: Answers will vary depending on how the electromagnet was built. Students may notice that the electromagnet picks up a similar number of paperclips each trial, although small differences may occur because of coil placement, battery strength, or how the paperclips are arranged. Repeating trials helps identify a typical result and improves the reliability of the data.)
Activity 2 (50 minutes)
Design an Electromagnet
- Explain that engineers rarely stop after building one prototype. Instead, they test one design variable at a time to determine how it affects performance.
- Tell students that in today’s activity they will investigate how the number of wire wraps affects the strength of an electromagnet while keeping the battery, nail, and wire gauge the same.
- Explain the design challenge: each group will design and build three different electromagnets, each with a different number of wire wraps (for example, 20 wraps, 40 wraps, and 60 wraps).
- Provide groups with the design constraints:
- Use the same wire gauge (20-, 22-, or 24-gauge) for all three electromagnets.
- Build and test one electromagnet at a time.
- Keep the wire coils as even, straight, and close together as possible.
- Avoid crisscrossing the wire because overlapping coils can weaken the magnetic field.
- One effective method is to wrap one neat layer down the nail and then wrap a second layer back toward the starting point.
- Secure the wire with electrical tape to prevent it from unwinding.
- Leave 3–4 inches of loose wire at each end for connecting to the battery.
- Use sandpaper to remove approximately ½ inch of insulation from both wire ends.
- Have each group decide how many wire wraps they will use for each of their three electromagnet designs (for example, 20, 40, and 60 wraps) and predict which design they think will be the strongest.
- Have students record the number of wire wraps for each electromagnet in the Activity 2 section of the Powering Up with Electromagnets Worksheet (PDF) before testing.
- Instruct students to sketch each of their electromagnet designs in their worksheet.
Test the Electromagnet Strength
- Have students connect the first electromagnet to the battery.
- D-cell battery: Tape one exposed wire end to the positive (+) terminal and the other exposed wire end to the negative (–) terminal.
- 2AA battery pack: Connect the exposed wire ends using the battery pack leads or alligator clips, then turn the switch to the ON position.
- Challenge each team to use its electromagnet to lift as many paperclips as possible.
- Have students count the maximum number of paperclips the electromagnet lifts and record the result in the Activity 2 data table.
- Have students turn off the electromagnet by disconnecting one battery connection or switching off the battery pack.
- Remind students not to leave the electromagnet connected for extended periods because this can drain the battery and cause the wire or nail to become warm.
- Repeat Steps 8–11 two additional times for the same electromagnet so that each design is tested three times.
- Repeat Steps 8–12 for the remaining two electromagnet designs.
- Have students calculate the average number of paperclips lifted for each electromagnet design and identify which design produced the strongest electromagnet.
Summary and Conclusion
- Bring the class together for a whole-group discussion. Ask each team to share:
- The number of wire wraps used for each electromagnet.
- The average number of paperclips lifted by each design.
- Which design produced the strongest electromagnet.
- Compare class results and discuss patterns. Ask:
- Which electromagnet design lifted the most paperclips? (Possible answers: Answers will vary. Students should identify the electromagnet design with the greatest average number of paperclips based on their collected data.)
- Did every group obtain exactly the same results? Why or why not? (Possible answers: No. Small differences in wire spacing, coil tightness, battery charge, and testing methods can affect the results.)
- How did changing the number of wire wraps affect the strength of the electromagnet? (Possible answers: Increasing the number of wire wraps generally increased the electromagnet's strength because additional coils created a stronger magnetic field.)
- Why was it important to keep the battery, nail, and wire gauge the same while changing only the number of wire wraps? (Possible answers: Keeping all other variables constant made it possible to determine how the number of wire wraps affected the electromagnet's strength.)
- Conclude the activity by asking students to reflect on what they learned.
- What evidence shows that the nail became a magnet only when electricity was flowing? (Possible answers: The nail picked up paperclips only while the battery was connected. When the battery was disconnected or the switch was turned off, the paperclips fell off because the magnetic field disappeared.)
- Which combination of wire wraps worked best, and why do you think it was the strongest electromagnet design? (Possible answers: Answers will vary. Students should identify the design with the highest average number of paperclips and explain that the number of wire wraps affected the strength of the magnetic field.)
- If you could redesign your electromagnet again, what would you change to make it even stronger? (Possible answers: Add or adjust the number of wire wraps, make the coils tighter and more evenly spaced, improve electrical connections, or test a different wire gauge while changing only one variable at a time.)
- Ask groups to reflect on how they could improve their electromagnet based on the evidence collected during testing.
Redesign and Retest (Optional)
- If time allows, have each student group redesign their electromagnet using what they learned from the class discussion.
- Have students build and test their improved electromagnet using the same testing procedure, then compare the results to their original designs and determine whether their redesign increased the electromagnet's strength.
- electric current
- The movement of electricity from one place to another, usually through a wire.
- electricity
- Energy made when tiny particles called electrons move. This energy can flow through wires to power lights, devices, and heat, and it can also appear naturally, like in lightning.
- electromagnet
- A temporary magnet created by electric current flowing through a coil of wire. When the electricity is turned on, the wire creates a magnetic field. When the electricity is turned off, the magnet stops working. A metal core, such as an iron nail, is often placed inside the coil to strengthen the magnet.
- magnetic fields
- An invisible "force field" or "bubble" surrounding a magnet or electric current that pushes or pulls on magnetic materials (such as iron) without touching them.
Pre-Questions (pre-assessment of student knowledge)
- What materials are needed to make an electromagnet, and what do you think each part does?
- How do you think electricity can turn a metal nail into a magnet?
- What do you predict will happen when the wire is connected to the battery?
Activity Embedded Questions (formative assessment)
- What do you notice about how tightly and evenly the wire is wrapped around the nail?
- What happens when the wire stays connected to the battery versus when it is disconnected?
- How many paperclips can the electromagnet pick up, and does this change when you test it again?
Post-Activity Reflections (summative assessment)
- What evidence shows that the nail became a magnet only when electricity was flowing?
- Which combination of wire wraps worked best, and why do you think it was the strongest electromagnet design?
- If you could redesign your electromagnet again, what would you change to make it even stronger?
- If an electromagnet does not work, first check that the insulation has been completely removed from both wire ends so the copper wire makes good electrical contact with the battery.
- Make sure the wire is wrapped tightly around the steel nail with even, closely spaced coils. Loose or crisscrossed coils can weaken the magnetic field.
- Students should leave 3–4 inches of exposed wire at each end to make secure connections to the battery.
- If the electromagnet is weak, check that the battery is fully charged and that the wire connections are secure.
- The number of wire wraps is one of the most important factors affecting electromagnet strength. Too few wraps produce a weak magnetic field, while too many wraps increase the wire's electrical resistance, reducing current and potentially decreasing the electromagnet's strength.
- Remind students to disconnect the battery or switch off the battery pack immediately after each trial. Leaving the electromagnet connected for extended periods can drain the battery and cause the wire or nail to become warm.
- After repeated use, a steel nail may retain a small amount of residual magnetism. If the nail continues to attract paperclips after the battery is disconnected, briefly reversing the battery connections can help demagnetize the nail before the next trial.
Suggestions for Activity 2 adaptations include:
- Offering a range of power source options (e.g., single 1.5 AA battery packs, 2 AA battery packs, and 4 AA battery packs) to assess whether voltage affects the strength of the electromagnet design (more voltage creates a stronger electromagnet).
- Offering a range of different diameter uncoated nails up to 5” long to assess whether the size of the metal core affects the strength of the electromagnet design (a larger core creates a stronger and more effective magnet, but be aware that this can cause the electromagnet core to heat up more).
For older students, explain that magnetic field strength increases with current and the number of windings. For a solenoid (an electromagnet made from many wire turns), the relationship is:
𝐵=𝜇𝑁𝐼𝐿B=μLNI
where:
- B = magnetic field strength
- μ = magnetic permeability (a constant)
- N = number of wire turns
- I = electric current
- L = length of the coil
This means that doubling the number of turns or doubling the current should roughly double the magnetic field.
If results do not match perfectly:
- Adding more wire can increase resistance and reduce current.
- Counting paperclips lifted is not precise—it shows trends, not exact values.
Contributors
Matt Jones, Ryan Cook, Seth Patterson of the ASPIRE Electric Vehicle & Roadway facility at Utah State University, Jennifer Taylor of the Pre-College Engineering Program at the University of Colorado (CU) Boulder, and Peiran Zhang, CU Pre-College Engineering team (classroom pilot)
Supporting Program
The Colorado Department of Transportation Office (CDOT) Office of Innovative Mobility and the National Science Foundation ASPIRE Engineering Research Center
Acknowledgements
This curriculum was developed under the CDOT E-Mobility Education and Awareness Grant award 25-HAA-ZL-00103 and the NSF award 1941524. Any opinions, findings, and conclusions, or recommendations expressed in this material are those of the authors and do not necessarily reflect the views of the Colorado Department of Transportation or the National Science Foundation.
Copyright
2026 by Regents of the University of Colorado