
Exploring Electric Motors
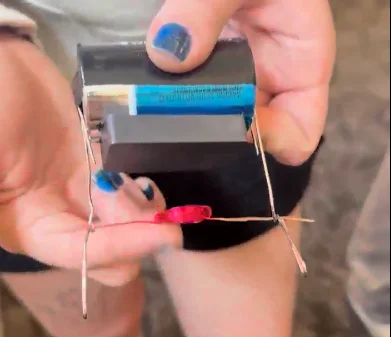 A finished DC motor coil made of thin insulated copper wire with the coating removed from one end and half of the coating removed from the other end.Copyright Ian Rauber Silverio, CU
Students explore how electric motors work through observation, investigation, and engineering design. Students begin by designing, building, and testing a simple direct-current (DC) motor to investigate how electrical energy and magnetic fields interact to produce motion. They explore how design variables such as wire gauge and number of coil wraps affect the consistency of the motor’s coil spin. Students then deepen their understanding of DC motors by watching a short video and disassembling a DC hobby motor to identify its major components and examine how each part contributes to motor operation. Finally, students connect what they have learned to electric vehicles and explore how electric motors are used to convert electrical energy into mechanical motion in real-world transportation technologies.
Electrical engineers design, develop, and test technologies that use electricity and electromagnetism, including electric motors and electric vehicle (EV) systems. In this activity, students practice similar skills by designing and testing a simple DC motor and investigating how electric current and magnetic fields interact to produce rotation. Students also examine the components inside a DC motor and connect these principles to EV motors. Although EV motors are more advanced, they rely on the same foundational principle of using electromagnetic forces to convert electrical energy from batteries into mechanical motion.
After this activity, students should be able to:
- Build a simple DC motor using basic materials.
- Describe how electricity and magnets work together to make motion.
- Explain how electrical energy changes into mechanical energy.
- Identify the main parts of a DC motor (armature, magnets, brushes, commutator).
- Explain what each motor part does.
- Compare a handmade simple electric motor to a hobby DC electric motor.
- STEL-7Q Apply the technology and engineering design process.
Grades 6-8
Do you agree with this alignment? - STEL-7R Refine design solutions to address criteria and constraints.
Grades 6-8
Do you agree with this alignment?
- MS-ETS1-1 Define the criteria and constraints of a design problem with sufficient precision to ensure a successful solution, taking into account relevant scientific principles and potential impacts on people and the natural environment that may limit possible solutions.
Grades 6-8
This resource focuses on the following Three Dimensional Learning aspects of NGSS:
Science & Engineering Practices- Define a design problem that can be solved through the development of an object, tool, process or system and includes multiple criteria and constraints, including scientific knowledge that may limit possible solutions.Do you agree with this alignment?
Disciplinary Core Ideas- The more precisely a design task's criteria and constraints can be defined, the more likely it is that the designed solution will be successful. Specification of constraints includes consideration of scientific principles and other relevant knowledge that is likely to limit possible solutions.Do you agree with this alignment?
Crosscutting Concepts- The uses of technologies and any limitations on their use are driven by individual or societal needs, desires, and values; by the findings of scientific research; and by differences in such factors as climate, natural resources, and economic conditions.Do you agree with this alignment?
- All human activity draws on natural resources and has both short and long-term consequences, positive as well as negative, for the health of people and the natural environment.Do you agree with this alignment?
Do you agree with this alignment? - Define a design problem that can be solved through the development of an object, tool, process or system and includes multiple criteria and constraints, including scientific knowledge that may limit possible solutions.
- MS-ETS1-2 Evaluate competing design solutions using a systematic process to determine how well they meet the criteria and constraints of the problem.
Grades 6-8
This resource focuses on the following Three Dimensional Learning aspects of NGSS:
Science & Engineering Practices- Evaluate competing design solutions based on jointly developed and agreed-upon design criteria.Do you agree with this alignment?
Disciplinary Core Ideas- There are systematic processes for evaluating solutions with respect to how well they meet the criteria and constraints of a problem.Do you agree with this alignment?
Do you agree with this alignment? - Evaluate competing design solutions based on jointly developed and agreed-upon design criteria.
- MS-PS2-2 Plan an investigation to provide evidence that the change in an object's motion depends on the sum of the forces on the object and the mass of the object.
Grades 6-8
This resource focuses on the following Three Dimensional Learning aspects of NGSS:
Science & Engineering Practices- Plan an investigation individually and collaboratively, and in the design: identify independent and dependent variables and controls, what tools are needed to do the gathering, how measurements will be recorded, and how many data are needed to support a claim.Do you agree with this alignment?
- Science knowledge is based upon logical and conceptual connections between evidence and explanations.Do you agree with this alignment?
Disciplinary Core Ideas- The motion of an object is determined by the sum of the forces acting on it; if the total force on the object is not zero, its motion will change. The greater the mass of the object, the greater the force needed to achieve the same change in motion. For any given object, a larger force causes a larger change in motion.Do you agree with this alignment?
- All positions of objects and the directions of forces and motions must be described in an arbitrarily chosen reference frame and arbitrarily chosen units of size. In order to share information with other people, these choices must also be shared.Do you agree with this alignment?
Crosscutting Concepts- Explanations of stability and change in natural or designed systems can be constructed by examining the changes over time and forces at different scales.Do you agree with this alignment?
Do you agree with this alignment? - Plan an investigation individually and collaboratively, and in the design: identify independent and dependent variables and controls, what tools are needed to do the gathering, how measurements will be recorded, and how many data are needed to support a claim.
- MS-PS2-3 Ask questions about data to determine the factors that affect the strength of electric and magnetic forces.
Grades 6-8
This resource focuses on the following Three Dimensional Learning aspects of NGSS:
Science & Engineering Practices- Ask questions that can be investigated within the scope of the classroom, outdoor environment, and museums and other public facilities with available resources and, when appropriate, frame a hypothesis based on observations and scientific principles.Do you agree with this alignment?
Disciplinary Core Ideas- Electric and magnetic (electromagnetic) forces can be attractive or repulsive, and their sizes depend on the magnitudes of the charges, currents, or magnetic strengths involved and on the distances between the interacting objects.Do you agree with this alignment?
Crosscutting Concepts- Cause and effect relationships may be used to predict phenomena in natural or designed systems.Do you agree with this alignment?
Do you agree with this alignment? - Ask questions that can be investigated within the scope of the classroom, outdoor environment, and museums and other public facilities with available resources and, when appropriate, frame a hypothesis based on observations and scientific principles.
- MS-PS2-5 Conduct an investigation and evaluate the experimental design to provide evidence that fields exist between objects exerting forces on each other even though the objects are not in contact.
Grades 6-8
This resource focuses on the following Three Dimensional Learning aspects of NGSS:
Science & Engineering Practices- Conduct an investigation and evaluate the experimental design to produce data to serve as the basis for evidence that can meet the goals of the investigation.Do you agree with this alignment?
Disciplinary Core Ideas- Forces that act at a distance (electric, magnetic, and gravitational) can be explained by fields that extend through space and can be mapped by their effect on a test object (a charged object, or a ball, respectively).Do you agree with this alignment?
Crosscutting Concepts- Cause and effect relationships may be used to predict phenomena in natural or designed systems.Do you agree with this alignment?
Do you agree with this alignment? - Conduct an investigation and evaluate the experimental design to produce data to serve as the basis for evidence that can meet the goals of the investigation.
- MS-PS3-2 Develop a model to describe that when the arrangement of objects interacting at a distance changes, different amounts of potential energy are stored in the system.
Grades 6-8
This resource focuses on the following Three Dimensional Learning aspects of NGSS:
Science & Engineering Practices- Develop a model to describe unobservable mechanisms.Do you agree with this alignment?
Disciplinary Core Ideas- A system of objects may also contain stored (potential) energy, depending on their relative positions.Do you agree with this alignment?
- When two objects interact, each one exerts a force on the other that can cause energy to be transferred to or from the object.Do you agree with this alignment?
Crosscutting Concepts- Models can be used to represent systems and their interactions—such as inputs, processes and outputs—and energy and matter flows within systems.Do you agree with this alignment?
Do you agree with this alignment? - Develop a model to describe unobservable mechanisms.
Each group/pair needs:
Activity 1: Beakman Electric Motor Design Challenge
- 1 D-cell battery
- insulated copper wire (range of 20-24 gauge)
- 1 ceramic magnet or small neodymium magnet(s)
- 2 large/jumbo paperclips
- electrical tape or a wide rubber band
- sandpaper
- Exploring Electric Motors Worksheet (PDF)(1 per student)
Activity 2: DC Motor Dissection
- 1 DC hobby motor
- 1 flathead screwdriver
- DC motor parts diagram found in the Exploring Electric Motors Worksheet (PDF)
For the entire class to share:
- 1 laptop or computer with internet access and projector (to show YouTube videos)
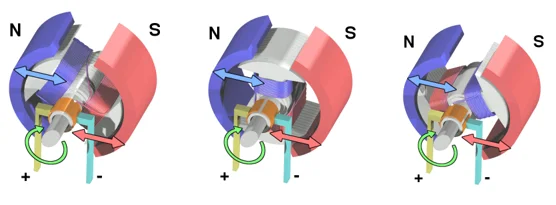 Spinning DC electric motor due to internal electromagnet.Copyright https://commons.wikimedia.org/wiki/File:Electric_motor_cycle_1.png
(Hold up a small DC motor, if available.) Where have you seen an electric motor before? What kinds of things do electric motors make move? (Allow students to respond. Possible answers: fans, toys, power tools, electric vehicles, appliances, robots.)
What do you think makes things spin in devices like fans or toys with motors? (Allow students to respond. Possible answers: electricity, a motor, magnets, gears, or moving parts.)
Electric motors are all around us. They make things spin, turn, roll, and move. Some motors are tiny enough to fit inside a toy, while others are powerful enough to move an electric vehicle. But how does electricity actually make something move?
Think back to what you know about electricity and magnetism. What happens when electric current flows through a wire or a coil of wire? (Allow students to respond. Possible answers: The current creates a magnetic field; a coil carrying current can act like an electromagnet.)
How do you think electricity and magnets might work together to cause motion? (Allow students to respond. Possible answers: Electricity may create a magnetic field that interacts with a magnet; magnetic forces may push or pull something and cause it to move.)
What might happen when electric current flows through a wire near a magnet? (Allow students to respond. Possible answers: The wire may experience a force or move because the magnetic field created by the current interacts with the magnetic field of the magnet.)
Today we're going to investigate how engineers use the interaction between electricity and magnetism to create motion.
(Hold up a battery, a coil of insulated wire, and a magnet.) Here is your first challenge. Do you think we can use only a battery, a coil of wire, and a magnet to make the coil spin? What role do you think each of these components might play? (Allow students to make predictions.)
The battery provides electrical energy, the wire carries electric current, and the magnet provides a magnetic field. When current flows through the coil, the coil produces its own magnetic field. The interaction between the magnetic field of the coil and the magnetic field of the permanent magnet produces a force on the coil that can make it rotate. In this way, an electric motor converts electrical energy into mechanical energy, or motion.
But there is a challenge. If we simply connect the coil to the battery, will it continue spinning in the same direction? Something needs to control when current flows through the coil so that it keeps rotating.
In the simple motor you will build today, one end of the coil wire has all of its insulation removed, while only one side of the insulation is removed from the other end. Why do you think we would do that? (Allow students to make predictions.)
This creates a simple switching action. As the coil rotates, electrical contact is made during part of each rotation and interrupted during another part. Combined with the coil's momentum, this helps the coil continue rotating rather than simply aligning itself with the permanent magnet and stopping.
This type of simple motor is often called a Beakman motor. Before you begin building, you'll watch a demonstration of how one works and look for evidence of how the battery, coil, and magnet work together to produce rotation.
But engineers don't just want a motor to spin; they also want it to perform in a particular way. They change design features, test the motor, collect evidence, and use their results to improve the design. That's what you'll do in your first activity.
Your engineering challenge is to investigate how the wire gauge or the number of wire wraps affects the motor's rotation. You'll build and test different designs and observe how consistently and quickly the coil spins. As you test, think about other factors that might affect your results. Is the coil balanced? Can it rotate freely? Is there friction at the supports? Is the magnet positioned correctly?
What do you predict will happen if you change the number of wire wraps? What about the thickness of the wire? (Allow students to share predictions.) Engineers use testing and evidence to determine how design choices affect performance, so your results may or may not match your predictions.
After you've investigated your Beakman motor, we're going to look inside a real DC hobby motor. You'll carefully disassemble it and identify components such as the stator, armature (rotor), commutator, brushes, and terminals. As you examine these components, you'll think about how they accomplish some of the same functions you observed in your simple motor.
Finally, we'll connect what you've learned to electric vehicles. Electric vehicles use much more sophisticated motors, but the fundamental idea is similar: Electrical energy is converted into mechanical energy that produces motion.
As you work today, keep one big question in mind: How do electricity and magnetism work together to create motion? By building your own simple motor and then investigating the components inside a DC motor, you'll gather evidence that helps you answer that question. Let's start by seeing a simple electric motor in action!
Background
Electricity and Magnetism: Electric current is the movement of electric charge through a conductor. When current flows through a wire, it produces a magnetic field around the wire. Coiling the wire concentrates this magnetic effect. When a current-carrying wire or coil is placed in the magnetic field of a permanent magnet, the interaction between the magnetic fields produces a force on the wire. In a motor, these forces can produce rotational motion.
Energy Conversion in an Electric Motor: An electric motor converts electrical energy into mechanical energy. The battery supplies electrical energy, current flows through the motor's coil, and magnetic forces create torque that causes the coil or rotor to rotate. Some energy is also converted to thermal energy because of electrical resistance and friction.
How the Beakman Motor Works: The Beakman motor is a simplified DC motor consisting primarily of a battery, a wire coil, paper clip supports/electrical contacts, and a permanent magnet. Current flowing through the coil creates a magnetic field that interacts with the permanent magnet's field, producing torque on the coil. The coil may need an initial push to begin rotating.
A particularly important feature is how the insulation is removed from the coil's two straight ends. One end has insulation removed all the way around, while the other has insulation removed from only one side. This creates a simple switching mechanism: current flows through the coil during part of its rotation and is interrupted during another part. The coil's momentum carries it through the unpowered portion of the rotation, allowing the process to repeat. This serves a function somewhat analogous to the commutation that occurs in a conventional brushed DC motor.
Factors Affecting Beakman Motor Performance: It’s important to understand that motor performance can be affected by more than the design variable students select. Wire gauge influences electrical resistance, while changing the number of coil wraps affects several things simultaneously, including magnetic effects, resistance, mass, and rotational inertia. Coil balance and shape, friction at the paper clip supports, quality of electrical contact, battery condition, magnet strength and placement, and how accurately students remove the insulation can all influence whether the coil spins consistently. For that reason, avoid presenting rules such as “fewer wraps always spin faster” or “thicker wire always produces a better motor” as universal conclusions; students should use their experimental evidence to evaluate the designs tested.
Parts of a Brushed DC Motor: For Activity 2, the major components and their functions students will identify include:
- Stator: The stationary part of the motor that provides a magnetic field. In a small hobby motor, this is commonly provided by permanent magnets.
- Armature (rotor): The rotating portion containing coils of wire. Current through these coils creates magnetic effects that interact with the stator's field to produce torque.
- Commutator: A segmented electrical contact attached to the rotor that changes the electrical connection to the armature coils as the rotor turns, helping maintain rotation.
- Brushes: Stationary electrical contacts that transfer current from the motor terminals to the rotating commutator.
- Terminals: External electrical connections through which the motor receives electrical power.
- Shaft: The rotating mechanical output of the motor that transfers motion to another device.
Connection Between the Activities: The Beakman motor provides a visible, simplified model of motor operation. When students dissect the hobby motor, they encounter more sophisticated components that perform related functions. The Beakman motor's coil corresponds conceptually to the current-carrying coils of the armature, the permanent magnet provides a stator-like magnetic field, and the partially stripped wire provides a simple switching function analogous to commutation. Making these connections can help students move from the simple model in Activity 1 to understanding the components of a practical DC motor in Activity 2.
Connection to Electric Vehicles: Electric vehicles also convert electrical energy into mechanical motion using interactions between electric currents and magnetic fields. However, EV traction motors are much more sophisticated than the simple brushed DC motor investigated in this lesson and may use different motor architectures and electronic controllers. The Beakman and hobby motors should therefore be presented as models for understanding fundamental motor principles, rather than as miniature versions of an EV traction motor.
Before the Activity
- Gather sufficient materials for student teams, as outlined in the Materials section.
- Prepare copies of the Exploring Electric Motors Worksheet (PDF) (1 per student)
- Review the engineering connection, learning objectives, and background knowledge sections to become familiar with the model EV concepts students will explore.
During the Activity
Activity 1: Beakman Electric Motor Design Challenge (simple DC motor) (50 minutes)
A simple direct current (DC) motor.Copyright Ian Rauber Silverio, CUIntroduction
- Divide students into pairs.
- Distribute one Exploring Electric Motors Worksheet (PDF)to each student.
- Read through the introduction and Motivation section.
Ask
- Introduce the design challenge: How can you design a Beakman motor to achieve the most consistent coil spin?
Research
- Introduce the Beakman motor by showing students this video demonstrating how a simple electric motor works: Beakman Motor Video (2:17 minutes).
- Ask students to observe the motor's components and note how the wire coil moves when connected to the battery in their worksheet.
Imagine
- Explain that students may investigate either the wire gauge (e.g., 20-, 22-, or 24-gauge) or the number of coil wraps (e.g., 5, 10, or 15 wraps).
- Give students 5 minutes to individually brainstorm how changing one of these variables might help them achieve the most consistent coil spin. Have students sketch their ideas on their worksheets.
Plan
- Give each pair 5 minutes to share their brainstormed ideas with each other.
- Have each pair select one design variable (i.e., wire gauge or number of coil wraps) to investigate.
- Ask students to record their designs, predict which will produce the most consistent coil spin, and justify their prediction on their worksheet.
Create
- Have students build their first motor design by completing the following steps:
- Make the coil: Wrap the selected gauge of wire around a cylinder, such as a glue stick or marker, for the planned number of wraps to form a circle.
- Secure the wire ends: Keep about 2 inches of straight wire on both sides. Loop each end lightly around the coil at opposite ends and thread the end through the loop to hold it together.
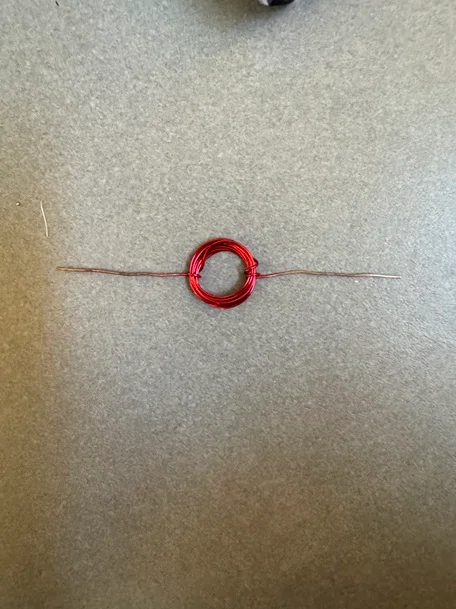 A finished DC motor coil made of thin insulated copper wire with the coating removed from one end and half of the coating removed from the other end.Copyright Ian Rauber Silverio, CU
- Remove wire insulation (important): Use sandpaper to lightly scrape off the red coating on the straight ends of the wire. Scrape all the way around one wire end, and scrape only one side of the other wire end.
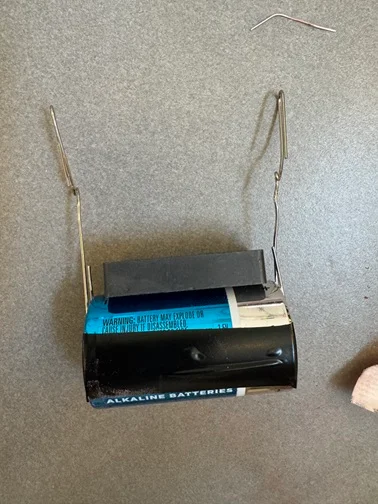 The simple DC, or Beakman motor, with a magnet placed between the wire coil paper clip supports.Copyright Ian Rauber Silverio, CU
- Build the coil stand: Slide one end of each of the two large paper clips upward to create a loop in the middle of each paper clip (this loop will support the wire coil). Use electrical tape or a wide rubber band to hold two paper clips upright on opposite sides of the D-cell battery. To avoid creating a short circuit, DO NOT touch the paper clips together once attached to the battery!
- Set the coil: Rest the coil ends in the paper clip loops. Check that the paper clip supports are straight and the wire is level and can spin freely. Reshape the wire coil if necessary.
- Add the magnet and test the design: Place the magnet on the battery off to the side between the two paper clips. Gently push the coil to help it start spinning. If the wire coil does not spin, check that the wire insulation is fully removed all the way around one wire end and only from one side of the other wire end. Adjust the magnet placement and slightly tilt the motor setup forward or backward. To avoid a short circuit, DO NOT place the magnet so it connects with the paper clips attached to the battery leads.
- Turn the motor off: Remove the wire coil from the motor stand to turn off the motor and conserve the battery. Use care when removing neodymium magnets from the battery to avoid pinched fingers.
Test
- Have students test their motor design and record the results in their worksheet.
- Have students classify the coil's performance as constant coil spin (continues spinning without assistance), intermittent coil spin (spins but stops or requires additional pushes), or no coil spin (does not continue spinning after the initial push).
Create and Test Additional Designs
- Repeat the Create and Test steps for the other two planned designs.
Iterate
- Based on the results of their three designs, have students identify which design performed best and write down 2–3 modifications they would make to improve its coil spin.
Reflect
- Have students answer the questions in the Reflection section of their worksheet.
Share Out
- Have a whole-class discussion about how wire gauge and number of coil wraps affected the consistency of the coil spin.
- Ask students to reflect on the Beakman simple DC motor designs and share how wire gauge, number of coil wraps, and other factors affected the performance of their motors.
- Ask teams to share how they would modify their simple DC motor design to achieve more consistent coil spin based on their test results and class feedback.
Activity 2: Dissect a DC Motor (50 minutes)
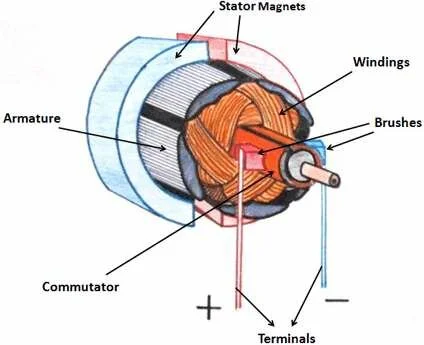 Key components of a DC (direct current) motor include the armature, brushes, commutator, stator, and terminals.Copyright CC BY-NC-4.0 https://www.researchgate.net/publication/342603671_Gesture_recognition_vehicle_using_PIC_microcontroller/figures
Introduction
- Have students remain in their pairs from Activity 1.
- Explain that students will investigate the inside of a DC motor to determine how its components work together to produce rotation.
Watch and Learn
- Show students this video explaining how DC motors work (4:49 minutes).
- Have students answer the questions in their worksheet based on the video:
- What is the stator? Does it act as a permanent magnet or an electromagnet?
- What is the armature? Does it act as a permanent magnet or an electromagnet?
- What is the commutator, and what is its purpose in an electric motor?
- What are the brushes, and what role do they play?
- Explain that the motors they investigate may look different from the motor shown in the video or diagram, but they should look for components that perform the same basic functions.
Disassemble and Investigate
- Optional: Review the disassembly procedure and safety expectations with students before they begin. For example, remind students to use screwdrivers carefully, directing tools away from their hands and bodies, and keeping track of all small motor components.
- Mark the case. Have students draw a small alignment line across the seam between the motor case and back cap. Explain that this mark will help them correctly align the components if the motor is reassembled.
- Remove the gear. If a gear is attached to the motor shaft, have students carefully remove it using a small screwdriver.
- Bend back the tabs. Have students locate the metal tabs securing the back cap to the motor case and carefully bend the tabs straight using their fingers or a small screwdriver.
- Open the motor case. Have students carefully pull the back cap away from the motor body. If necessary, they may gently pry it open with a small screwdriver.
- Remove the armature. Have students carefully slide the armature (rotor) out of the motor case. Remind them to keep track of any small components that become loose during disassembly.
- Identify the motor components. Have students identify as many components as possible using the DC motor diagram in their worksheet (also see Image 7) and their observations from the video. Students should look for the armature (rotor), brushes, commutator, stator, and terminals.
- Have students record or label the components they identify in their worksheet. Remind them that their motor may not contain every component shown in the reference diagram or that some components may look different.
- Point out that these small DC hobby motors do not include a cooling fan. Ask students: Why do you think a cooling fan is not needed in this motor? Have students record their reasoning in their worksheet.
Electric Motors and EVs
- Explain that the same fundamental idea explored with the Beakman motor and DC hobby motor (i.e., using electricity and magnetic fields to produce motion) is applied in much larger and more sophisticated electric motors.
- Show students this video about how electric motors move electric vehicles (9:15 minutes).
- Ask students to identify connections between the motors they investigated and the electric vehicle motor shown in the video. Discuss how both use interactions between electricity and magnetic fields to produce mechanical motion.
Reflect and Discuss
- Bring the class together for a whole-group discussion.
- Conclude by asking students to explain, in their own words, how the components of a DC motor work together to make the motor shaft rotate. Have students use evidence from the video, motor dissection, and their observations from Activity 1 to support their explanations.
- armature (rotor)
- Windings of copper coils that carry current in a DC motor part that spin inside a motor and make it move.
- brushes
- DC motor components that deliver electricity from the battery to the spinning part of the motor (armature).
- commutator
- A DC motor component that reverses the direction of current flowing through the motor’s spinning coils (armature).
- dc motor
- An electrical machine that changes electrical energy (direct current) into mechanical energy through rotational motion.
- lorentz force
- The force exerted on a charged particle by electric and magnetic fields; in a DC motor, the armature produces the Lorentz force.
- stator
- The outer casing of a DC motor that holds non-moving magnets of opposite polarities that create a magnetic field, which forces the center part (armature) to spin.
- terminals
- The external connection points where the positive and negative DC power source is attached.
Pre-Activity Assessment
Pre-Questions: Before beginning the activity, during the Introduction and Motivation section, assess students’ prior knowledge of electric motors, electricity, and magnetism by asking the following questions. Encourage students to share their ideas and explain their reasoning. At this stage, accept a range of responses and use their answers to identify existing understanding and misconceptions.
- What do you think makes things spin in devices like fans or toys with motors? (Possible answers: An electric motor makes the parts spin; electricity provides energy to the motor; electricity and magnets work together inside a motor to create motion.)
- How do you think electricity and magnets might work together to cause motion? (Possible answers: Electricity can create a magnetic field; magnetic fields can push or pull on each other; these magnetic forces can cause parts of a motor to move or rotate.)
- What might happen when electric current flows through a wire near a magnet? (Possible answers: The current creates a magnetic field around the wire that interacts with the magnetic field of the permanent magnet. This interaction can produce a force on the wire, causing it to move.)
Activity Embedded Assessment (formative assessment)
Motor Observations: During the activity, assess students’ developing understanding of how the components and design of the Beakman motor affect its operation. As students build and test their motors, circulate among the groups and ask the following questions. Use student responses and observations to identify misconceptions and guide instruction.
- What happens to the wire coil when the battery is connected? (Possible answers: Electric current flows through the coil, creating a magnetic field. The coil may begin to rotate when its magnetic field interacts with the magnetic field of the permanent magnet.)
- How does changing the coil’s shape, balance, or insulation affect how it spins? (Possible answers: A balanced, evenly shaped coil can rotate more freely and consistently. An unbalanced or misshapen coil may wobble or experience more friction. Removing the insulation correctly allows electrical contact to occur at the appropriate points as the coil rotates.)
- What role does the magnet play when the coil starts moving? (Possible answers: The permanent magnet provides a magnetic field that interacts with the magnetic field produced by the current-carrying coil. This interaction produces a force on the coil that helps cause it to rotate.)
Motor Worksheet: Activity1: During the activity, students Imagine, Plan and Test their designs in their Exploring Electric Motors Worksheet (PDF).
Post-Activity Reflections (summative assessment)
Reflection Questions: After students complete both activities, use the following questions to assess their understanding of how electric motors convert electrical energy into mechanical motion and how motor components work together.
- How does a battery-powered motor convert electrical energy into mechanical motion? (Possible answers: The battery provides electrical energy that causes current to flow through the motor's wire coil. The current creates a magnetic field that interacts with another magnetic field, producing forces that cause the motor to rotate.)
- How is the Beakman motor similar to the DC motor you took apart? (Possible answers: Both use electric current, wire coils, and magnetic fields to produce rotation. The Beakman motor is a simplified model, while the DC hobby motor contains components such as an armature, stator, brushes, and commutator that allow it to operate more continuously and efficiently.)
- How do the parts of a DC motor work together to keep the motor spinning? (Possible answers: The stator provides a magnetic field, while current flowing through the armature coils creates another magnetic field. The interaction between these magnetic fields produces torque on the rotor. The brushes deliver current to the rotating commutator, and the commutator changes the electrical connection to the armature coils as the rotor turns, helping maintain rotation.)
- Quantitative Motor Testing: Have students develop a method for measuring the rotational speed of their Beakman motors. Students can conduct multiple trials for each design, calculate average rotational speed, graph their results, and use the data to determine which design performs best.
- Redesign and Optimize: After the class share-out, give teams an opportunity to redesign their motor using evidence from their own testing and other teams' results. Have students build and test the improved design and determine whether their modifications increased the consistency of the coil spin.
- Compare Motor Designs: Have students create a diagram comparing the Beakman motor with the dissected DC hobby motor. Students can identify components that perform similar functions and explain how the simple switching action created by the partially stripped wire relates to the brushes and commutator in the hobby motor.
- Electric Vehicle Engineering Extension: Have students research different types of motors used in electric vehicles and compare them with the simple motors investigated in the activity. Students could identify similarities in the underlying electromagnetic principles while examining why EV engineers require more sophisticated motor designs and control systems.
For lower grades:
- Simplify the Beakman motor design challenge by having all students build the same motor using a predetermined wire gauge and number of coil wraps. Focus on observing that electric current and magnetic fields can produce motion rather than comparing multiple designs.
- Provide partially assembled motor stands or pre-shaped paper clips if needed.
- During the DC motor dissection, focus on identifying a few major components, such as the magnet (stator), armature (rotor), and wire coils, and discussing what each component does.
For upper grades:
- Increase the complexity of the design challenge by having students quantitatively measure motor performance rather than classifying the coil as constant, intermittent, or no spin.
- Have students measure rotations over a set period of time, calculate rotational speed, conduct multiple trials, calculate averages, and graph motor performance against wire gauge or number of coil wraps.
- Have students investigate additional variables, such as magnet position, magnet strength, coil diameter, or battery voltage, while controlling other variables.
Beakman’s Electric Motor. Scribd, https://www.scribd.com/document/943792594/Beakman-s-Electric-Motor. Accessed 8 May 2026.
Other Resources:
- DC Motor Explained webpage (https://theengineeringmindset.com/dc-motor-explained)
- How Does an Electric Motor Work? video (10:03 minutes)
Contributors
Matt Jones, Ryan Cook, Seth Patterson of the ASPIRE Electric Vehicle & Roadway facility at Utah State University, Rick Weismueller, DSST Public Schools, Jennifer Taylor of the Pre-College Engineering Program at the University of Colorado (CU) Boulder, Peiran Zhang and Ian Rauber Silverio, CU Pre-College Engineering Team (classroom pilot)
Acknowledgements
This curriculum was developed under the CDOT E-Mobility Education and Awareness Grant award 25-HAA-ZL-00103 and the NSF award 1941524. Any opinions, findings, and conclusions, or recommendations expressed in this material are those of the authors and do not necessarily reflect the views of the Colorado Department of Transportation or the National Science Foundation.
Copyright
2026 by Regents of the University of Colorado