
Prosthetic Leg Design Challenge (en español)
Students design, build and test prosthetic legs.
Each group needs:
- 1 roll duct tape
- 1 yardstick or tape measure
- 1 large sponge
- scissors
- roll string
- 1 ~2 ft. (60 cm) cardboard tube
- 1 sheet paper
For the class to share:
- miscellaneous cardboard pieces
- small hand saw
For one reason or another, many people require replacement body parts, called prostheses or artificial limbs. Those who need artificial legs must have a structurally stable one in order to replace a critical part of their skeletal system. One aspect of biomedical engineering is designing and researching new and better prostheses for people with this medical need. Biomedical engineers are continually improving the strength, durability, longevity and lifelikeness of prosthetic devices so amputees can lead full lives.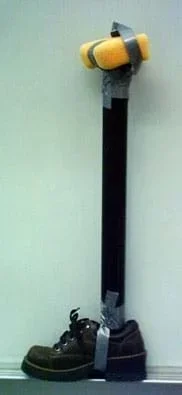 Students use simple materials to design and create prosthetic legs.Copyright 2008 Megan Podlogar, ITL Program, College of Engineering, University of Colorado Boulder
Procedures Overview
Student groups use simple materials to create prosthetic legs to replace the lower half of a leg. Then they test the legs and make improvements to their initial designs to increase their stability, comfort and aesthetics.
Procedure
- Lead a class discussion, focusing on the following questions:
- What is a prosthesis? (Answer: A prosthesis is an artificial body part to replace a missing one.)
- Why might someone need a prosthesis? (Answer: Because of an accident, war injury, etc.)
- What features would make a useful prosthetic leg? (Answer: Strength, stability, durability, lifelikeness, comfort, etc.)
- Organize students into groups of three.
- Pass out a sheet of blank paper to each group.
- Explain to students that their challenge is to make a prosthetic lower leg that one of them must be able to wear to walk around the room.
- Show students the available materials and have them brainstorm ideas on how to achieve the features discussed in answering the questions in Step 1.
- Remind students of the steps of the engineering design process: identify the problem, research the problem, develop possible solutions, select best solution, build a prototype, test and evaluate, and finally, redesign as necessary.
- Tell student groups that they must draw design sketches, which must be approved by the instructor before they can proceed to fabrication.
- Once sketches are approved, hand out materials and give students time to build their prosthestic prototoypes.
- Advise the teams to cut their tubes to (approximately) match the size of their designated tester's lower leg. (Note: Have students mark a "cut" line on the tube indicating the desired length where they want the instructor to cut the tube using the hand saw.)
- Supervise each group's "test" phase to offer constructive criticism and be on hand in case the support breaks under the student's weight.
- After testing, have groups make at least two improvements to their initial designs.
- Allow time for students to test their prostheses again after making their design changes.
- Provide enough time for student groups to show their designs to the rest of the class and discuss their reasoning for their prosthesis.
Hints
For safety reasons, instruct teams to pick the lightest member of the group to test the prototypes.
Wrap Up - Thought Questions
- What worked well about your design? Why?
- What did not work well? Why not?
- If you had additional materials, what improvements would you make?
This resource was modified from Prosthetic Party: Build and Test Replacement Legs to create a shorter, more streamlined version suitable for informal learning settings.
This resource is also available in Spanish.
Copyright
2008 by Regents of the University of Colorado