
Micro:bit and Python: Design Thinking for Home Challenges
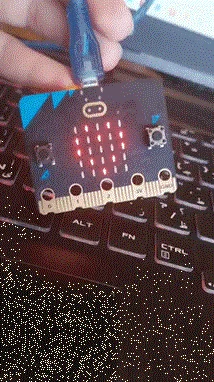 A micro:bit displaying a heart pattern on its LED grid.Copyright Amany Ayman
Students identify and solve an authentic, real-world problem in their home or community by designing and building a technology-based solution using the micro:bit and Python programming. Beginning with empathy, they interview users to understand their needs, experiences, and frustrations, and then they translate these insights into a clear, user-centered problem statement. Students brainstorm and evaluate multiple solutions based on user needs, feasibility, and technical constraints before developing their selected idea through pseudocode, Python coding, and micro:bit prototyping. Using the Input → Process → Output model, they learn how to program the micro:bit to use sensors, process information, and generate appropriate outputs. Throughout the process, students test and troubleshoot their code and prototypes, gather user feedback, and iteratively improve their solutions to better address the identified problem.
Embedded systems engineers design and program small computers that are built into everyday products and devices. They use microcontrollers, sensors, and programming languages such as Python to create systems that respond to their environment. They combine inputs, processing, and outputs to make devices perform specific tasks or solve real-world problems. They also build, test, troubleshoot, and improve prototypes to ensure their solutions work effectively.
After this activity, students should be able to:
- Formulate a human-centered problem statement identifying a user, a need, and technical constraints.
- Prototype a technical solution using a micro:bit and Python syntax (libraries, indentation).
- Identify micro:bit input and output components, specifically the LED display and sensors.
- Apply computational thinking to optimize code using for and while loops.
- STEL-7CC Apply a broad range of design skills to their design process.
Grades 9-12
Do you agree with this alignment? - STEL-7Z Apply principles of human-centered design.
Grades 9-12
Do you agree with this alignment?
- HS-ETS1-2 Design a solution to a complex real-world problem by breaking it down into smaller, more manageable problems that can be solved through engineering.
Grades 9-12
This resource focuses on the following Three Dimensional Learning aspects of NGSS:
Science & Engineering Practices- Design a solution to a complex real-world problem, based on scientific knowledge, student-generated sources of evidence, prioritized criteria, and tradeoff considerations.Do you agree with this alignment?
Disciplinary Core Ideas- Criteria may need to be broken down into simpler ones that can be approached systematically, and decisions about the priority of certain criteria over others (trade-offs) may be needed.Do you agree with this alignment?
Do you agree with this alignment? - Design a solution to a complex real-world problem, based on scientific knowledge, student-generated sources of evidence, prioritized criteria, and tradeoff considerations.
- HS-ETS1-3 Evaluate a solution to a complex real-world problem based on prioritized criteria and trade-offs that account for a range of constraints, including cost, safety, reliability, and aesthetics, as well as possible social, cultural, and environmental impacts.
Grades 9-12
This resource focuses on the following Three Dimensional Learning aspects of NGSS:
Science & Engineering Practices- Evaluate a solution to a complex real-world problem, based on scientific knowledge, student-generated sources of evidence, prioritized criteria, and tradeoff considerations.Do you agree with this alignment?
Disciplinary Core Ideas- When evaluating solutions it is important to take into account a range of constraints including cost, safety, reliability and aesthetics and to consider social, cultural and environmental impacts.Do you agree with this alignment?
Crosscutting Concepts- New technologies can have deep impacts on society and the environment, including some that were not anticipated. Analysis of costs and benefits is a critical aspect of decisions about technology.Do you agree with this alignment?
Do you agree with this alignment? - Evaluate a solution to a complex real-world problem, based on scientific knowledge, student-generated sources of evidence, prioritized criteria, and tradeoff considerations.
Each group needs:
- 1 micro:bit and 1 USB cable (v2 preferred: https://www.sparkfun.com/micro-bit-v2-go-bundle.html)
Note: The buttons, motion, light, and temperature sensors referenced in Part 2 are included in the above micro:bit.
- 1 laptop or computer with internet access (to use the Python Editor)
- 1 Project Rubric (PDF) (per group)
- 1 Project Worksheet (PDF)
- sticky notes
For the entire class to share:
- (optional) crafting materials: cardboard, scissors, pencils, cutters, and tape or glue
Students should be able to:
- Demonstrate basic computer literacy, including using a web browser, navigating an online application, and connecting a device via USB.
- Follow multi-step instructions and basic classroom technology safety procedures.
- Understand basic cause-and-effect relationships, which will support learning the Input → Process → Output model.
- Communicate ideas by asking questions, listening to others, and describing everyday problems or needs.
- Use basic logical and mathematical thinking, such as recognizing patterns and understanding simple sequences.
Today, we aren't just learning to code: We are going to start thinking like designers and engineers. We are going to learn how technology can be used to solve messy, human-centered problems.
But before I tell you about the process we are going to use, I want to hear how you would approach a problem.
Imagine that you have been asked to create something that will make another person's life easier or solve a problem they are experiencing. If you are designing something for another person, how would you know what that person actually needs? (Allow several students to respond.)
Now imagine that you already have a really cool idea for something you want to build. Should you start building your idea right away, or should you do something else first? Why? (Allow several students to respond. Listen for whether students mention asking the person questions, understanding the problem, learning about the person's experience, observing the situation, or trying different ideas.)
Now, think about your morning, from the moment you woke up until you arrived here. What is one small thing that frustrated you? Maybe your alarm was too quiet, you couldn't find something you needed, you missed your ride, or you forgot to water a plant. (Allow several students to respond.)
These might seem like small annoyances, but designers and engineers see them as problems and opportunities to make people's lives better.
In engineering and design, we are going to use an important mindset: ‘Fall in love with the problem, not the solution.’ What do you think that means? (Invite a few students to share their ideas.)
Before we start building something, we first need to understand the problem and the human experience behind it. We shouldn't assume that we know what another person needs just because we have a cool idea.
That's where design thinking comes in. Design thinking helps us understand people and their needs, explore different ideas, create solutions, test them, and improve them.
Later, you will use the micro:bit, a tiny but powerful programmable ‘brain’, and Python code to create technology that can address everyday challenges like the ones we just discussed.
But we're not starting with the hardware and code. We're starting with the person and the problem.
So, our big question is: How can we understand a person's everyday challenge and use design, technology, and code to create a solution that actually meets their needs?
Before we touch any hardware, let's practice thinking like designers.
Background
Micro:bit
The BBC micro:bit is a pocket-sized microcontroller, a small, programmable computer designed to interact with the physical world. Unlike a standard laptop, which is designed for general-purpose tasks such as web browsing or word processing, the micro:bit is designed to receive inputs, process information, and produce outputs through its hardware components. The micro:bit contains several built-in components that students can use in their designs. Inputs include buttons and sensing capabilities for motion, light, and temperature. The microprocessor executes the programmed instructions, while outputs include the 5 × 5 LED display, speaker, and radio communication. The LED display can be used to show images, text, and numbers.
The micro:bit supports both block-based and text-based programming. In this activity, students use Python to gain experience with text-based programming and concepts such as libraries (collections of pre-written code that provide useful functions), syntax (the rules for writing code correctly), and indentation (the spacing used to organize and group Python instructions). In engineering projects, the micro:bit can act as the “brain” of a prototype by following an Input → Process → Output pattern. For example, pressing a button can provide the input, the Python program processes the button press according to the programmed instructions, and the micro:bit produces an output, such as displaying a reminder on the LED grid. Understanding this relationship helps students connect a human need to a programmable engineering solution and consider how the micro:bit's inputs, processing capabilities, and outputs can be combined to address real-world problems.
Python Programming
The micro:bit can be programmed using block-based or text-based programming environments; this activity uses Python to introduce students to text-based programming. You do not need advanced Python knowledge but should understand several fundamental concepts. A library is a collection of pre-written code that provides useful functions; in this activity, from micro:bit import * gives the program access to micro:bit-specific functionality. Syntax refers to the rules for correctly writing instructions in a programming language, while indentation is particularly important in Python because it indicates which instructions are grouped together within structures such as loops.
You should also be familiar with the basic commands students encounter, including display.show() for displaying images or other information, display.scroll() for scrolling text or numbers across the LED display, display.clear() for clearing the display, and sleep() for pausing the program. Students also explore loops, which allow programmers to repeat instructions efficiently rather than writing the same code multiple times. A for loop, such as for i in range(3):, repeats a set of instructions a specified number of times, whereas while True: repeats instructions continuously until the program is stopped.
Pseudocode, Testing, and Iteration
Before writing Python code, students use pseudocode, a plain-language description of the sequence of actions a program should perform. Pseudocode allows students to concentrate on the logic of their solution before dealing with exact Python syntax. For example, a student might first describe a program as “when Button A is pressed, display a reminder, wait, and clear the display” and then translate those steps into Python. In this activity, students identify their required inputs, processing or decisions, outputs, and pseudocode before developing the actual program.
Finally, you should emphasize that engineering and programming are iterative processes. Programs and prototypes are not expected to work perfectly on the first attempt. Students follow a Code → Test → Observe → Debug → Modify → Test Again cycle as they develop their projects. Debugging is the process of identifying and correcting problems in a program, while iteration involves using observations, testing results, and user feedback to improve the overall solution. You can support this process by encouraging students to predict what their code will do, test one change at a time, compare expected and actual results, identify possible sources of errors, and revise their code or design based on what they learn. This reinforces the larger design thinking principle that testing, failure, feedback, and revision are expected—and valuable—parts of developing an effective engineering solution.
The Design Thinking Process
Design thinking is a human-centered approach to innovation and problem-solving used by engineers to address complex or “messy” challenges. Rather than immediately jumping to a technical solution, engineers seek to understand the problem and the people affected by it before generating possible solutions. In this activity, students begin with a short backpack design challenge and then identify problems from their own lives using a Challenge Wall. They interview users to better understand their experiences, needs, and frustrations and develop a user-centered problem statement before considering possible solutions.
Following the Teach Engineering Design Thinking Process framework, the process used in this session consists of six essential pillars that guide students from initial observation to a final, tested prototype:
- Formulating Problems: Engineers observe their environment and frame a problem within specific limits of time, resources, and materials. In this lesson, students use a "Challenge Wall" to identify specific frustrations in their daily lives.
- Seeking Solutions: This stage focuses on empathy. Engineers interview stakeholders to understand their needs, ensuring the final product actually solves a real human requirement.
- Thriving in Uncertainty: Design problems often have no single "right" answer. This phase encourages students to be creative and open-minded when brainstorming innovative solutions.
- Prototyping Ideas: Students create "rapid and rough" versions of their ideas. This includes initial sketches and early versions of Python code to visualize how the solution will function.
- Iterating Options: Engineering is an ongoing cycle. Students test their prototypes, gather feedback (using the "I like... I wonder..." format), and refine their code—such as using loops to make their program more efficient.
- Reflecting Frequently: At the end of the process, students pause to talk through their outcomes. This reflection helps them define what they learned from "bugs" or failures and how they would improve the design in the future.
An important principle for you to reinforce throughout the activity is to “fall in love with the problem, not the solution.” Students should resist settling on a solution before understanding their user's needs. Their interviews should therefore focus on what happens, when and why the problem occurs, who is affected, what the user currently does about it, and what a successful solution would help the user accomplish. This approach helps students recognize that engineering design is driven by people's needs rather than by the technology itself.
Before the Activity
- Prepare the coding environment.
- Ensure the micro:bit Python Editor is accessible on all student laptops or computers.
- Confirm that the computers can connect to the micro:bit boards and that the necessary USB cables are available.
- Create and test a sample micro:bit project.
- Create a simple program using the micro:bit Python Editor. (See Make It Code for examples.)
- Test the program using the simulator.
- Upload the program to a physical micro:bit board to confirm that the equipment and coding environment are working properly.
- Prepare to demonstrate the sample program to students so they can see an example of what a completed micro:bit program can do.
- Gather and organize activity materials.
- Prepare a micro:bit and USB cable for each student or student team.
- Gather sticky notes, pencils, markers, and other writing materials.
- Prepare the "Challenge Wall" using the categories of School, Home, Transportation, and Street.
- If students will create physical prototypes, gather optional crafting materials such as cardboard, construction paper, tape, scissors, and markers.
During the Activity
Part 1: Engage - Introduction and Design Sprint (50 minutes)
- Introduction and Framing (5 minutes)
- Open the session by challenging students to "fall in love with the problem, not the solution."
- Explain that design thinking is used to solve complex, "messy,” human-centered problems.
- Announce the challenge: "Your challenge is to improve your user's experience with their school bag/backpack. But you can't guess what they need. You have to ask."
- Empathize and Define (10 minutes)
- Put students into pairs.
- Assign Person A as the designer and Person B as the user. (Note: They will switch roles after the first interview.)
- The designer must interview the user about their school bag experience, asking about failures (broken zippers, weight) and wishes.
- Instruct designers to interview users about their experiences with their school bags or backpacks.
- Encourage students to ask about frustrations, failures, and wishes, such as broken zippers, heavy bags, difficulty finding items, or uncomfortable straps.
- Remind designers to listen carefully and avoid immediately proposing solutions.
- Develop a Problem Statement (5 minutes)
- Have each designer write a sticky note: "My user needs a way to __________ because__________."
- Remind students to focus on a need, experience, or feeling, rather than a specific product feature.
- Ideate and Prototype (15 minutes)
- Ask students to sketch 3–5 possible or “crazy” ideas for addressing their user's need.
- Have students select one idea.
- Instruct them to develop the selected idea into a more detailed prototype sketch showing how the solution would work.
- Gather Feedback (5 minutes):
- Have designers present their prototype sketches to their users.
- Ask users to provide feedback using:
- “I like…”
- “I wonder…”
- Encourage designers to listen to and record feedback without defending their designs. Designers present the sketch. Users provide feedback using "I like..." and "I wonder..."
- Wrap Up (10 minutes)
- Bring the class together and review the design thinking process using the classroom poster: Empathize → Define → Ideate → Prototype → Test → Iterate.
- Ask students to identify how they used each stage during the backpack challenge.
- Explain that students will use design thinking to develop projects that address challenges around them.
- Introduce the next activity by explaining that students will identify challenges in their communities and, beginning today and continuing in upcoming sessions, develop projects to address those challenges.
Part 2: Explore – The Challenge Wall and Technology Patterns (50 minutes)
- Build the Challenge Wall (10 minutes)
- Create four Challenge Wall categories: School, Home, Transportation, and Street.
- Conduct a silent brainstorm.
- Ask students to write specific frustrations or problems they experience or observe on individual sticky notes.
- Have students place each sticky note in the appropriate Challenge Wall category.
- Encourage students to describe problems rather than solutions. For example: “I always forget to water my plants.”
- See Everyday Technologies Sheet (PDF) for examples.
- Conduct a Gallery Walk (5 minutes)
- Have students walk around the Challenge Wall and silently read problems contributed by their classmates.
- Ask them to notice problems they have also experienced, problems they had not previously considered, and problems that technology might help address.
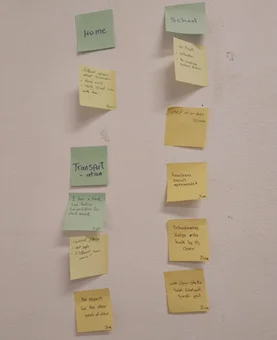 Sticky-note brainstorming activity organizing considerations into Home, Transportation, and School categories.Copyright Amany Ayman
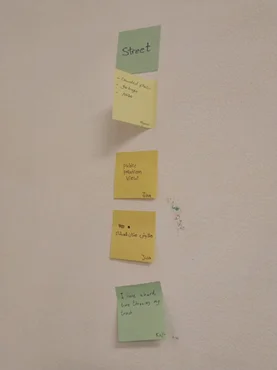 Sticky-note brainstorming activity documenting observations and considerations related to the “Street” category.Copyright Amany Ayman
- Introduce the Universal Technology Pattern (15 minutes)
- Draw students' attention to the number of challenges identified on the Challenge Wall.
- Explain that technology is often developed to address problems and make people's lives easier, safer, or more efficient. (See Everyday Technologies Sheet (PDF) for examples.)
- Discuss familiar technologies such as phones, air conditioners, and cars. Asking the following for each technology:
- What problem does this technology solve?
- What do we mean when we call a product ‘smart’?
- Does a smart product actually have a brain?
- Draw the following pattern on the board: Input → Process → Output
- Explain each component:
- Input: Information received by the device.
- Process: The device's “brain” follows programmed instructions and decides what to do.
- Output: The action or information produced by the device.
- Use familiar technologies to help students identify examples of inputs, processes, and outputs.
- Meet the Micro:bit (20 minutes)
- Distribute the micro:bit boards.
- Give students time to observe the boards and identify components they notice. Connect the micro:bit hardware to the Input → Process → Output pattern:
- Inputs: Buttons, motion, light, and temperature sensors.
- Process/Brain: The microprocessor executes the programmed instructions. (The microprocessor is programmed with Python.)
- Outputs: LED display, speaker, and radio communication.
- Introduce the micro:bit coding platform and explain that the micro:bit can be programmed using blocks or written Python code.
Part 3: Explain - Python Coding and Iteration (50 minutes)
- Set Up and Complete the First Upload (10 minutes)
- Explain that students will now begin programming their micro:bit.
- Before connecting the devices, review the official micro:bit electrical product guidance and safety rules with students.
- Guide students to the micro:bit Python Editor.
- Open micro:bit Python Editor.
- From the “Reference” menu, choose “display.”
- There will be commands display.show where they can choose a heart, a smile, or others.
- Have students choose their shape and then, drag it to the text code area.
- Have students create a simple program that displays a heart image. (See Image 3.)
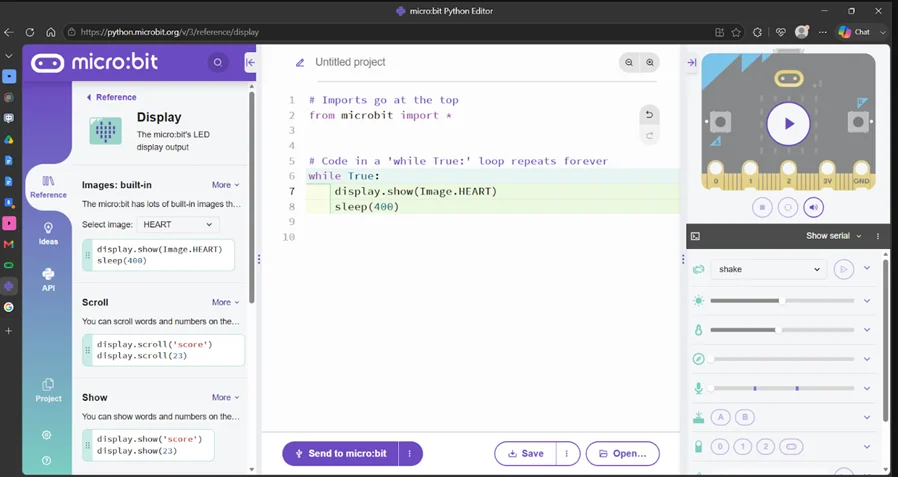 A micro:bit Python programming environment showing code that uses a repeating loop to display and clear a heart icon on the simulated micro:bit.Copyright Amany AymanA micro:bit displaying a heart pattern on its LED grid.Copyright Amany Ayman
- Ask students to run the program in the simulator and observe the output.
- Have students connect their micro:bit using USB and transfer the program to the physical boards.
- Ask students to compare the simulated output with the physical micro:bit output.
- Explore the Display (15 minutes)
- Explain important code elements, including the library/import statement, display.show(), and sleep().
- Challenge students to modify their programs to:
- Clear the display.
- Display a number.
- Display their name or initials.
- Display an image.
- Ask students to predict what their code will do before running it.
- Teacher reference: View this Code & Simulation Video.
- Written Code:
# Imports go at the top
from microbit import *
# Code in a while True: loop repeats forever:
while True:
display.clear()
display.scroll('My Name')
display.scroll('13')
- Introduce Iteration and Loops (25 minutes)
- Write pseudocode on the board for a repetitive program, such as displaying a happy face three times.
- Example:
Display a happy face
sleep
Clear
sleep
Display a happy face
sleep
Clear
Sleep
Display a happy face
sleep
Clear
Sleep
- Ask students to identify the repeated pattern.
- Explain that programmers can use loops to avoid writing the same instructions repeatedly.
- Introduce for i in range(3): as a way to repeat instructions a specified number of times.
- Introduce while True: as a way to repeat instructions continuously.
- Compare the two:
- A for loop repeats instructions a specified number of times.
- A while True loop repeats instructions indefinitely.
- Have students modify one of their previous programs to include a loop.
- Encourage students to test, identify errors, modify their code, and test again.
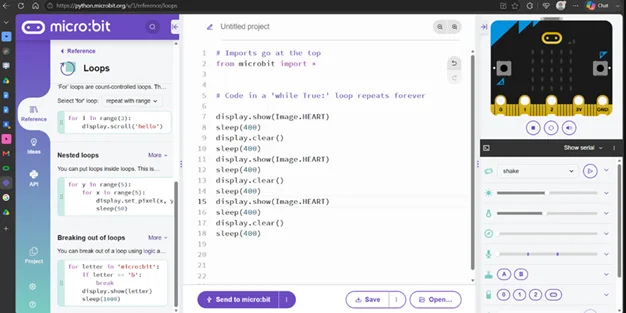 A micro:bit Python editor showing a while True loop programmed to repeatedly display a heart image.Copyright Amany Ayman
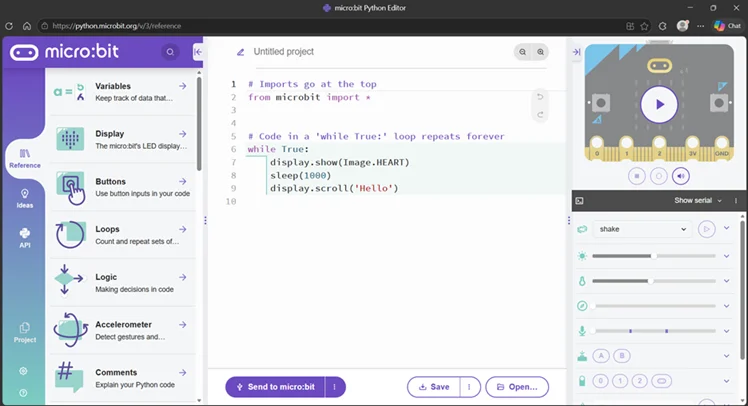 A micro:bit Python editor showing a while True loop programmed to display a heart, pause, and scroll the text “Hello.”Copyright Amany Ayman
Part 4: Elaborate - Building the Project (50 minutes)
- Select a Home Challenge (5 minutes)
- Return students' attention to the Challenge Wall.
- Have students review the problems in the Home category.
- Ask each student or team to select a Home challenge they are excited to address.
- Remind students to select a problem they want to understand, rather than simply choosing a problem for which they already have a solution.
- Interview the User (10 minutes)
- Have students identify and interview the classmate who originally wrote the selected sticky note.
- Ask students to learn more about:
- What happens.
- When the problem occurs.
- Why it is frustrating.
- Who is affected.
- What the user currently does about it.
- What a successful solution would help the user accomplish.
- Have students summarize the need using: “My user needs a way to __________ because __________.”
- Ideate, Plan, and Code (30 minutes)
- Have students generate at least three possible solutions to the challenge.
- Ask students to compare their ideas based on user needs, available micro:bit features, programming knowledge, available materials, time, and other limitations.
- Have students select one solution to develop.
- Distribute one Project Worksheet (PDF) to each student.
- Instruct students to complete their project worksheet by documenting:
- The challenge.
- The user's needs.
- At least three possible solutions.
- The selected solution.
- Why they selected it.
- Required inputs.
- Required processing or decisions.
- Required outputs.
- Pseudocode.
- Have students write a brief project description explaining how their solution addresses the user's challenge.
- Have students develop the Python code for their micro:bit solution.
- Encourage students to follow an iterative process: Code → Test → Observe → Debug → Modify → Test Again.
- Optional: Create a Physical Prototype
- Provide cardboard, markers, paper, tape, and other craft materials.
- Invite students to create a physical housing, plate, model, or interface demonstrating how the micro:bit could be incorporated into the final product.
Part 5: Evaluate - Presentation and Reflection (50 minutes)
- Finalize Projects (15 minutes)
- Have students review and refine their project descriptions.
- Give students time to complete their Python code.
- Ask students to test their micro:bit projects and troubleshoot any errors.
- Have students verify that the project's inputs, processing, and outputs function as intended.
- Encourage students to make final improvements based on testing.
- If students created physical prototypes, allow time to complete their housings or models.
- Present Projects (20 minutes)
- Have each student or team present their project and demonstrate the working micro:bit.
- Ask each presentation to address:
- What problem did you choose?
- Who is the user?
- What did you learn from interviewing the user?
- What solutions did you initially generate?
- Which solution did you select, and why?
- What are your project's inputs, process, and outputs?
- How does your Python code work?
- How does the micro:bit prototype address the user's need?
- What changes did you make during testing and iteration?
- Conduct a Reflection Discussion (15 minutes)
- Facilitate a whole-class discussion using questions such as:
- What would you edit or modify to make your project better?
- What did you discover during testing?
- What was the most difficult part of troubleshooting your code?
- How did interviewing the user change your original assumptions?
- Did the project address the original user's challenge?
- What does the original user think about the solution?
- What feedback could help improve the next version?
- What impact did design thinking have on solving a user-centered problem?
- Return to the opening statement: “Fall in love with the problem, not the solution.”
- Ask students to explain what the statement means after completing the design and programming experience.
- microcontroller
- A small computer on a single integrated circuit; the "brain" of your project.
- iteration (loop)
- The repetition of a process or a set of instructions in computer programming.
- syntax
- The set of rules that defines the combinations of symbols that are considered to be a correctly structured program in a language like Python.
- indentation
- The spaces at the beginning of a code line that define the "scope" or grouping of instructions in Python.
- python
- A high-level, text-based programming language known for its clear syntax and readability, making it ideal for engineering and data science.
- pseudocode
- A plain-language description of the steps in an algorithm or another system, used as a planning tool before writing actual code.
- design thinking
- A human-centered, iterative process used by engineers to understand users, challenge assumptions, redefine problems, and create innovative solutions.
Pre Assessment
Design Thinking and Technology Discussion: Before beginning the activities, assess students’ prior knowledge of problem solving, technology, and programming through a brief whole-class discussion. Ask students questions such as:
- When you experience a problem in your everyday life, how do you usually try to solve it?
- If you are designing something for another person, how can you find out what that person actually needs?
- What is an example of a technology you use every day? What problem does it solve?
Use student responses to identify their existing understanding of user needs, problem solving, technological systems, and programming. Do not correct every response at this stage; revisit students’ initial ideas as the lesson progresses.
Activity Embedded (Formative) Assessment
Design Thinking Check: During the backpack design sprint, circulate among student pairs and listen to their interviews. Check that designers are asking questions to understand the user rather than immediately proposing solutions. Review students’ problem statements to determine whether they identify a user need rather than a specific feature or solution. During testing, listen for constructive feedback using “I like…” and “I wonder…”
Python Programming Check: As students complete the introductory coding challenges, circulate and observe their programs. Ask individual students to predict what their code will do before running it and explain the purpose of selected lines of code. Check that students can modify the display, execute instructions in sequence, and transfer a program to the physical micro.
Project Planning Check: Review each student or team’s project worksheet before they move deeply into coding. Check that students have:
- Identified the challenge.
- Described the user’s need.
- Generated at least three possible solutions.
- Selected and justified one solution.
- Identified the required inputs, processing/decisions, and outputs.
- Developed pseudocode for the solution.
Use brief teacher conferences to ask students how evidence from their user interview influenced their selected solution.
Summative Assessment
Final Project and Presentation: Assess students based on their completed micro:bit project, project documentation, and presentation. Students should demonstrate both the engineering design process they followed and the functionality of their final solution. Use the Project Rubric (PDF) for assessment.
Reflection Discussion: Conclude the assessment with a whole-class reflection. Ask students to consider what they would change to improve their projects, what they learned through testing, how interviewing the user affected their assumptions, and whether the final solution addressed the original user’s challenge. Ask students to explain how design thinking influenced their approach to solving a user-centered problem.
- Before students begin working with the micro:bit, review the official Micro:bit Safety Rules with the class.
- Indentation Error: Remind students that Python uses indentation to identify instructions that belong inside a loop. Students should use consistent indentation (typically four spaces) for code inside a loop.
- Connectivity: If the code will not upload to the micro:bit, check that the USB cable is fully connected. If the problem continues, try another USB cable and make sure it supports data transfer and not just power.
- Library Error: Check that the program includes from microbit import * at the beginning when students are using the MicroPython APIs taught in this activity.
- Code Does Not Run as Expected: Ask students to read any error messages and check spelling, capitalization, parentheses, colons, and indentation.
- Nothing Appears on the Display: Check the display.show() or display.scroll() commands. Have students test a simple display command before returning to their larger program.
- Loop Does Not Work: Check that the instructions intended to repeat are correctly indented beneath the for or while statement.
- Program Runs Too Quickly: Add sleep() between outputs so students have enough time to observe what is happening.
- Input Does Not Produce the Expected Output: Test the input and output separately before combining them. Encourage students to use the process Predict → Test → Observe → Debug → Modify → Test Again.
- Have lower grades or students struggling with syntax use the built-in Reference Library in the Python Editor for copy-paste examples.
- Have older/advanced students create custom images using the Image() class using micro:bit display or use the A and B buttons in micro:bit as a trigger for their loops.
Contributors
Amany Ayman: Technical Learning Design Officer in San3a Tech; Lamiaa Nail: Education Manager in San3a Tech; Micro:bit Education Community
Supporting Program
San3a Academy
Acknowledgements
This instructional guide and activity were developed in San3a Academy. San3a Academy is a maker-centered learning hub under the umbrella of San3a Tech, the parent organization of Fab Lab Egypt. It designs and delivers hands-on educational experiences and flagship programs in STEM, digital fabrication, and technology for young learners, professionals, and educators, empowering them to learn through making, build real-world skills, and engage with technology as creators.
Copyright
2026 by Regents of the University of Colorado; original © 2025 San3a Academy