
Using Microcontrollers to Model Homeostasis
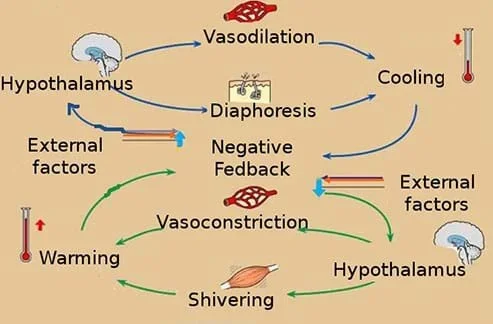 The body completes a series of “opposite” actions, such as shivering to warm up and sweating to cool down. This negative feedback “corrects” unstable states.Copyright 2012 ChancroVet, Wikimedia Commons {PD} https://commons.wikimedia.org/wiki/File:Temperature_Regulation.jpg
Students learn about homeostasis and create models by constructing simple feedback systems using Arduino boards, temperature sensors, LEDs and Arduino code. Starting with pre-written code, students instruct LEDs to activate in response to the sensor detecting a certain temperature range. They determine appropriate temperature ranges and alter the code accordingly. When the temperature range is exceeded, a fan is engaged in order to achieve a cooling effect. In this way, the principle of homeostasis is demonstrated. To conclude, students write summary paragraphs relating their models to biological homeostasis.
It is critical that biomedical engineers, doctors and pharmacists understand the mechanisms through which the human body controls its processes. Being too hot or too cold (or too hydrated/too dehydrated) can result in severe health consequences. Through the use of the Arduino system in this activity, students learn that modeling is a fundamental way to understand biological systems as well as a tool often used by engineers.
After this activity, students should be able to:
- Define homeostasis.
- Give an example of homeostasis within the body.
- Relate the microcontroller experiment to homeostasis.
- CCSS.ELA-Literacy.RST.6-8.3 Follow precisely a multistep procedure when carrying out experiments, taking measurements, or performing technical tasks.
Grades 6-8
Do you agree with this alignment?
- Students will develop an understanding of the relationships among technologies and the connections between technology and other fields of study.
Grades K-12
Do you agree with this alignment? - STEL-2N Illustrate how systems thinking involves considering relationships between every part, as well as how the system interacts with the environment in which it is used.
Grades 6-8
Do you agree with this alignment?
- HS-LS1-3 Plan and conduct an investigation to provide evidence that feedback mechanisms maintain homeostasis
Grades 9-12
Do you agree with this alignment? - MS-LS1-3 Construct an explanation supported by evidence for how the body is composed of interacting systems consisting of cells, tissues, and organs working together to maintain homeostasis.
Grades 6-8
Do you agree with this alignment?
- HS-LS1-3 Plan and conduct an investigation to provide evidence that feedback mechanisms maintain homeostasis.
Grades 9-12
This resource focuses on the following Three Dimensional Learning aspects of NGSS:
Science & Engineering Practices- Plan and conduct an investigation individually and collaboratively to produce data to serve as the basis for evidence, and in the design: decide on types, how much, and accuracy of data needed to produce reliable measurements and consider limitations on the precision of the data (e.g., number of trials, cost, risk, time), and refine the design accordingly.Do you agree with this alignment?
- Scientific inquiry is characterized by a common set of values that include: logical thinking, precision, open-mindedness, objectivity, skepticism, replicability of results, and honest and ethical reporting of findings.Do you agree with this alignment?
Disciplinary Core Ideas- Feedback mechanisms maintain a living system's internal conditions within certain limits and mediate behaviors, allowing it to remain alive and functional even as external conditions change within some range. Feedback mechanisms can encourage (through positive feedback) or discourage (negative feedback) what is going on inside the living system.Do you agree with this alignment?
Crosscutting Concepts- Feedback (negative or positive) can stabilize or destabilize a system.Do you agree with this alignment?
Do you agree with this alignment? - Plan and conduct an investigation individually and collaboratively to produce data to serve as the basis for evidence, and in the design: decide on types, how much, and accuracy of data needed to produce reliable measurements and consider limitations on the precision of the data (e.g., number of trials, cost, risk, time), and refine the design accordingly.
See the Buying Guide (PDF) for more details on what and where to buy materials for this activity.
Each group needs:
- ArduinoTM Uno Development Board or equivalent
- breadboard
- computer with Arduino IDE software loaded; download the Arduino software from https://www.arduino.cc/en/Main/Software
- USB cable, for powering Arduino/uploading code
- 10 wires to connect components, such as 6- or 7-inch jumper wires for Arduino boards
- 3 LEDs
- TMP36 temperature sensor
- 3 220 ohm (Ω) resistors; alternatively, use 330 ohm resistors
- 1-megaohm (MΩ) resistor
- IRF510 n-channel MOSFET (metal-oxide-semiconductor field-effect transistor)
- 12V computer cooling fan
- 12V AC adapter, to power the fan
- Circuit Building Instructions Sheet (PDF), one per student
- science notebook, journal or paper, and pen or pencil, for each student
- Buying Guide (docx)
- Buying Guide (pdf)
- Pre-Activity Preparation Process Sheet (docx)
- Pre-Activity Preparation Process Sheet (pdf)
- Circuit Building Instructions Sheet (docx)
- Circuit Building Instructions Sheet (pdf)
- Code Instruction Sheet (LoveMeterCode.ino) (ino)
- Code Instruction Sheet (LoveMeterCode.pdf) (pdf)
A basic understanding of human body organ systems and their functions. Ability to build circuits from circuit diagrams.
What happens to your body when it is really hot outside? How do you feel? How does your body react? Our bodies are incredible, but also very sensitive. Like Goldilocks in the Goldilocks and the Three Bears story, everything has to be “just right.” If we get too hot or too cold, our bodies don’t work correctly. If we are dehydrated or overly hydrated, we can get sick. Luckily, our bodies know how to keep everything in balance. We call this balance, “homeostasis” (Wikipedia, 2016). To stay healthy, it is critical that we maintain homeostasis. This is why we shiver when it’s cold; moving around generates heat in our bodies. When we eat a lot of sugar, the pancreas releases insulin to help store the sugar. This physical response to bodily disturbances is known as “feedback.” Today we are going to model the concept of homeostasis by creating a feedback system with an Arduino board.
Engineers often model living systems in order to better understand how they work. The principles that govern biological systems can even be applied to engineering designs. This practice, known as “biomimetics” (also called biomimicry), has resulted in the creation of technologies like Velcro®, tire tread and even nanoscale surface features that imitate the hydrodynamic skin of sharks (Wikipedia, 2016).
The system that we construct today will resemble a biological system used to maintain thermal homeostasis. Much like the panting of a dog, our fan will provide convective cooling to the temperature sensor once a specified temperature range has been exceeded.
Background
In this activity, students follow the Circuit Building Instructions Sheet (PDF) to complete the feedback system for modeling homeostasis. The system consists of a temperature sensor, three LEDs and a computer fan. Once the circuit has been built (according to the instruction sheet), students upload a pre-written Arduino “sketch” to the circuit board. (Programs written using Arduino software [IDE] are called sketches. These sketches are written in the text editor and are saved with the file extension, ino.)
The “sketch,” or code, controls the LEDs and computer fan using temperature inputs from the temperature sensor. A baseline temperature is set, below which the fan and all LEDs remain off. Students adjust the baseline temperature, along with the temperature ranges for each LED, and the activation temperature for the computer fan [see the Code Instruction Sheet (LoveMeterCode.pdf) (PDF) with highlighted sections].
Using their hands, students heat the temperature sensor, causing the LEDs to light up in sequence before the fan is activated. As students remove their hands from the sensors, the fan cools the temperature sensor, causing the LEDs and fan to switch back off.
Once students have refined the code and tested their feedback systems several times, they are asked to each write an essay that addresses how the feedback circuit relates to the physical property of homeostasis. Students can also brainstorm ways that the system could be improved to better model biological homeostasis experienced by the human body.
Before the Activity
- Gather materials and make copies of the Circuit Building Instructions Sheet (PDF), one per student.
- Review and complete the steps outlined on the Pre-Activity Preparation Process Sheet (PDF). As part of this process, install Arduino IDE software on all the computers, and make accessible for student groups the code file, Code Instruction Sheet (LoveMeterCode.ino) (INO).
- Turn on the computers and make sure the Arduino IDE programs are open.
With the Students
- Divide the class into groups of three students each.
- Hand out copies of the instructions sheet.
- Explain that teams are to independently construct the circuits following the steps on the instruction sheet and then bring them to the teacher for review/approval before proceeding. (See Figure 1.)
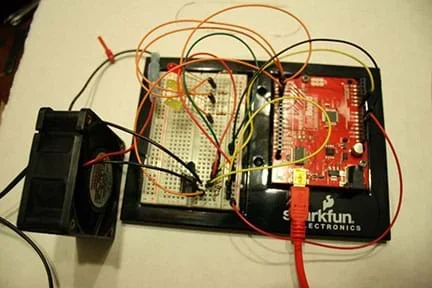 Figure 1. Completed homeostasis circuit.Copyright 2016 Aaron Lamplugh, ITL Program, College of Engineering and Applied Science, University of Colorado Boulder
- With teacher approval, students proceed to connect the Arduino to the IDE to import the code.
- Have students test the effects of applying heat by covering the sensor with their fingers, and observe as the LEDs light up in sequence.
- Instruct students to edit the code to modify the temperature range; then observe the effect on the Arduino. [Refer to the Code Instruction Sheet (LoveMeterCode.pdf) (PDF) with temperature range code highlighted.]
- Conclude by assigning students to write one-paragraph summaries that relate the microcontroller demonstration to homeostasis.
- biomimetics
- The inspiration from and imitation of concepts and principles from nature to create new materials, devices and systems. Also called biomimicry. (Source: Wikipedia)
- feedback
- Output from a system that is routed back as input to the system. For example, a process for regulating the body and maintaining homeostasis by responding to a disturbance.
- homeostasis
- Maintaining an internal balance or steady state; equilibrium or regulation of bodily systems. (Source: Wikipedia)
Pre-Activity Assessment
Lists: Before starting the activity, in pairs or as an entire group:
- Have students make a list of at least three things needed to be controlled in the human body to maintain homeostasis. (Possible answers: Hydration, blood sugar, blood pH, CO2 levels.)
- Ask students what types of devices engineers have created to help regulate biological functions. (Possible answers: Insulin pumps, medical respirators, heaters/coolers, etc.)
Activity Embedded Assessment
Check-In: Circulate from group to group, checking on circuit construction and code alterations.
Post-Activity Assessment
Written Summary: Assign students to individually write one-paragraph summaries (or longer essays, if you like) in their science notebooks/journals explaining the analogy between maintaining homeostasis and the function of the temperature sensor in the circuit system (the model). To earn bonus points, have students suggest ways that the system could be improved to better model biological homeostasis experienced by the human body.
Some risk is always present when working with electricity; remind students to be careful and closely follow instructions.
Most of the electrical components used in this activity are inexpensive and relatively easy to break. If difficulties arise, first check the code and wiring. If this does not solve the problem, attempt to replace malfunctioning components with new components.
After installing the IDE software, be sure to restart the computer to avoid any uploading issues.
- For lower grades, pre-build the circuits and give students time to experiment with them to observe how a feedback system functions. Ask them to explain how this electrical system might be related to biological systems that maintain homeostasis.
- For higher grades, have students generate their own Arduino code to run the system; this approach may require substantially more time, depending on students’ coding experience.
Biomimetics. Wikipedia, The Free Encyclopedia. (2016) https://en.wikipedia.org/wiki/Biomimetics
Homeostasis. Wikipedia, The Free Encyclopedia. (2016) https://en.wikipedia.org/wiki/Homeostasis
Contributors
Daniella DiLacqua; HauYu Chu; Aaron Lamplugh
Supporting Program
SMARTER RET Program, School of Engineering, Polytechnic Institute of New York University
Acknowledgements
This activity was developed by the Science and Mechatronics Aided Research for Teachers with an Entrepreneurial ExpeRience (SMARTER): A Research Experience for Teachers (RET) Program in the School of Engineering funded by National Science Foundation RET grant no. 1132482. However, these contents do not necessarily represent the policies of the NSF, and you should not assume endorsement by the federal government.
Copyright
2016 by Regents of the University of Colorado; original © 2015 Polytechnic Institute of New York University