
Clean the Dirty Water: Introduction to Chemical and Environmental Engineering
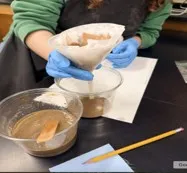 Students design water filtration system.Copyright Nichole DePaul
Students take on the roles of chemical and environmental engineers to design, build, and test a simple water filtration system. Working in pairs, students examine a “dirty water” sample containing soil, sand, gravel, vegetable oil, and water, recording observations and measuring its pH. Following the engineering design process, they select three filtration materials, plan their arrangement, and construct a layered filter using a funnel apparatus. Students test their designs and evaluate the filtered water by comparing its clarity and pH with the original sample and measuring the volume recovered. Finally, they analyze their results, identify ways to improve their filtration systems, and connect their work to how engineers address real-world water quality challenges.
Environmental and chemical engineers play important roles in protecting and improving water quality. Environmental engineers design systems that remove pollutants from water to protect people and ecosystems, while chemical engineers study materials and processes to enhance the efficiency and sustainability of water treatment. Both types of engineers apply their knowledge of filtration, materials, and chemistry to develop technologies that separate contaminants from water, improve water quality, reduce pollution, and help provide cleaner water for communities.
After this activity, students should be able to:
- Design and build a prototype water filtration system using simple materials, demonstrating how engineers test and improve systems.
- Explain how each material in their design functions (e.g., gravel for large debris, sand for fine particles, charcoal for odor/chemicals).
- Connect the classroom activity to real-world water treatment systems, recognizing the role of chemical engineers in providing clean, safe water globally.
- Evaluate their filter design by observing results and suggesting modifications while reflecting the iterative nature of engineering.
- STEL-7AA Illustrate principles, elements, and factors of design.
Grades 9-12
Do you agree with this alignment? - STEL-7CC Apply a broad range of design skills to their design process.
Grades 9-12
Do you agree with this alignment? - STEL-7Y Optimize a design by addressing desired qualities within criteria and constraints.
Grades 9-12
Do you agree with this alignment?
- HS-ESS3-4 Evaluate or refine a technological solution that reduces impacts of human activities on natural systems.
Grades 9-12
This resource focuses on the following Three Dimensional Learning aspects of NGSS:
Science & Engineering Practices- Design or refine a solution to a complex real-world problem, based on scientific knowledge, student-generated sources of evidence, prioritized criteria, and tradeoff considerations.Do you agree with this alignment?
Disciplinary Core Ideas- Scientists and engineers can make major contributions by developing technologies that produce less pollution and waste and that preclude ecosystem degradation.Do you agree with this alignment?
- When evaluating solutions it is important to take into account a range of constraints including cost, safety, reliability and aesthetics and to consider social, cultural and environmental impacts.Do you agree with this alignment?
Crosscutting Concepts- Engineers continuously modify these technological systems by applying scientific knowledge and engineering design practices to increase benefits while decreasing costs and risks.Do you agree with this alignment?
- Feedback (negative or positive) can stabilize or destabilize a system.Do you agree with this alignment?
Do you agree with this alignment? - Design or refine a solution to a complex real-world problem, based on scientific knowledge, student-generated sources of evidence, prioritized criteria, and tradeoff considerations.
- HS-ETS1-2 Design a solution to a complex real-world problem by breaking it down into smaller, more manageable problems that can be solved through engineering.
Grades 9-12
This resource focuses on the following Three Dimensional Learning aspects of NGSS:
Science & Engineering Practices- Design a solution to a complex real-world problem, based on scientific knowledge, student-generated sources of evidence, prioritized criteria, and tradeoff considerations.Do you agree with this alignment?
Disciplinary Core Ideas- Criteria may need to be broken down into simpler ones that can be approached systematically, and decisions about the priority of certain criteria over others (trade-offs) may be needed.Do you agree with this alignment?
Do you agree with this alignment? - Design a solution to a complex real-world problem, based on scientific knowledge, student-generated sources of evidence, prioritized criteria, and tradeoff considerations.
- HS-ETS1-3 Evaluate a solution to a complex real-world problem based on prioritized criteria and trade-offs that account for a range of constraints, including cost, safety, reliability, and aesthetics, as well as possible social, cultural, and environmental impacts.
Grades 9-12
This resource focuses on the following Three Dimensional Learning aspects of NGSS:
Science & Engineering Practices- Evaluate a solution to a complex real-world problem, based on scientific knowledge, student-generated sources of evidence, prioritized criteria, and tradeoff considerations.Do you agree with this alignment?
Disciplinary Core Ideas- When evaluating solutions it is important to take into account a range of constraints including cost, safety, reliability and aesthetics and to consider social, cultural and environmental impacts.Do you agree with this alignment?
Crosscutting Concepts- New technologies can have deep impacts on society and the environment, including some that were not anticipated. Analysis of costs and benefits is a critical aspect of decisions about technology.Do you agree with this alignment?
Do you agree with this alignment? - Evaluate a solution to a complex real-world problem, based on scientific knowledge, student-generated sources of evidence, prioritized criteria, and tradeoff considerations.
Each group needs:
- 1 large plastic funnel
- 2 250 mL beakers (one for the dirty water sample and one for collecting filtered water)
- 1 50 mL graduated cylinder
- pH paper
- 1 ring stand with ring clamp (lab stand and ring stand)
- 1 large craft stick (large popsicle stick)
- 1 pair safety goggles per student
- 1 pair nitrile lab gloves per student
- 1 lab apron per student
- 1 prepared dirty-water sample (see Before the Activity)
- Clean the Dirty Water Worksheet (PDF) (1 per student)
- 1 large bin containing the following filtration materials; students select three materials for their filtration system:
- 1 small (4–6 cup) coffee filter
- 2 11 × 11 cm pieces cotton fabric
- 5 small cotton balls
- 2, 11 × 11 cm pieces paper towel
- 2, 11 × 11 cm pieces felt
- 2, 10 × 10 cm pieces gauze
- 1/8 cup baking soda, in a small bag
- 1/8 cup grass clippings, in a small bag
- 1/8 cup sawdust, in a small bag
For the entire class to share:
For preparing the dirty water mixture:
- potting soil
- play sand
- pea gravel
- vegetable oil
- tap water
- measuring cups and spoons
- 1 large bucket
- plastic wrap, as needed to cover prepared dirty water samples
For cleanup:
- 1 large bucket, labeled “Liquid Waste”
- paper towels
- dish soap
- Clean the Dirty Water Presentation (pptx)
- Clean the Dirty Water Presentation (pdf)
- Clean the Dirty Water Worksheet (docx)
- Clean the Dirty Water Worksheet (pdf)
- Clean the Dirty Water Worksheet Answer Key (docx)
- Clean the Dirty Water Worksheet Answer Key (pdf)
- Clean the Dirty Water Teacher Rubric (docx)
- Clean the Dirty Water Teacher Rubric (pdf)
- CER Worksheet (docx)
- CER Worksheet (pdf)
- CER Worksheet Answer Key (docx)
- CER Worksheet Answer Key (pdf)
- CER Teacher Rubric (docx)
- CER Teacher Rubric (pdf)
Students should have a basic understanding of:
- The difference between pure substances and mixtures.
- Physical and chemical properties of substances.
- Methods for separating mixtures based on particle size and other physical properties.
- The differences among solutes, solvents, and solutions.
Good morning, engineers! Today, you are going to take on the roles of environmental and chemical engineers to tackle an important real-world challenge: improving water quality.
Imagine that your local city has discovered that a nearby water source contains unwanted materials, including soil, sand, gravel, and oil. Before water from a source like this could be used by a community, these contaminants would need to be removed through water treatment processes. Your challenge today is to design and test a filtration system that improves the quality of this dirty water.
Before we start designing, think about the word filtration. Where have you seen filters being used in everyday life?
(Pause for student responses. Students may mention water filters, coffee filters, air filters, swimming pool filters, or fish tank filters.)
Filters work by separating certain materials from others. Environmental and chemical engineers use their knowledge of materials, chemistry, and separation processes to develop technologies that improve water quality and reduce pollution.
Now think about water in your own environment. Have you ever seen muddy or oily water in a puddle, stream, lake, or other water source? What kinds of things can make water dirty or polluted? (Invite students to share ideas. Record responses on the board. Possible responses include soil, sand, garbage, oil, chemicals, and human or animal waste.)
How might these contaminants affect people, animals, plants, or ecosystems? And how could engineers remove some of them from the water? (Allow students to share ideas and add key responses to the board.)
These are the kinds of questions engineers consider when developing water treatment technologies. Today, you and your partner will have several simple materials available to you, but you can select only three for your filtration system. You will need to think carefully about the properties of those materials. What might each material remove? How might particle size affect what gets trapped? Does the order of the materials matter?
Your goal is to design a filtration system that produces approximately 10 mL of filtered water while improving its clarity and reducing visible contaminants. You will also compare the pH of the water before and after filtration.
As you work, remember that engineers don’t simply build something and assume it works. They collect evidence, evaluate the results, and decide how a design could be improved. After testing your filter, you will use your observations and measurements to determine what worked, what didn’t, and what you would change in a future design. (Remind students that even if their filtered water looks much cleaner at the end of the activity, they must not taste or drink it. Explain that clear-looking water is not necessarily safe drinking water and that the tests conducted in this activity cannot determine whether water is safe to consume.)
Before we begin designing and building, take a few minutes with your partner to come up with your own investigating questions. Ask questions an engineer might ask—questions to help you understand the why and how behind water filtration. (Give students a few minutes to come up with questions. Have students share their questions.)
Those are the kinds of questions engineers ask as they investigate a problem. Here are a few other questions we might consider:
- What properties of a material make it a good filter?
- How do particle size and material structure affect filtration efficiency?
- How can we design a system that balances cost, effectiveness, and environmental impact?
- How do natural processes like soil or plant filtration inspire our designs?
- What happens to the filtered waste—where does it go?
- How can we test whether the water is clean?
Keep these questions in mind as you design and test your filtration system. So, here is your engineering challenge: How can you use three simple materials to design an effective water filtration system?
Let’s find out!
Background
Water Quality and Contaminants
Water can contain many types of contaminants, including suspended soil and sediment, oils, dissolved substances, microorganisms, chemicals, and waste. Some contaminants are visible, while others cannot be detected simply by looking at the water. Water that appears clear is therefore not necessarily safe to drink. In this activity, students work with a “dirty water” mixture containing soil, sand, pea gravel, vegetable oil, and water. These materials allow students to investigate how filtration can separate some components of a mixture and improve visible water quality.
Mixtures and Separation
A mixture contains two or more substances that are physically combined. Components of a mixture can sometimes be separated by taking advantage of differences in their physical properties, such as particle size, density, solubility, and absorbency. Engineers use a variety of separation techniques depending on the substances involved and their properties.
Filtration is a separation process that uses a barrier, such as filter paper, cloth, sand, or other porous materials, to allow a liquid to pass through while trapping some solid particles. In a typical gravity-filtration system, filter material is placed inside a funnel positioned over a collection container. The mixture is poured slowly into the funnel, and gravity pulls the liquid through the filter. Solid particles that are too large to pass through the openings in the filter become trapped as residue, while the liquid that passes through and is collected is called the filtrate. After filtration, the trapped residue is appropriately discarded and the equipment is cleaned.
Filtration is used in many settings, from laboratory procedures that separate solids from liquids to household filters and large-scale environmental and water treatment systems. However, filtration does not necessarily remove all contaminants. Dissolved substances, microorganisms, very small particles, and some chemicals may remain in water even after it appears clear.
Filtration Materials and Design
The effectiveness of a filtration material depends on its properties. Materials with relatively large openings may trap larger particles while allowing smaller particles to pass through. Materials with smaller spaces between fibers or particles may capture finer suspended material but can also slow water flow or become clogged. Absorbent materials may retain some liquid, reducing the amount of water recovered.
The arrangement of filtration layers can also influence system performance. Students should recognize that there is not necessarily one “correct” combination or arrangement of materials. Instead, they select materials based on their predicted functions and use observations and measurements to evaluate the strengths and limitations of their designs.
pH and Water Quality
pH indicates how acidic or basic a solution is. A pH of 7 is neutral, values below 7 are acidic, and values above 7 are basic. In this activity, students measure the pH of their dirty water before filtration and compare it with the pH after filtration.
You should emphasize that pH is only one indicator of water quality. A pH near 7 does not mean that water is safe to drink. Similarly, improved clarity does not indicate that dissolved chemicals, microorganisms, or other potentially harmful contaminants have been removed. The filtered water produced during this activity should never be consumed.
Real-World Water Treatment
Real-world drinking water treatment is considerably more complex than the classroom filtration system used in this activity. Water treatment facilities typically use multiple processes to address different types of contaminants. Depending on the treatment system, these may include screening, coagulation and flocculation, sedimentation, filtration, and disinfection. The classroom filtration system serves as a simplified model that allows students to investigate some of the principles involved in separating contaminants from water.
Before the Activity
- Gather equipment and materials.
- Make copies of the Clean the Dirty Water Worksheet (PDF) (1 per student).
- Prepare the filtration materials.
- Cut and measure materials to the quantities and dimensions specified in the Materials List.
- Place the available filtration materials in a large equipment bin, one bin per pair.
- Prepare a container labeled “Liquid Waste” for collecting the used dirty and filtered water.
One Day Before the Activity: Prepare the Soil/Sand/Gravel Mixture
- In a large bucket, thoroughly mix the following:
- 1 small bag potting soil
- 1 small bag play sand
- 1 small bag pea gravel
- Cover the bucket with plastic wrap or a lid and store it until the activity.
Morning of the Activity—Prepare the Dirty-Water Samples
- Prepare one dirty-water sample per pair. For each sample:
- Place 1/4 cup of the prepared soil/sand/pea gravel mixture into a 250 mL beaker.
- Add 1 cup (approximately 240 mL) tap water.
- Add 1 tablespoon vegetable oil.
- Mix thoroughly with a spoon.
- Cover the beaker with plastic wrap until the activity begins.
During the Activity
Phase 1: Introduction and Ask (10 Minutes)
- Divide the class into pairs.
- Distribute one Clean the Dirty Water Worksheet (PDF) to each student.
- Project the Clean the Dirty Water Presentation (PPTX).
- Introduce the problem (Slide 2): Explain that access to clean water is an important challenge in communities around the world and that engineers develop technologies and processes to improve water quality.
- Have students work through the Introduction Activity in their worksheet.
- Ask students to identify items or substances that might make water appear dirty.
- Have students brainstorm ways they might remove each identified item or substance.
- Ask students to define what they think dirty means when describing water.
- Ask students how the challenge of cleaning dirty water connects to the work engineers do to solve real-world problems.
- Have students share and discuss their responses with the class. Record key responses on the board.
- Introduce the challenge questions (Slide 3):
- How can we clean dirty water using simple, everyday materials to make it safe to drink?
- How do we test the clean water to determine whether it is safe to drink?
- Explicitly define the design challenge (Slide 4): You are a team of chemical and environmental engineers. Your mission is to design a filtration system to clean dirty water from a local water source in your city using inexpensive materials. The goal is to obtain approximately 10 mL of clean water.
- Define what “clean” means for this investigation. Explain that students will evaluate their filtered water using two criteria:
- Clarity: Visual reduction of suspended particles and oil droplets.
- pH neutrality: How close the filtered water’s pH is to a neutral pH of 7 compared with the original dirty water sample.
- Conduct Qualitative and Quantitative Observations (Slide 5):
- Distribute a sample of the prepared dirty water mixture containing soil, sand, pea gravel, vegetable oil, and water to each pair.
- Have students use their senses, except taste, to make qualitative observations of the sample's sight, sound, smell, and touch characteristics.
- Have them record their observations in Phase 1 of their Clean the Dirty Water Worksheet (PDF).
- Have them test their sample with pH paper.
- Have students record the color of the pH paper and corresponding pH value in Phase 1 of their Clean the Dirty Water Worksheet (PDF).
- Remind students that a pH of 7 is neutral, values below 7 are acidic, and values above 7 are basic.
Phase 2: Imagine and Plan (15 Minutes)
- Introduce the available filtration materials (Slide 6). (See list in Phase 2 of the worksheet.)
- Review the design constraints and criteria:
- Each pair must select three different filtration materials.
- Each selected material will form one layer in the filtration system.
- The filtration materials will be placed in a large plastic funnel.
- The goal is to produce approximately 10 mL of filtered water that meets the activity's criteria for clarity and pH.
- Give pairs 10 minutes to discuss their options, choose their materials, and draw their design in the Phase 2 section of their worksheet (Slide 6).
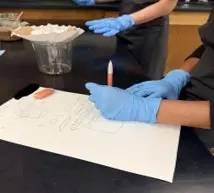 Students planning their water filtration system design before testing it.Copyright Nichole DePaul
- Circulate among the groups as they plan their systems. Ask questions such as:
- What property of each material makes you think it will help filter the dirty water?
- Which contaminants or particles do you think each layer might remove?
- Vegetable oil is less dense than water and tends to float. How might that affect the way you pour the dirty water into your filtration system?
- Which of your selected materials do you predict will be most effective at trapping or absorbing the oil droplets? Why?
- Why did you arrange your materials in this particular order?
- How might the size of the openings or spaces in each material affect what passes through the filter?
- If your filtered water looks clear but still contains visible oil or appears greasy, what might you change about your materials or layer arrangement in your next design?
 Students planning their water filtration system design before testing it.Copyright Nichole DePaul
Phase 3: Create (10 Minutes)
- Display Image 3, showing the standardized filtration apparatus.
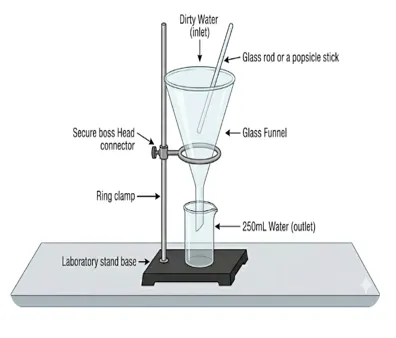 Standardized Apparatus SetupCopyright Nichole DePaul
- Explain that all groups will use the same basic setup for safety and consistency; however, each group's filtration materials and layer arrangement will be based on the design they developed in Phase 2.
- Assist students in the construction of their standardized filtration apparatus:
- Secure the ring stand to the lab bench.
- Attach the ring clamp approximately 6–8 inches above the base.
- Place the filtration housing (funnel) into the ring.
- Position a clean collection beaker directly beneath the filter outlet.
- Have each group create their filtration system with their selected materials based on their design by layering them carefully into the large funnel.
- Circulate around the room and check each apparatus before students begin filtration. Make sure:
- Ring clamps are securely tightened.
- Funnels are stable.
- Collection beakers are properly positioned.
- Filtration materials are securely placed to minimize spills or material loss.
- Instruct students not to begin filtering the dirty water until you have checked and approved their apparatus.
Phase 4: Test (15 Minutes)
- Have students review the initial observations and pH of the dirty water they recorded in Phase 1. Explain that these measurements will serve as the baseline for evaluating their filtration system.
- Instruct students to gently stir their dirty water sample immediately before testing so that the sample contains a representative mixture of water, oil, and solid materials.
- Have students slowly pour the dirty water into their filtration system.
- Instruct students to pour carefully to minimize spills and avoid overflowing the funnel.
- Have students use a popsicle stick, if necessary, to transfer any soil, sand, or other material remaining in the sample container into the filter.
- Have students observe their filtration system as the water passes through it.
- Have them record observations in Phase 4 of their worksheet, including:
- How quickly the water moves through the filter.
- Where particles or oil appear to be trapped.
- Changes in the filtration materials.
- Problems such as clogging, leaking, overflowing, or water moving too slowly or quickly.
- Other noticeable changes during filtration.
- Once filtration is complete, have students carefully remove the collection beaker from beneath the funnel.
- Have students observe the filtered water and record:
- Color and overall appearance.
- Clarity.
- Presence or absence of visible particles.
- Presence or absence of visible oil droplets or an oil film.
- Other relevant observations.
Students testing their water filtration system.Copyright Nichole DePaulPhase 5: Improve and Reflect (10 Minutes)
- If necessary, demonstrate the correct procedure for using the available pH-testing equipment. For example, demonstrate how to properly use a pH strip or how to use and rinse a digital pH meter.
- Have students measure and record the pH of their filtered water.
- Have students pour the filtered water into a graduated cylinder, measure the volume of water recovered, and record the value in their worksheet.
- Have students compare their before- and after-filtration observations and data. Ask them to consider:
- Did the clarity of the water improve?
- Were visible particles and oil reduced?
- Did the pH move closer to neutral (pH 7)?
- Did the system produce approximately 10 mL of filtered water?
- What was one strength of your filtration system?
- What is one change you would make to improve your filtration system?
- Have students complete the post-activity reflection questions in their Clean the Dirty Water Worksheet (PDF), using evidence from their observations and measurements to evaluate their filtration system and identify possible improvements.
- Optional: Have students complete the CER Worksheet (PDF).
Phase 6: Cleanup & Disposal (5 Minutes)
- Have students dispose of solid waste filter materials (sand, charcoal, etc.) in the regular trash.
- Instruct students on how to dispose of liquid waste:
- Even though vegetable oil is non-toxic, large amounts of it should not be put down the drain, as it can clog pipes.
- Have students pour the filtered water/oil mix into a designated "Liquid Waste" bucket.
- Wipe out beakers with a paper towel before washing with soap to remove grease.
- chemical engineer
- Uses principles from chemistry, physics, and engineering to design, develop, and operate processes that convert raw materials into useful products.
- environment engineer
- Uses principles of engineering, science, and math to solve environmental problems, protect public health, and promote sustainability.
- filtration system
- A collection of components designed to separate solid particles from a fluid by passing the fluid through a filter medium.
- acidity
- The level of acid in a substance.
- solution
- A liquid mixture in which the minor component, the solute, is uniformly distributed within the major component, the solvent.
- heterogenous mixture
- A mixture combining two or more substances that are not uniformly mixed, making it possible to see the varied composition throughout.
- homogeneous mixture
- A mixture combining two or more substances that are uniformly distributed throughout, making it impossible to see the individual components.
- ph
- A value expressing the acidity or alkalinity of a solution on a logarithmic scale on which 7 is neutral, lower values are more acid, and higher values are more alkaline. pH = - log[H+]
Pre-Activity Assessment
Brainstorming: In their groups, have the students brainstorm a list of things/items that could make water dirty, how to remove the items/things from the water, and connect it to engineers creating solutions to real-world problems on their Clean the Dirty Water Worksheet (PDF). Ask students to consider the following questions:
- What type of items/things would you see in the water to make it look dirty? (Potential answers: oil, sand, gravel, garbage, or other debris.)
- How would you remove each item or thing in the water? (Answers will vary. Students may suggest using an absorbent material, such as a paper towel, to remove oil; using tongs to remove larger pieces of garbage; or using a filter to remove sand, gravel, or other particles.)
- How does this connect to engineers solving real-world problems? (Potential answers: Engineers identify real-world problems and develop tools, technologies, and processes to help solve them. For example, engineers design filtration systems and other technologies to improve water quality.)
Have pairs share their responses with the class. Record key ideas on the board and use the discussion to identify students’ initial understanding of water filtration and the role engineers play in developing solutions to water-quality problems.
Activity Embedded Assessment
Worksheet Observations and Data: As students design and test their filtration systems, have them record qualitative and quantitative observations and measurements in the Clean the Dirty Water Worksheet (PDF). Review students’ designs, observations, pH measurements, recovered water volumes, and before-and-after comparisons to assess their understanding of how filtration materials and their arrangement affect system performance. Circulate among the groups and ask students to explain their material choices, observations, and results.
Post-Activity (Summative) Assessment
Activity Rubric: Use the Teacher Rubric (PDF) to assess students’ performance throughout the activity, including their participation in the engineering design process, filtration system design and construction, data collection and analysis, evaluation of results, and understanding of water filtration and its connection to environmental and chemical engineering.
Engineering Reflection: For the post-activity assessment, have each group answer questions about their experience and how it relates to the engineering design process.
- What did each material do for your filtration system?
- Why did you and your partner choose these materials for your filtration system?
- How much clean water did you obtain from your filtration system?
- Was the water clearer than before it was placed into the filtration system?
- What would you add or change to make the filter better?
- Why do you think chemical and environmental engineers are important in real life?
Use this guide to help identify and fix common issues students may encounter during the water filtration system experiment. Each problem includes possible causes and suggested solutions to keep the activity running smoothly.
Extensions and Enrichment (Grades 11–12 or advanced learners)
- Have students investigate how different filtration materials interact with dissolved and suspended contaminants and distinguish between filtration and other water treatment processes.
- Use digital sensors (pH, conductivity, or turbidity probes) for precise data collection.
- Have students evaluate trade-offs among filtration effectiveness, flow rate, cost, material use, and environmental impact.
- Have students redesign and retest their filtration systems based on evidence from their initial tests.
- Require students to justify design decisions and proposed improvements using quantitative data and evidence.
Activity Extensions
- Real-World Water Treatment: Have students research commercial or municipal water treatment systems and compare them with their classroom filtration systems. Ask students to identify which contaminants their classroom filters can and cannot remove and explain why additional water treatment processes may be necessary.
- Engineering and Society: Have students investigate other ways chemical and environmental engineers address global challenges related to water quality, pollution control, waste treatment, and environmental protection.
Scaling Back/Modifications (Grades 6–8 or students needing support)
- Simplify materials and testing: Use only a few filtration materials (sand, gravel, cotton) and focus on observable changes such as water clarity instead of precise measurements.
- Provide guided data tables and structured steps for the design process.
- Allow verbal explanations instead of written reports for assessment flexibility.
Scaling Up (Grades 9–10 or on-level students)
- Have students independently identify criteria and constraints, such as cost, sustainability, or effectiveness.
- Introduce quantitative data collection (e.g., using pH, turbidity, or dye color intensity to measure water quality).
- Require written design logs and evidence-based reasoning to justify material choices.
- Encourage iterative redesign after analyzing results.
Contributors
Nichole DePaul
Supporting Program
Research Experience for Teachers (RET), National Science Foundation, Rice University, Office of STEM Engagement (R-STEM).
Acknowledgements
This curriculum was developed under National Science Foundation RET grant number EEC-2302127. Any opinions, findings, and conclusions or recommendations expressed in this material are those of the authors and do not necessarily reflect the views of the National Science Foundation.
Copyright
2026 by Regents of the University of Colorado; original © 2025 Rice University