
RGB Color Mixing
Students move through the engineering design process as they write Arduino code and use a “digital sandbox” to create new colors out of the three programming primary colors: green, red and blue. They develop their own functions, use them to make disco light shows, and vary the pattern and colors of their shows. The digital sandbox is a hardware and software learning platform powered by a microcontroller that can interact with real-world inputs like light, while at the same time controlling LEDs and other outputs.
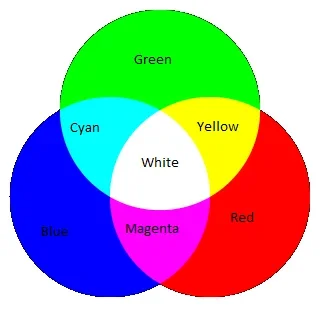 You can mix colors to make any new color you want!Copyright 2006 Wintermute, Wikimedia Commons {PD} https://commons.wikimedia.org/wiki/File:AdditiveColorMixingII.png
- SparkFun Digital Sandbox, at https://www.ebay.com/itm/325800037840?var=0&mkevt=1&mkcid=1&mkrid=711-53200-19255-0&campid=5338590836&toolid=10044&loc_physical_ms=90297&customid=99a8d666e53215631651bef0a7ddfdc8&gclid=99a8d666e53215631651bef0a7ddfdc8
- computer with access to Arduino programming environment
- USB cable, to connect sandbox
Bleh… white. So boring! Let’s add some color to this digital sandbox. Let's look at making some cool colors with a special device on your digital sandbox called the RGB LED. It's a special device that is basically three LEDs—red, green and blue—all integrated into a single package! It's pretty cool.
In art class, you probably learned about primary colors, and how you can mix them to produce any other color that exists. While the artsy primary colors you might be familiar with are red, yellow and blue, in electronics (and programming in general) our primary colors are red, green and blue. If we can control the three LEDs individually, we can start making all kinds of cool colors! Let's get started!
Let’s begin with this simple piece of code (see Figure 1). Type this in and upload it to your digital sandbox.
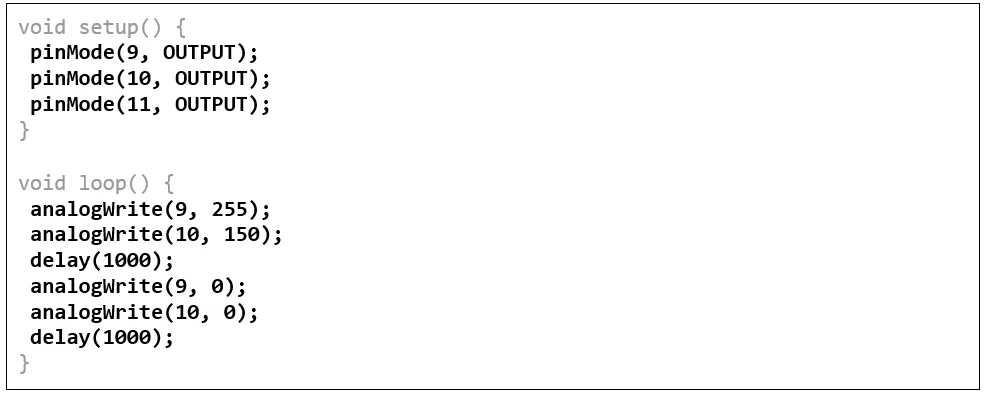
What does is this example code do? What color is the LED?
Notice that we introduced a new command called analogWrite(). It looks a lot like the digitalWrite() function, except that we can specify the intensity of the brightness with a value instead of just ON and OFF!
![The analogWrite() command in the digital sandbox: analogWrite([pin], [value]);](https://teachengwebstorageprod.blob.core.windows.net/te-content-prod/spfun_rgbcolor_maker1_image2-975x59.webp)
analogWrite() uses two arguments—a pin and a value that can be specified as a number from 0 to 255. This is pretty cool, but it only works on a few of the pins on the Arduino. These pins are 3, 5, 6, 9, 10 and 11. Luckily, the three pins that the RGB LED are connected to are pins 9, 10 and 11!
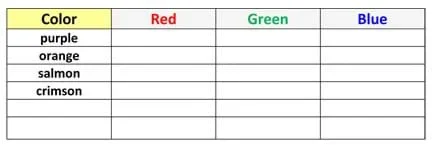
In our example, we get a standard blink of an orange-ish color by mixing 225 of red with 150 of green. Let’s make some other colors by playing with the analog inputs. How do you make purple, orange, salmon or crimson? How about two new colors? Create each color and record the RGB values for each. And, give your custom colors their own names!
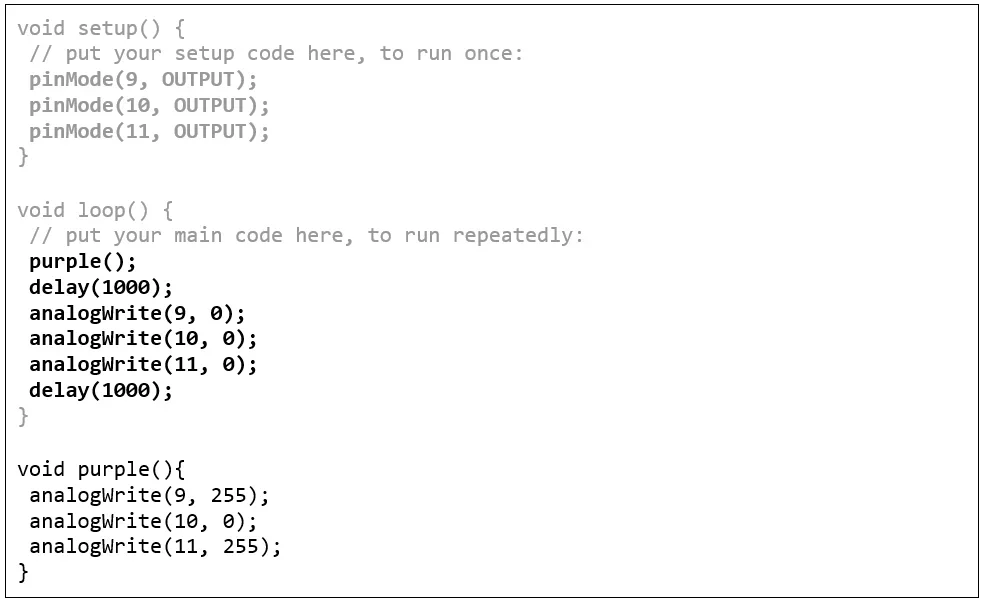
Do you find yourself copying a lot of the same code blocks? Clean up your code by writing your own function. A function is a block of code that can be re-used and called by name. Why might engineers make use of functions? When engineers develop programs, they save time and space by creating functions so that they can more easily create code to direct complex machines. Let's call our function purple(). Add this code to the very end of your program:

Does this look familiar? Now, let's change your code. This is what your code should look like:
Now, let's make a disco light show. Think about what colors you want to add to your show and determine their RGB values. Then, write functions for each color and modify the delays so that you get a blinking or fading pattern to blend between the various colors. What does your pattern do? Could you create a pattern to match music?
As a challenge: Combine the repeat loops, fading example, and the RGB LED to create a lightscape that alternates from red to blue to green to red.
Suggest students record the RGB values of their colors in a table like this:
As a class, have students share, compare and reflect on their disco shows:
- Which colors did you show and why? How did you change your functions to create new colors?
- What applications might engineers find for color-changing LEDs?
- What would you improve or change if you were to re-write your code?
- Refer to the Engineering Design Process hub on Teach Engineering to guide your students through the challenge.
- Utilize the Engineering Design Process Notebook (PDF) for design process documentation.
- See example code on codebender at https://codebender.cc/sketch:342882.
- Encourage students to come up with their own colors, but if they need inspiration, suggest they visit https://www.w3schools.com/colors/colors_picker.asp or www.colourlovers.com for other ideas.
Contributors
Brian Huang; Sabina Schill
Supporting Program
SparkFun Education
Copyright
2016 by Regents of the University of Colorado; original © 2014 SparkFun Education