
Android App Development
 In this activity, students act as software engineers to develop an Android application.Copyright California Department of Education Diagnostic Center of Central California http://www.dcc-cde.ca.gov/ (left); National Aeronautics and Space Administration, Global Climate Change http://climate.nasa.gov/news/777 (center); Tucson Police http://cms3.tucsonaz.gov/police/android-app-crime-tips (right)
Students develop an app for an Android device that utilizes its built-in internal sensors, specifically the accelerometer. The goal of this activity is to teach programming design and skills using MIT's App Inventor software (free to download from the Internet) as the vehicle for learning. The activity should be exciting for students who are interested in applying what they learn to writing other applications for Android devices. Students learn the steps of the engineering design process as they identify the problem, develop solutions, select and implement a possible solution, test the solution and redesign, as needed, to accomplish the design requirements.
As students create Android applications that performs specific functions, guided by the steps of the engineering engineering design process, they are doing just what software engineers do as they develop applications that we all encounter on a daily basis. This includes business software, communication software, compilers, computer graphics, and more. Ultimately, students must plan what the application will do, decide what it looks like, decide how to structure the software, test and edit to ensure the app works correctly. Thus, students act as software engineers in this hands-on application of the engineering design process.
After this activity, students should be able to:
- Design a mobile app for an Android device.
- Create a mobile app for an Android device using MIT's App Inventor.
- Apply the software/system (engineering) design process.
- STEL-7AA Illustrate principles, elements, and factors of design.
Grades 9-12
Do you agree with this alignment? - STEL-7W Determine the best approach by evaluating the purpose of the design.
Grades 9-12
Do you agree with this alignment?
- Use technology and mathematics to improve investigations and communications. A variety of technologies, such as hand tools, measuring instruments, and calculators, should be an integral component of scientific investigations. The use of computers for the collection, analysis, and display of data is also a part of this standard. Mathematics plays an essential role in all aspects of an inquiry. For example, measurement is used for posing questions, formulas are used for developing explanations, and charts and graphs are used for communicating results.
Grades 9-12
Do you agree with this alignment?
- 12.1.3.h Recognize creativity, imagination, and a good knowledge base are all needed to advance the work of science and engineering
Grades 9-12
Do you agree with this alignment?
- HS-ETS1-2 Design a solution to a complex real-world problem by breaking it down into smaller, more manageable problems that can be solved through engineering.
Grades 9-12
This resource focuses on the following Three Dimensional Learning aspects of NGSS:
Science & Engineering Practices- Design a solution to a complex real-world problem, based on scientific knowledge, student-generated sources of evidence, prioritized criteria, and tradeoff considerations.Do you agree with this alignment?
Disciplinary Core Ideas- Criteria may need to be broken down into simpler ones that can be approached systematically, and decisions about the priority of certain criteria over others (trade-offs) may be needed.Do you agree with this alignment?
Do you agree with this alignment? - Design a solution to a complex real-world problem, based on scientific knowledge, student-generated sources of evidence, prioritized criteria, and tradeoff considerations.
Each group needs:
- computer
- MIT's App Inventor (a web-based, free software available at https://appinventor.mit.edu/; this site provides information on how to set-up for and install App Inventor)
- sheet of large paper or dry-erase white board
- markers (dry erase markers if a dry-erase white board is used)
- Android device, such as a smartphone or tablet (The website http://appinventor.mit.edu/explore/ lists all devices known to work with App Inventor in the right column under the title "Phones & Tablets Database".) **Note: Each group needs this item. This activity has been performed with students using their own Android mobile devices, which may not be available for every classroom. Adjust group sizes depending upon how many devices are available for use, or if the class is small enough, working together as one group sharing a teacher-provided Android mobile device. These options may limit the learning experience of each student, though.**
- Pseudo-code Example (pdf)
- Pseudo-code Example (docx)
- App Inventor Code for Accelerometer Activity (pdf)
- App Inventor Code for Accelerometer Activity (docx)
- Accelerometer Android App (zip)
- App Inventor Code for GPS Location (pdf)
- App Inventor Code for GPS Location (docx)
- GPS Location Android App (zip)
- Android App Design Assessment Solutions (pdf)
- Android App Design Assessment Solutions (docx)
Students should have a basic understanding of computer programming design and control structure. Students should also have a basic knowledge of how MIT's App Inventor works. If this activity is conducted with students who have not previously worked with App Inventor, allow additional time for students to work through the MIT tutorials (http://appinventor.mit.edu/explore/learn.html) to gain an understanding of how App Inventor works.
In this activity, you will develop an app for an Android device. However, the activity is about more than the single app you develop. It is about the skills that you gain while you interact with the software that helps you develop your app. At the end of the activity, you should have the skills in place to write other apps for an Android device that use the internal sensors to collect data and store that data. If you desire, you can use the skills that you learn to write other apps for Android devices that can be published for public access and use.
Background
Students develop an app for an Android device that stores data collected during an experiment that can be used for analysis later. The Storing Android Accelerometer Data: App Design lesson has students complete online tutorials based on using MIT's App Inventor. At the end of this lesson, students should be prepared to write applications that can access an Android device's internal sensors.
The procedure is an outline and does not provide specific details on exactly what steps students must take to create their Android apps. This is because the purpose of this activity is for students to work through the process themselves. They might not figure out a code that works correctly the first time. This is an expected part of the learning process that forces students to evaluate their mistakes and redesign their codes. If too much information is provided, students never experience this critical part of the design process.
Before the Activity
- Install and set up the App Inventor software. Instructions for how to do this are provided in a tutorial on the MIT website: https://appinventor.mit.edu/explore/install-app-inventor-software.html
- The teacher and students should have a basic working knowledge of programming and how App Inventor works. Refer to MIT's tutorials for App Inventor at: http://appinventor.mit.edu/explore/
With the Students
Part I:
Students plan a mobile android app that can access the accelerometer on an Android device. This planning consists of the first two steps in the software/system design process, namely the requirement analysis and design steps. When working through these steps, facilitate a lot of discussion about how the application should function. No actual code is written at this point; rather, students write pseudo-code.
Pseudo-code is a rough draft of written computer code. It is syntax independent; meaning the language being used is irrelevant, so the pseudo-code simply puts the blueprint or plan for all or part of a program into words that can next be translated into a specific programming language using that language's particular syntax. Refer to the attached Pseudo-code Example (PDF).
Writing pseudo-code is a computer programming method in which the designer determines what an application must do without writing any code in the programming language's syntax. It might take the form of a flow chart or block diagram. In each stage of the pseudo-code, students need to think about the ordering, control structures and algorithms that are necessary to accomplish that stage. Have students work in groups of 2-3 to each discuss and figure out a design that allows them to create code that directs an android device to store and recall data. During the discussion, encourage them to use markers and large sheets of paper or dry-erase boards. Once group comes consensus on how to build the code is achieved, have students draw detailed diagrams of the necessary App Inventor blocks to share with the class. The diagram should include labels, colors and the correct connection types.
Part II:
Students use MIT's App Inventor to create an application that stores the accelerometer data from an Android device. This part of the activity is the implementation, testing and evolution phases of the software/system design process. Students create the software code using App Inventor (implementation), test to see if the code functions, and look for possible improvements (evolution). The program they create also allows students to retrieve the data and manually transfer it for analysis using Microsoft Excel, Geogebra, or a similar programs.
Follow this general process to create a program within App Inventor. Encourage students to add or modify these basics in order to make the program user-friendly. These steps are provided only as a guideline to help facilitate the implementation phase.
- Create a new application titled "AccelerometerData."
- The program needs a clock (the clock should not be enabled; wait until the start button is clicked to enable the clock), labels for displaying the data, start, stop and submit buttons, a TinyDB, and an AccelerometerSensor. Drag these in from the Palette.
- Open the Blocks Editor.
- In the Blocks Editor, the program needs the following:
- A variable to keep track of the timer
- A StartButton. Click that resets and enables the timer
- A Clock1.Timer thT increments the timer by one, sets the acceleration text box to the chosen value of the accelerometer sensor (x, y or z), and stores that value in the TinyDB, using the timer value as the tag
- A StopButton.Click that disables the timer and clears any text boxes
- A SubmitButton.Click that sets the text of the acceleration text box to the value from the TinyDB using the number typed into the timer text box as the tag
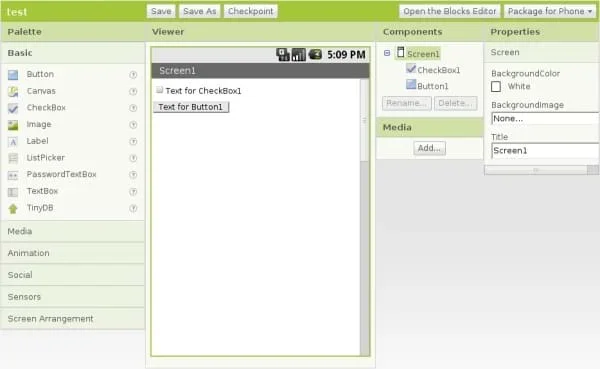 The App Inventor user interface.Copyright 2010 Pùnsa, Wikimedia Commons: http://commons.wikimedia.org/wiki/File:Interf%C3%ADcie_App_Inventor.png
- accelerometer
- A sensor that measures the acceleration of an object.
- persistent data
- Data that remains accessible for later use even after the application that created it closes and stops functioning.
- pseudo-code
- A computer programming method where students design what the application must do without writing any actual code in the programming language's syntax.
- tinydb
- A database on an Android device that can be used to store persistent data.
Pre-Activity Assessment
Review the software/system (engineering) design process with students and how it can be applied to this type of activity. Ask students to list each step in the process and write an example of what they might do during each step. Ask students to share their response with the class. (Details on the steps of the engineering design process and the software development life cycle may be found in the Background section of the associated lesson.
Activity Embedded Assessment
Circulate around the room while students are designing (writing pseudo-code) to assess their progress. Later, when the designs are implemented, be available to assess progress and assist with implementation.
For the teacher's use, refer to screenshots of example App Inventor Code for this program in the App Inventor Code for Accelerometer Activity (PDF), and the Android App developed in App Inventor is provided in Accelerometer Android App (ZIP). Use these files as an answer key or teacher guide.
Post-Activity Assessment
Have students complete the following performance assessment: Create an application that stores your GPS locations over a given time interval.
This code looks similar to the acceleration application, but requires a "Location Sensor" from App Inventor instead of an "Accelerometer Sensor." To grade this challenge, look at the design elements that students created as well as the code. The ultimate test of the program is to run the developed Android app and see if it indeed stores GPS locations over a time interval. Base part of the assessment on how students applied the software/systems design (engineering) process in the completion of the mobile app.
For the teacher's use, example screenshots of the GPS Location Storing App created in App Inventor are provided in App Inventor Code for GPS Location (PDF), and the Android App for storing GPS data is provided in GPS Location Android App (ZIP).
Assign students to complete one of the following writing assessments. Answers are provided in the attached file: Android App Design Assessment Solutions (PDF).
- Describe the purpose of the TinyDB when creating an Android app.
- Create a button that toggles off and on in an Android app. Explain what steps you would have to include in App Inventor to create this button and draw some pseudo-code that represents the programming of the button.
Have students create other mobile apps of their choosing to solve a problem or challenge decided by the teacher or the class.
Contributors
Scott Burns; Brian Sandall
Supporting Program
IMPART RET Program, College of Information Science & Technology, University of Nebraska-Omaha
Acknowledgements
The contents of this digital library curriculum were developed as a part of the RET in Engineering and Computer Science Site on Infusing Mobile Platform Applied Research into Teaching (IMPART) Program at the University of Nebraska-Omaha under National Science Foundation RET grant number CNS 1201136. However, these contents do not necessarily represent the policies of the National Science Foundation, and you should not assume endorsement by the federal government.
Copyright
2013 by Regents of the University of Colorado; original © 2012 Board of Regents, University of Nebraska