
Insulator Design Challenge
Students engage in the engineering design process while identifying the relative thermal conductivity of different materials. Students apply their understanding of heat transfer to build an insulator to prevent heat loss or gain from an object. Students practice the engineering design process by building their insulator. At the end, they reflect on the design process and the effectiveness of their product.
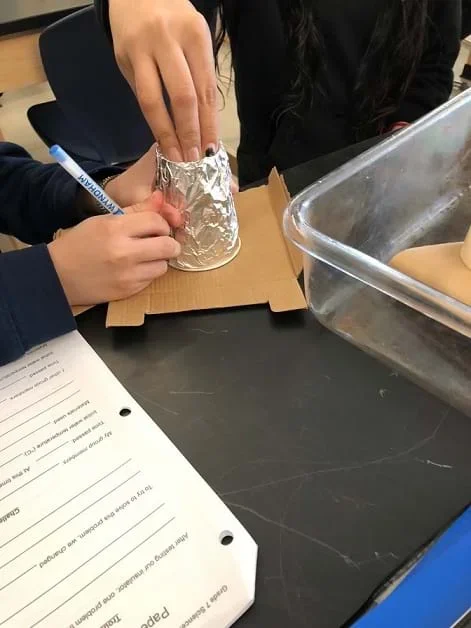 Two students work together to build their insulator based on their design from materials provided to them for the activity.Copyright Bradley Agostinelli, 2021
The students are presented with a problem: If you have a hot or cold drink, it will get hotter or colder over time, depending on the environment. How can you prevent this, so you can enjoy your drink longer? Students design, engineer, and test an insulator to try to solve this problem. Students collect time and temperature data and then evaluate whether their insulator was successful compared to others in their class.
After this activity, students should be able to:
- Design, construct, and test an insulator with a partner to prevent thermal energy loss or gain.
- Identify materials with high and low relative thermal conductivities.
- Compare and contrast their insulator product with at least one other group by answering guiding questions.
- Evaluate the success of their insulator by analyzing data they collected and discussing that data with their lab group.
- MS-ETS1-2 Evaluate competing design solutions using a systematic process to determine how well they meet the criteria and constraints of the problem.
Grades 6-8
This resource focuses on the following Three Dimensional Learning aspects of NGSS:
Science & Engineering Practices- Evaluate competing design solutions based on jointly developed and agreed-upon design criteria.Do you agree with this alignment?
Disciplinary Core Ideas- There are systematic processes for evaluating solutions with respect to how well they meet the criteria and constraints of a problem.Do you agree with this alignment?
Do you agree with this alignment? - Evaluate competing design solutions based on jointly developed and agreed-upon design criteria.
- MS-ETS1-3 Analyze data from tests to determine similarities and differences among several design solutions to identify the best characteristics of each that can be combined into a new solution to better meet the criteria for success.
Grades 6-8
This resource focuses on the following Three Dimensional Learning aspects of NGSS:
Science & Engineering Practices- Analyze and interpret data to determine similarities and differences in findings.Do you agree with this alignment?
Disciplinary Core Ideas- There are systematic processes for evaluating solutions with respect to how well they meet the criteria and constraints of a problem.Do you agree with this alignment?
- Sometimes parts of different solutions can be combined to create a solution that is better than any of its predecessors.Do you agree with this alignment?
- Although one design may not perform the best across all tests, identifying the characteristics of the design that performed the best in each test can provide useful information for the redesign process—that is, some of the characteristics may be incorporated into the new design.Do you agree with this alignment?
Do you agree with this alignment? - Analyze and interpret data to determine similarities and differences in findings.
- MS-PS3-3 Apply scientific principles to design, construct, and test a device that either minimizes or maximizes thermal energy transfer.
Grades 6-8
This resource focuses on the following Three Dimensional Learning aspects of NGSS:
Science & Engineering Practices- Apply scientific ideas or principles to design, construct, and test a design of an object, tool, process or system.Do you agree with this alignment?
Disciplinary Core Ideas- The more precisely a design task's criteria and constraints can be defined, the more likely it is that the designed solution will be successful. Specification of constraints includes consideration of scientific principles and other relevant knowledge that is likely to limit possible solutions.Do you agree with this alignment?
- A solution needs to be tested, and then modified on the basis of the test results in order to improve it. There are systematic processes for evaluating solutions with respect to how well they meet criteria and constraints of a problem.Do you agree with this alignment?
- Temperature is a measure of the average kinetic energy of particles of matter. The relationship between the temperature and the total energy of a system depends on the types, states, and amounts of matter present.Do you agree with this alignment?
- Energy is spontaneously transferred out of hotter regions or objects and into colder ones.Do you agree with this alignment?
Crosscutting Concepts- The transfer of energy can be tracked as energy flows through a designed or natural system.Do you agree with this alignment?
Do you agree with this alignment? - Apply scientific ideas or principles to design, construct, and test a design of an object, tool, process or system.
Each group (two students) needs:
- a paper cup
- a thermometer
- Insulator Design Challenge Worksheet (PDF), one per student
- a way of keeping track of time (Chromebook, stopwatch etc.)
For the entire class to share:
- aluminum foil
- cardboard
- plastic wrap
- cotton balls
- masking or duct tape
- ice cubes and/or cold water (teacher choice)
- room-temperature water
- gram scale or granulated cylinder
The teacher needs:
- Insulator Design Challenge Presentation (PPTX)
- a computer
- a projector
- a whiteboard/blackboard
- access to refrigerator/freezer for ice cubes and cold water
Students should be able to make observations, make predictions, and add and subtract double-digit numbers. Students should also have an understanding that heat transfers from hotter areas to colder areas, and can happen via convection, conduction, or radiation. Students should have already studied kinetic and potential energy, energy subtypes, energy transformation, energy transfer, and the types of heat transfer (conduction, convection, and radiation).
(Prepare to show students the Insulator Design Challenge Presentation (PPTX). Slides 1-5 are used in the Introduction.)
Today, we are going to do a project that applies our skills and understanding about heat transfer. This is an engineering project, so you will be learning and practicing new skills too! (Show Slide 2.) Imagine you have a cup of hot chocolate on a cold winter day. Draw a diagram and show where there would be heat transfer. Then, add something to the cup to show what you would do to keep your drink warm. (Have students work and share ideas with class).
(Review heat transfer concepts as represented in students’ diagrams.) Now that we have reviewed and practiced heat transfer, we need to talk about engineering! What words or pictures come to mind when you think about engineers or engineering? Draw a picture or write two sentences. (Have students share different ideas with the class out loud. Show Slide 3).
You are going to take on an engineering design challenge! Your challenge is to design and build an insulator with a paper cup and other materials to keep water or an ice cube colder than the other groups in your class! This is similar to what you thought about with your cup of hot chocolate. Heat transfer happens in cold drinks too! (Show Slide 4.) We will watch a five-minute video as a class to learn about the process of engineering. Answer these questions as you watch: What is the problem we are trying to solve? Which steps will we be using in this project? (Have students share answers with the class, and highlight the design, testing, troubleshooting, and evaluating parts of the process.)
(Show Slide 5.) Before you begin to design your insulator, here are some examples of what your insulator can look like:
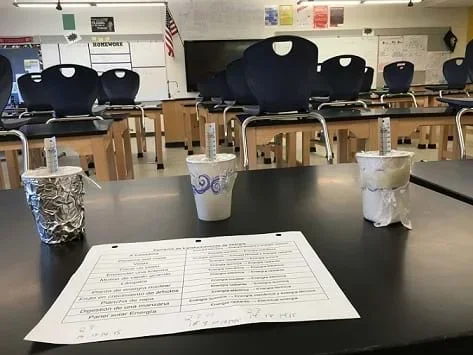 Examples of insulators that students can use to help them design their own.Copyright Bradley Agostinelli, 2021
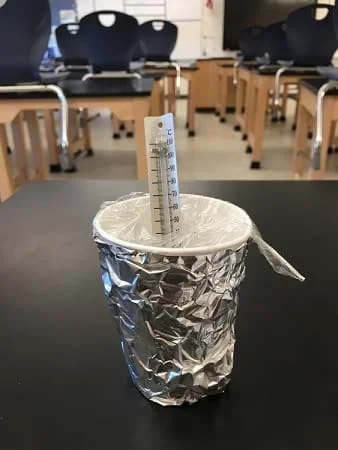 An example of an insulator that students can use as a starting point in designing their own.Copyright Bradley Agostinelli, 2021
You and your partner will start with a paper cup, and you will have access to materials like aluminum foil, cardboard, plastic wrap, cotton balls, and tape. You will have one day to design and plan, one day to build and test, and one day to run and collect data.
Background
The three types of heat transfer are conduction, convection and radiation. When thermal energy is being transferred, it always goes from the state of higher energy to lower energy. When a cup of ice is sitting in a warm room, the thermal energy is transferred to the ice through conduction via the ice touching the cup, through convection via the movement of water as the ice melts and changes phase, and through radiation via electromagnetic waves (e.g., light) that shine on the ice. Insulators slow the process of heat transfer. A cup with a thick outer layer, a lid, or a reflective surface can be an effective insulator.
Before the Activity
- Arrange students in partners based on their lab table.
- Distribute the Insulator Design Challenge Worksheet (PDF) to each student.
- Have room-temperature water ready that has been sitting out to ensure that it’s as close to the same temperature as possible, and have ice cubes in the freezer.
- Or have pitchers of cold water (36°F) in the refrigerator (enough for all groups) if you do not want to use ice cubes.
- Set up building materials in a common space for the students to pick up what they need.
- Review the cleanup procedure.
With the Students
Session 1: Design
- Lead students through the Introduction/Motivation (summary below):
- Watch this 5:16-minute video and share thoughts about the engineering design process.
- Ask students to talk to partners to identify examples of things that have been engineered and what problem they were trying to solve. (Example: An air conditioner solves problem of being too hot inside.)
- Ask students to talk to a partner about which parts of the engineering design process they will be doing. (Answer: Identifying a problem, designing a solution, building a prototype, testing prototype, comparing prototypes.)
- Introduce the background and details of the engineering project.
- Have students identify the problem we are trying to solve first. (Answer: A cold drink will eventually warm up on a warm day, so we are trying to keep it cold.)
- Discuss the guidelines, grading, and goal of the activity. (Answer: Students can only use a limited number of materials (at teacher’s discretion) to keep the cup of water cold.)
- Students answer introductory questions #1-4 with a lab partner in the Insulator Design Challenge Worksheet (PDF) (5 minutes) and then review answers as a class.
- Students individually design how they will build their insulator by drawing a diagram with labels on question #5 (5 minutes).
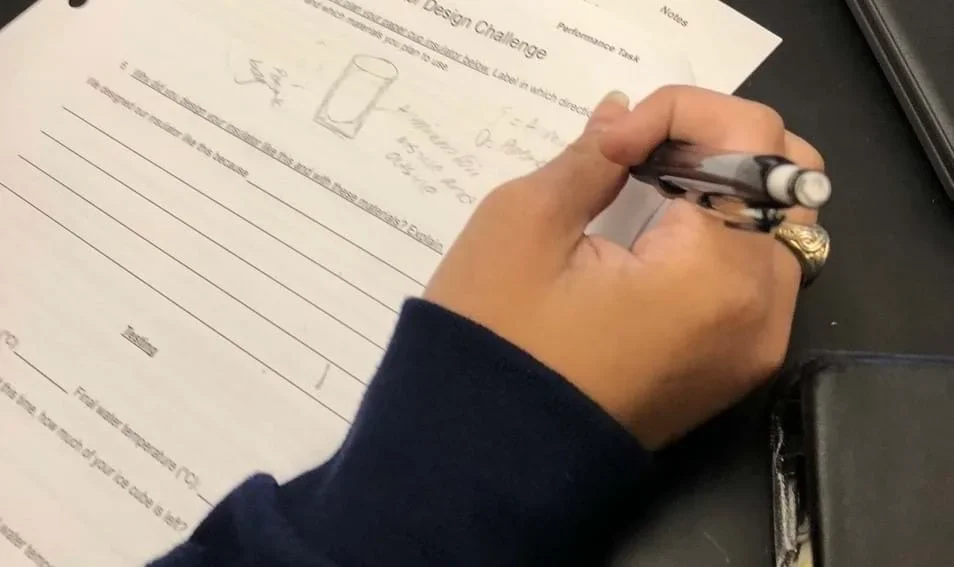 Prior to building, a student designs an insulator by drawing a diagram that includes types of materials and structures to be used.Copyright Bradley Agostinelli, 2021
 - Students write down their explanation of why they chose to design their insulator like that in question #6 (3 minutes).
Session 2: Build and test
- Students share their design with their partners and discuss which design and which parts they would like to use when they start building (2 minutes).
- Students build their insulator.Two students work together to build their insulator based on their design from materials provided to them for the activity.Copyright Bradley Agostinelli, 2021
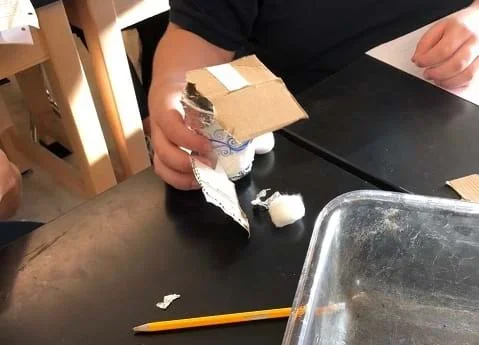 Students work together to build their insulator based on their design from materials provided to them for the activity. A student shows progress made during the building part of the lesson.Copyright Bradley Agostinelli, 2021
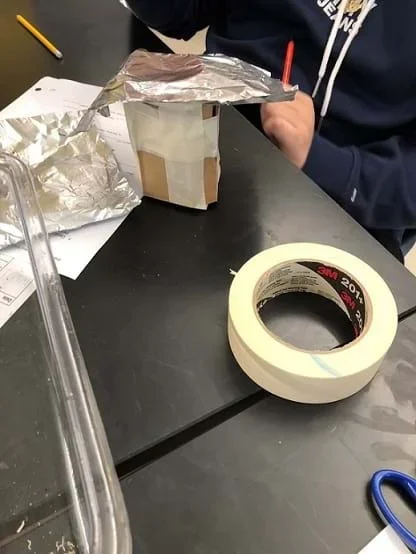 Students work together to build their insulator based on their design from materials provided to them for the activity. A student shows progress made during the building part of the lesson.Copyright Bradley Agostinelli, 2021
- Working with their partners, they discuss, decide, and use materials to build their design (30 minutes).
- The teacher walks around the classroom to ask guiding questions and observe students.
- As students build, they can test their insulators by requesting water and a thermometer. They can have access to a scale or granulated cylinder to measure the amount of ice left (if using ice).
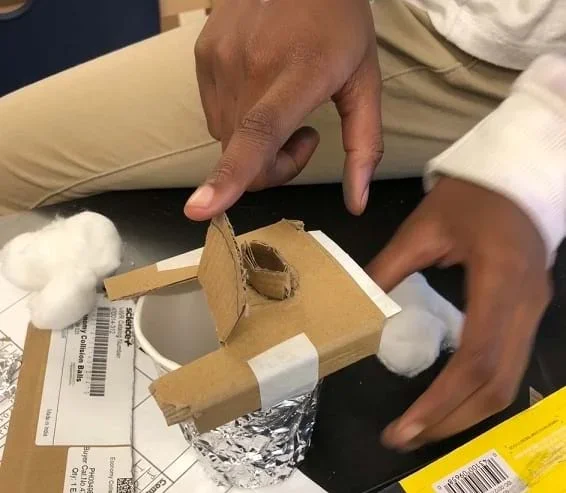 When students think they are finished, they can ask for a thermometer to test whether it can fit in their cup to measure the temperature of the water. It is required that a thermometer be able to fit into their cup. A student shows how a thermometer will be able to fit into her cup to measure water temperature.Copyright Bradley Agostinelli, 2021
 - As students test, they should write in their testing data in the “Testing” section in the Insulator Design Challenge Worksheet (PDF).
- Students record how long their test was, how much the temperature changed, and (if using ice) the amount of ice left.
- Before the end of the session, the students should have a completed insulator and have written notes about solving a problem they had with their insulator in the “Troubleshooting and Redesign Notes” section.
- Ask students: What issues did you come across when you were building, and what did you do to try to fix them? This is what they write in this “Troubleshooting” section.
Session 3: Run and collect data
- All students test their insulator with (1) one ice cube in a cup, or (2) one ice cube in water in a cup, or (3) only cold water at 36°F (teacher’s choice).
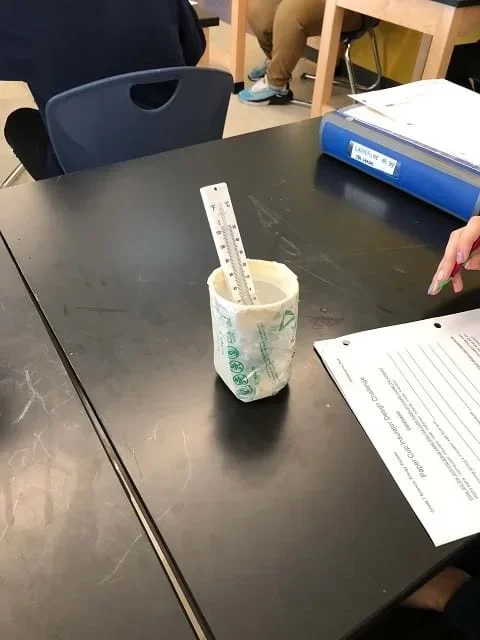 In the following session, the students will run their insulator for 15 minutes to measure the temperature change of the water and use that to assess the success of their design. In this case, all students started with cold water (approximately 36°F). A student observes the finished insulator and works on the “Results,” “Conclusions,” and “Reflection” sections of the lab packet.Copyright Bradley Agostinelli, 2021
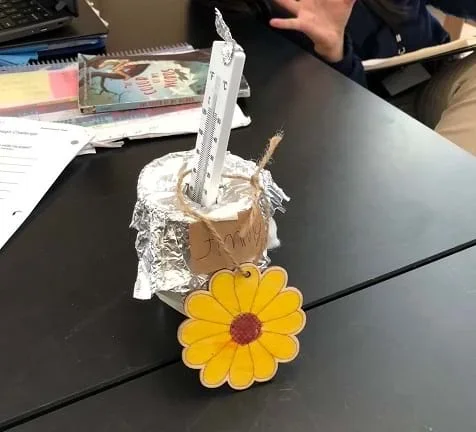 In the following session, students will run their insulator for 15 minutes to measure the temperature change of the water and use that to assess the success of their design. In this case, all students started with cold water (approximately 36°F). A student observes the finished insulator and works on the “Results,” “Conclusions,” and “Reflection” sections of the lab packet.Copyright Bradley Agostinelli, 2021
- As soon as the teacher pours the water in, the students begin keeping track of the time.
- If using water, students insert a thermometer and read the temperature over time and write data in the “Challenge Results” section.
- Remind students that if they touch the cup too much, they are adding thermal energy to their cup and their temperature will not reflect how effective their insulator is.
- If using just one ice cube, students observe the ice cube to see how quickly it completely melts and write data in the “Challenge Results” section.
- Halfway through the session (after ~20 minutes), students stop testing and share their results with the class.
- Do a poll to see which students had the lowest temperature change.
- Identify the winning group and carry their insulator around so others can see and compare their insulator to the winning one.
- Students complete the “Challenge Results” and “Conclusion” sections to compare and assess the performance of their insulator and different groups’ insulators.
- Students write the details of the winning group and their group in the “Challenge Results” section and compare them.
- Then they conclude why they got a different result than the winning group based on which structures they built and which materials they used.
- Students write in the “Reflection” section about their engineering experience.
- There are guiding questions and sentence starters in the questions to assist the students.
- conductor
- Material that transfers heat, light, electricity, or sound.
- design
- To plan and outline.
- engineering
- The art and science of building, maintaining, moving, and demolishing structures.
- heat (thermal energy)
- Energy that causes a rise in temperature.
- insulator
- Material that does not conduct heat, electricity, light, or sound.
- prototype
- Early version or model.
- thermal conductivity
- Measure of the ability of a material to transfer heat.
- troubleshoot
- Trace and correct problems in a mechanical or electronic system.
Pre-Activity Assessment
Engineering Design Video: Students will watch a video about the engineering design process and answer questions, which allows them to show what they know about engineering.
Activity Embedded (Formative) Assessment
Insulator Design: On the Insulator Design Challenge Worksheet (PDF), the students design their insulator and justify why they designed their insulator a certain way.
Guiding Questions: The teacher checks in with groups while students are building, testing, and running their insulators. The teacher asks questions to help students think about what part of the engineering process they are in and which step might be next. This helps students think about what changes they can make in their insulator based on their tests.
Post-Activity (Summative) Assessment
Evaluation and Reflection: Students evaluate the success of their insulator compared to others as a final step of this engineering design challenge. The teacher can use the “Reflection” part of the Insulator Design Challenge Worksheet (PDF) as a post-activity assessment for how the engineering process went for the students and what they learned. Optional: The teacher can also create a rubric to assess differently.
- Do not consume any ice cubes or water used as lab materials.
- Slowly cut or tear materials for the insulator (such as cardboard or aluminum foil) using scissors or hands.
- If there is a water spill, use paper towels to clean it immediately to prevent anyone from slipping.
- In this activity, the students used cold water to run their insulators (not ice cubes). It was a moderate success as long as there was enough cold water around the same temperature (36°F from the refrigerator) for all groups. This activity was tested with ice cubes alone, ice cubes and cold water, and just cold water, and the cold water alone yielded the quickest temperature change. Have the students use only cold water and no ice cubes so they have enough time to read a temperature change and compare it with other groups' insulators.
- More adults in the classroom would make it easier to monitor and distribute materials (such as water and ice cubes) for the students to test and run their insulator, but this should be able to be done with just one adult as well. Testing how fast the ice cube melts in the cup or with water in the cup will give the students an example to try to surpass with their design.
- A mini lesson on how to read the thermometer was important because a student did not know how to do that well. Each group needed to read their thermometer for their data after they ran their insulator, so this was necessary.
- If short on time, students may not have enough time to test the insulator multiple times and they may need to cross out the “Testing” and “Conclusion” sections. But if the activity extends longer, have students test their insulator multiple times and use both sections.
- While waiting for the thermometer to read the temperature change of the water (about 15 minutes), the students can work on the “Reflection” section of their packet, including anything else they may have been missing.
One extension is for the students to compare their insulator, which had a purpose of keeping a drink cold, to the activity in the Introduction/Motivation section about the examples of keeping drinks hot. Students can explore what the difference is in these situations with regard to heat transfer and design processes.
Additionally, students can bring in their own water bottles, cups, drink containers, etc. They can determine why their objects were designed that way based on their purpose.
- For lower grades/younger students:
- Provide at least one additional day to build and test insulators.
- Give students a model to follow in the engineering design process and final product.
- For upper grades/older students:
- Set more constraints and offer more materials to use (e.g., you can use a 5” x 5” piece of aluminum foil or four cotton balls, etc.).
- Or, have students choose only two materials from their list of choices so they can make a decision on which materials will be more insulative.
- Graph data collected from their group’s insulator and at least two other groups’ insulators.
- For more advanced students:
- Offer more time to test and redesign the prototype to increase the efficiency of their insulator.
- Build a second insulator with a different design to compare to their first one.
Lexico.com. Lexico. Accessed July 22, 2021. (Source of a vocabulary definition with some adaptation). https://www.lexico.com/en/definition/troubleshoot
Nationalgeographic.org. National Geographic Society. Accessed July 22, 2021. (Source of some vocabulary definitions). https://www.nationalgeographic.org/glossary/
StemScopes. Thermal Energy Transfer Explore 3: Engineering Solution - Build a Medicine Container. 2021. Accelerate Learning, Inc, https://app.acceleratelearning.com/scopes/17544/elements/775772.
The Engineering Process: Crash Course Kids #12.2. May 29, 2015. Crash Course Kids, https://www.youtube.com/watch?v=fxJWin195kU.
Contributors
Bradley Agostinelli (Morris H. Seigal Clark Avenue Middle School, Chelsea, MA); Victoria Bartow, MEd (Edward M. Kennedy Academy for Health Careers, Boston, MA); Shereen Mejia (East Boston High School, Boston, MA)
Supporting Program
NSF Research Experience for Teachers (RET) in Integrated Nanomanufacturing at the Photonics Center, Boston University
Acknowledgements
This curriculum was based upon work supported by the National Science Foundation under RET grant no. EEC 1407165—at the Research Experience for Teachers in Integrated Nanomanufacturing at the Photonics Center at Boston University. Any opinions, findings, and conclusions or recommendations expressed in this material are those of the authors and do not necessarily reflect the views of the National Science Foundation.
Copyright
2024 by Regents of the University of Colorado; original © 2021 Boston University