
Engineering an Electrophoresis Gel Box
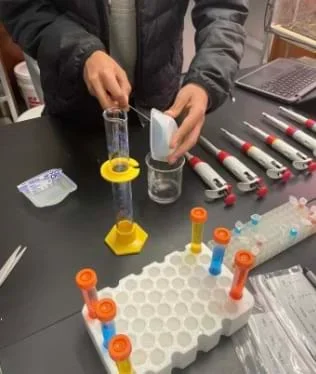 Students are micropipetting dyes into wells.Copyright William McDonald, 2023
Students build a functional electrophoresis gel and run samples of food coloring through the gel. As they learn how to build a functioning gel, they get a better understanding of the physics of the gel box and what the results can say about DNA and proteins.
Gel electrophoresis is a tool used in molecular biology and genetic engineering. In this activity, students create their own gel electrophoresis boxes to simulate the science that is used to solve crimes, identify genetic diseases, and determine DNA relatives.
After this activity, students should be able to:
- Design and engineer an electrophoresis gel and box by using provided materials.
- Practice/develop micro pipetting skills/techniques by loading samples into the wells of the gel.
- Analyze results of the electrophoresis gel by comparing/contrasting the samples.
- Connect the process to current applications in specific fields where the process may be used.
- HS-ETS1-2 Design a solution to a complex real-world problem by breaking it down into smaller, more manageable problems that can be solved through engineering.
Grades 9-12
This resource focuses on the following Three Dimensional Learning aspects of NGSS:
Science & Engineering Practices- Design a solution to a complex real-world problem, based on scientific knowledge, student-generated sources of evidence, prioritized criteria, and tradeoff considerations.Do you agree with this alignment?
Disciplinary Core Ideas- Criteria may need to be broken down into simpler ones that can be approached systematically, and decisions about the priority of certain criteria over others (trade-offs) may be needed.Do you agree with this alignment?
Do you agree with this alignment? - Design a solution to a complex real-world problem, based on scientific knowledge, student-generated sources of evidence, prioritized criteria, and tradeoff considerations.
- HS-LS1-1 Construct an explanation based on evidence for how the structure of DNA determines the structure of proteins which carry out the essential functions of life through systems of specialized cells.
Grades 9-12
This resource focuses on the following Three Dimensional Learning aspects of NGSS:
Science & Engineering Practices- Construct an explanation based on valid and reliable evidence obtained from a variety of sources (including students' own investigations, models, theories, simulations, peer review) and the assumption that theories and laws that describe the natural world operate today as they did in the past and will continue to do so in the future.Do you agree with this alignment?
Disciplinary Core Ideas- Systems of specialized cells within organisms help them perform the essential functions of life.Do you agree with this alignment?
- All cells contain genetic information in the form of DNA molecules. Genes are regions in the DNA that contain the instructions that code for the formation of proteins, which carry out most of the work of cells.Do you agree with this alignment?
Crosscutting Concepts- Investigating or designing new systems or structures requires a detailed examination of the properties of different materials, the structures of different components, and connections of components to reveal its function and/or solve a problem.Do you agree with this alignment?
Do you agree with this alignment? - Construct an explanation based on valid and reliable evidence obtained from a variety of sources (including students' own investigations, models, theories, simulations, peer review) and the assumption that theories and laws that describe the natural world operate today as they did in the past and will continue to do so in the future.
- HS-PS2-6 Communicate scientific and technical information about why the molecular-level structure is important in the functioning of designed materials.
Grades 9-12
This resource focuses on the following Three Dimensional Learning aspects of NGSS:
Science & Engineering Practices- Communicate scientific and technical information (e.g. about the process of development and the design and performance of a proposed process or system) in multiple formats (including orally, graphically, textually, and mathematically).Do you agree with this alignment?
Disciplinary Core Ideas- Attraction and repulsion between electric charges at the atomic scale explain the structure, properties, and transformations of matter, as well as the contact forces between material objects.Do you agree with this alignment?
Crosscutting Concepts- Investigating or designing new systems or structures requires a detailed examination of the properties of different materials, the structures of different components, and connections of components to reveal its function and/or solve a problem.Do you agree with this alignment?
Do you agree with this alignment? - Communicate scientific and technical information (e.g. about the process of development and the design and performance of a proposed process or system) in multiple formats (including orally, graphically, textually, and mathematically).
Each group needs:
- 1 pack of agar (28g/1oz)
- 250 mL of distilled water in a beaker
- 0.4 grams of baking soda
- 3 mL of corn syrup
- 1 four-pack of food dye
- 1 gel tray (weigh boat or pipette tip container cover)
- 1 piece of flexible plastic, such as the top of a plastic container (e.g., sour cream, yogurt, etc.) to make a plastic comb
- 200 mm to 300 mm of 1 mm stainless steel wire
- 3-5 9-volt batteries, depending on use of weigh boat (3) or pipette tip box cover (5)
- 1 12-well spot tray
- 6 disposable micropipettes/eyedroppers
- 2 alligator clips
- 1 spatula
- 1 pair of scissors
- 1 ruler with cm/mm markings
- lab safety glasses (1 pair per student)
For the class to share:
- at least 2 scales
- microwave oven
- hot/oven mitts
Today we are going to build an electrophoresis gel box so we can get an in-depth understanding of how gel electrophoresis works and how it is used. Gel electrophoresis is a piece of technology that can be used to determine DNA size and specific DNA information that can be used to solve a crime, determine ancestry, and inform about genetic diseases and maternity or paternity. It is done by adding electricity to the buffer and agar gel, which causes the DNA to run in their lanes through the gel. DNA has an overall negative charge and will start in the wells located at the negatively charged end (cathode). Depending on the size and charge of the DNA, they will move toward the positive side of the gel (anode). The larger and more positively charged DNA will not move as fast or far as the smaller DNA fragments and negatively charged DNA. The polarity of the electric field and gel will determine how fast and far the DNA can move. Scientists can run known DNA samples from other individuals to compare the similarities and differences. They can also compare known markers to determine potential diseases.
Background
Gel electrophoresis is one of the most important tools used in molecular biology and genetic engineering. Although electrophoresis gel boxes tend to be expensive to buy, they can be designed and engineered using common items and ingredients to simulate the science that is used to solve crimes, identify genetic diseases, and determine DNA relatives.
Gel electrophoresis is performed to compare DNA, RNA, or proteins from one individual to another or to a known sample. For this lab, we will focus only on how DNA runs through the gel. DNA is made up of nucleotides. The nucleotides contain a nitrogen base (adenine, cytosine, guanine, or thymine), a sugar, and a phosphate. The phosphate atom (PO43-) is bonded with oxygen atoms, making DNA negatively charged, because oxygen atoms carry a negative charge so the DNA will run through the gel from the negative side (cathode) of the gel box to the positive side of the gel (anode) in the gel box. Remember that opposite charges attract and like charges repel. Because the DNA is negatively charged, it will run through the gel away from the cathode (negative end of the gel) toward the anode (positive end of the gel).
DNA also moves through the gel based on the size of the DNA fragments. For this lab, we will need to focus on the size of the DNA and not the charge, given that all DNA has a negative charge. Smaller fragments of DNA can move more easily through the gel and thus can move faster and travel farther than larger fragments of DNA. Once the DNA samples have moved, you can compare the movement of the samples to each other and match the same DNA and identify those to whom the DNA belongs.
Agar comes from seaweed and is used to make the gel. The comb is used to make the wells that hold the samples. We are using food coloring with starch and water, but normally this is where the DNA samples would be put. The food coloring is like DNA; different colors have different molecular sizes, so some colors move farther through the gel than others. The buffer is poured over and around the gel and provides a medium to be able to run electricity though so that the samples can run through the gel in their lanes. The stainless-steel wire or paper clips are good conductors of the electricity from the power source, which will be the 9-volt batteries. To connect the gel box to the power source (batteries), students use alligator clips. Make sure that students have all the equipment set up correctly, and the samples loaded, before they complete the circuit by connecting the cathode (negative) end of the gel box to the battery sources with the alligator clip. This makes sense, as the electrons will flow from negative to positive, and the DNA is negative, so the negative end of the gel box will repel the negatively charged DNA down their lane in the gel. The DNA size will then determine how far it will run.
After students finish running the gel, they disconnect the alligator clip from the end of the negative end (cathode) of the gel box and then compare and analyze their results.
Before the Activity
- Gather materials and divide them for the groups on the lab tables.
- Make copies of the Build an Electrophoresis Lab Sheet (PDF) and Experimental Procedure Instructions (PDF) with the experimental procedure and reflection questions on them.
- Have at least two scales available.
- Have at least one microwave available.
- Queue the DIY Biology Video (2:59 minutes) so the students can see a visual of the overall procedure.
- Establish the student goal, mastery objective, and outcome.
- Review student goal, mastery objective, and outcome with students.
- Pass out the Build an Electrophoresis Lab Sheet (PDF) and Experimental Procedure Instructions (PDF) with the experimental procedure and reflection questions on it.
- Show DIY Biology Video (2:59 minutes).
- Divide students into their lab tables.
With the Students
Day 1
- Introduce the activity using the Introduction and Motivation section.
- Allow students to start working through the activity. Have them follow the Experimental Procedure Instructions (PDF); also refer them to the Build an Electrophoresis Lab Sheet (PDF) for helpful images to guide the process. Walk around the room to monitor their progress and answer any questions that arise.
- Making the comb
- Have students make the comb using the plastic top of a container. Ensure that they cut the width of the comb relative to the gel box they are using and that they cut at least four teeth for four wells for each color of food dye.
- Making the agar gel
- Have the groups move on to making the agar. Monitor students to ensure that they carefully measure the required amounts of distilled water, baking soda, and agar.
- Have students label their agar gels so they can identify them on Day 2.
- Preparing the buffer solution
- While the agar gel is cooling, have students prepare the buffer solution. Check that they carefully measure the required amounts of distilled water, baking soda, and buffer.
- Prompt students to label their buffer solutions so they can identify them on Day 2.
- Have students clean up their lab area.
Day 2
- Have students take out their handouts to guide their work: Experimental Procedure Instructions (PDF) and Build an Electrophoresis Lab Sheet (PDF). While students work, walk around the room to monitor their progress and answer any questions that arise.
- Preparing the gel for testing
- Have students prepare the gel for testing. Check that students are safe while cutting the wire and connecting the batteries. Remind them not to connect the alligator clip to the batteries at this point.
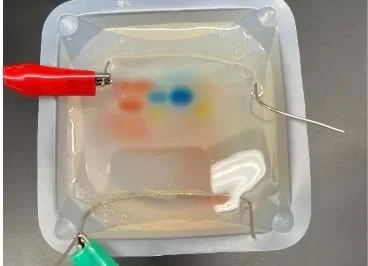 How do we run current through the gel?Copyright William McDonald, 2023
- Have students prepare the gel for testing. Check that students are safe while cutting the wire and connecting the batteries. Remind them not to connect the alligator clip to the batteries at this point.
- Preparing the food coloring samples
- Have students prepare the food coloring samples. Students are micropipetting dyes into wells.Copyright William McDonald, 2023
- Have students prepare the food coloring samples.
- Loading the samples
- Have students load the samples. Ensure that they carefully diagram which sample colors were loaded into each well on the Build an Electrophoresis Lab Sheet (PDF).
- Running the electrophoresis gel
- After students load the samples, have them run the electrophoresis gel for at least one hour. Ensure that students observe the gel and record their results in the Build an Electrophoresis Lab Sheet (PDF).
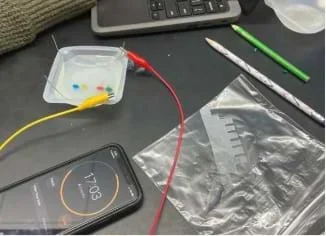 Students make observations as they run the gel for 1 hour.Copyright William McDonald, 2023
 - Have students disconnect the alligator clip after one hour.
- Have students place their gels in a safe area and allow them to sit there overnight.
- After students load the samples, have them run the electrophoresis gel for at least one hour. Ensure that students observe the gel and record their results in the Build an Electrophoresis Lab Sheet (PDF).
Day 3 (partial day)
- Have students collect their gels.
- Have students make and record observations and answer the reflection questions.
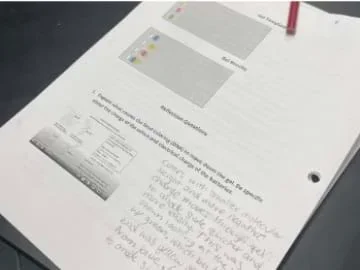 A student is writing about how a gel electrophoresis can be used to solve a crime.Copyright William McDonald, 2023
 - Collect student worksheets and have students clean up their lab area.
- agarose
- A sugar that comes from seaweed.
- buffer
- A liquid solution that allows current to be carried throughout the solution, gel, and sample.
- dna (deoxyribonucleic acid)
- A macromolecule that can store and transmit genetic information. Organized into chromosomes and smaller segments called genes, which code for proteins.
- electric field
- Electric charge that can flow throughout an area/volume and exert a force on other charged particles.
- electrophoresis
- Lab technique used to separate DNA, RNA, and proteins based on their size and charge by running a current through the gel and buffer.
- protein
- A macromolecule that helps cells and organisms build, repair, and regulate.
Pre-Activity Assessment
Discussion of DNA and crime: Classroom discussion probing student understanding of how DNA can be used in situations that help solve a crime, detect genetic diseases, or determine relationships.
Preparing for the activity: Show students this video (8:34 minutes). Have students look over the Experimental Procedure Instructions (PDF)for building an electrophoresis gel box.
Activity Embedded (Formative) Assessment
Monitor groupwork and progress: Students will be able to make the connection between how gel electrophoresis is used to link people to crimes, other people, diseases, and other organisms by building an electrophoresis gel box and generating a current to move the food coloring down their lanes of the gel, just like DNA, and comparing and analyzing the results. Walk around and monitor their progress through the activity.
Post-Activity (Summative) Assessment
Reflections: Have students complete the three reflection questions included in the Experimental Procedure Instructions (PDF) to show their understanding of how the electrophoresis box works.
- Use eye protection during this activity.
- Use hot mitts/oven mitts when handling the flask with the agar gel after it has been heated in the microwave.
- No materials in the lab are toxic.
- Food coloring dye can stain.
The corn syrup is thick and cannot be added with a plastic pipette. You can add it with a spatula and take the time to mix it in well. It will eventually make the solution denser.
- Students who need a visual can re-watch the video (2:59 minutes) while they are building their box.
Contributors
William McDonald (Cambridge Public Schools, Cambridge Rindge and Latin High School); Shereen Mejia (Boston Public Schools, East Boston High School); Victoria Bartow (Boston Public Schools, Edward M. Kennedy Academy for Health Careers)
Supporting Program
NSF Research Experience for Teachers (RET) in Integrated Nanomanufacturing at the Photonics Center, Boston University
Acknowledgements
This curriculum was based upon work supported by the National Science Foundation under RET grant no. EEC 1407165—at the Research Experience for Teachers in Integrated Nanomanufacturing at the Photonics Center at Boston University. Any opinions, findings, and conclusions or recommendations expressed in this material are those of the authors and do not necessarily reflect the views of the National Science Foundation.
Copyright
2024 by Regents of the University of Colorado; original © 2022 Boston University