
Testing the Effects of an Earthquake on the Structural Integrity of a Building
Students act as civil engineers and use the engineering design process to design and construct a building in an earthquake-prone area for a local developer. Students will have to make decisions on how many materials they use, because they will have a budget to meet. The building materials will include spaghetti noodles, toothpicks, flexible straws, marshmallows, and hot glue. They will also have to construct a building with specific size constraints and that can withstand a 2.5 lb. weight being placed on top of it. After construction, their building with the weight will be placed on a shake table. Students will measure the time their building remains standing during the earthquake. Students will review where their building first collapsed and redesign their building to try to make it last longer in a second earthquake. Finally, each group will use all of their information to develop a presentation of their results for the developer in hopes of winning the bid.
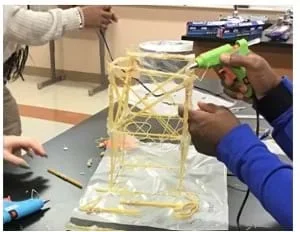 Students at work constructing their building.Copyright 2022, Jill Wold West Fargo, ND, RET Program, College of Engineering, North Dakota State University
Engineers building in earthquake zones must carefully design their buildings to keep infrastructure safe. Earthquakes produce three types of waves—primary, secondary, and surface—which cause buildings to sway and, in the worst circumstances, collapse. Engineers know that taller structures are more flexible, while shorter structures are more stiff. Because all buildings will sway in an earthquake, engineers must design buildings that will not shake at such a rate that could cause catastrophe. Using a shake table can simulate the waves and allow engineers to better design earthquake-safe buildings.
After this activity, students should be able to:
- Describe the components of the Engineering Design Process.
- Describe the effects of both vertical stress and sheer stress on a structure.
- Work collaboratively to create a structure within specified design constraints.
- Explain trade-offs in the design process using a cost-benefit analysis.
- Communicate the outcome of the design process to all parties involved.
- HS-ESS3-2 Evaluate competing design solutions for developing, managing, and utilizing energy and mineral resources based on cost-benefit ratios.
Grades 9-12
This resource focuses on the following Three Dimensional Learning aspects of NGSS:
Science & Engineering Practices- Evaluate competing design solutions to a real-world problem based on scientific ideas and principles, empirical evidence, and logical arguments regarding relevant factors (e.g. economic, societal, environmental, ethical considerations).Do you agree with this alignment?
Disciplinary Core Ideas- All forms of energy production and other resource extraction have associated economic, social, environmental, and geopolitical costs and risks as well as benefits. New technologies and social regulations can change the balance of these factors.Do you agree with this alignment?
- When evaluating solutions it is important to take into account a range of constraints including cost, safety, reliability and aesthetics and to consider social, cultural and environmental impacts.Do you agree with this alignment?
Crosscutting Concepts- Analysis of costs and benefits is a critical aspect of decisions about technology.Do you agree with this alignment?
- Science and technology may raise ethical issues for which science, by itself, does not provide answers and solutions.Do you agree with this alignment?
- Science knowledge indicates what can happen in natural systems—not what should happen. The latter involves ethics, values, and human decisions about the use of knowledge.Do you agree with this alignment?
- Many decisions are not made using science alone, but rely on social and cultural contexts to resolve issues.Do you agree with this alignment?
Do you agree with this alignment? - Evaluate competing design solutions to a real-world problem based on scientific ideas and principles, empirical evidence, and logical arguments regarding relevant factors (e.g. economic, societal, environmental, ethical considerations).
- HS-ETS1-2 Design a solution to a complex real-world problem by breaking it down into smaller, more manageable problems that can be solved through engineering.
Grades 9-12
This resource focuses on the following Three Dimensional Learning aspects of NGSS:
Science & Engineering Practices- Design a solution to a complex real-world problem, based on scientific knowledge, student-generated sources of evidence, prioritized criteria, and tradeoff considerations.Do you agree with this alignment?
Disciplinary Core Ideas- Criteria may need to be broken down into simpler ones that can be approached systematically, and decisions about the priority of certain criteria over others (trade-offs) may be needed.Do you agree with this alignment?
Do you agree with this alignment? - Design a solution to a complex real-world problem, based on scientific knowledge, student-generated sources of evidence, prioritized criteria, and tradeoff considerations.
- HS-ETS1-3 Evaluate a solution to a complex real-world problem based on prioritized criteria and trade-offs that account for a range of constraints, including cost, safety, reliability, and aesthetics, as well as possible social, cultural, and environmental impacts.
Grades 9-12
This resource focuses on the following Three Dimensional Learning aspects of NGSS:
Science & Engineering Practices- Evaluate a solution to a complex real-world problem, based on scientific knowledge, student-generated sources of evidence, prioritized criteria, and tradeoff considerations.Do you agree with this alignment?
Disciplinary Core Ideas- When evaluating solutions it is important to take into account a range of constraints including cost, safety, reliability and aesthetics and to consider social, cultural and environmental impacts.Do you agree with this alignment?
Crosscutting Concepts- New technologies can have deep impacts on society and the environment, including some that were not anticipated. Analysis of costs and benefits is a critical aspect of decisions about technology.Do you agree with this alignment?
Do you agree with this alignment? - Evaluate a solution to a complex real-world problem, based on scientific knowledge, student-generated sources of evidence, prioritized criteria, and tradeoff considerations.
Each group needs:
- spaghetti noodles (50)
- toothpicks (20)
- flexible straws (10)
- marshmallows (20)
- rubber bands (20) (can be used in construction, but must be removed before test)
- glue gun (2) and glue sticks (5)
- wax paper (to rest glue gun on when not in use)
- ruler
- scissors
- access to a camera or camera phone
- Pre-Build Worksheet (PDF)(1 per student)
- Constructing Your Model Worksheet (PDF) (1 per student)
- Bay Area Developers PowerPoint Template (PPTX) (1 per group)
For the entire class to share:
- shake table (see building instructions in Before the Activity)
- pieces of wood larger than 15 x 15 cm (2 pieces of identical size)
- bouncy balls (4 of identical size)
- rubber bands (2 that can fit around the pieces of wood)
- 2.5 lb. (1134 g) weight
- balance or scale
- stopwatch or other time-keeping device
- removeable top approximately 24 x 24 cm and 2 cm high
- masking tape or painter’s tape
- Optional: frame 24 x 24 cm and 2 cm high
- Optional: clamps (2)
- Introduction Worksheet (docx)
- Introduction Worksheet (pdf)
- Introduction Worksheet Key (docx)
- Introduction Worksheet Key (pdf)
- Pre-Build Worksheet (docx)
- Pre-Build Worksheet (pdf)
- Constructing Your Model Worksheet (docx)
- Constructing Your Model Worksheet (pdf)
- Presentation to the Bay Area Developers Template (pptx)
- Basic understanding of types of soil and relative strengths of different soils.
- Understanding of cause-and-effect relationships in motion.
- Use of cost-benefit analysis in decision making.
(Hand out the Introduction Worksheet (PDF). Lead students through the worksheet and have them discuss their responses as a class.)
Today, you will work as a group of civil engineers. Each group will belong to a firm that has just been tasked with designing a three-story building in San Francisco for the Bay Area Developers. San Francisco is near the San Andreas fault, which means each firm will have to account for earthquakes in the construction of their model. Each group’s job is to design, build, and test a model of a three-story building in an earthquake zone.
After you construct your buildings, they will be placed on a shake table. A wooden cover with a weight (2.5 lbs.) will be placed on top to test whether it stays standing. Then we will shake the building on the table, and you will measure the time it lasts before it breaks during an earthquake. Finally, each group will put together a presentation with their design, cost analysis, and the shake table test results. Each group will compete against the other groups in class to present to the Bay Area Developers in hopes of winning the bid.
Background
During an earthquake, seismic waves cause the ground to shake and buildings to vibrate. If the frequency vibration matches the natural frequency of the building, resonance may cause severe damage to the building. This is because each additional seismic wave from the earthquake amplifies the building’s vibration and causes it to vibrate more and more with each wave, resulting in significant damage, even if the strength of the earthquake is relatively small. Engineers work with geologists and seismologists to predict the frequency of earthquake motions at building sites to prevent resonance-induced collapses. They consider factors such as soil type and fault type, as well as data from previous quakes. Engineers have also devised ways to absorb shocks and limit deformation using innovative systems such as base isolation and tuned mass damper systems.
Engineers utilize the Engineering Design Process to solve problems such as how to design safe buildings in earthquake-prone areas. The process includes Ask: Identify the needs and constraints; Research the problem; Imagine: Develop possible solutions; Plan: Select a promising solution; Create: Build a prototype; Test and evaluate prototype; and Improve: Redesign as needed. In this activity, students use the engineering design process as they design a model building to withstand a simulated earthquake. Like engineers, students are prompted to consider the budget of their buildings and have the opportunity to iterate their designs.
Before the Activity
- Construct the shake table using two pieces of wood, four bouncy balls, and two rubber bands.
- Place four bouncy balls in between the pieces of wood.
- Wrap the rubber bands around the wood pieces to secure the shake table.
- For reference, see this 4:28-minute video “Earthquake Shake Table Experiment” or instructions on Building a Shake Table.
- Construct the removeable top, which will be placed on top of the buildings during testing to hold the weight in place.
- Use pieces of wood (or other material) to create a frame 24 x 24 cm that is 2 cm high.
- Attach a thin piece of wood 24 x 24 cm to the top of the frame.
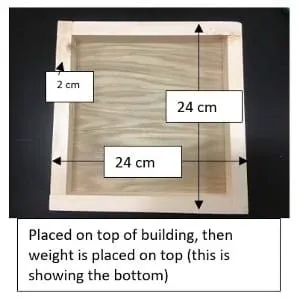 Dimensions for wooden “cap” to hold the weight on building.Copyright 2022, Jill Wold West Fargo, ND, RET Program, College of Engineering, North Dakota State University
- Print worksheets and gather materials.
- For Day 5, provide students with access to the Bay Area Developers PowerPoint Template (PPTX) through Google Classroom or another file-sharing system.
- Optional: For Day 6, invite a civil engineer to view student presentations and choose the winning bid.
With the Students
Day 1
- After the introduction, divide the class into groups of 3 or 4 students.
- Give students the Pre-Build Worksheet (PDF). Using what they learned in the introductory activity, have students create a preliminary design.
- Tell students that they will have the following constraints on their build, along with a limited supply of materials:
- Footprint must be between 15 x 15 cm.
- Height must be between 36-50 cm.
- Each story must be between 8-12 cm.
- Must hold a weight of 2.5 lbs. (1134 g).
- Mass of the building cannot exceed 300 g.
- Ensure students know that to survive the earthquake test, the building must not collapse for 10 seconds after the earthquake begins.
Days 2-3 (+optional extra day)
- Hand out the Constructing Your Model Worksheet (PDF)to each student.
- Within the group, assign students the following jobs:
- photographer (takes pictures of the build)
- cost analyst (keeps a running total of all materials used)
- timekeeper (keeps groups on track for each building time)
- Everyone will be builders!
- Remind students that rubber bands can be used to construct their building, but they must be removed before the mass is taken.
- Give students 2-3 days to complete their buildings. Students at work constructing their building.Copyright 2022, Jill Wold West Fargo, ND, RET Program, College of Engineering, North Dakota State University
Day 4
- After the groups have finished building, have them measure the mass (cannot go over 300 g) and record it on their Constructing Your Model Worksheet.
- Have students then place the building on the shake table (optional: place it within the 24 x 24 cm frame), place the removeable top on top of their building, and add a 2.5 lbs. weight on their building. Have students secure the weight to the removeable top with tape if needed. (Optional: Attach two clamps to the top piece of wood of the shake table and use them as handles while simulating an earthquake.)
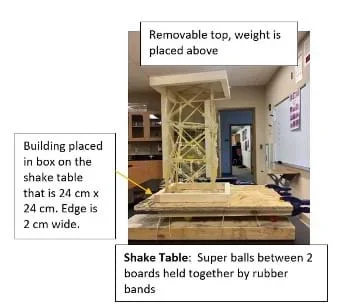 How to set up your own shake table.Copyright 2022, Jill Wold West Fargo, ND, RET Program, College of Engineering, North Dakota State University
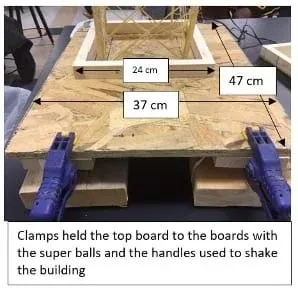 Dimensions of the top of a shake table.Copyright 2022, Jill Wold West Fargo, ND, RET Program, College of Engineering, North Dakota State UniversityDimensions for wooden “cap” to hold the weight on building.Copyright 2022, Jill Wold West Fargo, ND, RET Program, College of Engineering, North Dakota State University
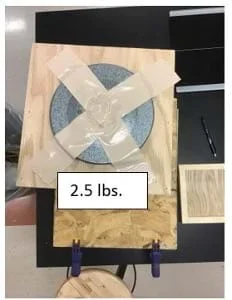 How weight is attached to the building “cap.”Copyright 2022, Jill Wold West Fargo, ND, RET Program, College of Engineering, North Dakota State University
 - Have students use a stopwatch to record the time it takes for the building to fail on the shake table. The building must remain standing for 10 seconds after the earthquake begins. If not, the students should fix mistakes to make sure it stands.
- Have students redesign their building to explain how it could be stronger, based on where the building failed. If the building did not fail, challenge students to redesign their building to ensure more than 10 seconds of an earthquake or a stronger earthquake.
Day 5
- Finally, tell students they will put together a PowerPoint presentation to the “Bay Area Developers” in hopes of winning the bid. Have students access the Bay Area Developers PowerPoint Template (PPTX) to share with their partners. This is only a template, and students should work to make it unique to their firm.
- The bid they put together should be professional and reflect their team of engineers to show that their design was strongest and most cost-effective. Encourage students to look at the Conclusion and Rubric on the Constructing Your Model Worksheet (PDF) for guidance on what to include in their presentations.
Day 6
- Have each group present their findings to the class. The teacher will determine the winning bid. Optional: invite a civil engineer to the class to determine the winning bid.
- primary (p) earthquake waves
- Compressional waves that travel through gas, liquids, and solids and move parallel to the direction of the earthquake. This is the fastest type of wave.
- secondary (s) earthquake waves
- Transverse waves that travel only through solids perpendicular to the direction of the earthquake.
- surface (l) earthquake waves
- Waves that move the slowest along the surface but cause the most damage.
- seismograph
- Machine that detects vibrations in the ground during and after an earthquake.
- richter scale
- Measures the strength of an earthquake.
- modified mercalli intensity scale
- Measures the intensity of shaking produced by an earthquake.
Pre-Activity Assessment
Civil Engineering Brainstorm: With their shoulder partner, students should discuss what a person with a civil engineering degree would do. What jobs would this type of engineer work have? As a class, record ideas on the board. They should see that a civil engineering degree can be used in a wide variety of jobs with many different aspects.
Activity Embedded (Formative) Assessment
Building Design: Students will work together to design and draw their building on paper. Their buildings need a footprint of 15 cm by 15 cm with a height of 36-50 cm. They will have to include how they will increase their stability throughout the build. They will use this as their blueprint for their spaghetti buildings. After they have their sketches done, they will answer the following questions on the Pre-Build Worksheet (PDF): What shape do you think will add the most stability for the building to withstand an earthquake? Where on the building do you think needs the most stability? How are you going to add that stability? Check in with students throughout this process and ask groups to explain their answers to the worksheet questions.
Post-Activity (Summative) Assessment
Building Presentation: Students are working as civil engineers in groups of 3 or 4 to design and build a model of a building that will withstand an earthquake. Students will follow the engineering design process. They will take pictures and careful notes that they will assemble into a well-thought-out, concise presentation on how they accomplished the task. Students will present their findings in a presentation to the “Bay Area Builders” in hopes of winning the bid. They will be graded with the rubric found on the Constructing Your Model Worksheet (PDF).
Give students limited resources. Students will just put as much glue as they can on their project if they have an unlimited supply.
Use caution when working with the hot glue gun. Keep guns on wax paper, so the glue doesn’t get all over the tables.
Students could contact a civil engineer from an earthquake-prone area (e.g., San Francisco) and have a video chat for a question-and-answer session before or after they build.
For lower grades, students could be given more ideas for what makes a building more stable to help with their design (e.g., a diaphragm or moment-resisting frames to help reinforce the building structure).
To go further, students could use an app on their phones or tablets (e.g., Vibration Meter) to measure the intensity of the earthquake waves on the building by using the gyroscope in their phone/tablet to measure the earthquake size and then analyze the waves that the shake table generated.
- There are many apps for bridge building. Students could use one of the apps to practice constructing a bridge and use some of those principles on their spaghetti building.
"How Earthquake-Proof Buildings Are Designed." Big Rentz, 4 May 2022, www.bigrentz.com/blog/earthquake-proof-buildings. Accessed 10 Nov. 2022.
May, Vicki V., screenwriter. Why Do Buildings Fall in Earthquakes. Ted-Ed, 2015, https://www.youtube.com/watch?v=H4VQul_SmCg
Contributors
Jill Wold (West Fargo Public Schools); Sarah Crary, PhD (North Dakota State University); Beena Ajmera, PhD (Iowa State University)
Supporting Program
Dr. Beena Ajmera, Iowa State University, Dr. Sarah Crary, North Dakota State University, Jill Wold, Sheyenne High school through the NSF RET program at NDSU, summer 2022.
Acknowledgements
The curriculum was developed under National Science Foundation RET grant #1953102. However, these contents do not necessarily represent the policies of the National Science Foundation, and you should not assume endorsement by the federal government.
Copyright
2024 by Regents of the University of Colorado; original © 2022 North Dakota State University