
Translating Human EMG Signal Readings to Robot Movements
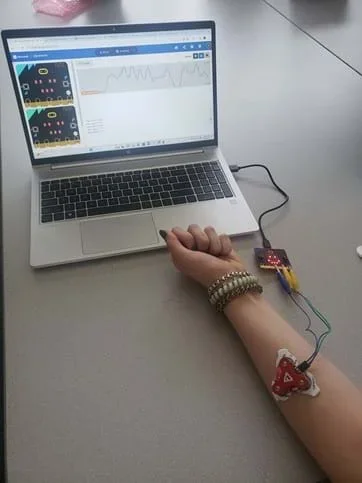 Sample experiment setup, with electrodes on forearm and laptop set up to collect EMG signal data.Copyright Taken during classroom testing.
With a design-thinking approach, students incorporate neuroscience into their robotics learning experiences in this activity. They perform an experiment to design a basic human-robot interface through which electromyography (EMG) signal readings from the muscle movements in their arm are translated to simple movements in their robots. Students brainstorm factors they believe will vary between arm movements, and use these factors to develop a data processing program for the EMG data collected. In doing so, students form an understanding of the considerations that are involved in designing, building, and evaluating a human-machine interface.
Neuroengineering is a rapidly growing field. Neuroscientists, biomedical engineers, and computer scientists all work together to develop brain-computer interfaces to treat neurological issues, restore movement in paralyzed individuals, and much more. When designing these interfaces, neuroengineers have to consider many different factors to ensure patient safety. There are limitations on how they connect these interfaces to the brain, which areas of the brain they record from and/ or simulate, and what type of activity they induce in the brain.
After this activity, students should be able to:
- Describe and sketch a simple neural circuit involved in a basic muscle movement.
- Design a basic EMG-based experiment, identifying inputs and outputs and prototyping different ways to connect the components together.
- Utilize programming to process data from an experiment to produce desired output in a robot.
- HS-ETS1-1 Analyze a major global challenge to specify qualitative and quantitative criteria and constraints for solutions that account for societal needs and wants.
Grades 9-12
This resource focuses on the following Three Dimensional Learning aspects of NGSS:
Science & Engineering Practices- Analyze complex real-world problems by specifying criteria and constraints for successful solutions.Do you agree with this alignment?
Disciplinary Core Ideas- Criteria and constraints also include satisfying any requirements set by society, such as taking issues of risk mitigation into account, and they should be quantified to the extent possible and stated in such a way that one can tell if a given design meets them.Do you agree with this alignment?
- Humanity faces major global challenges today, such as the need for supplies of clean water and food or for energy sources that minimize pollution, which can be addressed through engineering. These global challenges also may have manifestations in local communities.Do you agree with this alignment?
Crosscutting Concepts- New technologies can have deep impacts on society and the environment, including some that were not anticipated. Analysis of costs and benefits is a critical aspect of decisions about technology.Do you agree with this alignment?
Do you agree with this alignment? - Analyze complex real-world problems by specifying criteria and constraints for successful solutions.
- HS-ETS1-2 Design a solution to a complex real-world problem by breaking it down into smaller, more manageable problems that can be solved through engineering.
Grades 9-12
This resource focuses on the following Three Dimensional Learning aspects of NGSS:
Science & Engineering Practices- Design a solution to a complex real-world problem, based on scientific knowledge, student-generated sources of evidence, prioritized criteria, and tradeoff considerations.Do you agree with this alignment?
Disciplinary Core Ideas- Criteria may need to be broken down into simpler ones that can be approached systematically, and decisions about the priority of certain criteria over others (trade-offs) may be needed.Do you agree with this alignment?
Do you agree with this alignment? - Design a solution to a complex real-world problem, based on scientific knowledge, student-generated sources of evidence, prioritized criteria, and tradeoff considerations.
- HS-ETS1-3 Evaluate a solution to a complex real-world problem based on prioritized criteria and trade-offs that account for a range of constraints, including cost, safety, reliability, and aesthetics, as well as possible social, cultural, and environmental impacts.
Grades 9-12
This resource focuses on the following Three Dimensional Learning aspects of NGSS:
Science & Engineering Practices- Evaluate a solution to a complex real-world problem, based on scientific knowledge, student-generated sources of evidence, prioritized criteria, and tradeoff considerations.Do you agree with this alignment?
Disciplinary Core Ideas- When evaluating solutions it is important to take into account a range of constraints including cost, safety, reliability and aesthetics and to consider social, cultural and environmental impacts.Do you agree with this alignment?
Crosscutting Concepts- New technologies can have deep impacts on society and the environment, including some that were not anticipated. Analysis of costs and benefits is a critical aspect of decisions about technology.Do you agree with this alignment?
Do you agree with this alignment? - Evaluate a solution to a complex real-world problem, based on scientific knowledge, student-generated sources of evidence, prioritized criteria, and tradeoff considerations.
- HS-ETS1-4 Use a computer simulation to model the impact of proposed solutions to a complex real-world problem with numerous criteria and constraints on interactions within and between systems relevant to the problem.
Grades 9-12
This resource focuses on the following Three Dimensional Learning aspects of NGSS:
Science & Engineering Practices- Use mathematical models and/or computer simulations to predict the effects of a design solution on systems and/or the interactions between systems.Do you agree with this alignment?
Disciplinary Core Ideas- Both physical models and computers can be used in various ways to aid in the engineering design process. Computers are useful for a variety of purposes, such as running simulations to test different ways of solving a problem or to see which one is most efficient or economical; and in making a persuasive presentation to a client about how a given design will meet his or her needs.Do you agree with this alignment?
Crosscutting Concepts- Models (e.g., physical, mathematical, computer models) can be used to simulate systems and interactions—including energy, matter, and information flows—within and between systems at different scales.Do you agree with this alignment?
Do you agree with this alignment? - Use mathematical models and/or computer simulations to predict the effects of a design solution on systems and/or the interactions between systems.
Teacher needs:
- 1 soldering iron kit
- breadboard alligator clip jumpers (3 per muscle sensor)
- 1 laptop/computer with projector to show YouTube videos
Each group of 3-5 students needs:
- 1 laptop/computer
- 2 Micro:bit V2 starter kits
- 1 Micro:bit-compatible robot kit
- AAA batteries not included; each robot needs three AAA batteries
- 1 MyoWare 2.0 muscle sensor
- 12-24 MyoWare electrodes (3 electrodes per trial; each group will likely need 12-24 total, depending on how many tries they take to properly place them)
- Alternative: 3M Red Dot electrodes (3 electrodes) 34.5 mm by 40.6 mm. If the Red Dot electrodes are used, the cable shield and 3.5mm jack (listed as optional below) are required, as these electrodes are too large to place directly in the MyoWare muscle sensor.
Optional items (can be used to place the electrodes further away from the muscle sensor):
- Day 1: Intro to Neural Circuits Worksheet (docx)
- Day 1: Intro to Neural Circuits Worksheet (pdf)
- Day 1: Intro to Neural Circuits Worksheet Answer Key (docx)
- Day 1: Intro to Neural Circuits Worksheet Answer Key (pdf)
- Day 2: Interface and Experiment Design Worksheet (docx)
- Day 2: Interface and Experiment Design Worksheet (pdf)
- Day 2: Interface and Experiment Design Worksheet Answer Key (docx)
- Day 2: Interface and Experiment Design Worksheet Answer Key (pdf)
- Day 3: Building the Prototype Worksheet (docx)
- Day 3: Building the Prototype Worksheet (pdf)
- Day 3: Building the Prototype Worksheet Answer Key (docx)
- Day 3: Building the Prototype Worksheet Answer Key (pdf)
- Day 4: Initial Data Collection Sheet (docx)
- Day 4: Initial Data Collection Sheet (pdf)
- Day 4: Initial Data Collection Sheet Answer Key (docx)
- Day 4: Initial Data Collection Sheet Answer Key (pdf)
- Day 5: Programming Robot Movements Sheet (docx)
- Day 5: Programming Robot Movements Sheet (pdf)
- Day 5: Programming Robot Movements Sheet Answer Key (docx)
- Day 5: Programming Robot Movements Sheet Answer Key (pdf)
- Day 6: Testing, Redesign, and Reflection Sheet (docx)
- Day 6: Testing, Redesign, and Reflection Sheet (pdf)
Students should have:
- Basic proficiency with a programming language.
- Experience with experiment design and data collection.
- Familiarity with robotics, through an introductory robotics course or club experience.
Imagine being able to control a robot by simply moving your arm—just like in a science fiction movie! What if you could use a device to measure your muscle activity and translate that into movements for a robot? Today, we will begin an exciting activity where you will design a system that does just that. You’ll use a micro:bit and a muscle sensor to form the basis of a human-machine interface between your muscles and a mini robot.
Before we begin, can you think of ways a human-machine interface such as this one might be useful? Why might someone want or need to be able to control a computer with only their thoughts or muscle movements? Why might we want to create an interface between our brain and a computer? (Let students come up with various uses for brain-machine interfaces, such as for paralyzed individuals.)
(Show students a video on recent innovations in brain-machine interface design, such as one of the following: “Severe paralysis partially reversed using brain-machine interface training”: https://www.youtube.com/watch?v=gxEXG_4VrG8 [1:35 minutes] or “UCSF Researchers Help Paralyzed Man Translate Thoughts to Text”: https://www.youtube.com/watch?v=pnaoowolIsw [2:19 minutes])
Over the next few days, we will be completing a hands-on project where technology meets neuroscience. You’ll work on designing and building a human-machine interface that leverages muscle sensors to control a robot. This project will introduce you to concepts in engineering, computer science, neuroscience, and robotics. Here’s a breakdown of what you’ll be doing for this activity:
- Understanding neural circuits and the components of the interface: You’ll start by learning about neural circuits, as well as the micro:bit, muscle sensor, and robot, and how they will work together. You’ll understand how each part functions, and how we will connect them together to create our interface.
- Designing the experiment: Next, you will work in groups to plan and design your experiment. You will think about how the prototype should be set up with the items you are provided, researching how each component should be attached. You will also plan which data you will need to collect, how you will collect your data, and how you will translate this data to movements in your robots.
- Building the prototype: You will put together the pieces to create your prototype. You will attach one micro:bit to the muscle sensor, and your second micro:bit to the robot. I have already soldered wires to the muscle sensor to expedite the process and secure the connections.
- Programming the EMG micro:bit: You will program the micro:bit attached to the muscle sensor to ensure it will collect the desired EMG signals.
- Collecting base EMG data: You will collect EMG data to use to design the rest of your interface. You will flex your muscles in various ways to see how the data differs for each movement.
- Programming the robot movements: You will find a way to translate the EMG data collected to movements in the robot in real time, assigning meaning to the unique EMG data for each different movement and sending radio signals between the two micro:bits for communication.
- Testing and redesigning: You will test your system and redesign as needed.
Background
Neurons are nerve cells that send messages all over your body to allow you to do everything from breathing to talking, eating, walking, and thinking. To control our muscles, our neurons carry messages to and from the brain through the spinal cord to muscles in our body. Messages from the brain travel along the motor pathways to activate the muscles of the body, such as the muscles in our hands. The neurons that make up these pathways are called motor neurons. Each motor neuron ending sits very close to a muscle fiber, and together they form a neuromuscular junction. The motor neurons release a chemical, which is picked up by the muscle fiber. This signals the muscle fiber to contract, which makes the muscles move.
Neurons never function in isolation. They are organized into pathways (such as the motor pathway) called neural circuits, which act as information highways between different areas of the brain. Each circuit processes specific kinds of information.
Sources: NIH, Physiopedia, healthdirect
Before the Activity
- Prepare the muscle sensors for each group by soldering three breadboard alligator clip jumpers to each muscle sensor, as shown in the image below. This will allow students to connect the muscle sensor to the micro:bit securely.
- Make copies of all worksheets and handouts (one per student).
- Gather all materials for each group.
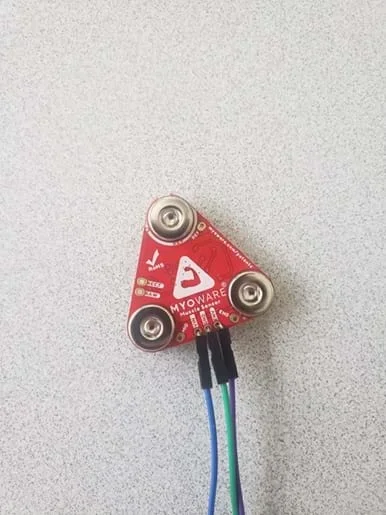 Teachers should solder three breadboard cables to the three MyoWare muscle sensor pins labeled VIN, GND, and ENV.Copyright Taken during classroom testing.
During the Activity
This activity consists of multiple parts and is divided into six one-hour sessions. If more or less time is available per session, activities can be adjusted to fit the schedule.
Day 1: Introduction to Neural Circuits
(Introduce neural circuits so students can begin to plan and design their interface.)
- Hand out one Day 1: Intro to Neural Circuits Student Worksheet (PDF) to each student.
- Ask students to clench and unclench their fists. After students have done this a few times, ask them to brainstorm the following questions and write their answers down in their worksheet:
- What parts of the body do you think are involved in the clenching of your fist? Think broadly
- How would you program a robot to clench its fist?
- Have students discuss their answers as a class.
- Discuss neural circuits with the students, giving them a definition of what a neural circuit is and explaining how multiple neural circuits work together.
- A neural circuit is a network of interconnected neurons that work together to process information and control different functions in the body. These circuits are responsible for everything from sensing your environment to moving your muscles and even thinking and feeling emotions.
- Each neural circuit consists of neurons (nerve cells) that communicate using electrical and chemical signals. The basic components of a neural circuit include:
- Sensory neurons – Detect stimuli (e.g., light, sound, touch).
- Interneurons – Process and relay information within the brain and spinal cord.
- Motor neurons – Send signals to muscles and organs to trigger a response.
- Neural circuits don’t work in isolation; they interact to perform complex functions. For example:
- Reflexes: When you touch something hot, a simple neural circuit in your spinal cord quickly pulls your hand away before your brain even processes the pain.
- Vision and Movement: When you see a ball coming toward you, circuits in your visual system detect the object, and circuits in your motor system coordinate your muscles to catch it.
- Learning and Memory: When you study for a test, different circuits in your brain strengthen their connections, allowing you to recall information later.
- Have students fill out their worksheets about a neural circuit.
- Have students sketch the components of a neural circuit for clenching their fist in their Day 1: Intro to Neural Circuits Student Worksheet (PDF).
- Prompt them to think in terms of design/systems that include an input and an output. In this case, they are as follows: INPUT is wanting to move (brain, decision-maker), converting the decision to action (neurons), transmission system (nerves), and actuator (muscles), and OUTPUT is clenching of wrist (by movement of fingers).
- Provide hints but not the solution itself.
- Have the class share out a few of their sketches and discuss what is similar and what is different in each of them. (Note: This will allow them to learn from each other, and begin to form an understanding of how the brain works with the muscles to form movements.)
- Give students time to answer the last two questions in the Day 1: Intro to Neural Circuits Student Worksheet (PDF).
- Discuss the final two questions on the worksheet with the students. (See Day 1: Intro to Neural Circuits Student Worksheet Answer Key (PDF)for potential answers.):
- How is the brain involved in the task of clenching a fist?
- What similarities and differences would be involved if a robot was implementing this process instead?
- Guide students in a class discussion of computations that go into the brain (i.e., firing of neurons at a certain rate to activate the muscles—the more they fire, the more the muscles contract, and the more the wrist is clenched.) Have them compare this to how computations would work for a robot that is performing movements.
- Show students this video to introduce the concept of EMG signals and to help them understand how to place the electrodes for their own experiments: “Introduction to EMG in the Anatomy and Physiology Lab”: https://www.youtube.com/watch?v=H9kwUXgmVyo (6:23 minutes).
Day 2: Designing the Interface
- Review the engineering design process with the students.
- Explain to students that they will work in groups to design their interface and plan their experiments. They will be provided with a list of components, and will have to think about how to connect them. They will also plan for data collection and processing.
- Split the students into groups of 3-5, depending on the age and level of the students. If they are more advanced students, smaller groups may be more appropriate, while students needing more support may benefit from larger groups.
- Hand out one Day 2: Interface and Experiment Design Worksheet (PDF) to each student.
- Give students time to plan their full experiment and interface design, following the outline provided in the Day 2: Interface and Experiment Design Worksheet (PDF). The handout provides students with possible sources of information to support them in their research and design process. They can reference the MyoWare website for information on the muscle sensor and how to connect it to the micro:bit, the micro:bit website for information on programming the micro:bit, and the Cutebot website for information on setting up the robot and the robot’s capabilities.
- Have student groups share their designs for the experiment and interface with the class, so they can learn from each other and adjust their designs as needed.
- Provide feedback on the student designs, to ensure their experiments will be feasible.
Day 3: Building the Prototype
- Explain to students that today they will put together the components to create their prototype. They will create two distinct but connected systems: the micro:bit – muscle sensor – electrode system and the micro:bit – robot system.
- Hand out one Day 3: Building the Prototype Worksheet (PDF)to each student.
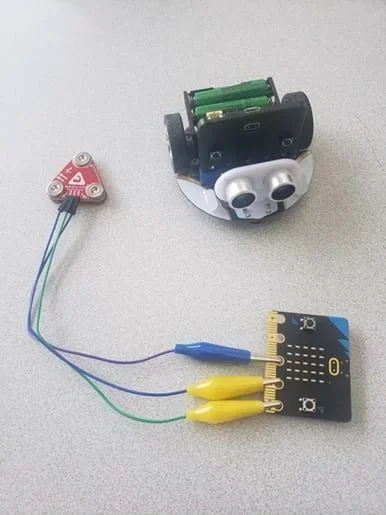 Assembled components, including the Cutebot and the micro:bit attached to the muscle sensor.Copyright Taken during classroom testing.
- Give students time to finish their plans and designs if not yet complete. Note: It is imperative that students finish their design prior to building their prototypes, as they may notice that they need to connect certain components differently as they design the full experiment.
- While the groups finish up their planning, circulate and ensure that students are connecting the components correctly.
- Give students time to build their prototypes based on their designs. Have them keep track of any challenges they face as they build, and any changes they make to their original designs, in their Day 3: Building the Prototype Worksheet (PDF). This is an important part of the engineering design process, as someone should be able to replicate the design based on their notes.
Day 4: Programming the EMG Micro:bit and Initial Data Collection
- Explain to students that today they will program the micro:bit attached to the muscle sensor to collect EMG signals. They will be provided with the necessary micro:bit code for collecting the data and for translating the collected graphs to numerical data. Students will then collect some base EMG data so they can revise their plans for data processing as needed. They should collect data while performing various muscle movements.
Sample experiment setup, with electrodes on forearm and laptop set up to collect EMG signal data.Copyright Taken during classroom testing.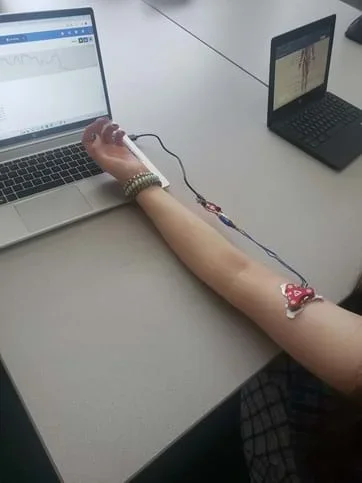 Alternative experiment setup, with electrodes on upper arm. Students should be encouraged to experiment with various placements.Copyright Taken during classroom testing.
- Hand out the Day 4: Initial Data Collection Sheet (PDF) to each student.
- Give students time to follow the instructions in the handout to attach the muscle sensor to their test subject’s arm and to program the micro:bit connected to the muscle sensor. Students should be able to collect graphs and numerical data for the EMG signals.
- Give students time to experiment with various electrode placements, including placements higher and lower on the arm, to find the placements that give them the best results.
- As needed, support students in finding proper electrode placements.
- Give students time to collect initial data for various muscle movements, based on their experiment design.
- Remind students they should record a detailed description of each movement, along with a screenshot of the graph output by the micro:bit in correlation with the movement, in their Day 4: Initial Data Collection Sheet (PDF).
- Make sure students are spacing out the movements appropriately, as they should be able to distinguish which movements correspond with which portions of the data.
- While students test, circulate to help support students in meeting this objective.
Day 5: Programming the Robot Movements
- Explain to students that today they will program the robot movements. They will translate different numerical EMG values into movements in the robots, figuring out how the data for each unique movement differs and how this can be translated into movements in the robots.
- Hand out one Day 5: Programming Robot Movements Sheet (PDF)to each student.
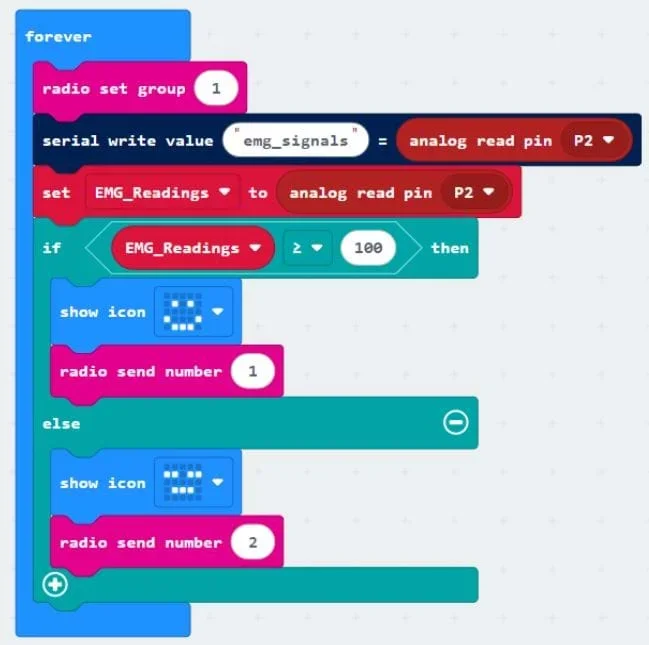 Sample code for the micro:bit attached to the muscle sensor.Copyright Taken during classroom testing.
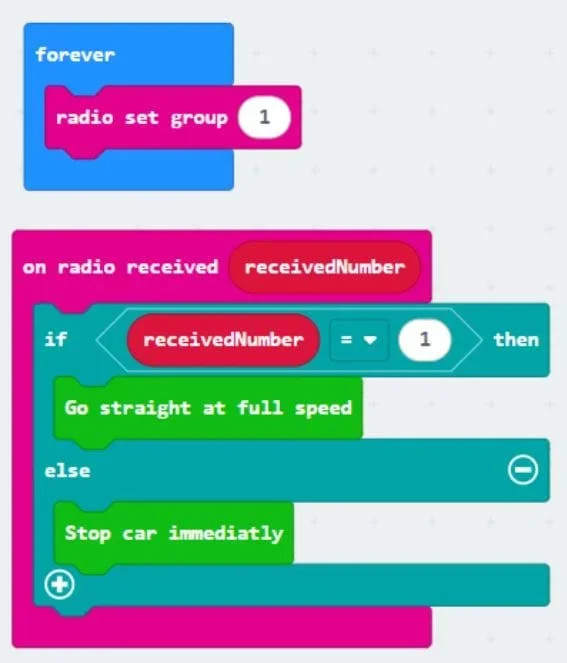 Sample code for the micro:bit attached to the robot.Copyright Taken during classroom testing.
- Have students program both the micro:bit attached to the muscle sensor and the one attached to the robot. The two micro:bits should communicate using radio signals.
- During this time, support students as they program, providing hints but not completed blocks of code.
Day 6: Testing, Redesign, and Reflection
- Explain to students that they will now test their systems with various movements, redesigning and reprogramming as needed. They will also reflect, discussing issues they ran into and whether they were able to accomplish their original goals.
- Hand out one Day 6: Testing, Redesign, and Reflection Sheet (PDF)to each student.
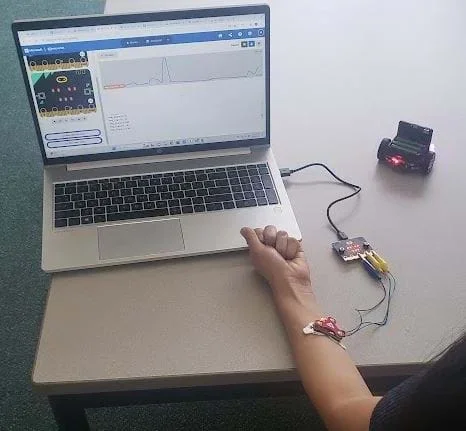 Full experiment setup.Copyright Taken during classroom testing.
- Give students time to test their interfaces according to their experimental design.
- Remind students that they should describe their testing process in the “Testing Your Interface” section of the Day 6: Testing, Redesign, and Reflection Sheet (PDF), highlighting any problems or surprises that arise as they test their interfaces.
- Make sure students improve their design as needed, redesigning or reprogramming to fix any issues that emerged during testing.
- Give students time to reflect on the process as a whole in the “Reflection” section of the handout, describing any challenges they faced and how they could have mitigated these challenges at the beginning of the process.
- neural circuit
- A population of neurons interconnected by synapses to carry out a specific function when activated.
- brain-machine interface
- A computer-based system that acquires brain signals, analyzes them, and translates them into commands that are relayed to an output device to carry out a desired action.
- electromyography (emg) signals
- Electrical signals that measure the activity of muscles when they contract.
- microcontroller
- A small computer on a single integrated circuit.
Pre-Activity Assessment
Intro Sheet: Day 1: Intro to Neural Circuits Student Worksheet (PDF)allows the teacher to gauge students’ initial understanding of circuits, the brain, and robots.
Activity Embedded (Formative) Assessment
Worksheets: There is a handout for each day that you should collect and analyze to ensure students are making adequate progress and meeting the activity objectives. You should also circulate as students are working each day to assess how their level of understanding is growing.
Post-Activity (Summative) Assessment
Reflection: The Day 6: Testing, Redesign, and Reflection Sheet (PDF)asks students to reflect on their whole experiment, discussing what they learned and what they would do differently if they repeated this experiment. This allows you to assess whether the students formed the desired engineering design skills as they evaluate their work and find areas for improvement.
It can be difficult to find the correct placement for the electrodes. Students should keep trying until they find placements that work well. This is part of the engineering design and testing process, but it can be frustrating. Before implementing this activity, you should watch videos and review pictures of proper electrode placement on the arm, and read the online MyoWare documentation for tips, to ensure you are able to help the students in troubleshooting this aspect of the experiment. Encourage students to experiment with electrode placement until they find something that works, even if they have to go through many iterations.
- For younger students, you can make project groups larger, so students have more support. Five students per group should suffice. Students can also be provided with more guidance during the experiment design process. For example, instead of having students design their own interfaces independently, each group can take ownership of one specific portion of the system (i.e., one group designs the muscle-to-micro:bit connection, another designs the micro:bit-to-robot connection, another figures out how to transfer data between the two micro:bits, etc.). This way, the class will design the interface together, rather than each group having their own design.
- For older students, you can make project groups smaller, such as three students per group. Students can be provided with less guidance during the interface design process. More independence will push them to research each component deeply, allowing them to explore different approaches and come to a consensus as a group.
Australia, Healthdirect. “Neuromuscular System.” Www.healthdirect.gov.au, 18 Oct. 2023,
www.healthdirect.gov.au/neuromuscular-system#:~:text=Neurons%20carry%20messages%20to%20and
BBC Micro:bit. (2024). https://microbit.org
MyoWare 2.0 Muscle Sensor. (2024). https://myoware.com/products/muscle-sensor.
“Neural Circuit.” Physiopedia, www.physio-pedia.com/Neural_Circuit.
NIH. “Brain Basics: The Life and Death of a Neuron.” National Institute of Neurological Disorders and Stroke, 24 Mar.
2023, www.ninds.nih.gov/health-information/public-education/brain-basics/brain-basics-life-and-death-neuron#:~:text=Neurons%20are%20nerve%20cells%20that.
Contributors
Hend Rasheed; Ashwin Mohan; Dr. David A. Bergin; Satish S. Nair
Supporting Program
Research Experience for Teachers (RET), University of Missouri Columbia
Acknowledgements
This work is based on work supported in part by the National Science Foundation under grant no. EEC-1801666—Research Experiences for Teachers at the University of Missouri. Any opinions, findings and conclusions or recommendations expressed in this material are those of the authors and do not necessarily reflect the views of the National Science Foundation.
Copyright
2025 by Regents of the University of Colorado; original © 2024 University of Missouri