
Pendulum Art: Simple Harmonic Motion with a TWIST!
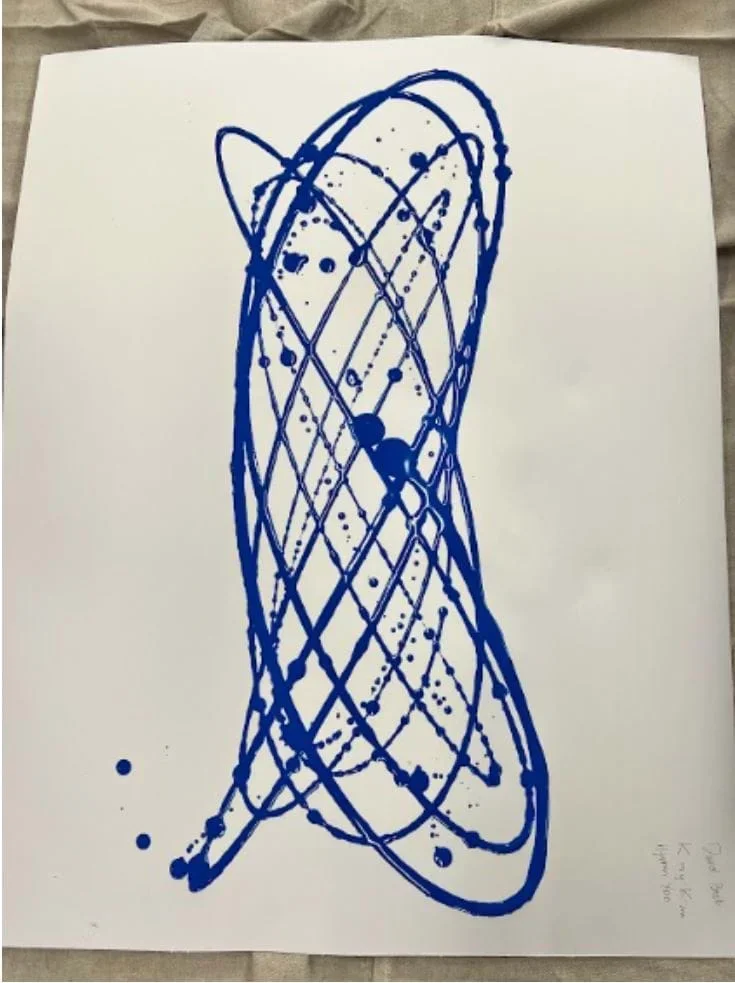 A Lissajous pattern created by a paint pendulum.Copyright Mukherjee
Students take on the role of biomedical engineers by designing and building paint pendulums that model oscillatory signals similar to brain waves. By combining pendulum motion in two perpendicular directions, students create Lissajous patterns that provide a visual representation of interacting oscillations, like the signals analyzed in electroencephalograms (EEGs). Along the way, they explore simple harmonic motion and discover how pendulum motion becomes more complex when a pendulum oscillates in multiple directions simultaneously. Through designing, testing, and improving their pendulums, students gain a deeper understanding of harmonic motion, mathematical modeling, and the engineering design process while creating a unique piece of pendulum art.
Biomedical engineers design technologies that measure and analyze brain waves, such as electroencephalograms (EEGs), to better understand how the brain functions. They study the oscillations produced by groups of neurons to identify normal brain activity and detect conditions such as epilepsy, sleep disorders, and brain injuries. By analyzing the frequency, amplitude, and patterns of these oscillations, biomedical engineers develop tools that help doctorsS2454546 diagnose and monitor neurological conditions. They also create innovative technologies such as brain-computer interfaces, which use brain wave signals to help people communicate with or control devices using their thoughts.
After this activity, students should be able to:
- Use the complete engineering design process.
- Describe simple harmonic motion as it appears in a pendulum.
- Recognize the determining variables for simple harmonic motion in a pendulum (length and gravity).
- Understand that not all real-life pendulums are “simple.”
- CCSS.Math.Content.HSA-REI.B.3 Solve linear equations and inequalities in one variable, including equations with coefficients represented by letters.
Grades 9-12
Do you agree with this alignment?
- STEL-7AA Illustrate principles, elements, and factors of design.
Grades 9-12
Do you agree with this alignment? - STEL-7W Determine the best approach by evaluating the purpose of the design.
Grades 9-12
Do you agree with this alignment? - STEL-7Y Optimize a design by addressing desired qualities within criteria and constraints.
Grades 9-12
Do you agree with this alignment?
- HS-ETS1-2 Design a solution to a complex real-world problem by breaking it down into smaller, more manageable problems that can be solved through engineering.
Grades 9-12
This resource focuses on the following Three Dimensional Learning aspects of NGSS:
Science & Engineering Practices- Design a solution to a complex real-world problem, based on scientific knowledge, student-generated sources of evidence, prioritized criteria, and tradeoff considerations.Do you agree with this alignment?
Disciplinary Core Ideas- Criteria may need to be broken down into simpler ones that can be approached systematically, and decisions about the priority of certain criteria over others (trade-offs) may be needed.Do you agree with this alignment?
Do you agree with this alignment? - Design a solution to a complex real-world problem, based on scientific knowledge, student-generated sources of evidence, prioritized criteria, and tradeoff considerations.
- HS-PS2-1 Analyze data to support the claim that Newton's second law of motion describes the mathematical relationship among the net force on a macroscopic object, its mass, and its acceleration.
Grades 9-12
This resource focuses on the following Three Dimensional Learning aspects of NGSS:
Science & Engineering Practices- Analyze data using tools, technologies, and/or models (e.g., computational, mathematical) in order to make valid and reliable scientific claims or determine an optimal design solution.Do you agree with this alignment?
- Theories and laws provide explanations in science.Do you agree with this alignment?
- Laws are statements or descriptions of the relationships among observable phenomena.Do you agree with this alignment?
Disciplinary Core Ideas- Newton's second law accurately predicts changes in the motion of macroscopic objects.Do you agree with this alignment?
- Attraction and repulsion between electric charges at the atomic scale explain the structure, properties, and transformations of matter, as well as the contact forces between material objects.Do you agree with this alignment?
Crosscutting Concepts- Empirical evidence is required to differentiate between cause and correlation and make claims about specific causes and effects.Do you agree with this alignment?
Do you agree with this alignment? - Analyze data using tools, technologies, and/or models (e.g., computational, mathematical) in order to make valid and reliable scientific claims or determine an optimal design solution.
- HS-PS4-5 Communicate technical information about how some technological devices use the principles of wave behavior and wave interactions with matter to transmit and capture information and energy.
Grades 9-12
This resource focuses on the following Three Dimensional Learning aspects of NGSS:
Science & Engineering Practices- Communicate technical information or ideas (e.g. about phenomena and/or the process of development and the design and performance of a proposed process or system) in multiple formats (including orally, graphically, textually, and mathematically).Do you agree with this alignment?
Disciplinary Core Ideas- Solar cells are human-made devices that likewise capture the sun's energy and produce electrical energy.Do you agree with this alignment?
- Information can be digitized (e.g., a picture stored as the values of an array of pixels); in this form, it can be stored reliably in computer memory and sent over long distances as a series of wave pulses.Do you agree with this alignment?
- Photoelectric materials emit electrons when they absorb light of a high-enough frequency.Do you agree with this alignment?
- Multiple technologies based on the understanding of waves and their interactions with matter are part of everyday experiences in the modern world (e.g., medical imaging, communications, scanners) and in scientific research. They are essential tools for producing, transmitting, and capturing signals and for storing and interpreting the information contained in them.Do you agree with this alignment?
Crosscutting Concepts- Systems can be designed to cause a desired effect.Do you agree with this alignment?
- Modern civilization depends on major technological systems.Do you agree with this alignment?
- Science and engineering complement each other in the cycle known as research and development (R&D).Do you agree with this alignment?
Do you agree with this alignment? - Communicate technical information or ideas (e.g. about phenomena and/or the process of development and the design and performance of a proposed process or system) in multiple formats (including orally, graphically, textually, and mathematically).
- MMA.9-12.5.C use quadratic functions to model motion.
Grades 9-12
Do you agree with this alignment?
Each group needs:
- ~5 ft (1.5 m) of string (can be whatever type of string is on hand)
- paper cups or plastic cups (Note: smaller cups work better and though we used paper cups, sometimes paper cups self-heal, which can cause problems.)
- watered down paint (A 1:1 ratio works well, and washable acrylic paint worked best. Be sure to do a test run with the paint before trying the activity with students.)
- 4 pieces of paper
- 1 hole punch (for creating holes in the sides of cups)
- 1 stopwatch
- butcher paper, cardboard or newspaper (i.e., something to catch the mess)
- access to two supports of equal height (e.g., chairs, ring stands [retort stands] with utility clamps, support stands with crossbars, two desks or tables placed a short distance apart, music stands)
- (optional) washable plastic boards
Note: For less permanent artwork, you can use sand (or flour) on cardboard or plastic instead of paint. The sand can be gathered and reused each time.
For the entire class to share:
- 1 laptop or tablet with projector (to display movie)
- 1 screwdriver or something else to poke holes in the bottom of the cups (we recommend this as a teacher task)
Students should have:
- A basic understanding of simple harmonic motion, including the period formula for a pendulum.
- An understanding of ratios and radical functions.
Today, you are going to take on the role of biomedical engineers! Biomedical engineers design technologies that help doctors understand, monitor, and improve human health. In this activity, you will use paint pendulums to model brain wave patterns. Let's start by watching a short video. As you watch, pay close attention to how the artwork is created. (Show the Pendulum Art Sample Video (MOV), 0:38 minutes)
How are they creating the art? (Let students point out what they notice in the video. Guide them to notice the pendulum apparatus and that the paint is suspended from it.)
Right, they are using a pendulum! What do you notice about the way the pendulum moves? (Potential answers: It swings back and forth; it swings in multiple directions; movement repeats repeatedly; it creates a pattern; it looks symmetrical; it follows a curved path; etc.)
What do you know about pendulums? What is a pendulum? (Responses will vary. Guide students to define a pendulum as an object suspended from a fixed point that swings back and forth under the influence of gravity.)
(Show students a drawing of a simple pendulum.)
This is a simple pendulum. It undergoes simple harmonic motion, meaning it swings back and forth in a single direction.
Where have you seen pendulums before in real life? (Potential answers: swings; grandfather clocks; metronomes; wrecking balls; playground swings; some amusement park rides. You may also want to have example photos and videos of these things on hand for students to see.)
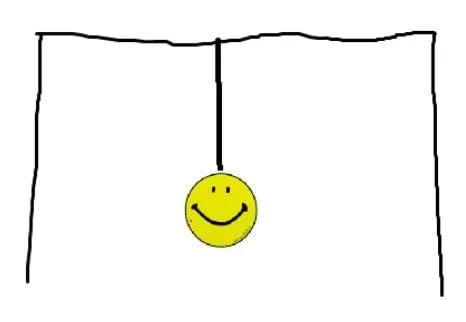 A simple pendulum.Copyright Mukherjee/Palombi
Are all of these examples as simple and straightforward as the pendulum in the picture? (Students should say no.) What makes these pendulums different from the one in the picture? (Students should recognize that many real-world pendulums are more complex than a simple pendulum. Some swing in more than one direction, some have multiple suspension points (such as playground swings), and some receive additional energy while moving, such as certain amusement park rides.)
Today, you'll work as biomedical engineers to design and build pendulums that not only create art but also model brain wave patterns.
How does this relate to brain waves? Your brain contains billions of nerve cells called neurons. As neurons communicate with one another, they produce tiny electrical signals. When millions of neurons are active at the same time, these signals combine to form repeating patterns called brain waves. Different brain waves have different frequencies and are associated with activities such as sleeping, relaxing, concentrating, and solving problems.
Biomedical engineers design and improve devices called electroencephalograms (EEGs) that use sensors placed on the scalp to record brain wave activity. By analyzing the frequencies and patterns of these electrical signals, doctors can monitor brain activity and help diagnose conditions such as epilepsy, sleep disorders, and brain injuries.
Although your paint pendulums do not create actual brain waves, they provide a model of oscillating signals. Just as brain waves have different frequencies, your pendulum will oscillate at different frequencies depending on its length. Later in the activity, you will combine two perpendicular oscillations in a single pendulum. When these oscillations interact, they create predictable curves called Lissajous patterns.
Lissajous patterns are widely studied in mathematics, physics, and engineering because they show how two oscillating motions interact. Although they are not EEGs, they help visualize how oscillating signals with different frequencies combine, making them a useful model for exploring concepts related to brain waves and biomedical engineering. (Show students Image 2.)
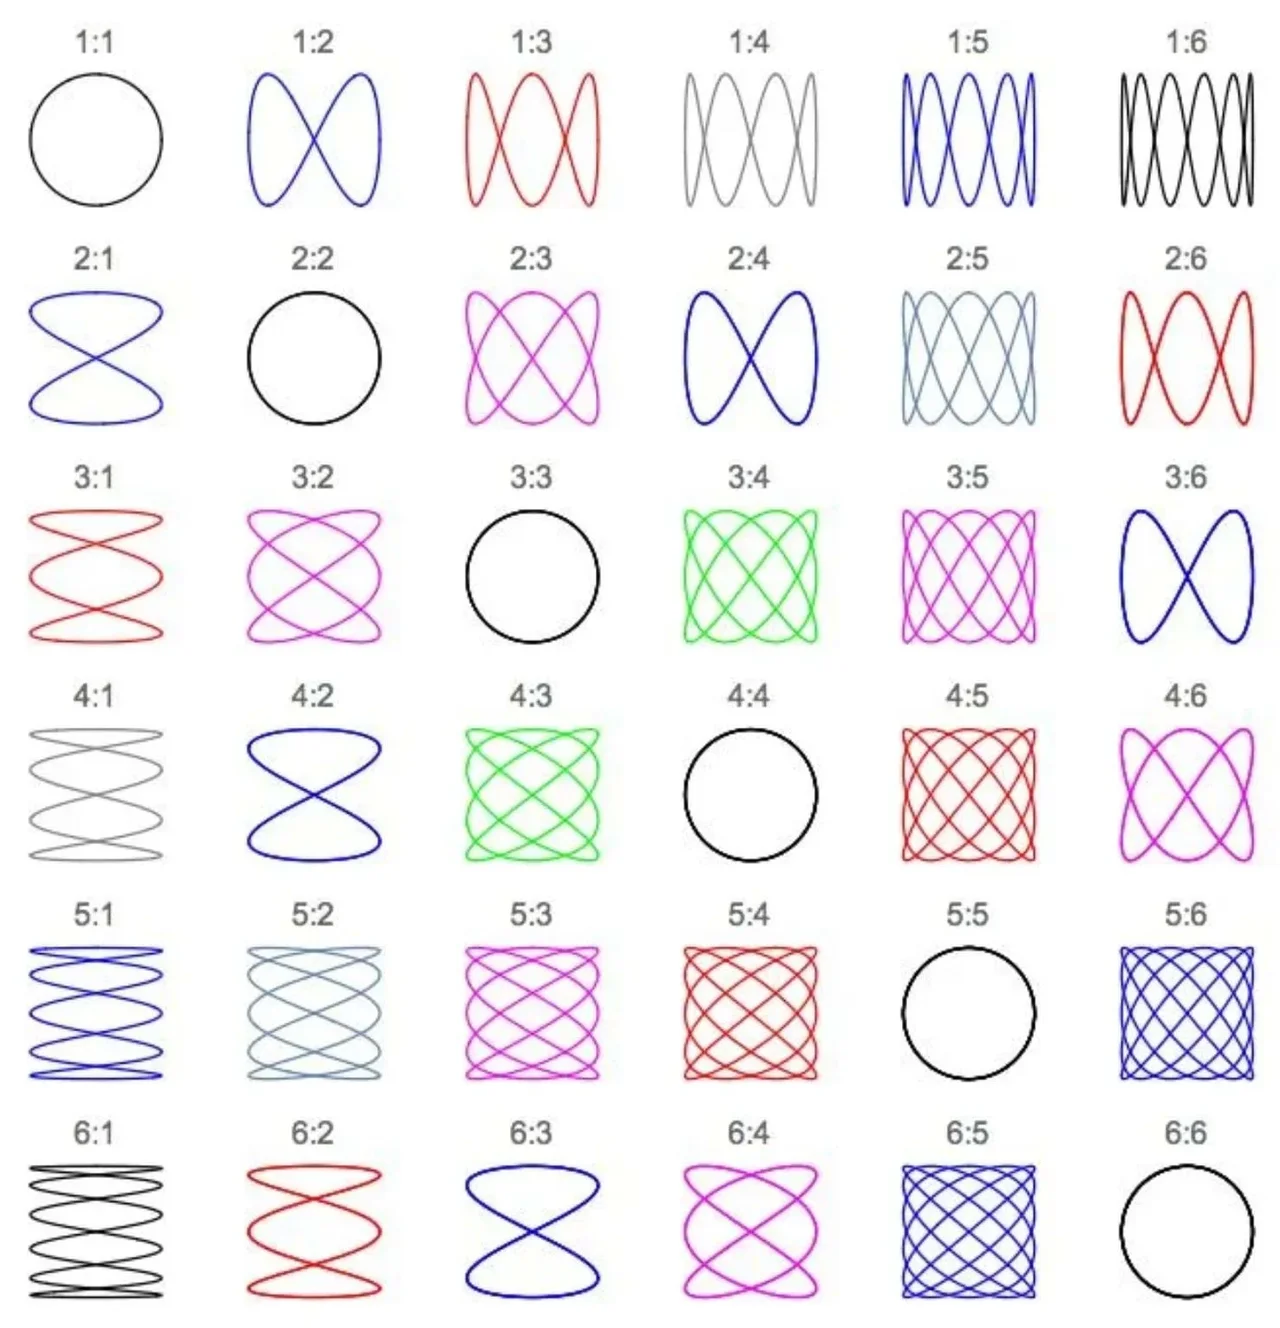 Lissajous curves.Copyright 2025 by Pedro Ney Stroski, Electrical e-Library. Retrieved from https://electricalelibrary.com/en/2025/05/03/lissajous-curves-what-are-they
First, you will work in pairs, taking on the roles of a biomedical engineer and a patient. You will select a brain wave frequency (and its corresponding period) and build a simple pendulum using the materials provided. Then, you will redesign your pendulum so that it swings in two directions at the same time.
The shape of the pattern your pendulum creates depends on the ratio of the oscillation frequencies (or periods) in the two directions. You will design and build a modified pendulum like the one shown below. (Show Image 3.)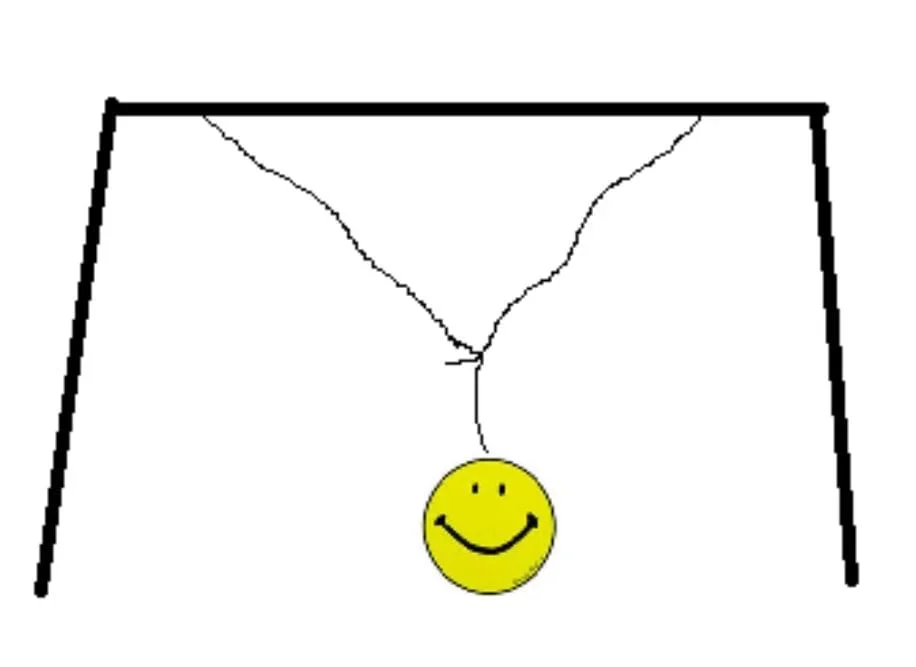 A modified pendulum.Copyright Mukherjee/Palombi
Using paint, you will trace the path of your pendulum as it swings. By adjusting the pendulum lengths, you will create different Lissajous patterns that model different oscillation ratios. By the end of the activity, you'll have designed, tested, and improved your own engineering solution, gained a deeper understanding of pendulum motion and harmonic motion, and created a unique piece of pendulum art to take home.
Background
Many real-world oscillations are more complex than simple harmonic motion. However, complex oscillatory behavior can often be understood by combining multiple simple harmonic motions. In this activity, students design a pendulum that oscillates simultaneously in two perpendicular directions, producing a more complex motion. The combination of these oscillations creates intricate curves known as Lissajous patterns. Lissajous patterns are formed when two perpendicular harmonic oscillations with frequencies that have a simple ratio are combined.
Interestingly, the electrical signals generated by the brain are also oscillatory. Biomedical engineers and physicians use electroencephalography (EEG) to record and analyze these brain wave signals to monitor brain activity and diagnose neurological conditions. Although EEGs are not Lissajous patterns, both involve the study of oscillating signals and their frequencies. In this activity, students create their own Lissajous patterns using a paint pendulum to model oscillatory behavior and explore the connections between harmonic motion, brain waves, and biomedical engineering.
In this activity, students apply the fact that the period of a simple pendulum depends on the pendulum length (l) and the acceleration due to gravity (g). They use the simple pendulum equation, T = 2π √(l/g) (where T is the period of one full swing in seconds) together with the relationship between period (T) and frequency (f), T = 1/f, to calculate the pendulum lengths needed to produce a chosen frequency. Students use ratios, square roots, and proportional reasoning to design pendulums that create specific Lissajous patterns.
For example, a student may be trying to create a Lissajous pattern with a frequency ratio of 2:1, meaning the frequency of oscillation in the x direction is twice the frequency of the oscillation in the y direction. The following shows how students can determine the required pendulum lengths for a frequency ratio of 2:1.
T =2π√(l/g),
and
T=1/f,
Therefore,
f∝1/√l.
For a frequency ratio of
fx/fy =2,
we have
2=√(ly/lx),
which gives
4=ly/lx.
This means that the pendulum with the shorter period must be one-fourth the length of the pendulum with the longer period.
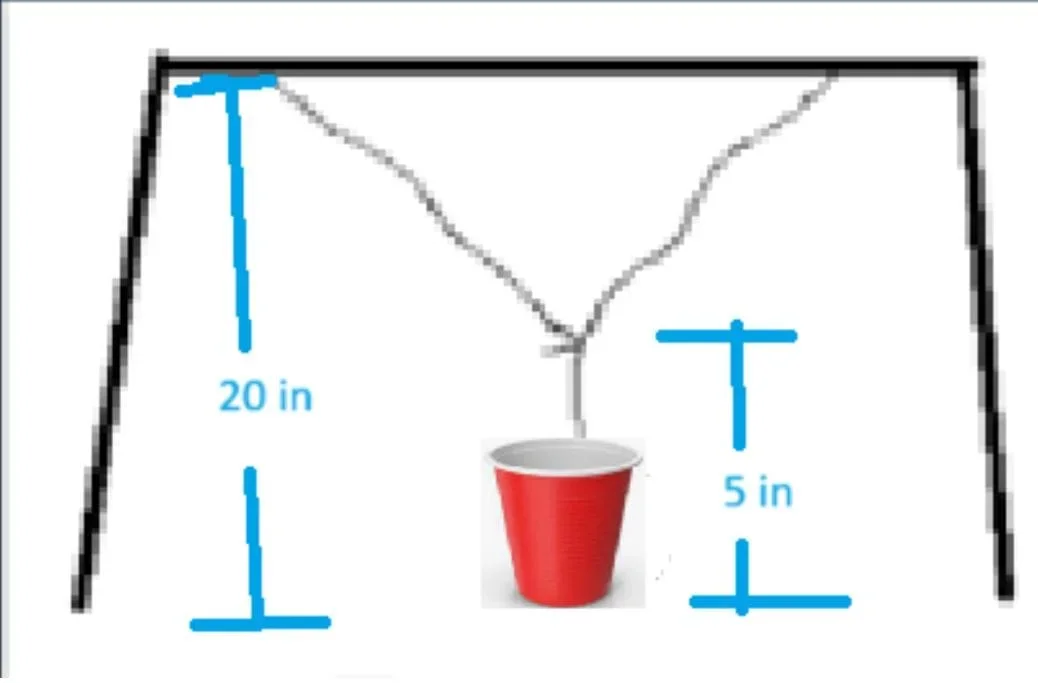 Example ratios.Copyright Mukherjee/Palombi
Students can achieve this in their pendulums by having two strings tied to a cup with a total vertical height from the top of the pendulum to the bottom of the cup of 20 inches and then tying the strings together so that the length above the cup is 5 inches. In that case, one length is four times the other. (See Image 4.) This can also be achieved with other lengths, such as 24 inches and 6 inches. The exact lengths do not matter if the ratio between the lengths is correct. The patterns are forgiving, so perfect measurements are not required, but it helps to aim for a specific measurement.
The pendulum design looks simple, especially because the general design will be provided to students. However, there are many variables that can affect the final pattern. This creates an engineering design challenge for students and gives them an opportunity to troubleshoot and improve their designs during the process.
Before the Activity
- Gather all materials needed for the activity.
- Make one copy of the Pendulum Art Packet (PDF) for each student pair.
- Build and test the demonstration pendulum:
- Construct and test a paint pendulum that can swing in two directions before class. Keep it hidden until students have built their own pendulums.
- To build the demonstration pendulum:
- Tie two strings of equal length to two supports of equal height placed approximately 2 feet apart (two chairs work well). (See Image 5.)
- Attach a cup to the strings.
- Tie the two strings together at two points, one directly above the cup and another several inches above the cup.
- Select a desired Lissajous pattern ratio and calculate the corresponding pendulum lengths. (See the Background section for details.)
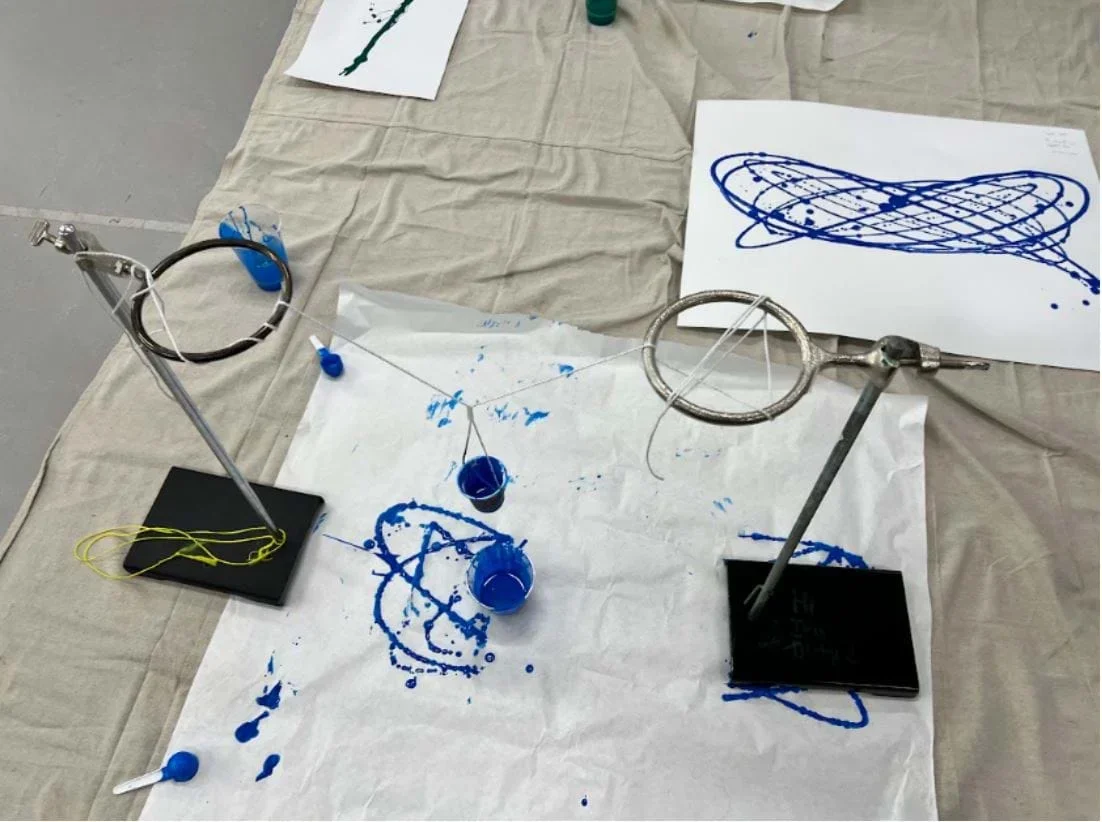 A paint pendulum setup.Copyright Mukherjee
- Prepare the pendulum cup:
- Consider cutting the pendulum cup shorter to make the target length ratios easier to achieve.
- Poke a hole in the center of the bottom of the pendulum cup. Tip: Make the hole from the inside of the cup outward to create a smoother opening and improve paint flow. You may need to reopen the hole if dried paint clogs it.
- Prepare the paint:
- Dilute the paint with water at approximately a 1:1 ratio.
- Test the paint to ensure it flows smoothly through the hole. The paint should drip steadily without clogging or flowing too quickly. Refer to the Ideal Consistency Video (MOV) (0:04 minutes) for an example of the desired consistency.
- Finalize the setup:
- Make a final test of the demonstration pendulum and adjust it as needed before class.
- Note that paper cups are generally easier to manipulate than plastic cups. However, after repeated use, the hole in the bottom may soften or partially close ("self-heal"), reducing the paint flow.
- To reduce spills, place a second, larger cup beneath the pendulum cup while filling it with paint. When you are ready to begin, simply remove the larger cup and release the pendulum.
During the Activity
Part 1: Ask, Research, and Prototype
- Read through the Introduction and Motivation section above, showing the Pendulum Art Sample Video (MOV) to the class.
- Display the Pendulum Pre-Assessment (PPTX) for the class and lead a discussion on pendulums.
- Divide the class into pairs.
- Distribute one Pendulum Art Packet (PDF) to each pair.
- Randomly assign one student in each pair to the role of “Patient” and the other student to the role of “Intern.”
- Have the "Intern" complete the Patient Intake Form section in the Pendulum Art Packet (PDF) based on how the "Patient" is feeling today.
- Have each pair identify the brain wave that best matches the Patient's mental state using the "Human Brainwaves" chart in the Pendulum Art Packet (PDF).
- Have each pair select a brain wave frequency from the appropriate range shown in the chart.
- Have students use the Brain Wave Model Pendulum Design section of the Pendulum Art Packet (PDF) to calculate the required pendulum length for their selected frequency. (Note: The calculated pendulum length may sometimes be too short to build practically. If this occurs, have students multiply the calculated length by a scale factor. A scale factor of 100 works well for most frequency combinations.)
- Have each pair draw a model of its pendulum in the space provided on page 3 of the Pendulum Art Packet (PDF). They should label the drawing with:
- The pendulum length.
- The materials being used.
- How the pendulum will be suspended.
- Have students select a cup (paper cup, plastic cup, or plastic bottle) and string to construct their simple pendulum.
- Have students use a stopwatch to measure the pendulum's period. They should time 10 complete oscillations and divide the total time by 10 to calculate the period of one oscillation.
- In the Reflect section of the Pendulum Art Packet (PDF), instruct students to compare their measured period with the expected period. Students should discuss with their partners how they could modify their pendulum to improve the accuracy of the measured period.
Part 2: Imagine, Plan, and Create
- Combine the pairs of students into new groups consisting of 3–4 students. Whenever possible, combine pairs that selected different brain wave frequencies.
- Explain that students will now design a paint pendulum that swings in two directions simultaneously to create Lissajous patterns. These patterns provide a visual representation of interacting oscillatory motions and help illustrate concepts that biomedical engineers use when analyzing brain wave signals recorded with an electroencephalogram (EEG).
- Optional: Show this one-minute video on EEGs to give students additional background on how brain waves are recorded and analyzed.
- Show students the demonstration paint pendulum you built before class. Allow them to observe its design without explaining how it works so they can generate ideas for their own designs.
- Have students complete the Planning: New Pendulum Design section of the Pendulum Art Packet. Using the brain wave frequencies selected by the two original groups, have them determine the target Lissajous pattern they will attempt to create. Students should sketch their design and identify the pendulum lengths needed to produce the desired oscillation ratio.
- Have students use the provided materials to construct their paint pendulums according to their plans. Remind them to build the pendulums so that a sheet of paper can easily be placed beneath them during testing.
Part 3: Test and Analyze
- Have each group prepare a work area by placing a large sheet of butcher paper or cardboard beneath their pendulum to protect the workspace. Then, place a clean sheet of paper on top of the butcher paper or cardboard. This sheet of paper will serve as the group's canvas. (See Image 6.)
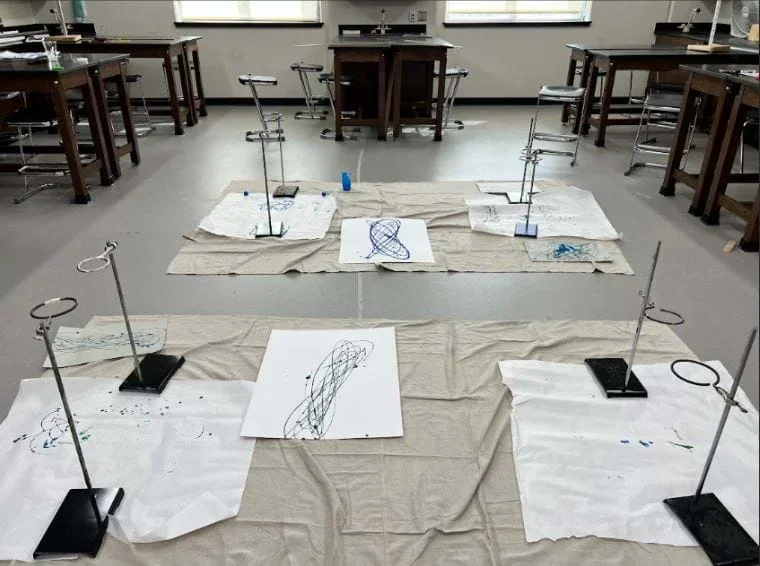 An example classroom setup.Copyright Mukherjee
- Have each group fill the pendulum cup with the diluted paint mixture and create their first pendulum painting. (Refer to the Pendulum Art Sample Video (MOV) as an example.)
- Have students make at least three attempts to create their target Lissajous pattern, making improvements to their design between each trial.
- Have students record the modifications they make and the results of each attempt in the Improve section of the Pendulum Art Packet (PDF). An example of a completed pendulum painting is shown in Image 7.
A Lissajous pattern created by a paint pendulum.Copyright Mukherjee
Part 4: Improve and Reflect
- Conduct a gallery walk so students can observe the pendulum artwork created by the other groups. Encourage them to compare the different Lissajous patterns and discuss how changes in pendulum design affected the final results.
- Have students complete the questions in the Gallery Walk Reflection Question section of the Pendulum Art Packet (PDF). Note: Their responses should describe what they learned about pendulum motion, oscillations, and the engineering design process, as well as what they learned from observing other groups' designs.
- Conclude the activity with a whole-class discussion. Ask students the following questions:
- How did changing the pendulum lengths affect the Lissajous patterns? (Potential answers: Longer pendulums swung more slowly; shorter pendulums swung more quickly; changing the ratio of the pendulum lengths changed the shape of the Lissajous pattern; different length ratios produced different patterns.)
- Why was it important to test and improve your design multiple times? (Potential answers: Our first design did not create the pattern we expected; testing helped us identify problems; making small changes improved the accuracy of the pattern; engineers often improve designs through trial and error.)
- How did mathematics help you design your pendulum? (Potential answers: We used equations to calculate the pendulum lengths; we used ratios to determine the relationship between the two pendulum lengths; we used measurements to build the pendulum accurately; math helped us predict how the pendulum would move.)
- How did your pendulum model oscillatory behavior similar to brain waves? (Potential answers: The pendulum oscillated with a specific frequency, similar to brain waves; swinging in two directions created combined oscillations; different frequency ratios produced different patterns; although the pendulum does not create actual brain waves, it modeled how oscillating signals can interact.)
- How do biomedical engineers use tools such as EEGs to study brain activity? (Potential answers: EEGs record the brain's electrical signals using sensors placed on the scalp; biomedical engineers design and improve EEG technology; doctors analyze brain wave frequencies and patterns to monitor brain activity and diagnose neurological conditions such as epilepsy or sleep disorders.)
- frequency
- The number of complete oscillations that occur in one second; measured in Hertz (Hz), which is equivalent to "per second."
- period
- The time for one complete cycle, a left swing and a right swing.
- simple harmonic motion
- A type of periodic motion in which an object moves back and forth because a restoring force pulls it toward its equilibrium position; sometimes abbreviated as SHM.
- ratio
- A comparison of two or more numbers that indicates their relative sizes.
- brainwaves
- Oscillating electrical voltages in the brain.
- square root
- A value that, when multiplied by itself, equals the original number.
- pendulum
- A weight hung from a fixed point so that it can swing freely backward and forward.
- pendulum length
- The length of the string of the pendulum from the hanging point to the center of the hanging object.
- acceleration due to gravity
- The acceleration experienced by an object falling freely under the influence of gravity. On Earth, this acceleration is approximately 9.8 meters per second squared (9.8 m/s²), meaning an object's downward velocity increases by 9.8 m/s every second.
Pre-Activity Assessment
Pre-Assessment Discussion: Display the Pendulum Pre-Assessment (PPTX) presentation and lead a class discussion about pendulums, simple harmonic motion, oscillations, and brain waves. Use students' responses to gauge their prior knowledge and misconceptions before beginning the activity. (Example answers are included in the presentation.)
Activity Embedded (Formative) Assessment
Pendulum Design: As students complete Pages 1–5 of the Pendulum Art Packet (PDF), monitor their progress to assess their understanding of brain wave frequencies, pendulum motion, mathematical calculations, and engineering design. Review students' patient intake forms, pendulum calculations, design sketches, and prototype testing to provide feedback and address misconceptions before they build their final paint pendulums.
Engineering Design: Observe students as they build, test, and refine their pendulums. Encourage them to explain how changes to pendulum length, release angle, and other design variables affect the resulting Lissajous patterns. Use students' recorded modifications and observations on Page 6 of the Pendulum Art Packet (PDF) to assess their application of the engineering design process.
Post-Activity (Summative) Assessment
Gallery Walk: Conduct a gallery walk in which students observe and compare the pendulum artwork created by other groups. Encourage students to identify similarities and differences among the Lissajous patterns and discuss how different design choices affected the final results.
Reflection Questions: Have students complete the reflection questions in the Pendulum Art Packet (PDF). Students should describe what they learned about pendulum motion, oscillations, Lissajous patterns, brain waves, and the engineering design process. Their responses provide a summative assessment of their understanding of the activity's learning objectives.
- For safety, poke the holes in the pendulum cups. Don't be afraid to make the hole fairly large, as larger holes generally improve paint flow.
- Test the paint consistency before students begin. If the paint drips slowly or clogs, add more water or slightly enlarge the hole in the cup. If the paint flows too quickly and produces blurry patterns, add more paint to thicken the mixture.
- Poke the hole from the inside of the cup outward. This creates a smoother opening and prevents the edge of the hole from restricting paint flow.
- Fill the pendulum cup with more paint than needed and have a plan for catching excess paint. We found it helpful to place a larger cup without a hole beneath the pendulum cup while filling it. When the desired pattern has been created, simply catch the pendulum with the larger cup to stop the paint flow.
- Release the pendulum from an angle rather than straight down. Starting the pendulum at an angle produces clearer Lissajous patterns and more interesting artwork.
- Protect the workspace with multiple layers of butcher paper, newspaper, or cardboard. This makes cleanup much easier and helps contain paint spills.
- Remind students not to move their artwork immediately after testing. Allow the paint to dry for a few moments before lifting the paper to prevent the paint from running and distorting the pattern.
Scaling for younger students
- Provide students with predetermined pendulum lengths instead of having them calculate the lengths.
- Limit students to one or two target Lissajous patterns with simple frequency ratios (e.g., 1:1 or 2:1).
- Focus on qualitative observations of how changing pendulum length affects the pattern rather than completing mathematical derivations.
- Provide partially assembled pendulums so students can focus on testing and improving their designs.
Scaling for older or advanced students
- Have students derive the relationship between pendulum length and frequency before building their pendulums.
- Challenge students to calculate pendulum lengths for more complex frequency ratios (e.g., 3:2 or 5:4) and predict the resulting Lissajous patterns.
- Require students to compare measured and theoretical periods and calculate experimental error(s).
- Investigate how changing the starting angle of the pendulum affects the resulting pattern. Students can explore how different release angles create a phase difference between the oscillations and examine how this phase difference changes the resulting Lissajous patterns.
- Challenge students to explain how frequency ratio, phase difference, and pendulum length together influence the shape and symmetry of the patterns.
Contributors
Faith Palombi; Tanima Mukherjee
Supporting Program
Research Experience for Teachers (RET), The Material Science and Engineering Department at the University of Texas, Austin
Acknowledgements
This curriculum was developed under National Science Foundation through the Center for Dynamics and Control of Materials: an NSF MRSEC under Cooperative Agreement number DMR-1720595. Any opinions, findings, and conclusions or recommendations expressed in this material are those of the authors and do not necessarily reflect the views of the National Science Foundation.
Copyright
2026 by Regents of the University of Colorado; original © 2025 University of Texas at Austin