
Design Step 7: Improve and Redesign/Manufacture a Product
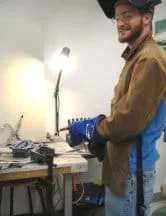 Manufacturing a final project involves the use of various tools and machinery. This student uses welding equipment to fuse two steel bars together.
As students learn more about the manufacturing process, they use what they learned from testing their designs in the previous activity to continue to improve and redesign. Students also have the opportunity to manufacture their final product. Teams work with more advanced materials and tools, such as plywood, Plexiglas, metals, epoxies, welding materials and machining tools. (Note: Conduct this activity in the context of a design project that students are working on; this activity is Step 7 in a series of seven steps that guide students through the engineering design loop.)
Improving and redesigning is an important part of the engineering design process. It allows engineers to think about how they could improve their designs after testing. They often iterate to make the product the best that it can be. Once an engineer has developed a design for a product, s/he often creates an engineering drawing to be used by a machinist or manufacturer to create the product. Engineers must be careful about the details to assist in creating products that can be efficiently manufactured.
After this activity, students should be able to:
- Evaluate the most successful aspects of a prototype and extend these to the manufacture of a final product.
- Describe how engineering drawings are the communication between engineers and manufacturers.
- Create a product according to specifications while working with more advanced building tools and materials.
- CCSS.Math.Practice.MP1 Make sense of problems and persevere in solving them.
Grades K-12
Do you agree with this alignment?
- Students will develop an understanding of the attributes of design.
Grades K-12
Do you agree with this alignment? - Students will develop an understanding of engineering design.
Grades K-12
Do you agree with this alignment? - Evaluate the design solution using conceptual, physical, and mathematical models at various intervals of the design process in order to check for proper design and to note areas where improvements are needed.
Grades 9-12
Do you agree with this alignment? - Evaluate final solutions and communicate observation, processes, and results of the entire design process, using verbal, graphic, quantitative, virtual, and written means, in addition to three-dimensional models.
Grades 9-12
Do you agree with this alignment? - STEL-1R Develop a plan that incorporates knowledge from science, mathematics, and other disciplines to design or improve a technological product or system.
Grades 9-12
Do you agree with this alignment? - STEL-7AA Illustrate principles, elements, and factors of design.
Grades 9-12
Do you agree with this alignment? - STEL-7DD Apply a broad range of making skills to their design process.
Grades 9-12
Do you agree with this alignment?
- HS-ETS1-2 Design a solution to a complex real-world problem by breaking it down into smaller, more manageable problems that can be solved through engineering.
Grades 9-12
This resource focuses on the following Three Dimensional Learning aspects of NGSS:
Science & Engineering Practices- Design a solution to a complex real-world problem, based on scientific knowledge, student-generated sources of evidence, prioritized criteria, and tradeoff considerations.Do you agree with this alignment?
Disciplinary Core Ideas- Criteria may need to be broken down into simpler ones that can be approached systematically, and decisions about the priority of certain criteria over others (trade-offs) may be needed.Do you agree with this alignment?
Do you agree with this alignment? - Design a solution to a complex real-world problem, based on scientific knowledge, student-generated sources of evidence, prioritized criteria, and tradeoff considerations.
Each group needs:
- graphing paper
- pencils
- rulers
- sticky notes
- Evaluation Rubric (PDF), for group to see and teacher to fill out
Materials and tools for the entire class to share will vary, depending on the project topic. Suggestions:
- foam core
- balsa wood
- plywood
- sheet plastic
- cardstock
- wooden or metal dowels
- craft utility knives
- rulers (if using utility knives, metal-edge rulers work best)
- cutting surface, such as plastic board, kitchen cutting board or back of newsprint pad
- hot glue and hot glue gun
- epoxy (if binding metal or plastic)
- scrap materials (have students scavenge or ask for donations)
- hardware (nuts, bolts, screws, hinges, fasteners, wire)
- machining tools (drills, saws, sanders)
- (optional) overhead projector with transparencies of Types of Engineering Drawings, (PDF)Engineering Drawing Components (PDF)and Evaluation Rubric (PDF)
Prior to beginning this activity, students must complete the associated activity, Steps 5 and 6: Create and Test a Prototype.
What's the end result of the engineering design loop? (Take suggestions from the students.) Improving and redesigning to create a final product is the culmination of the engineering design process. And, that's where manufacturing comes in. Basically, manufacturing is the use of machines, tools and labor to make things for use or sale. Manufacturing is most commonly applied to industrial production, in which raw materials (such as iron ore, logs or crude oil) are transformed into finished goods on a large scale. Generally, it is more economical (per piece) to manufacture goods on a large scale because you can produce a lot at one time.
Although you will be manufacturing a final product, you won't be doing so on a large industrial scale. Instead, to create your final creation, you will work with more advanced materials than what you used previously. Possible materials are plywood, sheet plastic, metals, epoxies and adhesives, as well as machining tools.
Before we start manufacturing, it is important to improve your design to make it the best that it can be- that is go through different iterations. Then, what you want to do is select the most successful attributes of your final prototype and incorporate them into your final product. For example, maybe you design a promising hinging mechanism for your prototype that could work even better with sturdier materials—say pieces of sheet metal and screws. Or maybe you have trouble joining two parts of your prototype using regular classroom glue. For your final prototype you can use a more advanced adhesive, such as an epoxy.
Once you have identified the successful attributes of your final prototype and thought through how you might incorporate these attributes into your final product, you will create an engineering drawing. An engineering drawing fully defines all geometric features of a design in enough detail and clarity that another person could build that component or product. For example, "design for manufacturing" (DFM) is a process that takes the different available machining processes into consideration when completing a drawing. This approach improves communication with a machinist and the quality of the final product. Communication of the design is an important part of the process and engineering drawings help with that.
Have you heard the carpentry expression "measure twice, cut once"? The same idea pertains to engineering. The process of creating an engineering drawing helps you transform the final product concept in your mind to something tangible on paper that others (like the other groups in our class) can refer to and discuss. It also helps you visualize the smaller details of your product so you can select the most appropriate materials and building processes.
Some of the materials and building processes you use to manufacture your final product may be similar to or the same as those used to make your prototype. Although your final product may resemble your prototype, you want to focus more on craftsmanship and aesthetics—making your final product look good! Once you have worked out the kinks in your design, you can devote your attention to manufacturing a functional and polished final product.
Background
Prototypes are used to explore design alternatives, test theories, confirm performance, and ensure a product is safe and user-friendly (as learned in the previous activity, Design Steps 5 and 6: Construct and Test a Prototype). It often requires improving and redesigning to find the best design. A successful prototype is used as the basis for creating a final product. The goal is to extract the most successful features of the prototypes and integrate them to create a final product.
Before constructing the final product, it is important to have a detailed engineering drawing in hand. An engineering drawing is a type of technical drawing used to fully and clearly define requirements for manufacture of the product. These drawings usually provide information on materials and dimensions, as well as multiple drawing views of the product. See the attached Types of Engineering Drawings (PDF)and Engineering Drawing Components (PDF).
Modern engineering drawings are often produced using computer-aided design (CAD) software programs; however, engineering drawings can be adequately generated by hand. Regardless of the method, the purpose of the drawing is to accurately and unambiguously capture all the geometric features of a design such that another person (such as a machinist) has all the information needed to produce that component or product.
Typically, a final product is constructed using higher-quality materials than what were used to create its prototypes. These materials may include metal, wood, plastic, ceramics and electronics. Also, more advanced construction techniques may be employed, such as special machining tools, welding equipment, and laser cutting equipment.
Check with your school to see what machining and manufacturing equipment is available. If these resources are not available, check with people in your community who have access to these resources. Sometimes a smaller engineering or manufacturing company can assist students with simple manufacturing. Another option is to check with a local university, community college or technical training school. These facilities usually have a machine shop and other manufacturing resources, and you may be able to arrange for students to use the facilities.
Before the Activity (Teacher Prep)
- Gather the materials needed to manufacture students' final products.
- Determine the amount of time necessary for the manufacturing process. Depending on the nature of the projects, this could range from several class periods to several weeks.
- If necessary, contact machine shop/manufacturing facilities managers to make arrangements for students to use off-campus resources.
- Because many of the materials and building processes will be new to students, it may be difficult for the teacher to help every team at once. To facilitate the product construction process, see if students' parents or other adults can help the teams get started during the manufacturing stage.
- As necessary, prepare written instructions to guide students to complete certain aspects of the manufacturing process that are the same for each team. For example, using epoxy to join plastic parts together might be a common manufacturing process.
- As necessary, set up advance workshops to introduce new materials and tools (for example, a "saws and drills workshop") as support for project manufacturing needs.
- Create overhead transparency (or make copies) of the Types of Engineering Drawings (PDF), Engineering Drawing Components (PDF) and Evaluation Rubric (PDF).
- Make copies of the Evaluation Rubric (PDF) (one per team) for students to see and teacher to use.
- Student teams should continue with the same 3-5 members each, as determined in the first activity of this unit, Design Step 1: Identify the Need.
With the Students: Improve and Redesign
- Using the results of testing and reflections from the previous activity, have students create at least one iteration of their prototypes. Have students make modifications and re-build their prototypes.
- Allow students to continue making improvements until they are satisfied with their final designs.
With the Students: Prior to Manufacturing (Research & Drawing)
- Discuss manufacturing with the class, as presented in the Introduction/Motivation section.
- Use the Investigating Questions to lead a class discussion about design for manufacturing.
- Have student teams refer to their final prototype(s) as you lead the activity embedded assessment (as described in the Assessment section). Ask each team to use their prototype(s) to discuss and evaluate the most successful design features, what they want the final product to do, and how they might combine the successful features from their prototype(s) into the final product. Encourage students to draw their prototypes to scale, making sure that the scale is written explicitly on the sketch.
- Give each team several sheets of graphing paper, pencils, and rulers.
- Have the teams begin sketching how they might create an engineering drawing for manufacture of the final product based on the successful features of their prototypes.
- Teams may need more than one class period to finish their sketches. Some independent research may also be needed for teams to gather information about possible materials, different construction procedures, etc.
- Help students turn their sketches into engineering drawings (show them the attached two drawing handouts as examples).
- Have students evaluate each other's drawings using the engineering drawing pin-up activity described in the Assessment section.
With the Students: The Manufacturing Process
- Give students time for the final product manufacturing process, which may range from several class periods to several weeks.
- As necessary, have groups complete workshops to introduce new materials and tools (for example, a "saws and drills workshop").
- Provide written instructions to guide students to complete certain aspects of the manufacturing process that are common among teams. For example, how to use epoxy to join plastic parts.
- With the guidance of teachers, parents and other adults, help teams complete their final product manufacturing.
With the Students: Test and Evaluate Design
- Pair each team with another and give them a few minutes to "show and tell" their products.
- Have each team prepare a 3-5 minute presentation about their project to present to the class, as described in the Assessment section. Require the following presentation components: explain the problem or need that the product is designed to solve, talk about the target audience, show how the product works and what it does, and explain the design process they followed.
- Use the attached Evaluation Rubric (PDF) to grade each team's product prototype and other design process elements.
- balsa wood
- One of the lightest varieties of wood available with remarkable strength. Because it can be carved easily and bent into a number of shapes, balsa wood is often used to create models and prototypes.
- engineering drawing
- A way to accurately and unambiguously capture all the geometric features of a design to allow another person (such as a machinist) to produce that component or product.
- epoxy
- A high-performance adhesive used for wood, metal, glass, stone and some plastics.
- foam core board
- A strong and lightweight material commonly used to produce architectural models, prototype small objects and produce patterns for casting. It consists of three layers—an inner layer of polystyrene with outer facings of white or brown craft paper.
- iteration
- Repeating a series of steps to get closer to a desired outcome (that is, re-design, re-test, re-build to get closer to an optimal engineering solution to a specific problem); can also refer to a version of the final product or solution.
- machinist
- A person who uses machine tools such as drills, mills and lathes, to make or modify parts (primarily metals parts) that conform to a set of specifications, usually in the form of engineering drawings.
- manufacturing
- The use of machines, tools and labor to make things for use or sale. On a large scale, the transformation of raw materials into finished goods.
- plexiglas
- A transparent plastic material often used as an alternative to glass. Because of its low cost, and easy handling and processing, it is often used to build models and prototypes.
Pre-Activity Assessment
Review: Have students review what they wrote for their reflection at the end of the Design Steps 5 and 6: Create and Test a Prototype activity to assess changes they intend to make.
Activity Embedded Assessment
What Works? Ask teams to examine and evaluate their final prototypes as they discuss the following questions among their teammates:
- What are the most successful design features of our prototype(s)?
- What do we want our final product to do?
- How could we combine the successful features from our prototype(s) into our final product?
- Use students' responses to verify that they understand that their final products should be based on the successful features of their prototypes.
Engineering Drawing Pin-Up: Have groups attach their engineering drawings to a chalkboard or classroom wall. Ask each team to evaluate one or two drawings (other than their own) as if they were a team of machinists or manufacturers preparing to construct the product. In other words, could they manufacture the product based solely on the information contained in the engineering drawing, or is more or different information needed to fully define the manufacturing process? Using sticky notes, have teams write down what clarifying information is needed and attach the comments to the corresponding engineering drawing. (Note: This is similar to the brainstorming process outlined in the Design Step 3 activity).
Post-Activity Assessment
Team Presentations: Ask each team to prepare a 3-5 minute presentation about its project. Require that students explain the problem or need that the product is designed to solve, talk about the target audience, show how the product works and what it does, and explain the design process followed. Give each team written or verbal feedback to help them think about any final product modifications. Use the attached Evaluation Rubric (PDF) for grading. Use this time to evaluate whether the students:
- Have identified a target audience
- Designed a product to solve a specific problem or need
- Designed a safe product
- Designed a functional product
- Used materials appropriately
- Safety issues are very important during this step of the design process, especially with construction techniques that are new to students. Review safety procedures for every construction or fabrication process, and if possible, solicit help from other adults to help in this phase of the project.
The manufacturing process often takes longer than students expect. At the beginning of class, ask each team "what will you accomplish today?" and then check in with them at the end of the period to see if they met their daily goals. This helps all team members stay on target and be accountable for the project.
You may want to share the Evaluation Rubric (PDF)with students in advance, so they are clear on what they will be graded on at the end.
Project Documentary: Have teams create short (2-4 minute) video documentaries about the making of their final products—everything from studying their prototypes to creating engineering drawings to the actual manufacturing process. (If video cameras are not available, have students create a picture flow chart or scrapbook instead). This activity helps teams reflect on the engineering design process while providing summary materials for the teacher to show future students.
Design for Manufacturability (DFM): DFM describes an engineer's knowledge and consideration of manufacturing processes in her design. Since manufacturing processes can vary widely in costs and time, several guidelines help engineers consider manufacturing in their designs. Some of the guidelines are: simplify the design by reducing the number of parts, use common parts and materials, design for ease of assembly, and design for easy joining of parts. Consideration of these guidelines in a final prototype and design can improve communication with a machinist. Have students return to their final drawings and consider the manufacturing processes that could be used in mass production of their design. Have them label on their drawings where they might change things in light of the DFM guidelines.
Engineering Expo: While working on their team presentations, have groups prepare summary posters of their design projects. Set up the classroom with an area for each team to display their research, drawings, prototypes, analysis results, final product and poster. Invite an audience — another classroom of students and teachers, or parents and families — to the expo, at which students gain experience and confidence explaining their work to "non-technical" people, and hear feedback from "the public."
Yowell, J.L. and Carlson, D.W., Eds., Introductory Engineering Design: A Projects-Based Approach, Third Edition, Textbook for GEEN 1400: First-Year Engineering Projects, Integrated Program, College of Engineering and Applied Science, University of Colorado at Boulder, Fall 2000. Accessed April 8, 2010. http://itll.colorado.edu/index.php/courses_workshops/geen_1400/resources/textbook/
Contributors
Lauren Cooper; Malinda Schaefer Zarske; Denise W. Carlson
Supporting Program
Integrated Teaching and Learning Program, of Engineering, University of Colorado Boulder
Acknowledgements
The contents of this digital library curriculum were developed under a grant from the Fund for the Improvement of Postsecondary Education (FIPSE), U.S. Department of Education and National Science Foundation GK-12 grant no. 0338326. However, these contents do not necessarily represent the policies of the Department of Education or National Science Foundation, and you should not assume endorsement by the federal government.
Copyright
2009 by Regents of the University of Colorado