
Density Column Lab - Part 2
Concluding a two-part lab activity, students use triple balance beams and graduated cylinders to take measurements and calculate densities of several household liquids and compare them to the densities of irregularly shaped objects (as determined in Part 1). Then they create density columns with the three liquids and four solid items to test their calculations and predictions of the different densities. Once their density columns are complete, students determine the effect of adding detergent to the columns. After this activity, present the associated Density & Miscibility lesson for a discussion about why the column layers do not mix.
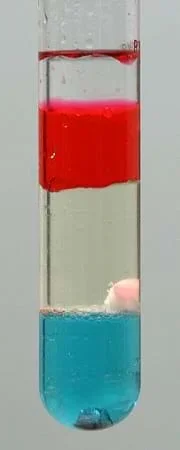 A density column containing some common liquids and solids. From top: baby oil, rubbing alcohol (colored red), vegetable oil, wax, water (colored blue) and aluminum.Copyright 2008 PRHaney, Wikimedia Commons http://commons.wikimedia.org/wiki/File:Density_column.JPG
To monitor groundwater quality, and to clean water sources if necessary, it is vital to for environmental engineers to be familiar with the physical and chemical properties of the contaminants. Properties such as density and hydrophobicity must be considered when determining the best way to remediate contaminated sites. For example, the differing densities and immiscibilities of oil and water prove beneficial to engineers when cleaning oil spills.
After this activity, students should be able to:
- Explain the difference and relationship between mass and density.
- Take accurate measurements of mass and volume using a triple balance beam and reading a meniscus, respectively.
- Relate hydrophobicity and miscibility to density.
- CCSS.Math.Content.6.NS.B.3 Fluently add, subtract, multiply, and divide multi-digit decimals using the standard algorithm for each operation.
Grade 6
Do you agree with this alignment? - CCSS.Math.Content.6.SP.B.4 Display numerical data in plots on a number line, including dot plots, histograms, and box plots.
Grade 6
Do you agree with this alignment? - CCSS.Math.Content.8.SP.A Investigate patterns of association in bivariate data.
Grade 8
Do you agree with this alignment? - CCSS.Math.Content.8.SP.A.1 Construct and interpret scatter plots for bivariate measurement data to investigate patterns of association between two quantities. Describe patterns such as clustering, outliers, positive or negative association, linear association, and nonlinear association.
Grade 8
Do you agree with this alignment? - CCSS.Math.Content.HSS-ID.B.6 Represent data on two quantitative variables on a scatter plot, and describe how the variables are related.
Grades 9-12
Do you agree with this alignment?
- STEL-3G Explain how knowledge gained from other content areas affects the development of technological products and systems.
Grades 6-8
Do you agree with this alignment?
- CCSS.Math.Content.6.NS.B.3 Fluently add, subtract, multiply, and divide multi-digit decimals using the standard algorithm for each operation.
Grade 6
Do you agree with this alignment? - CCSS.Math.Content.6.SP.B.4 Display numerical data in plots on a number line, including dot plots, histograms, and box plots.
Grade 6
Do you agree with this alignment? - CCSS.Math.Content.8.SP.A Investigate patterns of association in bivariate data.
Grade 8
Do you agree with this alignment? - CCSS.Math.Content.8.SP.A.1 Construct and interpret scatter plots for bivariate measurement data to investigate patterns of association between two quantities. Describe patterns such as clustering, outliers, positive or negative association, linear association, and nonlinear association.
Grade 8
Do you agree with this alignment? - CCSS.Math.Content.HSS-ID.B.6 Represent data on two quantitative variables on a scatter plot, and describe how the variables are related.
Grades 9-12
Do you agree with this alignment?
- Science understanding is developed through the use of science process skills, scientific knowledge, scientific investigation, reasoning, and critical think
Grades 6-8
Do you agree with this alignment?
Each group needs:
- triple balance beam
- 2 100-ml graduated cylinders
- marble
- Popsicle® or wooden craft stick piece (break wooden sticks into 1-inch pieces)
- crayon piece (break crayons into 1-inch pieces)
- pasta noodle (such as dry, uncooked penne pasta)
- tap water, 30 ml
- (optional, but recommended) few drops of liquid food coloring (to color the water)
- corn syrup, 30 ml
- vegetable oil, 30 ml
- 4 paper cups, 5-ounce (~ 148 ml) size
- liquid laundry or dish detergent, ~1 cup
- Density Column Lab - Part 2 Worksheet (PDF), one per student
Note: Many of these materials are the same as those used in the associated Part 1 activity; re-use the marbles, crayons and pasta noodles, if still available.)
Have students complete the Introduction to Water Chemistry lesson and Density Column Lab – Part 1 activity before conducting this activity.
(Review with students what they did in the associated Density Column Lab – Part 1 activity.) During the first part of our two-part lab activity, we used triple balance beams and graduated cylinders to make density measurements of a few irregularly shaped solid objects. Why did we use the triple beam balance?
What did it help us measure? (Listen to student answers.) That's right; we used the triple beam balance to measure the mass of the objects.
Why did we use the graduated cylinder? What did that help us measure? (Listen to student answers.) The graduated cylinder enabled us to measure the volume of the objects. We did this by measuring the water displacement by adding the objects to a known volume of water and determining the change in total volume.
Why did we measure mass and volume if we really were looking for the density of these objects? (Listen to student answers.) Density is equal to the mass of an object divided by its volume. So we measured mass and volume in order to have the data necessary to calculate density.
Today, we will conduct the second part of our two-part lab activity. In this part, we will expand what we did in Part 1 to include several household liquids and compare them to the densities of the irregularly shaped solid objects. Do you think liquids can have different densities, similar to solid objects? We will find out today and create density columns with three liquids and the four solid items. In addition, we will see what happens when we add detergent to the column. Let's get started!
Note: This lab is meant to be inquiry-based so the worksheet has a loosely written procedure.
Before the Activity
- Gather materials and make copies of the Density Column Lab – Part 2 Worksheet (PDF).
- Break the Popsicle sticks and crayons into three or four equally sized pieces so that the pieces fit into graduated cylinders. At each lab station, place a marble, Popsicle stick piece, crayon piece and pasta noodle.
- Prepare and place at each lab station paper cups filled with water, vegetable oil, corn syrup and detergent. Recommendation: Add a few drops of food coloring to the water to help distinguish it from the other liquids.
With the Students
- Divide the class into groups of five students each (same groups as in the associated Part 1 activity).
- Hand out the lab worksheets and have students document their density predictions for the three liquids.
- Direct students to fill in the worksheet data table with information learned from the previous lab activity (densities of four solid objects).
- Ask students how they predict the densities of the liquids will compare to the solids. Direct them to draw on the back of their worksheets a diagram that ranks their predictions for the densities of all seven items (three liquids and four solids) in relation to each other.
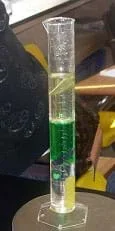 A completed density column composed of three liquids and four objects.Copyright 2010 Jessica Ray, Washington University in St. Louis
 - Measure the mass of an empty graduated cylinder and record this value for each of three liquids in the data table.
- Next, add 30ml of one of the liquids (best to start with the corn syrup) into one of the graduated cylinders. (As necessary, guide students on how to read the liquid level in the graduated cylinder; explain about the meniscus.) Record the exact volume and the mass of the graduated cylinder with the liquid. Subtract the two masses to obtain the mass of the liquid. Leave this liquid in this graduated cylinder to build the column.
- Next add 30ml of another liquid into the second graduated cylinder. Record the exact volume. Measure the mass of this graduated cylinder with the second liquid, record the mass and then calculate the mass of the second liquid.
- Add this second liquid to the first graduated cylinder containing the first liquid. Then rinse and dry the now emptied graduated cylinder.
- Repeat this process for the last liquid and then calculate the densities of all three liquids. Record on the worksheet.
- Slowly and one at a time, add the four solid items in the density column just created. Draw a diagram of the actual density column on the back of the worksheet, showing the relative placement of all liquids and solid objects relative to each other.
- Finally, add liquid detergent to fill the graduated cylinder, being careful not to overflow. Watch what happens and record your observations on the worksheet. (The layers mix without any stirring.)
- Have students answer the questions on their worksheets and hand them in for grading.
- Conclude by leading a wrap-up class discussion to compare results and conclusions; see questions in the Assessment section.
- density
- Mass per unit volume.
- hydrophilic
- Water-loving.
- hydrophobic
- Water-fearing or water-hating.
- immiscible
- Incapable of mixing.
- miscible
- Capable of mixing.
Pre-Activity Assessment
Part 1 Recap: As a class, have students discuss results and conclusions from the Density Column Lab – Part 1 activity. Talk about misconceptions about mass and density and how that relates to judging the densities of liquids.
Predictions: Direct students to the Density Column Lab – Part 2 Worksheet (PDF) to rank the liquid test items based on what they believe to be the most and the least dense. Expect most students to use mass to make their assumptions.
Activity Embedded Assessment
What's Going On? While students are conducting the lab, walk around and ask them questions to keep them engaged and on task. Example questions:
- What is the density of water? (Answer: 1,000 kg/m3 or 1 g/mL or ~8.3 lbs. per gallon.)
- How do we determine the mass and volume of one of the liquids? (Answer: For each liquid, we measure the volume using a graduated cylinder. Then we place the graduated cylinder on the triple balance beam and record the mass of both the graduated cylinder and the liquid. Finally, we subtract the mass of the graduated cylinder to find the mass of the liquid.)
- What are common uses for detergent? What do you think will happen once you add it to the column? (Answer: Detergent breaks down grease and fat, as well as disinfects. Student predictions will vary. The science behind what happens is explained in detail in the associated lesson.)
Post-Activity Assessment
Worksheet: Have students complete the worksheet questions and diagrams and hand them in for grading. Review their work to gauge their comprehension of the material.
Wrap-Up: At lab end, bring students together as a class and review their responses to the worksheet. Make sure everyone understands the answers.
Start with corn syrup as the first liquid since it is the densest and extremely sticky (and thus hard to transfer to the other graduated cylinder).
Make sure to slowly add the items, one by one, to the column, otherwise the final placement of the pasta and crayon might be altered in the column.
After completing this activity, present the Density & Miscibility lesson, which explains why the liquids did not mix together initially and why they did mix after the addition of the detergent.
Comparing the density of different liquids: How do the densities of vegetable oil, water and corn syrup help them to form layers in a cup? Published 2007. Activity 7.3, Investigation 7: Density, Inquiry in Action, American Chemical Society. 2007. Last accessed 2010. (Inspiration for this activity) http://www.inquiryinaction.org/pdf/chapter7/7.3_teacher.pdf
Contributors
Jessica Ray; Phyllis Balcerzak; Barry Williams
Supporting Program
GK-12 Program, School of Engineering and Applied Science, Washington University in St. Louis
Acknowledgements
This curriculum was developed with support from National Science Foundation GK-12 grant number DGE 0538541. However, these contents do not necessarily represent the policies of the NSF, and you should not assume endorsement by the federal government.
Copyright
2013 by Regents of the University of Colorado; original © 2010 Washington University in St. Louis