Quick Look
Grade Level: Elementary school
Time Required: 1 hour
Expendable Cost: US $1.00
Group Size: 2
Introduction
Bolded words are vocabulary and concepts to highlight with students during the activity.
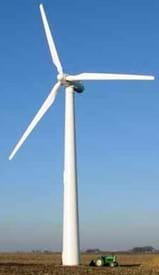
Engineers design wind turbines to transform wind energy into electrical energy, providing a renewable and economical alternative to conventional power plants in some locations. Wind is considered a clean energy source because wind turbines do not cause air or water pollution since no fuel is burned.

Supplies
Each group needs:
- 1 sheet of paper
- 1 writing utensil
- 1 small DC motor
- 1 rubber band
- scotch tape
- stiff ruler
- cylindrical-shaped cork, at least 2 cm or ¾-inch in diameter
- 4 paperclips
- 4 index cards
- scissors
For the class to share:
- alligator clips
- DC voltmeter
- hair dryer or electric fan (wind source)
Subscribe
Get the inside scoop on all things TeachEngineering such as new site features, curriculum updates, video releases, and more by signing up for our newsletter!Procedure
Overview
Students build small wind turbines to generate the maximum amount of voltage from a constant wind source.
Procedure
- Ask students what they know about wind energy and wind turbines. Then present and discuss the Introduction content.
- Organize the students into groups of two.
- Direct the teams to discuss factors they think would affect the performance of a wind turbine (such as wind strength, direction and elevation; animals, etc.). Then, briefly have each group share its thoughts with the class.
- Tell students that their engineering challenge is to build wind turbines that generate the most electrical energy. While the motor setup is the same for all groups, teams can design and build the propellers however they wish.

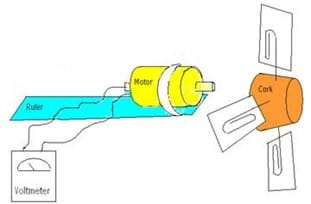
- Demonstrate the motor setup to the class (as follows, see Figure 1).
- Use a rubber band to securely attach the motor to one end of the ruler, leaving the motor shaft sticking over the end of the ruler
- Adjust the voltmeter settings so that the rotating dial is on 20V, the black wire comes out of the COM port, and the red wire comes out of the VOMA port. Use alligator clips to connect the voltmeter to the motor.
- Push the cork onto the motor shaft.
- Turn the cork and show students that turning the cork causes a voltage reading to appear on the voltmeter.
- Show students the hair dryer (or fan) that serves as the wind source. Remind them that the engineering challenge is to generate as much electrical energy as possible—that is, the highest possible voltage reading on the voltmeter.
- Show each group the supplies available to use for their propeller designs: 4 paperclips, 4 index cards, scissors, and tape.
- Give each group a pen/pencil and a piece of paper.
- Direct the teams to brainstorm ideas for how they want to build their propellers, and sketch all generated ideas.As students brainstorm (3-5 minutes), pass out the supplies to each group.
- While students are building their propellers, set up a classroom testing station, such as a desk where students can place their turbines so that the propellers hang off the desk edge.
- When students are ready to test their designs, hold the hair dryer (or place the fan) about a foot away from the turbine. Have one teammate hold the turbine in place while the other monitors the voltmeter, taking note of the highest voltage reading. Have students record all their results (voltmeter measurements) on the back of their design papers (Test 1, Test 2, Test 3, etc.).
- Give students 20 minutes to test and modify their turbines. Then have each group approach the testing station and conduct a final test with its best design effort. The turbine propeller design that obtains the highest voltage reading is the winning team.
Wrap Up - Thought Questions
- Which design(s) worked the best? Why?
- Would these designs have worked if the wind was coming from a different direction?
More Curriculum Like This

Los estudiantes construyen pequeñas turbinas de viento para ver cuánta energía eólica pueden transformar en energía eléctrica.

Students learn and discuss the advantages and disadvantages of renewable and non-renewable energy sources. They also learn about our nation's electric power grid and what it means for a residential home to be "off the grid."

Students get introduced to the real-world technical tool of a wind turbine propeller attachment. It’s a device that efficiently harvests wind energy, and in this activity they’ll build one of their own using a LEGO wind turbine, fan, and energy meter.
Copyright
© 2016 by Regents of the University of ColoradoLast modified: May 12, 2022


User Comments & Tips