Quick Look
Grade Level: 11 (10-12)
Time Required: 2 hours 15 minutes
(three 45-minute classes)
Expendable Cost/Group: US $5.00
Group Size: 4
Activity Dependency: None
Subject Areas: Physical Science, Problem Solving
NGSS Performance Expectations:

| HS-ETS1-2 |
Summary
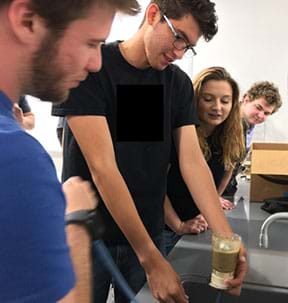
Students explore the physical science behind the causes of quicksand and become familiar with relationship between concepts such as total stress, pore pressure, and effective stress. Students also relate these concepts to soil liquefaction—a major concern during earthquakes. Students begin the activity by designing a simple device to test the effects of quicksand on materials of different densities and weights. They prototype a support structure that works to prevent a heavy object from sinking into quicksand. At the end of the activity, students reflect on the engineering design process and consider the steps civil engineers take in designing sturdy buildings and other structures.Engineering Connection
In regions of the world subject to earthquakes, civil engineers must consider how well a building, as well as the ground upon which it sits, can withstand seismic waves. The potential for soil liquefaction, a condition of stress in which solid ground can behave like a liquid, is a major consideration in civil engineering. One example is the extensive liquefaction that occurred during the 1964 Niigata earthquake in Japan. Much of Niigata had been built on loose sand from ancient river beds and many buildings sunk into the ground because of the earthquake (see Image 2). Studying the relationship between concepts such as total stress, pore pressure, and effective stress in liquefaction help engineers understand how to design structures that can withstand major seismic activity. By using quicksand as a model, engineers can advance their understanding of foundational soils and prevent structural damage—and the loss of life from such damage—due to liquefaction.

Learning Objectives
After this activity, students should be able to:
- Explain the relationship between soil and water in quicksand and soil liquefaction.
- Create a model testing device to test the question: “Would humans sink in quicksand?”
- Design and test a model structure to prevent objects from sinking in quicksand.
Educational Standards
Each TeachEngineering lesson or activity is correlated to one or more K-12 science,
technology, engineering or math (STEM) educational standards.
All 100,000+ K-12 STEM standards covered in TeachEngineering are collected, maintained and packaged by the Achievement Standards Network (ASN),
a project of D2L (www.achievementstandards.org).
In the ASN, standards are hierarchically structured: first by source; e.g., by state; within source by type; e.g., science or mathematics;
within type by subtype, then by grade, etc.
Each TeachEngineering lesson or activity is correlated to one or more K-12 science, technology, engineering or math (STEM) educational standards.
All 100,000+ K-12 STEM standards covered in TeachEngineering are collected, maintained and packaged by the Achievement Standards Network (ASN), a project of D2L (www.achievementstandards.org).
In the ASN, standards are hierarchically structured: first by source; e.g., by state; within source by type; e.g., science or mathematics; within type by subtype, then by grade, etc.
NGSS: Next Generation Science Standards - Science
-
Apply scientific ideas to solve a design problem, taking into account possible unanticipated effects.
(Grades 9 - 12)
More Details
Do you agree with this alignment?
| NGSS Performance Expectation | ||
|---|---|---|
|
HS-ETS1-2. Design a solution to a complex real-world problem by breaking it down into smaller, more manageable problems that can be solved through engineering. (Grades 9 - 12) Do you agree with this alignment? |
||
| Click to view other curriculum aligned to this Performance Expectation | ||
| This activity focuses on the following Three Dimensional Learning aspects of NGSS: | ||
| Science & Engineering Practices | Disciplinary Core Ideas | Crosscutting Concepts |
| Design a solution to a complex real-world problem, based on scientific knowledge, student-generated sources of evidence, prioritized criteria, and tradeoff considerations. Alignment agreement: | Criteria may need to be broken down into simpler ones that can be approached systematically, and decisions about the priority of certain criteria over others (trade-offs) may be needed. Alignment agreement: | |
Common Core State Standards - Math
-
Make inferences and justify conclusions from sample surveys, experiments, and observational studies
(Grades
9 -
12)
More Details
Do you agree with this alignment?
International Technology and Engineering Educators Association - Technology
-
Students will develop an understanding of the attributes of design.
(Grades
K -
12)
More Details
Do you agree with this alignment?
-
Students will develop an understanding of engineering design.
(Grades
K -
12)
More Details
Do you agree with this alignment?
-
Students will develop an understanding of the role of troubleshooting, research and development, invention and innovation, and experimentation in problem solving.
(Grades
K -
12)
More Details
Do you agree with this alignment?
State Standards
Colorado - Math
-
Make inferences and justify conclusions from sample surveys, experiments, and observational studies.
(Grades
9 -
12)
More Details
Do you agree with this alignment?
Colorado - Science
-
Natural hazards have local, national and global impacts such as volcanoes, earthquakes, tsunamis, hurricanes, and thunderstorms
(Grades
9 -
12)
More Details
Do you agree with this alignment?
Materials List
Each group needs:
- 1 empty 2 L bottle; clear plastic soda bottles work best so students can observe quicksand in action
- 1 m flexible tubing or a 1 m section of old garden hose; fittings removed or cut off
- small round objects of similar sizes but different densities; for example, a metal ball, large marble, and a lime:
- Note: one object needs to be denser than quicksand, which has an approximate specific gravity of 2. For example, a hollow steel ball with a diameter of 5 cm and a specific gravity of 2.5, and will sink in the experiment. Another object needs either as dense or denser than a human but less dense than quicksand. Humans have an approximate specific gravity of 0.95, so a lime with an approximate specific gravity of 1.1 would suffice. Students could even use toothpicks to make made lime “people” with arms & legs to save.
- 10 cm2 piece of cheesecloth
- drain filter to protect sink from overflow sand (paper towels work well in a pinch)
- 1 L container of water to dampen sand from the top of quicksand model
To share with the entire class:
- sink and faucet (use of a laboratory set up with multiple sinks is ideal)
- 4.5 kg of playground sand
- duct tape
- paper towels and cleaning supplies
- waste container for wet sand
- supplies to design and create a prototype structure that prevents a heavy object from sinking in the quicksand; items may include Popsicle sticks, cardboard, straws, aluminum foil, sponges, plastic or paper cups, etc.
- tools to help student build their prototype support structures, including rulers, scissors, permanent markers, and hot glue and glue guns, etc.
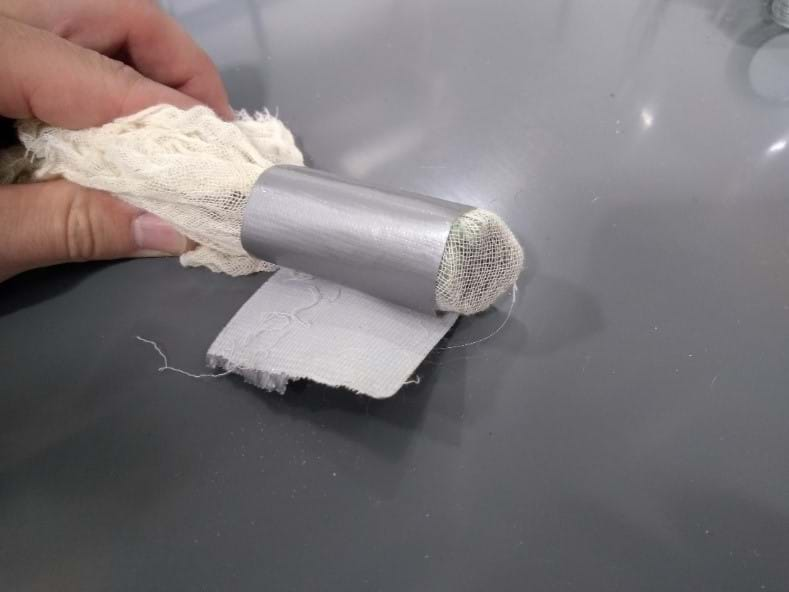
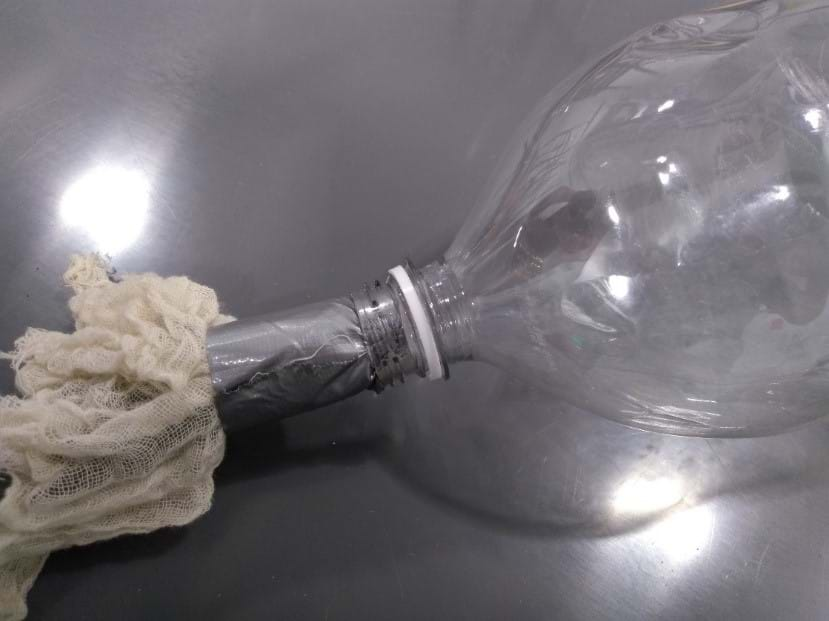
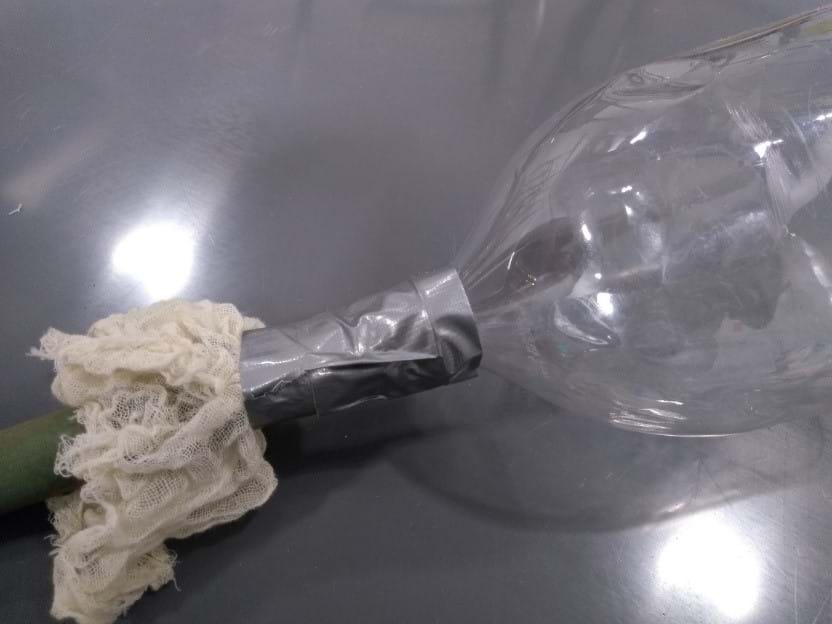
The following images (Image 3, Image 4, and Image 5) show a mock-up of a quicksand testing device in three stages of construction. This example may be used as a model that students can follow for guidance if the groups run out of ideas. This model uses cheesecloth fitted to one end of a flexible tube using duct tube (Image 3). The end with the cheesecloth is inserted roughly 2 cm into the testing container (Image 4). The tube is then taped to the opening of a 2 L plastic bottle (Image 5). The other end of the tube is taped to a faucet (not pictured).
Pre-Req Knowledge
Students should have a basic understanding of the following concepts: weight, density, liquids versus solids, and pressure.
Introduction/Motivation
To set the scene for this activity, let us take a brief look at one of the more well-known motifs founds in adventure movies. Picture an explorer moving through a thick jungle who suddenly encounters a clearing. Exhausting from hacking through underbrush, the explorer treads into the open space only to suddenly sink up to their knees in gray mud—quicksand! The explorer struggles to move forward, only to find themselves sinking further up to their thighs! Another struggle forward and they sink up to their waist. A lesser explorer might have struggled until they were doomed to sink into the murky depths of the quicksand, but this particular explorer managed to grab a nearby vine and pulled themselves to safety.
A scene like that in a Hollywood movie may be dramatic, but is it realistic? Can a human really sink in quicksand? To answer this question, let’s examine the nature of quicksand as well as some of the science behind this natural phenomenon.
In essence, quicksand is a saturated sand that has been liquefied due to water flow. Sand, a type of soil, is a mixture of granular material composed of rock or mineral containing microscopic gaps or voids that may be filled with air or water. When these voids are completely filled with water, we define it as being saturated.
Now, let us consider the mass and weight of a human. Weight is the force of gravity applied to our mass, and is defined with the basic equation W = mg, where W is weight in Newtons, m is mass in kilograms, and g is the acceleration of gravity in ms2, or meters per second squared. Based on this information, weight alone does not determine whether we will break through a particular walking surface. Whether we break through or not depends on our weight divided by the area over which that weight is applied. We call this concept stress, which is symbolized by the lower-case Greek letter sigma σ and is defined by the equation σ = W/A, where A is cross-sectional area in square meters.
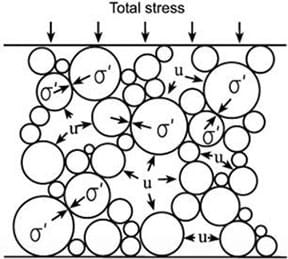
When we walk on soil, we are usually supported because the soil is strong enough to resist the total amount of stress applied by our feet. The soil resists this total stress by a combination of pore pressure (u), which results from water that exerts pressure on its surroundings, and effective stress (σ’), which results from the physical contact between adjacent soil particles. We can write the relationship between total stress (σ), pore pressure, and effective stress as follows:
σ = u + σ’
This equation says that if our soil column is saturated, we are supported by a combination of effective stress and pore pressure. In certain situations, like a significant up flow of groundwater or soil consolidation triggered by earthquakes, pore pressure is increased enough so that it is the only factor supporting the total stress. With effective stress no longer playing a part in supporting our load, there is no longer any force holding the soil grains against each other. When this happens, the soil acts like a liquid (specifically, a slurry), instead of a porous solid. We are now only supported by the pore pressure provided by the slurry of water and sand that can now easily escape from under our feet. This is called liquefaction. Liquefaction is when a soil has a pore pressure greater than or equal to the total stress, so there is no effective stress.
In quicksand, liquefaction occurs when an outside source of water enters saturated soil in a manner in which it increases the water pore pressure so it is higher than the total stress. This source of this water flow is usually upward, or up flow.
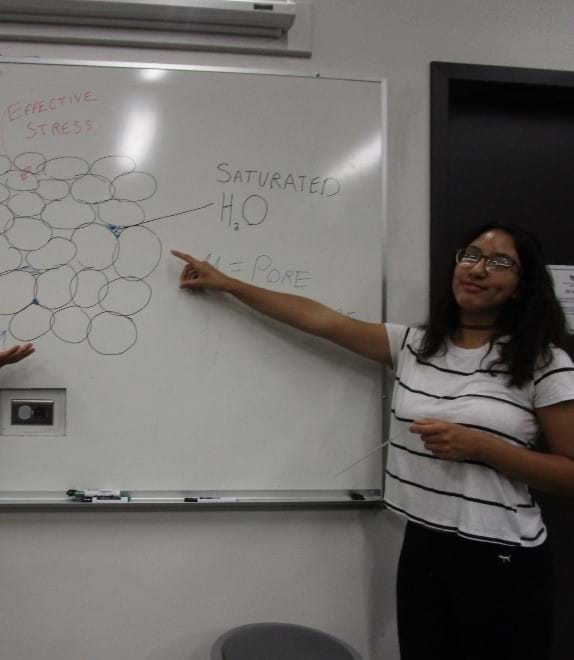
Now we have a basic idea of the science, let us get back to our original question: if solid sand turns into quicksand will a human sink? To answer this, we need to think about one more concept: buoyancy. Buoyancy is defined as the upward force on an object submerged in a liquid. The magnitude of the buoyant force is equal to the weight of the liquid displaced. Objects submerged, or partially submerged, in quicksand will experience a buoyant force, just as they would in a pool of water. However, quicksand has higher density than water, because it is a mixture of water (with a specific gravity of 1) and sand (with specific gravity of about 2.5). Consequently, the buoyant force in quicksand is greater than the buoyant force in water. Do you think you would sink all the way in quicksand? Let us find out!
If a human is similar to a lime, then will a human ever sink all the way in quicksand? (Accept student ideas.) The answer is no, but we can still get terribly stuck. So, are movie or TV portrayals of quicksand accurate? Why or why not? (Answers will vary depending on the movie or TV show, but most of the portrayals are not accurate and show humans almost “swallowed up” by quicksand.)
Why do we care about quicksand? As we mentioned, earthquakes can cause an up flow of groundwater and create a large area of quicksand that may compromise a structure that is not designed properly. There are many communities around the world that are prone to earthquakes, sometimes with disastrous effects. Engineers develop designs to help build strong structures that will keep people and communities safe during such events. Civil engineers who design structures that can withstand seismic events also design support systems for existing buildings, roads, bridges, and city structures to help them withstand soil liquefaction. Knowing the characteristics of soils can help engineers design buildings as well as pinpoint optimal locations for construction.
Now that we have seen how quicksand can sink a heavy object (like a building), or even a human under the right conditions, we will act as engineers and try to figure out if we can keep objects from sinking. First, your team will design and build a quicksand testing device out of simple materials. Your groups will then test your quicksand model with a variety of objects to make sure your device is working. Similar to civil engineers, you will brainstorm, design, build, and test prototype structures to prevent objects from sinking into the quicksand. Engineers often build and test several prototypes before they propose and build a final design. They often use easily available materials to test their ideas, just as we will do today. Ready to get started? (At this point in the activity, you can show students the available materials.) Choose common materials such as Popsicle sticks, newspapers, aluminum foil, sponges, or small paper and plastic cups. Also consider using reused and recycled materials!
Procedure
Before the Activity
- Gather the items. You may want to keep the items out of sight to promote brainstorming.
- The teacher may choose to assemble the testing devices shown in Images 3-5.
With the Students
Day 1: Quicksand testing devices:
- Frame the activity using ideas from the Introduction/Motivation section of the activity.
- Show the students the available materials (2 L bottle, flexible tubing, cheesecloth, paper towels and duct tape) and let them proceed.
- Show students the objects that they will try to “sink” in the quicksand, such as a steel ball, a large marble, or a lime.
- Encourage students to brainstorm on how to design a device from easily available materials to test whether humans/structures would sink in quicksand. Encourage all ideas.
- Allow students to start building models to create and show the interactions of quicksand.
- Require students to test and iterate their designs until they have the right model for testing objects.
- An example model may consist of the following steps:
- Cover the sink drain with paper towels to keep sand out.
- Attach the flexible tube to the device using duct tape.
- Attach the other end of the tube to the faucet using duct tape.
- Load the sand into the top of the filter. The sand needs to be deep enough to submerge the largest object tested. (10-15 cm of sand is a good starting point.)
- Pour water over the sand to give it an initial saturation.
- Add densest object to the surface of the sand.
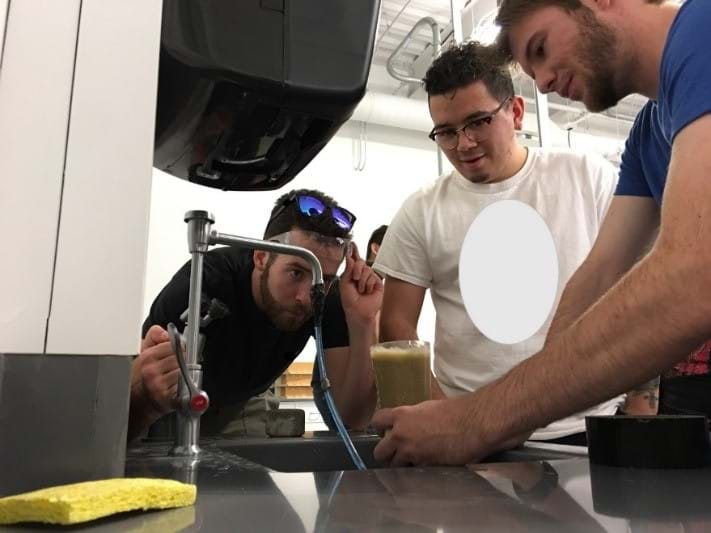
- Slowly turn on the faucet tap and let the water flow through the tubing and into the bottle, allowing it to rise to the surface. If the discharge is small enough, the object will remain on top of the sand. If the discharge is large enough, the sand will liquefy and the dense object will sink to the bottom.
- Drain the water from the top of the device after each test so the up flow of water can work effectively during each test.
Day 2: Designing structures to prevent sinking of objects in quicksand:
- After students have tested their quicksand models several times, start on the second part of engineering design: to develop structures to prevent an object from sinking into the quicksand.
- Show the students the available materials (common or recycled materials such as popsicle sticks, cardboard, straws, aluminum foil, sponges, small paper or plastic cups)
- Encourage students to brainstorm on how to design a structure from easily available materials to prevent objects from sinking in their quicksand testing device. Encourage all ideas.
- Allow students to start building their designs.
- Require students to test and iterate their designs as engineers do to keep their objects on top of the quicksand. Students may want to start testing their lightest object and move to their heaviest, while iterating through the process.
- Again, remind students to drain the excess water off the top of their sand before each test of their designs.
- Give students an occasional time stamp of how much time they have left to iterate their design.
Day 3: Communicating design ideas
- After student teams have time to build and iterate, have them present their designs to the rest of the class.
- Ask students the following questions to facilitate discussion for presenting their designs:
- What worked well on your design?
- What could be further improved?
- If you had more time or different materials, what would you change about your design?
- Conclude the discussion by connecting the activity back to and civil engineering. Remind the students that seismic waves during earthquakes can rearrange soil particles, and allow an up flow of water into a newly compacted pore space. The resulting increase in pore pressure sometimes causes liquefaction as shown in Image 1 above.
Vocabulary/Definitions
effective stress: Force that keeps a collection of particles rigid or “stuck” together; usually applied to sands and soils.
liquefaction: A process that generates a liquid from a solid. For example, water-saturated soil may act as a liquid because the water pressure within a soil has caused the particles to lose contact with one another.
pore pressure: The pressure of water held within the gaps or pores between particles.
seismic: Related to the study of earthquakes. (From the Ancient Greek, seismós, meaning “earthquake.”)
slurry: Thin, viscous liquid mixture containing a substantial component of suspended solids.
soil: A mixture of organic matter, minerals, gases, liquids, and organisms and a major component of the Earth’s ecosystem. Sand, a type of soil, consists of weathered rock, minerals, and organic matter typically containing solid particles and gaps or pore spaces. The gaps may be filled with water, air, or both.
soil saturation: The quantity of water contained in a material, such as soil or sand. In saturated soils, most pore spaces and gaps are filled with water.
stress: Physical quantity that expresses the internal forces that neighboring particles exert on each other.
Assessment
Pre-Activity Assessment
Brainstorming: Ask students if they have heard of quicksand. What do they know about quicksand? Can they think of any stories where quicksand is referenced? Brainstorm ideas on how we can test to see if humans would sink in quicksand.
Research (this will be covered in the Introduction/Motivation, if used as written)
- Have the students find the density of a human as well as the test objects. Use a preferred reference or use Archimedes principle if desired: The principle states that the upward buoyant force that is exerted on a body immersed in a fluid, whether fully or partially submerged, is equal to the weight of the fluid that the body displaces and acts in the upward direction at the center of mass of the displaced fluid.
- Ask the students how they can test to see whether a human would sink in quicksand.
- Ask the students to look up the specific gravity of quicksand.
- Note: humans are half the density of quicksand and will sink approximately half way into the quicksand due to the buoyancy of a human.
Activity Embedded Assessment
Communicate Your Design/ Presentation (Day 3 of the activity): Have the students discuss their designs with the rest of the class:
- What worked well on your design?
- What could still be improved on your design?
- If you had more time or different materials, what would you change about your design?
Post-Activity Assessment
Project Reflection: Ask students to reflect on their designs as an assignment – in a journal, in an online document, or on paper. Ask them to think about the following in their reflection:
- How could you have improved your design?
- What do you think would be different if your objects were different proportions, such as wider and shallower?
- How was your process similar to civil engineers who work with communities around the world?
Troubleshooting Tips
Try using various containers for the quicksand testing device design, including large plastic containers used for storing items. For example, students could use a large plastic container or tub to test larger areas of quicksand. To accomplish the water up flow, place flexible tubing under the sand at the bottom of the container. This may allow students to test larger and heavier structures and design more complex systems to prevent them from sinking in the quicksand.
Practice filling the testing the apparatus to find a depth of sand and a rate of water flow that bring desirable results. Keeping the water from going above the sand surface while the device is filling up can take some skill.
Activity Extensions
There are a number of possible content extensions for this activity, all of which provide an opportunity for students to fuel their interest in quicksand and, more importantly, civil engineering. Below are four examples of potential research topics related to quicksand (and a little information about each topic):
- Shear Stress: Instructors wishing to extend this activity could elaborate on the important distinctions between normal stress, in which the force is perpendicular to the area (i.e., compression and tension), and shear stress, in which the force is parallel to the area. For intermediate angles, both normal and shear stress components may be present. Engineering materials often fail from shear stress rather than from compression or tension. In particular, fluids can resist normal stress, but cannot resist shear stress; when a shear is applied to a fluid, it deforms, or flows. The shear stress is proportional to the rate of deformation and a proportionality constant called viscosity.
- Hydrostatics: Students with swimming experience will know that water pressure, generally perceived in the eardrums, increases with depth. This results from the hydrostatic pressure profile, defined by the equation P = ρgh. P is pressure in Newtons per square meter, ρ is density in kilograms per cubic meter, g is the acceleration of gravity in meters per second squared, and h is the depth measured below the water surface in meters. The same hydrostatic pressure profile exists in soils, where h is measured downward from the water table, the elevation below which all pore spaces are saturated. The hydrostatic pressure profile is relevant to this activity because it determines the pressure required at depth to trigger liquefaction. Under ordinary circumstances, effective stress increases with depth because the pore pressure increases hydrostatically (that is, since water has a specific gravity of unity), while the total stress increases more than hydrostatically since the saturated soil has a specific gravity greater than unity. Since total stress increases faster than pore pressure, their difference—effective stress—increases too. If the pore pressure at depth were much larger than hydrostatic—large enough to match the total stress—then liquefaction would occur.
- Backwashing: Liquefaction is a key element in water treatment. Providing safe drinking water is one of the most important tasks entrusted to municipalities, and engineers play an important role. Within many water treatment plants, sand filtration is an essential treatment step. Sand filters are quite simple: After pre-treating the water, it is passed downward through a bed of sand that is 1‑2 m deep. Suspended solids, including microbial pathogens, stick to the sand surfaces while the water proceeds to further treatment before being sent to a water distribution pipe network. However, after running for approximately 24 hours, these sand filters become clogged with deposits and require cleaning. This is accomplished through backwashing, where high capacity pumps are used to force clean water upward through the sand filter. These pumps provide sufficient pore pressure to trigger liquefaction. After liquefaction, the swirling sand grains grind against each other, which removes the deposits and collects them as wastewater.
- Landslides: Landslides are not a manifestation of liquefaction, but they depend on some of the same variables. Specifically, landslides occur when the shear stress (see above) applied to a soil exceeds the soil’s shear strength. This is why landslides often follow rainfall events. Rainfall fills some of the pore space in the soil thereby making the soil heavier and increasing the shear stress. Meanwhile, the additional water increases the pore pressure, which decreases the effective stress as well as decreases the soil’s shear strength. Increasing load and decreasing strength are a recipe for failure in any material
Subscribe
Get the inside scoop on all things Teach Engineering such as new site features, curriculum updates, video releases, and more by signing up for our newsletter!More Curriculum Like This

Students learn how water flows through the ground, what an aquifer is, and what solid properties predict groundwater flow. Groundwater is one of the largest sources of drinking water, so environmental engineers need to understand groundwater flow in order to tap into this important resource.
References
Das, Braja and Sobhan, Khaled. Principles of Geotechnical Engineering, 8th edition, Stamford, CT Cengage Learning, 2014.
Kramer, Steven. Liquefaction in Encyclopedia of Natural Hazards. Rotterdam, Netherlands, Springer, 2013. Accessed 2016 DOI: https://doi-org.aurarialibrary.idm.oclc.org/10.1007/978-1-4020-4399-4_219
Copyright
© 2018 by Regents of the University of Colorado; original © 2016 University of Colorado DenverContributors
J. Patrick Coughlin; Malinda S. Zarske; David C. MaysSupporting Program
Department of Civil Engineering, University of Colorado DenverAcknowledgements
This activity was developed as part of the Department of Civil Engineering, University of Colorado Denver supported by the National Science Foundation under grant numbers EAR-1417005 and EAR-1417017. Any opinions, findings, and conclusions or recommendations expressed in this material are those of the authors and do not necessarily reflect the views of the National Science Foundation.
Last modified: December 15, 2018


User Comments & Tips