Quick Look
Grade Level: 8 (6-8)
Time Required: 45 minutes
Expendable Cost/Group: US $0.00 This activity requires the use of non-expendable (reusable) LEGO kits; see the Materials List for details.
Group Size: 4
Activity Dependency: None
Subject Areas: Computer Science, Problem Solving, Science and Technology

Summary
Students experience haptic (the sense of touch) feedback by using LEGO® MINDSTORMS® EV3 robots and touch sensors to emulate touch feedback recognition. With four touch sensors connected to LEGO EV3s, they design sensor attachments that feel physically distinguishable from each another. Then students answer questions and communicate their answers to the EV3 by pressing the touch sensor that is associated with the right multiple-choice answer letter. Haptics becomes essential when students must use the EV3 sensors to answer the next set of questions without the aid of their vision. This challenges them to rely solely on the tactile feeling of each unique touch sensor attachment that they created in order to choose the correct peripheral slot. Students also learn about real-world applications of haptics technology.Engineering Connection
With the advancement of touchscreen technology in mobile devices, haptics are increasingly common as a means of communicating feedback to users that commands are received. For example, Android tablets (among other devices) notify users when their commands are received by screen movement accompanied by vibration. The physical feedback of the device's vibration clarifies the consequences of a user's actions. Engineers have incorporated haptics into many other applications such as video game enhancement, medical rehabilitation and training (using haptic feedback during electronic surgical simulations so medical students can differentiate between how certain tissues feel in the body before ever cutting open a live person), and improved accessibility or convenience for the blind (a proposed application in which text is converted to braille for the reading of emails, messages and text from a touchscreen, a process that otherwise would require extra peripheral equipment).
Learning Objectives
After this activity, students should be able to:
- Define haptics and give examples of devices that use haptics technology.
- Explain how haptics works at a basic level, without going too deep into the physics behind the technology.
- Describe the impact haptics has in the medical field and the future applications that may arise from the use of this technology.
Educational Standards
Each TeachEngineering lesson or activity is correlated to one or more K-12 science,
technology, engineering or math (STEM) educational standards.
All 100,000+ K-12 STEM standards covered in TeachEngineering are collected, maintained and packaged by the Achievement Standards Network (ASN),
a project of D2L (www.achievementstandards.org).
In the ASN, standards are hierarchically structured: first by source; e.g., by state; within source by type; e.g., science or mathematics;
within type by subtype, then by grade, etc.
Each TeachEngineering lesson or activity is correlated to one or more K-12 science, technology, engineering or math (STEM) educational standards.
All 100,000+ K-12 STEM standards covered in TeachEngineering are collected, maintained and packaged by the Achievement Standards Network (ASN), a project of D2L (www.achievementstandards.org).
In the ASN, standards are hierarchically structured: first by source; e.g., by state; within source by type; e.g., science or mathematics; within type by subtype, then by grade, etc.
Common Core State Standards - Math
-
Write, read, and evaluate expressions in which letters stand for numbers.
(Grade
6)
More Details
Do you agree with this alignment?
-
Summarize numerical data sets in relation to their context, such as by:
(Grade
6)
More Details
Do you agree with this alignment?
International Technology and Engineering Educators Association - Technology
-
Evaluate designs based on criteria, constraints, and standards.
(Grades
3 -
5)
More Details
Do you agree with this alignment?
-
Modeling, testing, evaluating, and modifying are used to transform ideas into practical solutions.
(Grades
6 -
8)
More Details
Do you agree with this alignment?
-
Differentiate between inputs, processes, outputs, and feedback in technological systems.
(Grades
6 -
8)
More Details
Do you agree with this alignment?
State Standards
New York - Math
-
Summarize numerical data sets in relation to their context, such as by:
(Grade
6)
More Details
Do you agree with this alignment?
-
Write, read, and evaluate expressions in which letters stand for numbers.
(Grade
6)
More Details
Do you agree with this alignment?
Materials List
Each group needs:
- LEGO MINDSTORMS EV3 robot, such as EV3 Core Set (5003400) at https://education.lego.com/en-us/products/lego-mindstorms-education-ev3-core-set/5003400#lego-mindstorms-education-ev3; the LEGO MINDSTORMS EV3 Intelligent Brick, 1 touch sensor, 4 cables to connect the touch sensors to the EV3 brick, and additional LEGO parts are used from this kit
- LEGO MINDSTORMS Education EV3 Software 1.2.1, free online, you have to register a LEGO account first; at https://www.lego.com/en-us/mindstorms/downloads/download-software
- computer, loaded with EV3 1.2.1 software
- 3 additional touch sensors (for total a of 4 touch sensors, including the one in the core set), available for $21.99 each at https://shop.lego.com/en-US/EV3-Touch-Sensor-45507
- (optional) assorted materials to aid creating unique sensory attachments, in addition to the LEGO kit parts and pieces, such as tape, cotton balls, rubber bands, sandpaper strips
- Pre-Activity Worksheet, one per student
- Activity Datasheet, one per student
- Post-Activity Worksheet or Scaled-Up Post-Activity Worksheet, one per student
Alternative: LEGO MINDSTORMS NXT Set:
Note: This activity can also be conducted with the older (and no longer sold) LEGO MINDSTORMS NXT set instead of EV3; see below for those supplies:
- LEGO MINDSTORMS NXT robot, such as the NXT Base Set
- computer loaded with the NXT 2.1 software
Worksheets and Attachments
Visit [www.teachengineering.org/activities/view/nyu_haptics_activity1] to print or download.Introduction/Motivation
Can blind people use touch pads and keypads? How would they interact with the devices? How could they tell if they had pressed a key down far enough on a keyboard? Haptics technology—the use of sensory feedback as a form of acknowledgment to you and the device you are interacting with—makes both of these things possible.
Touchpads are, by nature, very visual. But, the emergence of a new integrated chip (IC) that allows for the ability to feel what you are seeing on a screen could be applied to produce braille text for people who are blind. This new IC generates a frictional force between your fingers and the screen, creating the sensation of real friction and thus, the feeling of a unique sensory recognition to whatever surface your finger is touching on the screen. For example, if sandpaper appears on the screen, you can feel that it is sandpaper. The same goes for wood, plastic, carpeting, etc. Since each surface you touch has a different feeling, it also has a different amount of friction between your finger and it. Thus, the IC is able to recreate the feeling with tangible accuracy.
When it comes to knowing how a key on a keyboard feels to be pressed down fully, the typical current laptop keyboards do not give much noticeable feedback. The first computer keyboards, like their typewriter counterparts, had mechanical switches that audibly clicked when fully pressed. The click gave a slight feeling of the physical switching that was happening (the haptics is in the feeling of the click). But most of our devices these days do not use mechanical keyboards; some people consider them to be old and out-of-date, just like typewriters. It turns out that the use of mechanical keyboards is just less common because they cost more to make, and mechanical keyboards have a higher performance in providing feedback to the user that keys were pressed, compared to the more common membrane keyboards that most of you use with current laptops.
Prior to the development of these ICs, the use of capacitive and resistive touchscreens was most prevalent.
- Interactions with capacitive touchscreens take advantage of the naturally occurring electrical properties of the human body. You have probably experienced this with most iPhones, iPads, android tablets, phones and other devices if you ever tried to operate them with a gloved finger. You quickly found out that they don't work! This is because the glove blocks the electrical properties that the screen relies on for you to operate it.
- Resistive touchscreens are composed of several layers with gaps between them. To communicate with the device, you must push on it with enough pressure to make all the layers connect. When the connection occurs, it completes a circuit and the device acts on your point of contact. This technology can be seen in older ATMs and in factories where gloves are worn as a safety requirement.
Think about what happens when you use a PlayStation® or Xbox® controller. When something makes contact with your presence in the game, you might notice the controller vibrates to notify you that you really did make contact! Depending on the game, this notification might be about something positive or negative, such as your bat making contact with a baseball, or you getting hit by an arrow. Because games simulate so many different environments and situations, they also enable you to experience many different forms of feedback. For example, a heavy and continuous vibration when sliding across a wall in a racing game not only tells you that your car is off course, but also communicates a sensation that is similar to what you might feel in a real car.
While this application of haptics enhances fun by bringing more realism to video games, haptics has other more useful applications, such as giving visually impaired people a greater sense of control when using certain devices. For example, through the use of vibrations, blind people might get confirmation that they touched something they wanted to. Or, when they touch something, the haptic (vibration) feedback enables them to recognize that the device understood the touch commands they gave it. These acknowledged interactions are very helpful.
Even though vibrations are quite limited, engineers are employing the frictional feeling that is made possible with the emerging IC technology (like those found in newer androids and other devices) to medical rehabilitation and surgical training. For example, they incorporate haptic feedback during electronic surgical simulations so medical students can learn to accurately differentiate between how different tissues feel in the body, before ever cutting open a person.
Has haptics helped you experience a better sense of control over a device? If so, when? How? (Encourage students to continue thinking about these questions and formulate their own opinions before interacting with the devices in the activity.)
Procedure
Background
Students connect touch sensors to LEGO EV3 device ports 1-4, and experience the development of haptic-centric technology. They design four separate touch sensor attachments that feel physically distinguishable from each other and then test their haptics sensory abilities as if they were blind.
Future idea: This smiley face that shows up on the display screen for some correct answers is visual and consequently not haptic in nature. As of this writing, it is not possible to make the EV3 brick vibrate. If that becomes possible in the future, adding vibration would provide the ideal haptics feedback to communicate correct/incorrect answers.
Before the Activity

- Gather materials and make copies of the Pre-Activity Worksheet, Activity Datasheet and Post-Activity Worksheet, one copy of each per student.
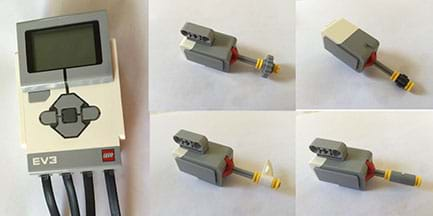
- For each group's LEGO kit and extra sensors, attach all four EV3 touch sensors to the EV3 brick, connecting one to each of the four peripheral ports 1-4, not A-C (see Figure 1).
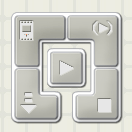
- Download the EV3 Robot Program (an rbt file), and load it onto the EV3 brick. Figure 2 shows the LEGO MINDSTORMS interface, which is found in the bottom right after opening the haptic_program.rbt file in the MINDSTORMS IDE. The down arrow on the bottom left downloads to the EV3 microcontroller through the use of the USB port and cable in the basic kit. The rbt program correlates directly to the datasheet.
With the Students
- Hand out the pre-activity worksheets and give students 10 minutes to complete them. As a class, spend five minutes discussing student answers.
- Remind students that the LEGO touch sensor works similarly to how a key works on a keyboard. Like a key being pressed down, a touch sensor is activated by pressing in on it. Show students an EV3 brick with four attached touch sensors (see Figure 1).

Figure 1. An example completed full device with four touch sensor peripherals attached. Each touch sensor has a unique haptic attachment. - Explain the engineering challenge: Each group designs and constructs four attachments for the touch sensors that are physically different and feel distinguishable from one another. Each touch sensor has a spot on its actuation area where you plug in your attachment. Be creative in your attachment designs. Each group member is expected to individually design at least one attachment (depending on group size).
Figure 1 shows example attachments designed by students, all made from LEGO basic kit materials, plus some tape. There are no hidden materials and they are relatively straightforward to build. Each has a unique feel. For example even though the items are all made from LEGO pieces, (a) has a piece of tape wrapped around it, which feels different than the smooth surface of (b), which is yet again different from the single prong shape of (c), even though it is made of the same material as (b), and (d) has many ridges that distinguish it from the others. Alternatively, attachment (a) could be redesigned to use some other LEGO piece from the kit, but for demonstration purposes, tape was used to show the incorporation of non-LEGO materials (such as cotton balls, etc.) to make them more unique.
- Give students time to design and build their group's unique touch sensor attachments.
- Have students answer the datasheet questions using their EV3 robots. The questions pertain to haptics and are extensions of the pre-activity assessment. Students select multiple-choice answers, a through d by pressing on EV3 brick touch sensor attachments 1 through 4. Direct students to:

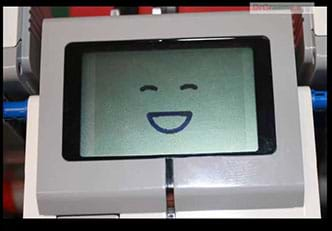
Figure 3. Students receive visual feedback (a smiley face) when they answer correctly by pressing the right touch sensor.
- Answer questions 1-4 without any visual impairment. While answering the questions, expect students to be able to feel the touch sensors and take the opportunity to become familiar with their associated ports. The haptics is based on knowing that each sensor is unique by the way it feels and being able to consciously associate distinctive sensory characteristics to specific ports. This becomes more important in the next section of questions. When correct answers are given for questions 1-4, a smiley face appears on the EV3 microcontroller display screen (see Figure 3). When not yet answered or answered incorrectly, it displays the question number.
- Answer questions 5-8 with eyes closed! To do this, one group member reads the question to the student answering. To answer the questions with eyes closed, students must rely on touch and memory to discern which sensor is which, based on the feedback they receive from the haptic devices their team created! Students who were successful in the design and construction of four distinguishable touch sensor attachments will able to tell the difference between buttons. When correct answers are given for questions 5-8, a check mark appears on the display screen, and a team member can inform the blindfolded person whether or not the answer is correct. When not yet answered or answered incorrectly, it displays the question number.
- Answer questions 9-11 individually.
In the course of answering the datasheet questions, students are tested on their ability to consciously identify each touch sensor by its haptics qualities. Expect students to have a sense of gratification when they select the correct answer by using only their sense of touch.
Additionally, if a group chose not to follow the instructions and made two sensor attachments the same, use it as a learning lesson for the entire class who will see these students struggle much more to answer the questions while "blind" since they will not be able to tell the difference using their body's haptic feedback when touching the attachments.
- Remind students of the questions asked in the Introduction/Motivation section: Has haptics helped you experience a better sense of control over a device? If so, when? How? Then ask students:
- Has this activity changed your answers? How? Did haptic feedback help your sense of control over the devices you built?
The haptics students experience in the activity is based entirely on their own bodies' feedback of the touch sensor attachments. The sensors themselves only serve as push buttons to interface with the EV3 microcontroller. It is because the attachments are uniquely different in shape and or texture that makes them feel distinctive and thus make the ports distinguishable.
- Hand out the post-activity worksheets and give students 10 minutes to complete them. As a class, review student answers, specifically focusing on why haptic feedback is important in certain devices and applications.
- Conclude with a class discussion. Ask students about other haptic technologies they may be familiar with. How do they help their users? Some questions to consider:
- Why are haptic technologies useful? (Example answer: Expect most students to remember the example of students training on surgical simulators to learn to differentiate between human tissue types via haptic feedback. This application is useful because it gives students practice during their education without harming patients so they gain experience that can be used later in their careers.)
- When a person cannot visually see an object being touched, would haptic feedback be a good choice, or would a different sensory feedback be better suited? Why? (Example answers: It is a good choice to use haptic feedback when someone cannot see because it is the most direct way to get sensory information especially since they are trying to discern the object they are touching. Since haptics deals directly with the sense of touch, it is the best for identifying the object whereas audio may not be as useful. Another good answer is that the use of multiple senses, such as audio and haptics together, creates a more complete picture of an object, such as whether it is hollow or not, which otherwise may not be able to be determined with haptics alone.
Vocabulary/Definitions
capacitive touchscreen: A screen that takes advantage of the electrical properties of the human body to work so that light finger gestures are able to operate it.
feedback: Information returned from a system based on an input.
haptics: The sense of touch as a form of communication.
impaired: Having a physical disadvantage or limitation, such as vision impairment or blindness.
integrated chip: An electrical circuit that performs a very specific set of tasks as part of a larger, more versatile device. This is similar to your kidneys performing the specific task of removing waste from your body as part of the body's overall organ system. Abbreviated as IC.
resistive touchscreen: A screen composed of multiple layers with gaps between them that is activated when enough pressure on an area closes the spaces so a circuit connection is made.
simulate: To imitate a real device, event or system.
Assessment
Pre-Activity Assessment
Pre-Activity Worksheet: Before the activity, have students complete the six-question Pre-Activity Worksheet. Discuss student answers to assess their baseline knowledge of haptics and opinions on its applications.
Activity Embedded Assessment
Activity Datasheet: During the activity, have students complete the Activity Data Sheet to guide them through the activity, recording their answers. Especially review their individual answers to questions 9-12 to gauge their comprehension of the topic.
Post-Activity Assessment
Post-Activity Worksheet: At activity end, administer either the seven-question Post-Activity Worksheet or the 10-question Scaled-Up Post-Activity Worksheet to assess student understanding. Because pre/post questions are similar, you can compare them to gauge student learning due to the activity.
Activity Extensions
As follow up to datasheet questions 9 and 11, assign students an internet research project to investigate other haptics applications that may not have been mentioned in the activity. Additionally, they could come up with new situations that have not been discussed or researched yet within the field. This has the potential to be a fun project, since it gives them open-ended freedom in what they are looking for so they can follow their own interests and make it their own, while reinforcing the main concepts of what haptic technologies are, how they work, and what haptic feedback is.
Activity Scaling
For upper grades, go into more detail about how resistive and capacitive haptics are being implemented and incorporated into products. Then, at activity end, administer the 10-question Scaled-Up Post-Activity Worksheet, which is the post-activity worksheet with the following three questions added:
- What is the difference between a capacitive touchscreen and a resistive touchscreen? (Answer: The primary difference between the two types of touchscreens is that a capacitive touchscreen uses the electrical properties of the human body to activate the area being touched. Alternatively, the resistive touchscreen is actuated through the compression of multiple layers in the screen to create contact between all layers, thus completing a circuit and actuating the point of contact.)
- When would it be better to use a capacitive touchscreen instead of a resistive touchscreen, and vice versa? (Answer: It is better to use a capacitive touchscreen if you want high sensitivity for the user with the constraint that it generally must be a finger or specialized stylus. A resistive touchscreen is more useful in industry when the environment requires gloves, or you want a more durable screen since it is pressure activated.)
- What is electrostatic force? (This is generally explained in the Senseg demonstration video; see the website URL provided in the Additional Multimedia Support section. Answer: Electrostatic force is the interaction between electrically charged particles. The charge that is exerted back on your finger through the haptic device is based on Coulombs law, which follows this equation:

The equation for Coulombs law defines quantifies electrostatic force based on the interaction between electrically charged particles.
F is the electrostatic force, where ke=1/4πε0ε and ε0 is the permittivity of free space in ε; q1 and q2 are the two charges, that is, your finger and the screen and r is the distance between the two charges. If two charges have the same sign, they repel each other, causing your finger to feel the force of repulsion exerted on it, whereas if they are opposing, they attract and the finger feels less electrostatic force.
Additional Multimedia Support
Show students "The Tablet That Touches You Back," a 3:32-minute demonstration video of a Senseg prototype touch sensor tablet technology that uses an electrostatic field to turn touchscreens into "feel screens." Altering the friction between the user and the screen surface gives the sensory perception of physical edges, contours and textures. Expected to be released by December 2013. https://www.youtube.com/watch?v=lzM5X0WH_6Q
Subscribe
Get the inside scoop on all things Teach Engineering such as new site features, curriculum updates, video releases, and more by signing up for our newsletter!Copyright
© 2013 by Regents of the University of Colorado; original © 2012 Polytechnic Institute of New York UniversityContributors
James Muldoon, Saranii Muller-ClarkSupporting Program
AMPS GK-12 Program, Polytechnic Institute of New York UniversityAcknowledgements
This activity was developed under the Applying Mechatronics to Promote Science (AMPS) Program funded by National Science Foundation GK-12 grant no. 0741714. However, these contents do not necessarily represent the policies of the NSF and you should not assume endorsement by the federal government.
Last modified: October 16, 2020


User Comments & Tips