
Quick Look
Grade Level: 5 (4-6)
Time Required: 1 hours 15 minutes
Expendable Cost/Group: US $4.00
Group Size: 4
Activity Dependency:
Subject Areas: Biology, Science and Technology
NGSS Performance Expectations:

| 3-5-ETS1-3 |
| MS-ETS1-4 |
Quick Look

- Grade Level:
- 5 (4 – 6)
- Time Required:
- 1 hours 15 minutes
- Group Size:
- 4
- Subject Areas:
-
Biology Science and Technology -
NGSS Performance Expectations:
3-5-ETS1-3 MS-ETS1-4

Summary
This activity is designed to give students an understanding of one aspect of what an engineer does and the ability to experience various steps in the engineering design process as it relates to a 3D printing task. Students transform into engineers as they work in teams to carry out a 3D printing task by using a blunt-tip needle syringe to print a line using a variety of colored liquid materials (shampoo, conditioner, aloe, and hand sanitizer) into a small plastic box filled with a gel base. Approximating the work of engineers, the teams observe the interactions between the printed material and the gel base at intervals of 10 minutes and iterate, or change, the ink base as necessary to achieve a goal. Using the dye to color the ink allows students to determine which material will permeate or diffuse throughout the base more effectively. Teams share their results to compare with their classmates. A real-world application for this investigation would be when engineers conduct research to develop new medicines, the goal is for the medicine to make its way through the body in the most effective way so that the body can heal.Engineering Connection
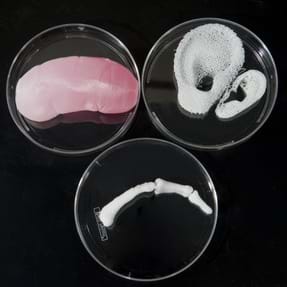
The investigation is simulated after a real-world engineering design in which researchers investigated 3D printing cells in a gel base, and then introduced a dye into the base to determine the ability of the dye to diffuse through the base and make it to the cells. These individuals work in the field of biomedical engineering and develop solutions to help and heal the human body. 3D printing allows biomedical engineers to solve problems in ways that were not previously available such as printing cells in a lab to grow a 3D printed body part such as an ear, or creating a replacement body part such as a hip. To complete the investigation, students use several steps in the engineering design process such as defining a problem, planning a solution, testing the design solution, and sharing their results.
Learning Objectives
After this activity, students should be able to:
- Identify the steps in the engineering design process.
- Replicate a 3D printing task step-by-step.
- Use the engineering design process to determine the best ink type.
Educational Standards
Each Teach Engineering lesson or activity is correlated to one or more K-12 science,
technology, engineering or math (STEM) educational standards.
All 100,000+ K-12 STEM standards covered in Teach Engineering are collected, maintained and packaged by the Achievement Standards Network (ASN),
a project of D2L (www.achievementstandards.org).
In the ASN, standards are hierarchically structured: first by source; e.g., by state; within source by type; e.g., science or mathematics;
within type by subtype, then by grade, etc.
Each Teach Engineering lesson or activity is correlated to one or more K-12 science, technology, engineering or math (STEM) educational standards.
All 100,000+ K-12 STEM standards covered in Teach Engineering are collected, maintained and packaged by the Achievement Standards Network (ASN), a project of D2L (www.achievementstandards.org).
In the ASN, standards are hierarchically structured: first by source; e.g., by state; within source by type; e.g., science or mathematics; within type by subtype, then by grade, etc.
NGSS: Next Generation Science Standards - Science
| NGSS Performance Expectation | ||
|---|---|---|
|
3-5-ETS1-3. Plan and carry out fair tests in which variables are controlled and failure points are considered to identify aspects of a model or prototype that can be improved. (Grades 3 - 5) Do you agree with this alignment? |
||
| Click to view other curriculum aligned to this Performance Expectation | ||
| This activity focuses on the following Three Dimensional Learning aspects of NGSS: | ||
| Science & Engineering Practices | Disciplinary Core Ideas | Crosscutting Concepts |
| Plan and conduct an investigation collaboratively to produce data to serve as the basis for evidence, using fair tests in which variables are controlled and the number of trials considered. Alignment agreement: | Tests are often designed to identify failure points or difficulties, which suggest the elements of the design that need to be improved. Alignment agreement: Different solutions need to be tested in order to determine which of them best solves the problem, given the criteria and the constraints.Alignment agreement: | |
| NGSS Performance Expectation | ||
|---|---|---|
|
MS-ETS1-4. Develop a model to generate data for iterative testing and modification of a proposed object, tool, or process such that an optimal design can be achieved. (Grades 6 - 8) Do you agree with this alignment? |
||
| Click to view other curriculum aligned to this Performance Expectation | ||
| This activity focuses on the following Three Dimensional Learning aspects of NGSS: | ||
| Science & Engineering Practices | Disciplinary Core Ideas | Crosscutting Concepts |
| Develop a model to generate data to test ideas about designed systems, including those representing inputs and outputs. Alignment agreement: | Models of all kinds are important for testing solutions. Alignment agreement: The iterative process of testing the most promising solutions and modifying what is proposed on the basis of the test results leads to greater refinement and ultimately to an optimal solution.Alignment agreement: | |
International Technology and Engineering Educators Association - Technology
-
Students will develop an understanding of the attributes of design.
(Grades
K -
12)
More Details
Do you agree with this alignment?
-
Students will develop an understanding of engineering design.
(Grades
K -
12)
More Details
Do you agree with this alignment?
-
Evaluate designs based on criteria, constraints, and standards.
(Grades
3 -
5)
More Details
Do you agree with this alignment?
-
Modeling, testing, evaluating, and modifying are used to transform ideas into practical solutions.
(Grades
6 -
8)
More Details
Do you agree with this alignment?
-
Make two-dimensional and three-dimensional representations of the designed solution.
(Grades
6 -
8)
More Details
Do you agree with this alignment?
-
Advances and innovations in medical technologies are used to improve healthcare.
(Grades
6 -
8)
More Details
Do you agree with this alignment?
-
Apply the technology and engineering design process.
(Grades
6 -
8)
More Details
Do you agree with this alignment?
-
Develop innovative products and systems that solve problems and extend capabilities based on individual or collective needs and wants.
(Grades
6 -
8)
More Details
Do you agree with this alignment?
State Standards
Florida - Technology
-
Describe how models and simulations can be used to solve real world issues in science and engineering.
(Grades
3 -
5)
More Details
Do you agree with this alignment?
-
Solve real world problems in science and engineering using computational thinking skills.
(Grades
3 -
5)
More Details
Do you agree with this alignment?
Materials List
Each group needs:
- 4 plastic boxes for printing in dimensions approximately 11.4 x 3.8 x 3.8 cm (4.5 x 1.5 x 1.5 in.)
- small spatula (the size of a teaspoon size or smaller)
- gloves
- safety goggles
- 10 ml syringe with 3.8 cm (1.5 in.) blunt tip needle
- hair gel-base for printing
- liquid food coloring for dye
- shampoo
- conditioner
- aloe
- hand sanitizer
- timer
- small disposable container for “waste”
- napkins or wipes
- Printing Possibilities Recording Sheet, one per student
Worksheets and Attachments
Visit [www.teachengineering.org/activities/view/uof-2397-prodigious-printing-possibilities-activity] to print or download.Pre-Req Knowledge
Students should complete the associated lesson, Monumental Movements, prior to doing the activity.
Students should have knowledge of science laboratory safety (such as using gloves and goggles).
Introduction/Motivation
3D printing has many implications in the healthcare field. From testing vaccines and treatments for disease and cancer, to printing body parts. When you are dealing with the body and trying to replicate that environment you need a soft substance to print in and a soft ink to carry things like medicine and cells through the printing process.
[Ask the class the question] When we think of how to determine the effectiveness of a drug or treatment, what things would make that treatment most effective? [A way to get students thinking out loud is to allow them time to share with a shoulder partner or desk buddy. Give them a couple of minutes to share with one another and then ask one person from each group to share with the class the group discussion. Student answers may vary, but one thing that is most important is that the medicine makes it way to the targeted location in the body or is able to effectively spread through the body.]
[You may refer to slide 6 of the Monumental Movements PowerPoint Presentation from the Monumental Movements lesson to introduce the students to today’s activity.] Today you get to be engineers! You will be working in teams and using the engineering design process to complete an investigation. You will be replicating a 3D printing task to test the effectiveness of one soft substance to permeate another soft substance.
You will be actively using the engineering design process today to determine which ink medium will best deliver the key ingredient (simulating a drug treatment), throughout the gel base (represents the human body).
Procedure
Before the Activity
- Set up materials for each group which should include; several pairs of gloves, safety goggles, four boxes for printing, syringe, waste container, one type of base (for example, shampoo or conditioner) and food coloring.
- It may be easier to measure out the bases for the students before the activity (60 ml or 2 oz.).
- Practice the first four steps from the procedure below. These steps will be modeled for the students before they begin working on their own.
- Make copies of the Printing Possibilities Recording Sheet.
With the Students – Pre Laboratory Setup
- Divide students into groups of 4.
- Review lab safety protocols such as using gloves and goggles, keeping materials off our skin and out of mouths, and using materials responsibly (such as the syringe).
- Discuss how to be an effective lab partner. Team members should share the tasks equally and each team member is responsible for recording data on their Printing Possibilities Recording Sheet.
- Model steps 1-4 for the students (see steps below). Distribute copies of the Printing Possibilities Recording Sheet, one per student.
- Instruct the class that they will need to complete all steps (1 through 7) each time they print.
With the Students – Laboratory
- Step 1: Prepare the boxes for printing. Squeeze hair gel into each of the clear boxes, filling it up and smoothing over the top with a gloved finger or the spatula. Use the syringe to suck out the air bubbles. Empty any residual gel from the syringe into the disposable “waste” container. This is an approximation of what engineers do; when working with chemicals they must always dispose of them properly.
- Step 2: Prepare a 60 ml (2 oz.) sample base (using the conditioner) and mix in 5 drops of food coloring to this base.
- Step 3: Fill the syringe with the ink you prepared.
- Step 4: Insert the needle into the gel, about 3.5 cm (1 in.) deep. “Print” a line of the ink within the gel. This means you will push down the plunger of the syringe continuously while dragging it slowly through the gel base in the clear container. The width of the line should be about the width and length of a toothpick (2 mm x 76 mm or 1/16 inch x 3 inches).
- Step 5: Set the timer for 10 minutes. After 10 minutes, observe whether the color has diffused through the gel base and document any observations. The gel base surrounding the printed line will take on the color of the ink. Measure the effectiveness of the ink by how much color has diffused throughout the gel solution. More color a greater distance away from the base (in any direction) equals a more effective ink.
- Step 6: Teams may need to iterate their bases by making another batch and adding more food coloring than the first batch.
- Step 7: Repeat steps 3-6 every 10 minutes, iterating the process as necessary for at least 4 complete sets, or until you have printed in all four boxes.
- Step 8: After all teams have printed in all 4 boxes, let students discuss and share their results as a class. Lead the discussion by asking which base and ink mixtures were most effective in permeating through the gel. Remind students that biomedical engineers do tests like this to determine the best ink medium for delivering a drug treatment into the human body, and that conducting multiple tests and iterating designs are important parts of engineering.

Vocabulary/Definitions
approximation : In engineering, the act of doing something similar, but not exactly the same.
diffuse: To spread or scatter widely.
iteration: A necessary change made to a design while in the engineering design process to improve the process or final product.
permeate: To spread or flow throughout.
Assessment
Pre-Activity Assessment
Class discussion or Pre-Quiz: Review the Monumental Movements lesson and ask students to recall facts about 3D printing.
Activity Embedded Assessment
Recording Sheet: Students complete the Printing Possibilities Recording Sheet to record their observations during the activity. Check that students are thorough in their recording of iterations, observations, and conclusions.
Post-Activity Assessment
Rubric: Complete the Prodigious Printing Possibilities Rubric; the front can be filled out by the teacher and the back is to be filled out by the student.
Safety Issues
The needle tip is blunt, not sharp, it should not injure the students if they are using their supplies safely. Monitor students closely and ensure that all syringes are collected and counted for at the end of the investigation.
Troubleshooting Tips
If the students are having difficulty loading the syringe with the ink, you can remove the needle tip by twisting it off. Then draw up the ink without it and twist the needle tip back on.
Subscribe
Get the inside scoop on all things Teach Engineering such as new site features, curriculum updates, video releases, and more by signing up for our newsletter!More Curriculum Like This

Students learn some of the implications of 3D printing in the biomedical field. Students learn how 3D printers used in a classroom or by consumers, which use a plastic filament to produce a product, differ from 3D printing for medical purposes, which is often with real living cells.
Copyright
© 2019 by Regents of the University of Colorado; original © 2018 University of FloridaContributors
Amanda SpotzSupporting Program
Multidisciplinary Research Experiences for Teachers of Elementary Grades, Herbert Wertheim College of Engineering, University of FloridaAcknowledgements
This curriculum was based upon work supported by the National Science Foundation under RET grant no. EEC 1711543— Engineering for Biology: Multidisciplinary Research Experiences for Teachers in Elementary Grades (MRET) through the College of Engineering at the University of Florida. Any opinions, findings, and conclusions or recommendations expressed in this material are those of the authors and do not necessarily reflect the views of the National Science Foundation.
Last modified: July 3, 2019
User Comments & Tips