Quick Look
Grade Level: 1 (K-2)
Time Required: 45 minutes
Expendable Cost/Group: US $0.00
Group Size: 1
Activity Dependency: None
Subject Areas: Measurement, Physical Science, Physics, Reasoning and Proof
NGSS Performance Expectations:

| 1-PS4-1 |
| K-2-ETS1-2 |

Summary
Why do guitars create amazing sounds using just a few strings? In this activity, students explore how sound is created. After researching with classmates, students are then challenged to create a prototype guitar. Using paint on the strings of their guitar, students create vibrations by plucking on the strings. To visualize this, they engineer their very own sound wave art and create a visual representation of the sound they are hearing. Afterward, students measure their sound waves, and come to conclusions about what it means when sound waves get further apart.Engineering Connection
Sound is used in many different types of engineering to solve various problems. There are engineers called audio engineers who specifically focus on how to make music sound good when creating records for artists. There are also acoustic engineers who help design buildings like theaters to carry or muffle sound as needed. Sound can also be important in fields like biomedical engineering when creating hearing aids or studying the ear.
Learning Objectives
After this activity, students should be able to:
- Explain how sound is caused by vibrations.
- Summarize why sound is louder or quieter.
- Design their own instrument to produce sound.
- Create a visual representation of sound waves.
Educational Standards
Each TeachEngineering lesson or activity is correlated to one or more K-12 science,
technology, engineering or math (STEM) educational standards.
All 100,000+ K-12 STEM standards covered in TeachEngineering are collected, maintained and packaged by the Achievement Standards Network (ASN),
a project of D2L (www.achievementstandards.org).
In the ASN, standards are hierarchically structured: first by source; e.g., by state; within source by type; e.g., science or mathematics;
within type by subtype, then by grade, etc.
Each TeachEngineering lesson or activity is correlated to one or more K-12 science, technology, engineering or math (STEM) educational standards.
All 100,000+ K-12 STEM standards covered in TeachEngineering are collected, maintained and packaged by the Achievement Standards Network (ASN), a project of D2L (www.achievementstandards.org).
In the ASN, standards are hierarchically structured: first by source; e.g., by state; within source by type; e.g., science or mathematics; within type by subtype, then by grade, etc.
NGSS: Next Generation Science Standards - Science
| NGSS Performance Expectation | ||
|---|---|---|
|
1-PS4-1. Plan and conduct investigations to provide evidence that vibrating materials can make sound and that sound can make materials vibrate. (Grade 1) Do you agree with this alignment? |
||
| Click to view other curriculum aligned to this Performance Expectation | ||
| This activity focuses on the following Three Dimensional Learning aspects of NGSS: | ||
| Science & Engineering Practices | Disciplinary Core Ideas | Crosscutting Concepts |
| Plan and conduct investigations collaboratively to produce data to serve as the basis for evidence to answer a question. Alignment agreement: Science investigations begin with a question.Alignment agreement: Scientists use different ways to study the world.Alignment agreement: | Sound can make matter vibrate, and vibrating matter can make sound. Alignment agreement: | Simple tests can be designed to gather evidence to support or refute student ideas about causes. Alignment agreement: |
| NGSS Performance Expectation | ||
|---|---|---|
|
K-2-ETS1-2. Develop a simple sketch, drawing, or physical model to illustrate how the shape of an object helps it function as needed to solve a given problem. (Grades K - 2) Do you agree with this alignment? |
||
| Click to view other curriculum aligned to this Performance Expectation | ||
| This activity focuses on the following Three Dimensional Learning aspects of NGSS: | ||
| Science & Engineering Practices | Disciplinary Core Ideas | Crosscutting Concepts |
| Develop a simple model based on evidence to represent a proposed object or tool. Alignment agreement: | Designs can be conveyed through sketches, drawings, or physical models. These representations are useful in communicating ideas for a problem's solutions to other people. Alignment agreement: | The shape and stability of structures of natural and designed objects are related to their function(s). Alignment agreement: |
Common Core State Standards - English
-
With guidance and support from adults, recall information from experiences or gather information from provided sources to answer a question.
(Grade
1)
More Details
Do you agree with this alignment?
-
Participate in collaborative conversations with diverse partners about grade 1 topics and texts with peers and adults in small and larger groups
(Grade
1)
More Details
Do you agree with this alignment?
Common Core State Standards - Math
-
Use appropriate tools strategically.
(Grades
K -
12)
More Details
Do you agree with this alignment?
-
Attend to precision.
(Grades
K -
12)
More Details
Do you agree with this alignment?
-
Express the length of an object as a whole number of length units, by laying multiple copies of a shorter object (the length unit) end to end; understand that the length measurement of an object is the number of same-size length units that span it with no gaps or overlaps.
(Grade
1)
More Details
Do you agree with this alignment?
Materials List
Each student needs:
- piece of cardboard about 1 to 2 sq. ft in area
- piece of white paper
- 5-10 rubber bands
- Measuring Sound Waves Worksheet
For the entire class to share:
- multiple colors of paint (liquid tempura paint works well)
- duct tape
- smocks or large shirts to keep students’s clothes clean (optional)
- table coverings for painting (optional)
Worksheets and Attachments
Visit [www.teachengineering.org/activities/view/uof-2709-seeing-sound-musical-art-waves-activity] to print or download.Introduction/Motivation
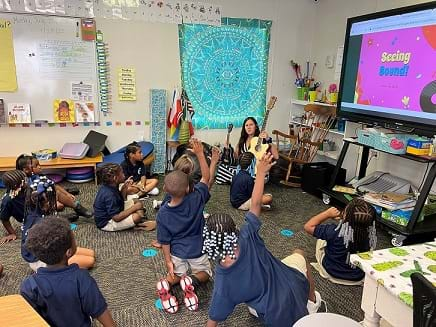
(If the teacher has access to a guitar, ukulele or any other stringed instrument, it recommended to bring that instrument into the class for a demonstration can. If not, parts of this video from All Sounds https://www.youtube.com/watch?v=-PK_mKCfIDE&t=26s can be played to demonstrate different sounds a guitar can make. Have the students gather around and then very dramatically strum the guitar just once quietly, so that a sound can barely be heard.)
Did you hear that sound? (Let students respond. After they acknowledge they have, strum it once more very loudly.) Can you hear the sound better this time? (Let students respond. Note: If both a guitar and ukulele are available, do this first with the guitar and then with the ukulele.)
Let’s think about these three questions:
- What do we think causes sound?
- How could we see sound?
- What factors can make sound louder or quieter?
Now, I’d like you to turn to the person next to you and discuss these questions. I’ll give you two minutes. (Give students a five-minute timer, or just keep an eye on how the conversation is flowing.)
Okay, let’s hear what you think! What do we think causes sound? (Let students share with the whole group the responses they discussed with their partners. Write down some of the main ideas or answers the group came up with on the board next to each question. See how close students are to the truth or how far away they are.) Today we are going to answer these questions by designing a device that will help you see sound by creating your very own sound art. (Optional: Show students this video https://www.youtube.com/watch?v=hP36xoPXDnM&t=94s to get them interested if needed.)
Procedure
Background
Sound is created by vibration. One of the clearest examples of this can be seen in music and musical instruments. Instruments are designed so that they will create sound within a particular pitch range and be able to reach a certain volume level. These parameters are developed by considering things like the size, shape, and materials used in creating the instrument. The same engineering design process will apply to each student’s design.
Sound is vibrations that create waves and move through a medium like a solid, liquid, or gas. Waves are energy that moves across a given space. Different wavelengths and amplitudes of waves produce different energy and thus, different sounds. This is how we get all the different sounds in the world that we hear around us. While these concepts may be advanced for early elementary, they can be useful for anyone who is thinking about how to scale the concept of sound design toward this age group.
Before the Activity
- Gather cardboard boxes and cut them into rectangles or squares. They do not all need to be the same size but the minimum size is about 6 sq. inches.
- Have the Measuring Sound Waves Worksheet printed and ready.
- Have paint, tape, paper, rubber bands, and any other necessary materials set up.
- (optional) Have a long roll of paper ready to cover tables.
Part 1
- Tell the students that they will be making their very own stringed instrument using the engineering design process. It would be helpful to review the design process prior to starting for students who are not familiar with it.

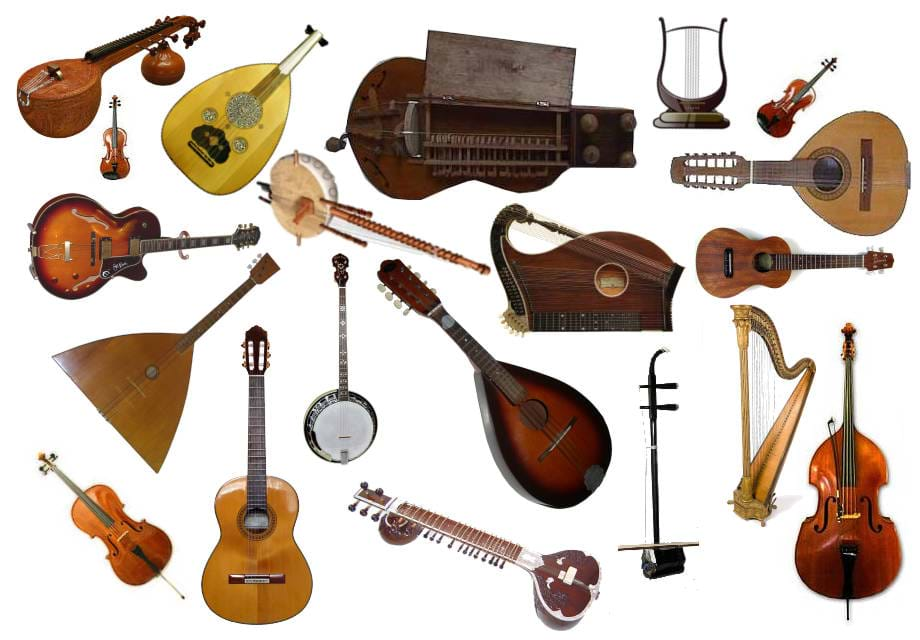
Using a guitar or ukulele is a great way to demonstrate vibrations and sound! - Show them a picture of various types of string instruments to get them thinking outside the box about what their instrument can look like.

How do stringed instruments make sound? - Tell them that they will receive:
- a piece of cardboard
- paper
- tape
- 6-10 rubber bands
- Tell the students there will be criteria and constraints around designing their instrument.
- Their instrument can be any size or shape, but:
- Their instrument must have between 4-8 strings
- There must be white paper underneath all of their strings.
- They must be able to pluck their strings without the strings breaking.
- They must have their name on their instrument.
- They can use anything they might have in their pencil box or on their table (i.e. crayons, glue sticks, scissors).
- They will have 20 minutes to build their instrument.
- Let students choose their cardboard and materials in whatever method works best for the classroom procedures.
- Allow students to begin building.
- While students are working, facilitate their designs by asking pointed questions. Some examples include: What are you modeling your instrument after? How many strings will your instrument have? Why did you choose that shape? What struggles are you having?
- When the 20-minute timer is up, have students show off their designs and explain what they built. Ask them why they chose a particular size or a particular number of strings.

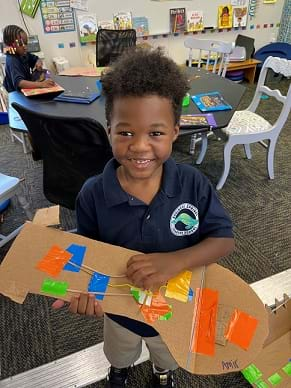
A student displays their new prototype! - When the sharing session is over, gather the students together. Tell them they will now be using their instruments to see sound. Tell them they will be putting paint on their strings. They will then pluck their strings and watch how the paint moves to create sound waves. (If smocks are available, now would be a good time to put them on.)
- They will get to choose three colors of paint.
- They need to try plucking at least one string hard, and one string gently.
- They must be careful with the paint.
- They can put their paint colors in any order and design their art any way they want.
- After giving them these criteria, have students choose paint colors individually, or have some responsible students help, depending on the number of students and their level of ability.
- Put the paint directly on the rubber bands. Just a line should do.
- Allow them to pluck the strings and make their sound wave art.

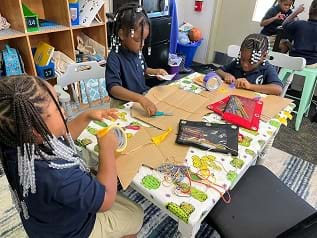
Students building their musical designs. - When they are finished, have them put them in a place to dry in somewhere in the classroom and wash their hands and remove smocks if they were wearing them.
- When all students are finished, have them gather on the carpet for a discussion.
- Ask students:
- What did you observe? (Potential answer: I noticed that the paint spread more when I plucked the string harder.)
- What did the string you plucked lightly look like? (Potential answer: The paint didn’t spread very much at all.)
- What about the string you plucked hard? (Potential answer: The paint went much further.)
- What do you think this means? (Potential answer: That bigger waves make louder sounds.)
- How do you think you saw sound? (Potential answer: I saw how the vibrations made everything move around them and how that was like my voice spreading around a room for people to hear.)
- What do you think the different size waves mean? (Potential answer: That sounds can be louder or quieter depending on the vibrations.)
- What do you think sound is now after seeing this? (Potential answer: Sound is waves and vibrations.)
- Show this video for wrap-up for the day. What is Sound? | Physics for Kids | SciShow Kids (https://www.youtube.com/watch?v=3-xKZKxXuu0). Then tell students that tomorrow we will measure the sound we made and see if we can discover even more.
Part 2
- Hand out students’ instruments from the previous day and a ruler for each student, the instruments should now be dried.
- Have them do the measurement activity paper.
- After students have completed the paper. Have a discussion using the following questions:
- What do you think a bunch of sound waves close together might mean? (Answer: The sound is faster.)
- What do you think very tiny waves could mean? (Answer: The sound is quiet.)
- What about bigger waves? (Answer: The sound is loud.)
- How does seeing what sound waves look like help us understand how sound works? (Answer: We can see that sound is made up of waves and they look different depending on the sound being produced.)
Vocabulary/Definitions
frequency: How many waves there are per second.
pitch: The rate at which vibrations are produced.
sound wave: Vibrating forms of energy that are made of molecules and look like waves.
vibration: A rapid motion (as of a stretched cord) back and forth.
volume: The measure of loudness.
wavelength: The measured distance between two identical points on two back-to-back waves.
Assessment
Pre-Activity Assessment
Discussion: Turn and talk to a partner about these questions.
- What do we think causes sound?
- How could we see sound?
- What factors can make sound louder or quieter?
Activity Embedded (Formative) Assessment
Discussion: Students will discuss designs with peers and teacher to create various iterations. They will also have a post discussion aftward of their observances during the engineering design.
Post-Activity (Summative) Assessment
Measurement of waves activity: Students will measure the distance between their sounds waves to understand how sound spreads and gets quieter as it gets further away using the Measuring Sound Waves Worksheet.
Making Sense Assessment: Have students reflect on the science concepts they explored and/or the science and engineering skills they used by completing the Making Sense Assessment.
Safety Issues
You may want to wear smocks if you have them to avoid any paint on clothes, but this is optional.
Activity Extensions
Have students devise another way, on their own, that they might be able to see vibrations. Students develop a design to allow them to hear the sound waves from further distances. Students could also delve into how different instruments vibrate to make sound and design a new instrument after their research.
Activity Scaling
Have students work in groups to create an instrument
- Help students with the tape and maybe give them fewer sizes and shapes to choose from.
- Allow students to make a non-stringed instrument.
- Give students the added parameter of making their instrument as loud as possible.
- Have students do the activity with less reusable materials such as real guitar strings and wood.
Additional Multimedia Support
Fun extras:
Links to videos:
Subscribe
Get the inside scoop on all things Teach Engineering such as new site features, curriculum updates, video releases, and more by signing up for our newsletter!Copyright
© 2023 by Regents of the University of Colorado; original © 2021 University of FloridaContributors
Rebecca ButlerSupporting Program
Multidisciplinary Research Experiences for Teachers of Elementary Grades, University of FloridaAcknowledgements
This curriculum was based upon work supported by the National Science Foundation under RET grant no. EEC 1711543— Engineering for Biology: Multidisciplinary Research Experiences for Teachers in Elementary Grades (MRET) through the College of Engineering at the University of Florida. Any opinions, findings, and conclusions or recommendations expressed in this material are those of the authors and do not necessarily reflect the views of the National Science Foundation.
Last modified: March 16, 2023


User Comments & Tips