Quick Look
Grade Level: 6 (6-8)
Time Required: 3 hours 15 minutes
(45-minute setup; observations recorded for 2-3 weeks (~5 minutes/day); 45-minute assessment which includes graphing results and completing worksheets)
Expendable Cost/Group: US $6.00 This activity uses some non-expendable (reusable) items such as a glue gun, drill and lab supplies; see the Materials List for details.
Group Size: 4
Activity Dependency:
Subject Areas: Biology, Chemistry, Measurement, Science and Technology
NGSS Performance Expectations:

| MS-ESS2-1 |
| MS-LS2-3 |
Summary
In a multi-week experiment, student teams gather biogas data from the mini-anaerobic digesters that they build to break down different types of food waste with microbes. Using plastic soda bottles for the mini-anaerobic digesters and gas measurement devices, they compare methane gas production from decomposing hot dogs, diced vs. whole. They monitor and measure the gas production, then graph and analyze the collected data. Students learn how anaerobic digestion can be used to biorecycle waste (food, poop or yard waste) into valuable resources (nutrients, biogas, energy).Engineering Connection
Anaerobic digestion is an integral part of many environmental engineering processes, such as wastewater treatment, and food and agricultural waste management. Engineers design these systems to recycle and minimize the impacts of waste on our environment, as well as produce useful products such as heat, energy and nutrient fertilizers.
Learning Objectives
After this activity, students should be able to:
- Explain why breaking up organic waste before adding it to a digester helps microbes break it down faster, much like chewing food helps a stomach digest it faster.
- Explain why researchers use a blank (or control) within an experimental setup.
- Explain the relationship between biogas production and microbial activity.
- Demonstrate how to record, analyze and interpret data.
- Recognize opportunities in which biorecycling can turn waste management into resource creation.
Educational Standards
Each TeachEngineering lesson or activity is correlated to one or more K-12 science,
technology, engineering or math (STEM) educational standards.
All 100,000+ K-12 STEM standards covered in TeachEngineering are collected, maintained and packaged by the Achievement Standards Network (ASN),
a project of D2L (www.achievementstandards.org).
In the ASN, standards are hierarchically structured: first by source; e.g., by state; within source by type; e.g., science or mathematics;
within type by subtype, then by grade, etc.
Each TeachEngineering lesson or activity is correlated to one or more K-12 science, technology, engineering or math (STEM) educational standards.
All 100,000+ K-12 STEM standards covered in TeachEngineering are collected, maintained and packaged by the Achievement Standards Network (ASN), a project of D2L (www.achievementstandards.org).
In the ASN, standards are hierarchically structured: first by source; e.g., by state; within source by type; e.g., science or mathematics; within type by subtype, then by grade, etc.
NGSS: Next Generation Science Standards - Science
| NGSS Performance Expectation | ||
|---|---|---|
|
MS-ESS2-1. Develop a model to describe the cycling of Earth's materials and the flow of energy that drives this process. (Grades 6 - 8) Do you agree with this alignment? |
||
| Click to view other curriculum aligned to this Performance Expectation | ||
| This activity focuses on the following Three Dimensional Learning aspects of NGSS: | ||
| Science & Engineering Practices | Disciplinary Core Ideas | Crosscutting Concepts |
| Develop and use a model to describe phenomena. Alignment agreement: Analyze and interpret data to determine similarities and differences in findings.Alignment agreement: Use mathematical representations to describe and/or support scientific conclusions and design solutions.Alignment agreement: | All Earth processes are the result of energy flowing and matter cycling within and among the planet's systems. This energy is derived from the sun and Earth's hot interior. The energy that flows and matter that cycles produce chemical and physical changes in Earth's materials and living organisms. Alignment agreement: | Models can be used to represent systems and their interactions. Alignment agreement: |
| NGSS Performance Expectation | ||
|---|---|---|
|
MS-LS2-3. Develop a model to describe the cycling of matter and flow of energy among living and nonliving parts of an ecosystem. (Grades 6 - 8) Do you agree with this alignment? |
||
| Click to view other curriculum aligned to this Performance Expectation | ||
| This activity focuses on the following Three Dimensional Learning aspects of NGSS: | ||
| Science & Engineering Practices | Disciplinary Core Ideas | Crosscutting Concepts |
| Develop a model to describe phenomena. Alignment agreement: | Food webs are models that demonstrate how matter and energy is transferred between producers, consumers, and decomposers as the three groups interact within an ecosystem. Transfers of matter into and out of the physical environment occur at every level. Decomposers recycle nutrients from dead plant or animal matter back to the soil in terrestrial environments or to the water in aquatic environments. The atoms that make up the organisms in an ecosystem are cycled repeatedly between the living and nonliving parts of the ecosystem. Alignment agreement: | The transfer of energy can be tracked as energy flows through a natural system. Alignment agreement: Science assumes that objects and events in natural systems occur in consistent patterns that are understandable through measurement and observation.Alignment agreement: |
Common Core State Standards - Math
-
Model with mathematics.
(Grades
K -
12)
More Details
Do you agree with this alignment?
-
Reason abstractly and quantitatively.
(Grades
K -
12)
More Details
Do you agree with this alignment?
-
Recognize and represent proportional relationships between quantities.
(Grade
7)
More Details
Do you agree with this alignment?
-
Construct and interpret scatter plots for bivariate measurement data to investigate patterns of association between two quantities. Describe patterns such as clustering, outliers, positive or negative association, linear association, and nonlinear association.
(Grade
8)
More Details
Do you agree with this alignment?
International Technology and Engineering Educators Association - Technology
-
Compare how different technologies involve different sets of processes.
(Grades
6 -
8)
More Details
Do you agree with this alignment?
-
Develop innovative products and systems that solve problems and extend capabilities based on individual or collective needs and wants.
(Grades
6 -
8)
More Details
Do you agree with this alignment?
State Standards
Florida - Math
-
Model with mathematics.
(Grades
K -
12)
More Details
Do you agree with this alignment?
-
Reason abstractly and quantitatively.
(Grades
K -
12)
More Details
Do you agree with this alignment?
-
Construct and interpret scatter plots for bivariate measurement data to investigate patterns of association between two quantities. Describe patterns such as clustering, outliers, positive or negative association, linear association, and nonlinear association.
(Grade
8)
More Details
Do you agree with this alignment?
Florida - Science
-
Construct a scientific model of the carbon cycle to show how matter and energy are continuously transferred within and between organisms and their physical environment.
(Grade
8)
More Details
Do you agree with this alignment?
Materials List
Each group needs:
- 6 2-liter soda bottles
- 3 2-liter bottle caps
- 3 500-ml plastic water bottles with caps
- 1.5 meters (5 ft) thin tubing, such as fish tank aeration tubing, which is reusable and can be used for a number of other activities; such as aquarium airline tubing with 0.165-inch inner diameter and 0.225-inch outer diameter, available in various lengths from https://www.petmountain.com/product/lees-airline-tubing-for-aquariums
- 1.5 liters cow manure, or sediment from the bottom of a pond, swamp or other consistently wet area
- 1 hot dog
- lab gloves, one pair per student
- safety goggles, one per student
- lab coat, one per student
- sharpie or similar marker for labeling plastic bottles
- graduated cylinder
- Anaerobic Digestion Data Sheet, one per group
- Anaerobic Digestion Worksheet, one per student
To share with the entire class:
- hot glue gun and glue sticks
- drill and a drill bit that is slightly larger than the aeration tubing diameter; alternatively, use a knife to cut holes in bottle caps
- measuring cup
- bucket of tap water that has been left sitting out at room temperature for 24 hours (to help the chlorine dissipate); need at least 1.5 liters per group
- scissors, for cutting plastic bottles and tubing
- knife and cutting board, to cut hot dogs
- graph paper, colored pencils/markers, for plotting graphs
Worksheets and Attachments
Visit [www.teachengineering.org/activities/view/usf_biorecycling_lesson01_activity1] to print or download.Pre-Req Knowledge
Students should understand that although microbes are too small for our eyes to see, they do very important work in biorecycling processes. This "work" can be measured in ways other than sight, such as by measuring the products they produce, such as biogas.
Introduction/Motivation
Did you know that engineers put microbes to work? We make microbes do all of our "dirty work," everything from treating wastewater to cleaning up soils contaminated by radioactive materials. The good thing is, the microbes don't mind the hard work because to them the pollutants are food!
In this activity, you are acting as engineers who have been given a challenge. A local school has asked you to deal with all of the food waste that its cafeteria produces. You know that a technology called anaerobic digestion can help recover energy and nutrients from food waste. The challenge is that the cafeteria produces so much food waste every day that you must make sure that your anaerobic digester works as efficiently as possible. In this experiment, you will try different conditions to see if you can speed up the process for food waste recycling.
Procedure
Background
Anaerobic digestion occurs when microbes break down organic materials in the absence of oxygen. When the organic matter decomposes, it is converted to biogas, which contains methane that can be used as a fuel source, just like propane or natural gas. Anaerobic digestion happens in nature all the time. The same process happens in cow stomachs, which causes them to release methane gas. Anaerobic digestion also happens at the bottom of swamps and lakes where fish waste, dead leaves and plants slowly break down. The biogas that is released in swamps is often called "swamp gas." Anaerobic digestion is used by engineers all over the world to break down complicated organic waste such as garbage, and food, yard and human waste. Not only does anaerobic digestion create biogas, but it also releases all of the nutrients in the organic "waste" making them available again as raw resources for new plant growth.
Before the Activity
- In the weeks before the activity, ask students to bring in the two sizes of rinsed plastic bottles with caps.
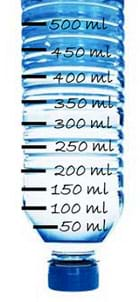
Figure 1. To measure gas production in the mini-anaerobic digesters, make a gas measurement bottle from a graduated water bottle. - Gather materials, tools and lab supplies.
- Cut the tubing into 0.5 meter (~1 foot) sections, enough for three sections per group. Alternatively, have students do this themselves during the activity.
- Make copies of the Anaerobic Digestion Data Sheet, one per group, and the Anaerobic Digestion Worksheet, one per student.
- Leave the experimental water supply sitting out overnight to rid it of chlorine.
- Divide the class into groups of four students each.
With the Students: Preparing the Gas Measurement Bottles
- Cut 2.5 cm off the bottoms of the three 500-ml water bottles.
- With the cap on, invert the bottle so the cap is on the table. Use a graduated cylinder to measure 50 ml of tap water and put the 50 ml of water in the inverted bottle. Mark the water line with a permanent marker and label it "50 ml."
- Continue to fill the water bottles, 50 ml at a time, marking each new 50-ml water level until the bottles are full. The three bottles should look like the one in Figure 1. These are the "gas measurement bottles" for the experiment.
- Cut 3 of the 2-liter bottles in half. Recycle the tops; they are not needed for the experiment. The bottom halves serve as water traps to keep the gas in the gas measurement bottles (see Figure 2).
- Fill the three 2-litter bottoms three-quarters of the way with regular tap water.
- Uncap each gas measurement bottle and place it within a water bath with the bottle cap side up. Let the bottle fill completely with water, as shown in Figure 2.
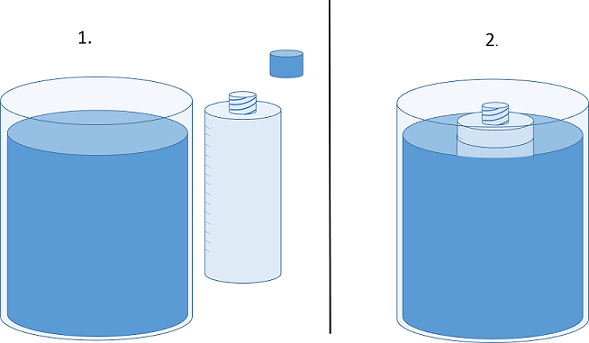
Figure 2. Prepare the gas measurement bottle by placement in a water bath.
With the Students: Preparing the Anaerobic Digesters
- Now let's build our reactors! Take the six bottles caps (three from the 2-liter and three from 500-ml water bottles) and use a drill to make one small hole in the center of each cap. The hole must be large enough to permit the tubing to slide through it.
- Cut the tubing into 0.5 meter (~1 foot) sections, enough for three sections per group. Place the end of one section into the cap of the 2-liter bottle used as the anaerobic digester. The tubing should only go into the cap about 2-3 cm (~1 inch).
- Use hot glue to secure the tubing in place with no air leaks. It is critical to have a tight fit because if any air enters the bottle, the microbes won't be happy and the biogas will escape. Figure 3 summarizes these steps.

Figure 3. Bottle cap preparation using a drill, tubing and hot glue. - Place the other end of the tubing in the hole of a 500-ml bottle cap.
- Glue the tubing in place. Refer to Figure 4 to see the final experimental setup composed of an anaerobic digester and a gas measurement device.
- Repeat these steps for the remaining two sections of tubing so that three experimental setup are prepared.
With the Students: Food Preparation
- Cut the hotdog in half. Dice one half as finely as possible; leave the other half unchanged.
- Place the diced hotdog in one anaerobic digester bottle and label it "Diced Hotdog."
- Place the remaining hotdog section in the second anaerobic digester bottle and label it "Hotdog."
- The last/third anaerobic digester bottle serves as a blank (control); do not add any food to it. Label it "Blank."
- Place 500 ml of cow manure or pond sediment into each of the three bottles. This is the source of the microbes.
- To each bottle add 500 ml of the water that has been standing out overnight.
- Seal the filled anaerobic digester bottles using the caps that have tubing attached to them. Refer to Figure 4.
- Take the opposite ends of the tubing and use them to cap the gas measurement water bottles. Refer to Figure 4.
- Your three experimental setups (diced hotdog, hotdog and blank) are complete!
- At this stage, verify student understanding by assigning students to each draw the experimental setup, labeling all components and writing a brief description/prediction of what is expected to happen.
With the Students: Observation and Data Recording
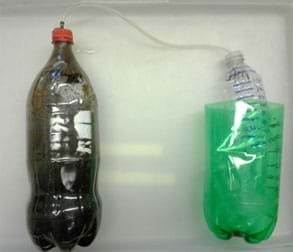
- Over the course of two to three weeks, observe the bottles (see Figure 4).
- As gas is produced, it pushes the gas measurement bottle up from the water bath. Each day (or as often as possible), measure the amount of gas produced by reading the marked line at the level of water inside the gas measurement bottle.
- Once the gas has been measured, uncap the gas measurement bottle. This permits the bottle to completely refill with water from the water bath and resets the bottle so it is ready to collect more gas. It may not be necessary to reset the bottle every day, as it depends on the amount of biogas being produced. The point of refilling, or resetting the gas measurement bottle, is so that it never overfills with gas. If it overflows with biogas, then gas measurements are lost.
- Hold groups accountable for monitoring, measuring and recording the amounts of gas produced. Have them record data on the team data sheets.
- Once done, empty the bottles into the toilet, and rinse and recycle them.
- Give students some time to plot and analyze their collected data, as described in the Assessment section.
- Lead a class discussion to share results and guide students in the interpretation of their data. See the Assessment section for suggested questions.
- Hand out the worksheets. Have students individually complete and hand them in for grading.
Vocabulary/Definitions
anaerobic: An environment or condition that lacks oxygen.
biogas: A gas mixture, produced during anaerobic digestion that contains methane and carbon dioxide. Biogas can be burned as an energy source.
bioreactor: An artificial environment in which organisms are encouraged to accomplish a particular task, essentially microbes' work place.
organic material: All living or once-living things or items produced by living things. These carbon-based items include food waste, yard scraps, plant material, sugar, animals and people. Also just called "organics."
Assessment
Pre-Activity Assessment
What's Happening? Have students draw the anaerobic digester and label its components. Require them to write a brief description/prediction of what is expected to happen. (Answer: We predict that the contents of the digester bottle with the diced food will breakdown faster and produce more gas. This is because the complex organic material is already broken down a bit before the microbes start eating it, so it is easier for them to digest.)
Activity Embedded Assessment
Data Recording: Have student groups record the daily gas production on the Anaerobic Digester Data Sheet. How are their bottles performing? Is it as expected? Why or why not?
Post-Activity Assessment
Data Graphing: Have students plot their data and analyze what it means. Direct students to each create one graph with days on the x-axis and the gas amount on the y-axis. Plot three sets of data (one for each setup: diced hotdog, hotdog and blank) on one graph, using different colored pencils/markers for each data set. As a class, guide students to interpret their data. Ask them:
- Which bottle performed best? (Answer: The bottle with the diced hotdog usually does the best.)
- Why do you think that anaerobic digester bottle performed better? (Answer: The diced hotdog has more surface area, which means that the microbes can access the food easier.)
- Which anaerobic digester bottle generated the least biogas? (Answer: The blank bottle.)
- Why did we include a blank in the experimental setup? (Answer: The blank was included so we could determine if the hotdog [diced or whole] was the main source of the food/energy for the microbes. If no [or significantly less] biogas is produced in the blank compared to the setups with hot dogs, it tells us that the hotdog is the main source of the food/energy for the microbes.)
Putting Microbes to Work! Have students complete the Anaerobic Digester Worksheet, which reviews anaerobic digestion and asks them to fill in a diagram representing the process, inputs, outputs and benefits of anaerobic digestion. Review their answers to gauge their comprehension of the concepts.
Investigating Questions
- Which set up do you think will perform better, whole or diced food? Why?
- What else would you like to test in the digester? Do you think it would produce more or less gas? Why?
Safety Issues
- Wash hands after touching anything in this system. Always wear gloves when handling cow manure.
- The gas inside the bottles is flammable. While it does not pose a large risk, do not keep open flames near the gas. With the correct safety equipment (gloves, safety goggles, lab coat) this gas can be flared once gas collection has been completed.
- Do not fill a reactor bottle to more than 50% of its volume. If large particles clog the tubing, extreme pressures can build up within the reactor. If this happens, place the clogged bottle in a trash bag and unscrew the bottle cap through the bag to prevent the reactor contents from spraying in the classroom.
- The bottles may have on odor, like rotting eggs or cow manure. Be sure adequate ventilation is available when conducting the activity.
Troubleshooting Tips
If no noticeable change occurs in a gas measurement bottle, check to make sure that gas is not leaking out of the container. If a leak is found, cover it with hot glue.
Activity Extensions
Expand the activity by investigating other variables. For example, vary the amount of organic materials added and/or use other types of organic material, such as bread, candy or yard scraps to see the difference in biogas production.
Activity Scaling
- For lower grades, prepare a few demonstration anaerobic digester bottles for which students take turns recording data. Relate anaerobic digestion to stomach digestion and flatulence production.
- For higher grades, increase the number of variables and have students make predictions about their variables as well as their classmates' variables.
Subscribe
Get the inside scoop on all things Teach Engineering such as new site features, curriculum updates, video releases, and more by signing up for our newsletter!More Curriculum Like This

By studying key processes in the carbon cycle, such as photosynthesis, composting and anaerobic digestion, students learn how nature and engineers "biorecycle" carbon. Students are exposed to examples of how microbes play many roles in various systems to recycle organic materials and also learn how ...

Students learn the fundamentals of using microbes to treat wastewater. They discover how wastewater is generated and its primary constituents. Microbial metabolism, enzymes and bioreactors are explored to fully understand the primary processes occurring within organisms.

Students learn how plastics in the human trash stream end up as microplastic particles entering the food chains via polluted water, harming animals and people. They think of ways to reuse or replace the common plastic items they discard daily. They learn how microplastics persist in the environment ...

Students investigate what types of materials biodegrade in the soil, and learn what happens to their trash after they throw it away. They learn about the concepts behind landfills and compost piles. In an associated activity, students create their own miniature landfills—a hands-on way to learn the ...
References
Food Waste Management Tools and Resources. Last updated August 2, 2013. U.S. Environmental Protection Agency. Accessed February 22, 2014. http://www.epa.gov/foodrecovery/fd-tools_rescrs.htm
Copyright
© 2014 by Regents of the University of Colorado; original © 2013 University of South FloridaContributors
Robert Bair, Ivy Drexler, Jorge Calabria, George Dick, Onur Ozcan, Matthew Woodham, Caryssa Joustra, Herby Jean, Emanuel Burch, Stephanie Quintero, Lyudmila Haralampieva, Daniel YehSupporting Program
Membrane Biotechnology Laboratory, College of Engineering, University of South Florida, TampaAcknowledgements
This curriculum was developed under National Science Foundation grant numbers 1236746, 1200682, 0965743 and 1243510, which includes the Water Awareness Research and Education (WARE) - Research Experience for Teachers (RET). However, the contents do not necessarily represent the policies of the National Science Foundation or the U.S. Department of Education, and should not be assumed an endorsement by the federal government.
The authors gratefully acknowledge funding from the Department of Education Graduate Assistants in Areas of National Need (GAANN) Fellowship, and the Bill and Melinda Gates Foundation, as well as classroom support from Learning Gate Community School (Lutz, FL), the Science and Technology Education and Innovation Center (St. Petersburg, FL), and Erin Morrison.
Last modified: June 24, 2021



User Comments & Tips