
Introduction to Arduino: Getting Connected and Blinking LEDs
Microcontrollers are the brains of the electronic world, but in order to play with one, you must first get it connected! For this maker challenge, students work through the engineering design process, as they learn how to connect their Arduino microcontroller circuit boards to computers. First, students are walked through the connection process, helped to troubleshoot common pitfalls, and write their first Arduino programs (setup and loop functions, semicolons, camel case, pin 13 LED). Then they are given the open-ended challenge to create their own blinking LED code—such as writing Morse code messages and mimicking the rhythm of a heartbeat. This practice helps students become comfortable with the fundamental commands before progressing to more difficult programs.
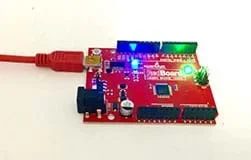 A Sparkfun RedBoard programmed with Arduino.
- computer, Window or Mac
- Arduino software; download from https://www.arduino.cc/en/software
- SparkFun RedBoard or Arduino Uno microcontroller and programming cable; an Arduino Inventors Kit is recommended, such as at SparkFun
These days, consumer products are made less expensive and more efficient through the use of electronics. A clothes dryer can sense how long it needs to run without shrinking your clothes. An oven can hold its temperature stable so that one side of a turkey doesn’t burn to a crisp while the other side is raw. A refrigerator can tell you when your milk is about to go bad. The key to all of these advancements is the use of sensors to take measurements, microcontrollers to process the information, and actuators to change the physical systems.
(Engage students with the following prompts.) Can you think of a project for which you could use a sensor? What problem would you like to solve?
A microcontroller functions like the “brain” of a project. They are like mini-computers that process the information from sensors and control actuators based off the sensor readings.
In this maker challenge, we are going to start using the Arduino microcontroller. This small, low-cost microcontroller was designed by engineers to be relatively easy to use, so it is ideal for student projects!
The first step to using an Arduino for a project is to connect the Arduino board to a computer. Oddly, this may be the hardest step—since the microcontroller and your computer are both complex pieces of hardware!
(After completing the following steps, students are ready to move on to the First Program section.)
- Open the Arduino program (also called Arduino integrated development environment or IDE)
- In the Tools menu under Boards > select Arduino/Genuino Uno
- In the Tools menu under Ports,
- For Windows: select a Port labeled COM (followed by usually the highest number)
- For Macs: select a Port labeled /dev/tty.usbserial-(then alpha-numeric specific to you)
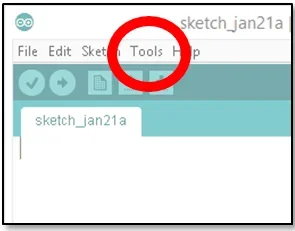 Find the Tools menu option.Copyright 2017 Daniel Godrick, ITL Program, College of Engineering and Applied Science, University of Colorado Boulder
(If students have problems, see the Resources section. If using a Mac computer or if a Windows computer does not show a COM port, refer to the Install FTDI Drivers section.)
First Program
(Once students have connected the board, have them start the first task.)
Blink the LED that is on the Arduino itself (see Figure 1). This is on the same circuit as pin 13 and is often blue or yellow.
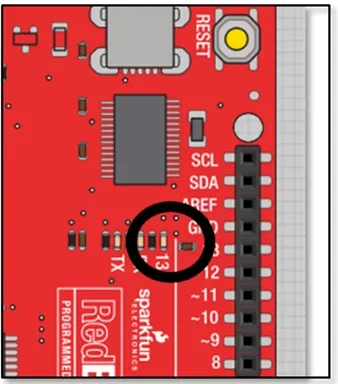 Figure 1. The location of the LED on pin 13.Copyright 2017 Daniel Godrick, ITL Program, College of Engineering and Applied Science, University of Colorado Boulder
If we start easy and then layer on complexity, we can more easily troubleshoot issues if/when things do not work. Once we get the board’s LED blinking, we know that the code works! If we cannot get the LED on the board to blink, then we know we have a problem to fix before we can move on. The ability to isolate the source of issues is especially helpful as our projects get more and more difficult.
Before we program, let’s think about what we want to do without having to worry about syntax.
We want to
- Use the LED on pin 13
- Turn this pin on
- Wait a little while
- Turn this pin off
- Wait a little while
- And then do this again and again
Now that we know what we want to do, let’s talk about how to do this with Arduino commands.
Every Arduino needs two functions; these are called setup and loop. Arduino programs will not work without both of these functions and you only get one of each.
The setup function runs one time and looks like this:
void setup()
{
//You put what you want to set up here.
}
The loop function runs over and over and looks like this:
void loop()
{
//You put what you want Arduino to keep doing (continuously) here.
}
The command to tell Arduino how we are going to use a pin is:
pinMode,
If we are turning an LED on and off, we are sending output signals from the Arduino, so we want to set this pin as an output. The command looks like:
pinMode(13,OUTPUT);
Note the semicolon! Semicolons are to Arduino commands what periods are to English sentences. End your commands with a semicolon.
See anything weird about the syntax? Why is the first letter lowercase, and the first letter of each subsequent letter upper case? This is called “camel case” and computer scientists like to use it because they can have descriptive names without a bunch of underscores (_) or spaces that can cause problems in code and readability. With practice, using camel case becomes second nature.
Also, note that in Arduino, the syntax is very important and Arduino is case sensitive. The makers of Arduino help you by changing the text colors to let you know that you got the syntax correct!
That is all we need for the setup function; now onto the loop function. Remember that every Arduino program needs both the setup and the loop functions in order to run correctly. The loop function runs repeatedly when power is applied to the Arduino. We will use this functionality to make the light blink repeatedly.
In the loop function, we want to turn on the LED first. In computer science, when we are turning things on and off in two discrete states, we say this is a “digital” signal. You may have heard the word “digital” used with your other electronics, but in the case of microcontrollers, the meaning is a little more specific. When we are turning something on and off (like the LED), this is known as writing the signal.
Therefore, in Arduino, if we want to turn on the light attached to pin 13, we use the command digitalWrite like this:
digitalWrite(13,HIGH); <-- remember the semicolon!
Can you guess the command to turn the pin 13 light off?
digitalWrite(13,LOW);
We also need to incorporate a delay between the on and off? Why do we need to do this? The reason is that the microcontroller acts very, very quickly. It can run thousands of commands every second. If we do not delay it to slow it down, our eyes cannot see the change! A delay of 1 second between on and off works pretty well.
Make your final code look like Figure 2.
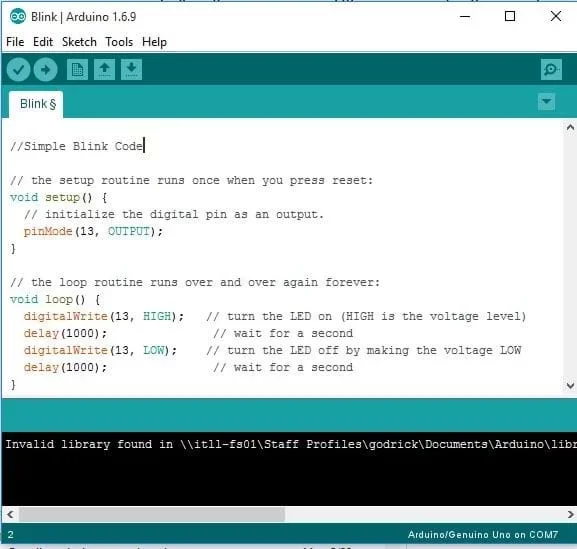 Figure 2. Final code for blinking the LED on pin 13.Copyright 2017 Daniel Godrick, ITL Program, College of Engineering and Applied Science, University of Colorado Boulder
Try typing in this code, upload it, and watch the LED on pin 13 turn off and on!
When students are done with the first exercise, challenge them to control the light in more difficult ways. Having students think about and then program a heartbeat and Morse code encourages them to process the basics of the Arduino output commands. Understanding the fundamental commands helps them as they progress to more difficult programs.
- Heartbeat light program prompts: What is the rhythm of a heartbeat? What changes in your code do you need to make to accomplish this?
- Morse code for SOS prompts: Who knows the Morse code for SOS? (Three short blinks, followed by three long blinks, followed by three short blinks.) How can you change your code to signal SOS?
After students complete these programs, if they are interested in coding more efficiently and learning another tool, direct them look through the “for loop” explanation under Resources.
Finally, have students use Morse code to spell out their names or write their own messages!
Fun Fact: Do you have a blue LED on your board? The inventor of the blue LED won a Nobel Prize in 2014 “for the invention of efficient blue light-emitting diodes, which has enabled bright and energy-saving white light sources.” (Source: Nobel prize.org)
(As a class, reflect on the Arduino exercise. Emphasize peer learning about the hookup and programming processes. What worked for one student today might not work for that same student tomorrow! Ask the following questions.)
- What went easily and smoothly? (Example student answer: Changing how long the light stays on/off.)
- What was more challenging to get to success? (Example student answers: Programming the longer Morse code blinking patterns, remembering to use the semicolons, etc.)
- If you had better, brighter, more numerous LEDs, what could you make? (Example student answer: Have many lights turn on/off along with music.)
- Who has a Morse code project that they would like to share with the class? Can other students decode the messages?
It sometimes helps to think of Arduino like an ideal little kid—it does exactly what you tell it to do, but sometimes that is not really what you want it to do!
If the Port does not show up in the Tools menu, verify that the USB is connected to both the computer and the Arduino.
If the wire is connected, but you still have uploading issues:
- If the Port is not showing up in a Windows or Mac computer, refer to the Install FTDI Drivers resource.
- If a Mac computer only permits one program to upload, refer to the Install FTDI Drivers resource and update the drivers.
- Refer to the Engineering Design Process hub on Teach Engineering to guide your students through the challenge. If documentation of the design process is desired, utilize the Engineering Design Process Notebook (PDF).
- RedBoard information, SIK Guide: https://cdn.sparkfun.com/datasheets/Kits/RedBoard_SIK_3.2.pdf
- Help getting connected: SparkFun’s RedBoard Hookup Guide covers common issues at https://learn.sparkfun.com/tutorials/redboard-hookup-guide?_ga=2.197934895.1417644557.1496245065-137412878.1496245065
- Help getting connected: If you have problems seeing your board in the Tools menu, follow these instructions for how to Install FTDI Drivers at https://learn.sparkfun.com/tutorials/how-to-install-ftdi-drivers/windows---in-depth
- Analog vs. Digital explanation: https://learn.sparkfun.com/tutorials/analog-vs-digital
- A table of International Morse Code: https://en.wikipedia.org/wiki/Morse_code
- Arduino “for loop” explanation: https://docs.arduino.cc/built-in-examples/control-structures/ForLoopIteration
Contributors
Daniel Godrick
Supporting Program
ITL Program, College of Engineering and Applied Science, University of Colorado Boulder
Acknowledgements
This activity was developed by the Integrated Teaching and Learning Program in the College of Engineering and Applied Science at the University of Colorado Boulder.
Copyright
2017 by Regents of the University of Colorado