
Quick Look
Grade Level: High school
Time Required: 2 hours (wild guess!)
(two 60-minute class periods)
Subject Areas: Algebra, Computer Science, Measurement, Physical Science, Physics, Science and Technology

Maker Challenge Recap
For this maker challenge, students move through the engineering design process. They investigate Python and Jupyter Notebook to analyze real astronomical images in order to calculate the interstellar distance to a star cluster across the Milky Way from our own Solar System. They learn how to write Python code that runs in a Jupyter Notebook so they can determine the brightness of stars in an astronomical image. Next, students complete the functions in the project to determine how far away a single star in the cluster is from Earth. This is a chance to try hands-on astronomical research techniques in the field of aperture photometry. The real astronomical image data will be directly manipulated and analyzed by code the students create. Groups compare their final images and results to answer questions about the astronomy of stars and stellar distances within the Milky Way. Students experience their discoveries the same way Harvard scientist Harlow Shapley first learned the true size and shape of the Milky Way.
Maker Materials & Supplies
- A computer running Windows, Mac OS X, Linux, or Chrome OS
- Access to a web browser such as Chrome, Microsoft Edge, or Firefox
- At least one of the following (tested on all 3):
- Access to the internet and Microsoft Azure Notebook
- Install Anaconda Distribution of Python with Jupyter Notebook
- Access to Google Colaboatory (free access)
Worksheets and Attachments
Visit [www.teachengineering.org/makerchallenges/view/rice3-2467-milky-way-stars-design-challenge] to print or download.Subscribe
Get the inside scoop on all things Teach Engineering such as new site features, curriculum updates, video releases, and more by signing up for our newsletter!More Curriculum Like This

Students are introduced to the basic known facts about the universe, and how engineers help us explore the many mysteries of space.

Kickoff
Did you know the first person to figure out the size and shape of the Milky Way galaxy, Harlow Shapley, had nothing more than some pictures of stars in far-off star clusters? We can figure out a lot about a given star, including how far it is from us, by analyzing the light it emits. Based on this information, how can we measure astronomical distances? One technique is to use "standard candles," which are astronomical objects that have well-known brightness. (See Resources below for more information). By measuring how bright an object appears to us and knowing the actual brightness from some analysis, we can work out how far the object is from us. This is where the inverse square law comes in.
The inverse square law is one of the most useful tools in astronomy. The law says that light spreads out as it rushes away from a star such that the brightness of the light decreases by a factor of 1 divided by the change in distance squared. How is the inverse square law related to the relation for finding the surface area of a sphere?
Shapley used a handy tool for a standard candle called RR Lyrae variable stars. We will do the same thing here. A variable star literally swells up and gets brighter and redder and then after a time shrinks again and gets dimmer and bluer. Imagine if the sun became 50% bigger than normal in the morning but by the evening shrink to 50% smaller than normal. It would make Earth a hard place to live. What is the astronomical term we use for the intrinsic brightness of a star? All we need to do is use some clever math and the inverse square law and we can measure distances in the Milky Way once we find one of these variable stars.
We have five images of a globular cluster full of these RR Lyrae stars. Each image was taken in the same night. If we look at the images as an animation, the RR Lyrae stars are the ones that appear to blink brighter and dimmer. We will choose one and measure its light using some Python code.
Scientists often have to work on software engineering projects like this. We will write only some new code, but we will mainly take existing code and make it do something new! We will engineer a solution to the given problem using the software tools and techniques available to us.
This is an interactive programming project called a Jupyter Notebook. There is background information, examples, and live code to run, test, and complete. All of this happens directly in your web browser rather than using a separate application.
Resources
- Refer to the Engineering Design Process hub on TeachEngineering to guide your students through the challenge. For design process documentation, utilize the Engineering Design Process Notebook.
- If students need some background, the free OpenStax Astronomy text is a great choice; it contains a section about variable stars as standard candles.
- Here is an animation of images with the RR Lyrae stars clearly visible as they change brightness.
- Students can use the free web-based Microsoft Azure Notebook service to complete their project.
- You can also have students install the Anaconda Distribution on their own Windows, Linux, or Mac computers so they can run the Python-based Jupyter Notebook locally.
- Animation of a variable star changing as it shrinks and expands from HubbleESA.
- Included with the student Jupyter Notebook is a teacher notebook with solutions provided.
Maker Time
The best way to start is to dive in! The supplied Jupyter Notebook has some background information, sample code, and the start code for you to complete. Start by loading the Jupyter Notebook on your computer. That might be by uploading the notebook to the Azure Notebook server or by starting Jupyter Notebook on your own computer and opening the starter notebook. We are using the Jupyter Notebook software (either local or online) to edit and write Python code. Python coding is becoming a big part of modern astronomical research. You’re using the same tools as professional astronomers in this activity.
The challenge here is to complete the code left blank by reading through the example code and working with other students to make your code work as expected. There are questions scattered throughout for you to answer in addition to the code to be completed.
Read through the background info until you get to the “Coding and Questions” section. Each cell in the Jupyter Notebook will have questions for you to answer as you interact with completed code or code to complete on your own and sometimes both. Don’t forget to test your solutions using the examples provided before moving on to the next cell. You’ll need all the parts to work individually before putting them together as a whole.


Many of the code cells are meant to be read and then run, but not altered, since they run correctly to start with. Below is a list of the functions to complete and descriptions of the incomplete cells for students to finish. Any code that has an ellipsis (…) needs to be completed.
Functions to complete:
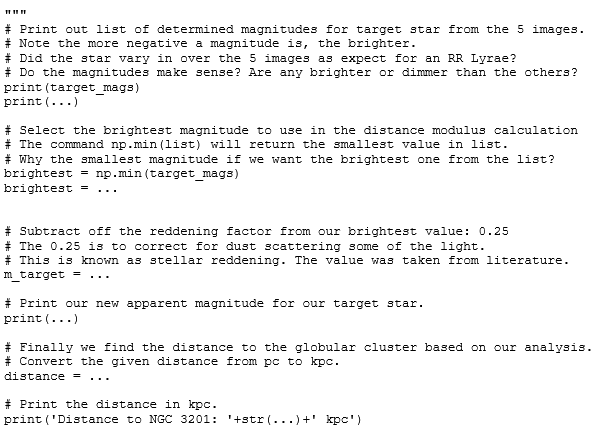
- distance_modulus – Function to find the distance of an astronomical object in parsecs if given the apparent (m) and absolute (M) magnitudes of the object. Use some algebra and rearrange the distance modulus equation to return the distance in parsecs of the object. Don't forget how exponents work: x^2 (x squared) would be written as x**2.
Distance modulus formula: m - M = -5 - log10(d)
- process_image –
- This function consumes:
- a filename which can be local or a URL for a FITS file,
- the starting and ending points marking the bounding box for the image,
- and whether or not the image needs to be flipped (both vertical and horizontal)
- This function returns:
- the apparent magnitude of the target star
- The process image function is where we bring the steps together. Here is where the engineering process is needed.
- Get the image data using the filename and mirror flag.
- Get the subtracted data and background using the data from step 1
- Extract a list of sources using the subtracted data, the background, and the given x and y pairs (2 x values and 2 y values).
- Set the target as the center of the image.
- Get the flux for our target star.
- Get the flux for our calibration star.
- Determine the apparent magnitude of the calibration star.
- Calibrate the apparent magnitude of the target star.
- Print and return our target star magnitude.
The 5 cells that call the “process_image” function will produce a number and also an image. This is image number 5 with the targets selected.

Note that the calibration star magnitude should be around 14.81 for each of the 5 processed images. The magnitude of the target star should vary between about 14.2 at the brightest and 15.5 at the dimmest.
The distance in the teacher notebook to cluster NGC 3201 yields a distance of 4.87 kpc or 15884 light years. For comparison, the Milky Way is about 100,000 light years across, and the sun is about 25,000 light years from the edge of the Milky Way galaxy.
Description of cells for students to complete using Jupyter Notebook: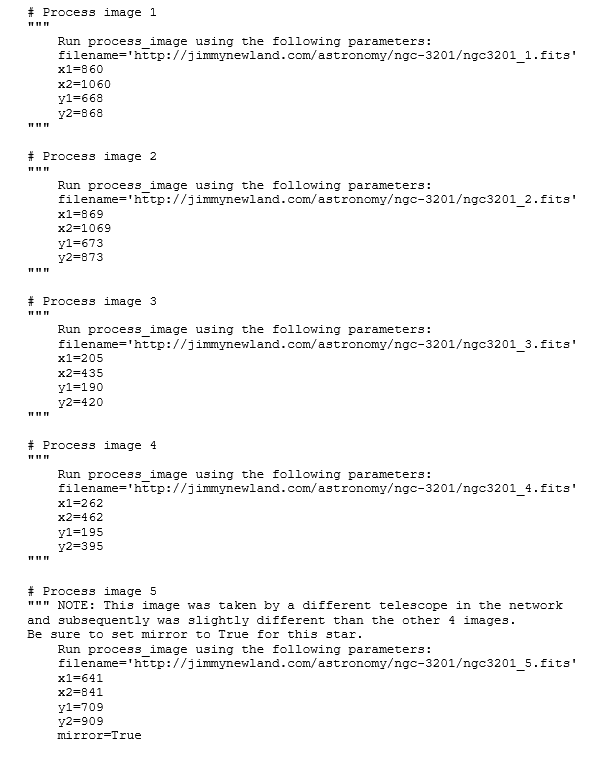
Wrap Up
How far away is NGC 3201? According to other researchers, the distance to NGC 3201 is 16 kly or 4.9 kpc. How does your analysis compare?
Students should share their code and their results with one another. Consider a gallery walk or take volunteers to project the final result from various groups for the class to see. Discuss where difficulties arose and tackle questions about how students’ algorithms compared with one another.
What would have to change if we selected a new target star? How could we apply what we have done here for a different star cluster?
Tips
- You probably want students to turn on the line numbering in Jupyter Notebook.
- Have students go to View->Toggle Line Numbers in the menu bar.
- Software engineering is meant to be a collaborative process. It’s best to treat this activity as a group activity and have groups share ideas and solutions to problems between themselves.
Copyright
© 2019 by Regents of the University of Colorado; original © 2019 Rice UniversityContributors
Jimmy NewlandSupporting Program
Research Experience for Teachers, Office of STEM Engagement, Precise Advance Technologies and Health Systems for Underserved Populations and Department of Electrical and Computer Engineering, Rice UniversityAcknowledgements
This activity was developed as part of the Research Experience for Teachers through the Office of STEM Engagement and the Department of Electrical and Computer Engineering at Rice University supported by the National Science Foundation under grant number IIS 1730574. Any opinions, findings and conclusions or recommendations expressed in this material are those of the authors and do not necessarily reflect the views of the National Science Foundation or Rice University.
Last modified: July 17, 2023
User Comments & Tips