Quick Look
Grade Level: Elementary school
Time Required: 45 minutes
Expendable Cost: US $2.00
Group Size: 2
Subject Areas: Physical Science
Introduction
Bolded words are vocabulary and concepts to highlight with students during the activity.
What is an electromagnet? The two types of magnets are permanent magnets and electromagnets. Students are probably familiar with permanent magnets—they are the ones that stick to refrigerator doors. They are called permanent magnets because they always have magnetic fields. Electromagnets are different because their magnetic fields are created by current running through them, meaning the magnetic fields can be removed by turning off the electricity. Today, students make electromagnets and experiment with ways to change their strength.
Supplies
- 1 D-cell battery (fully charged)
- 1 3-inch (7.6-cm) iron nail
- 1 wide rubber band
- 2 x 2-inch (5 x 5-cm) piece of 150 grit sandpaper
- 4 paperclips
- 24 inches (61 cm) magnet wire (at least AWG 22 or higher)
- blank paper
Subscribe
Get the inside scoop on all things Teach Engineering such as new site features, curriculum updates, video releases, and more by signing up for our newsletter!Procedure
Procedures Overview
Working in groups of three, students make magnets that each consist of magnet wire, a battery and an iron nail. Students wrap wire around the nail, manipulating the current and creating a magnetic field. Then they use their electromagnets to pick up paperclips, counting how many they can pick up. Also, they experiment with different methods of wrapping the wire in order to create the strongest magnets possible. 
Building and Testing
- Divide the class into groups of three students each. Hand out the supplies.
- Have groups sand the coating off the last quarter-inch of each end of the wire (this is where the wire connects to the battery).
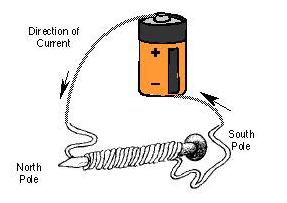
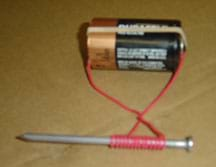
- Have students wrap the magnet wire around the nail—in whichever manner they choose, leaving approximately 2 inches of wire free on each end of the nail (see image above). Advise students to wrap their nails at least 20 times and wrap the copper coils tightly, leaving no gaps between wraps. Later, they have an opportunity to experiment with different ways of wrapping the wire, so encourage them to be creative and think outside the box.
- Have groups draw and describe their current wire configuration on paper. Remind them to be specific: how many times did they wrap the wire around the nail? Did they wrap it tightly or loosely around the nail?

- Direct students to hold a wire end on each end of the battery, and secure the wires by wrapping the battery with a rubber band (see image above).
- Students are now able to pick up paperclips with their magnets. Instruct them to count how many paperclips they can collect on the tip of the nail.
- Have students record on the back side of the paper how many paperclips they picked up with their current wire configuration. Call this Trial 1.
- Have students try many different configurations. Have them keep track of each of configuration, recording their findings as Trial 2, Trial 3, etc.
- At the end of the class, ask groups to share the maximum number of paperclips they were able to pick up, and how that electromagnet was configured to achieve the best results.
Wrap Up - Thought Questions
- Which electromagnet designs worked the best? Why?
- Why might engineers want to use an electromagnet rather than a permanent magnet?
- Keeping the same wire configuration, how else could you increase the strength of your electromagnet?
More Curriculum Like This

Students investigate the properties of magnets and how engineers use magnets in technology. Specifically, students learn about magnetic memory storage, which is the reading and writing of data information using magnets, such as in computer hard drives, zip disks and flash drives.

Students build small electric motors and use them to do work!

Students learn more about magnetism, and how magnetism and electricity are related in electromagnets. They learn the fundamentals about how simple electric motors and electromagnets work. Students also learn about hybrid gasoline-electric cars and their advantages over conventional gasoline-only-pow...
Copyright
© 2013 by Regents of the University of ColoradoLast modified: May 12, 2022


User Comments & Tips