
Quick Look
Grade Level: 4 (3-5)
Time Required: 30 minutes
Expendable Cost/Group: US $0.00 Necessary supplies are readily available in classrooms and homes.
Group Size: 2
Activity Dependency: None
Subject Areas: Science and Technology
NGSS Performance Expectations:

| 3-5-ETS1-1 |
Quick Look

- Grade Level:
- 4 (3 – 5)
- Time Required:
- 30 minutes
- Group Size:
- 2
- Subject Areas:
-
Science and Technology -
NGSS Performance Expectations:
3-5-ETS1-1
Summary
Students create models of objects of their choice, giving them skills and practice in techniques used by professionals. They make sketches as they build their objects. This activity facilitates a discussion on models and their usefulness.
Engineering Connection
Modeling and prototyping is an important part in the engineering design process. Before beginning work on a new project, engineers develop models of what they want the product to look like. Models serve as examples both for those involved in development as well as customers.
Learning Objectives
After this activity, students should learn:
- What a scale model is and how to construct one
- The uses for scale models and why they are produced
Educational Standards
Each Teach Engineering lesson or activity is correlated to one or more K-12 science,
technology, engineering or math (STEM) educational standards.
All 100,000+ K-12 STEM standards covered in Teach Engineering are collected, maintained and packaged by the Achievement Standards Network (ASN),
a project of D2L (www.achievementstandards.org).
In the ASN, standards are hierarchically structured: first by source; e.g., by state; within source by type; e.g., science or mathematics;
within type by subtype, then by grade, etc.
Each Teach Engineering lesson or activity is correlated to one or more K-12 science, technology, engineering or math (STEM) educational standards.
All 100,000+ K-12 STEM standards covered in Teach Engineering are collected, maintained and packaged by the Achievement Standards Network (ASN), a project of D2L (www.achievementstandards.org).
In the ASN, standards are hierarchically structured: first by source; e.g., by state; within source by type; e.g., science or mathematics; within type by subtype, then by grade, etc.
NGSS: Next Generation Science Standards - Science
| NGSS Performance Expectation | ||
|---|---|---|
|
3-5-ETS1-1. Define a simple design problem reflecting a need or a want that includes specified criteria for success and constraints on materials, time, or cost. (Grades 3 - 5) Do you agree with this alignment? |
||
| Click to view other curriculum aligned to this Performance Expectation | ||
| This activity focuses on the following Three Dimensional Learning aspects of NGSS: | ||
| Science & Engineering Practices | Disciplinary Core Ideas | Crosscutting Concepts |
| Define a simple design problem that can be solved through the development of an object, tool, process, or system and includes several criteria for success and constraints on materials, time, or cost. Alignment agreement: | Possible solutions to a problem are limited by available materials and resources (constraints). The success of a designed solution is determined by considering the desired features of a solution (criteria). Different proposals for solutions can be compared on the basis of how well each one meets the specified criteria for success or how well each takes the constraints into account. Alignment agreement: | People's needs and wants change over time, as do their demands for new and improved technologies. Alignment agreement: |
Common Core State Standards - Math
-
Use appropriate tools strategically.
(Grades
K -
12)
More Details
Do you agree with this alignment?
-
Attend to precision.
(Grades
K -
12)
More Details
Do you agree with this alignment?
International Technology and Engineering Educators Association - Technology
-
Students will develop an understanding of the attributes of design.
(Grades
K -
12)
More Details
Do you agree with this alignment?
-
Students will develop an understanding of engineering design.
(Grades
K -
12)
More Details
Do you agree with this alignment?
-
Models are used to communicate and test design ideas and processes.
(Grades
3 -
5)
More Details
Do you agree with this alignment?
-
Apply the technology and engineering design process.
(Grades
3 -
5)
More Details
Do you agree with this alignment?
State Standards
Massachusetts - Math
-
Attend to precision.
(Grades
Pre-K -
12)
More Details
Do you agree with this alignment?
-
Use appropriate tools strategically.
(Grades
Pre-K -
12)
More Details
Do you agree with this alignment?
Massachusetts - Science
-
Describe different ways in which a problem can be represented, e.g., sketches, diagrams, graphic organizers, and lists.
(Grades
3 -
5)
More Details
Do you agree with this alignment?
-
Identify relevant design features (e.g., size, shape, weight) for building a prototype of a solution to a given problem.
(Grades
3 -
5)
More Details
Do you agree with this alignment?
Materials List
Possible building materials:
- LEGO® bricks
- PopsicleTM sticks
- pipe cleaners
- sugar cubes
- cardboard
- candy
- toothpicks
- tape and glue
- paper and pencil
Worksheets and Attachments
Visit [www.teachengineering.org/activities/view/build_a_scale_model] to print or download.Introduction/Motivation
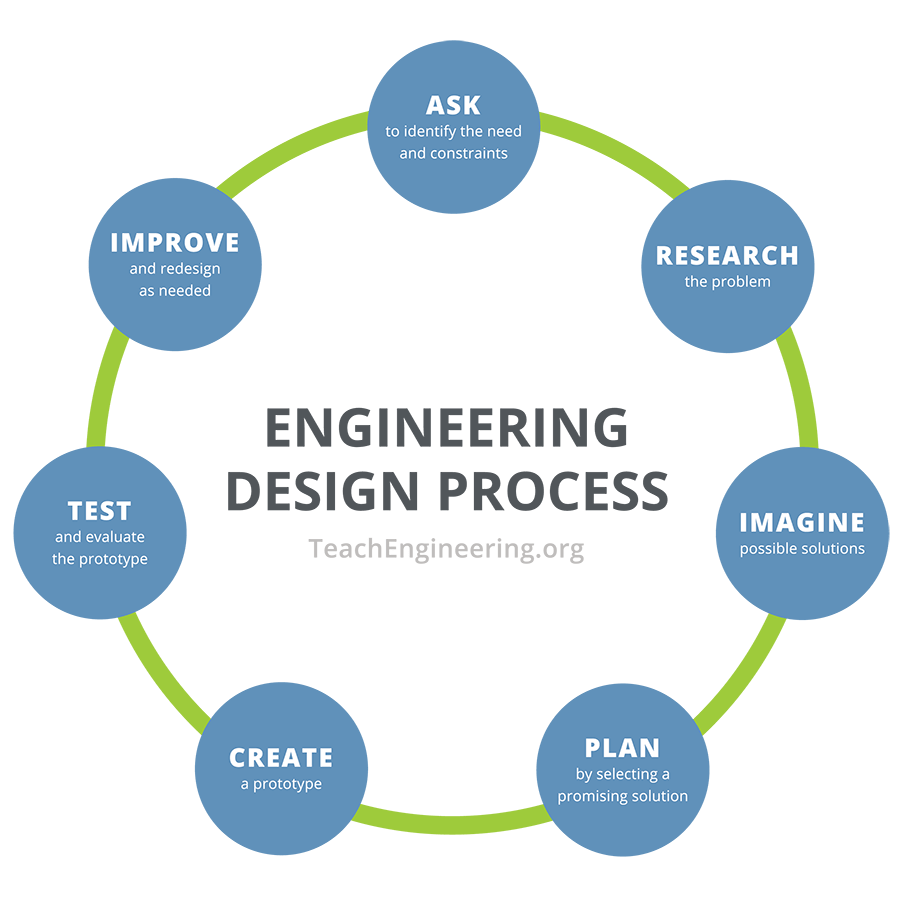
Have you ever built or seen a model car or airplane? They look just like real cars and airplanes, only much, much smaller. These are what you call scale models because they are an exact smaller copy of the real object. Scale models are often built as a hobby, but engineers build scale models as part of the engineering design process when designing objects or structures. There are various ways to define the engineering design process, but all involve the following basic steps:
- Identify need or problem
- Research the problem
- Imagine possible solutions
- Plan by selecting the most promising solution
- Create a prototype
- Test and evaluate the prototype
- Improve and redesign as needed
Developing a model (or working prototype) is a crucial step in every definition of the engineering design process. These small-scale models are built to simulate the real larger objects or structures. Experiments are conducted on these prototypes to test how well they work and determine if the design is safe and effective before building the real-sized structure. It is much easier, safer and less expensive to make design corrections on a model rather than the real object.
For example, if an aerospace engineer was in charge of designing a new satellite to orbit Jupiter, she and her team would build a scale model of the satellite and run experiments on the model before building the real satellite. However, if she skipped the design process of building and testing a model and the satellite did not work properly, she would suffer the consequences of wasting millions of dollars of NASA's funding. As an engineer, it is extremely important to understand the significance of creating a scale model.
For today's task, students will act as engineers to develop a scale model using only the materials available and the duration of the class. Successful scale models must show evidence of very careful craftsmanship and the design should be to scale and detailed with proportional dimensions indicated. Teachers can use the Rubric for Performance Assessment to assess student work.
Procedure
Background
Recommended Resources:
The Wikipedia entry for "scale model" contains several good links to modeling concepts: https://en.wikipedia.org/wiki/Scale_model
Preparation
- Gather building materials.
- Obtain or make a scale model of something the students are be familiar with.
- Have students choose what objects they are going to model. (Tip: You might want to have a few objects for them to pick from; this helps them to choose objects that are not too difficult to accomplish in the time provided. Some ideas include a bridge, skyscraper, car, bus, items around the classrooms, etc.)
With the Students
- Explain to students what a scale model is. Show the class an example and discuss with the students why they think that engineers would need to make models before making the real things.
- Ask the students if they know what the engineering design process is. (Elicit student answers). Show the image below or draw the seven steps in the shape of a circle on the board and explain that engineers use the engineering design process to develop new products, processes, and systems around the globe.
- Guide students to move into the third and fourth steps of the engineering design process - imagine possible solutions and plan by selecting a promising solution. Have student teams pick the item or structure that they want to model and sketch out ideas of how to build a scale model. Make sure that they label the different materials they plan to use on each drawing. Once they have several ideas, encourage them to discuss the pros and cons around each idea and select one to prototype.
- Have students begin the fifth step of the EDP - create a prototype and build their scale models using the building materials provided.
- You may choose to have students build something specific, or with a common theme, or have it be open-ended. An easy criterion is to have students build something that is in the classroom, that way, a variety of objects are available and in front of them. Students could also bring objects in from home.
Vocabulary/Definitions
model: A small but exact copy of something.
scale: The size of a picture, plan, or model of a thing compared to the size of the thing itself.
sketch: A rough drawing representing the chief features of an object or scene.
Assessment
Grading Rubric: Evaluate student models based on the criteria in the attached rubric, including design planning, construction craftsmanship, accurate sketches with proportional dimensions, and demonstrated understanding of the purposes for and value of scale models.
Scaling their Models: Have students measure the height of their models using a ruler. Then ask students how their measurements will change if the models were two, five and ten times bigger.
Investigating Questions
- What is a scale model?
- How can you depict an object without the actual object?
- Why are scale models useful?
- Where are they used?
- What did you build?
- How did you build it?
- What is its function(s)?
- What other material would you use for the life-size version?
Subscribe
Get the inside scoop on all things Teach Engineering such as new site features, curriculum updates, video releases, and more by signing up for our newsletter!More Curriculum Like This

After learning, comparing and contrasting the steps of the engineering design process (EDP) and scientific method, students review the human skeletal system, including the major bones, bone types, bone functions and bone tissues, as well as other details about bone composition. Students then pair-re...

Students learn about nondestructive testing, the use of the finite element method (systems of equations) and real-world impacts, and then conduct mini-activities to apply Maxwell’s equations, generate currents, create magnetic fields and solve a system of equations. They see the value of NDE and FEM...
Copyright
© 2013 by Regents of the University of Colorado; original © 2004 Worcester Polytechnic InstituteSupporting Program
Center for Engineering Educational Outreach, Tufts UniversityLast modified: September 2, 2022
User Comments & Tips