Quick Look
Grade Level: 7 (6-8)
Time Required: 1 hour
30 minutes for construction, 30 minutes for testing and classroom discussion/journal writing.
Expendable Cost/Group: US $0.60
Group Size: 3
Activity Dependency: None
Subject Areas: Science and Technology
NGSS Performance Expectations:

| MS-ETS1-4 |
Summary
After a discussion about what a parachute is and how it works, students create parachutes using different materials that they think will work best. They test their designs, and then contribute to a class discussion (and possible journal writing) to report which paper materials worked best.
Engineering Connection
Aerodynamics and fluid flow concepts are used by engineers to design planes, parachutes and ships. Accounting for drag is an important aspect of these designs; engineers redesign the shape and materials used to get better results.
Learning Objectives
After this activity, students should be able to:
- Adopt techniques for designing a parachute that falls slowly.
- Determine which type of material works best by testing different options.
- Understand how air resistance plays a role in flight.
Educational Standards
Each TeachEngineering lesson or activity is correlated to one or more K-12 science,
technology, engineering or math (STEM) educational standards.
All 100,000+ K-12 STEM standards covered in TeachEngineering are collected, maintained and packaged by the Achievement Standards Network (ASN),
a project of D2L (www.achievementstandards.org).
In the ASN, standards are hierarchically structured: first by source; e.g., by state; within source by type; e.g., science or mathematics;
within type by subtype, then by grade, etc.
Each TeachEngineering lesson or activity is correlated to one or more K-12 science, technology, engineering or math (STEM) educational standards.
All 100,000+ K-12 STEM standards covered in TeachEngineering are collected, maintained and packaged by the Achievement Standards Network (ASN), a project of D2L (www.achievementstandards.org).
In the ASN, standards are hierarchically structured: first by source; e.g., by state; within source by type; e.g., science or mathematics; within type by subtype, then by grade, etc.
NGSS: Next Generation Science Standards - Science
| NGSS Performance Expectation | ||
|---|---|---|
|
MS-ETS1-4. Develop a model to generate data for iterative testing and modification of a proposed object, tool, or process such that an optimal design can be achieved. (Grades 6 - 8) Do you agree with this alignment? |
||
| Click to view other curriculum aligned to this Performance Expectation | ||
| This activity focuses on the following Three Dimensional Learning aspects of NGSS: | ||
| Science & Engineering Practices | Disciplinary Core Ideas | Crosscutting Concepts |
| Develop a model to generate data to test ideas about designed systems, including those representing inputs and outputs. Alignment agreement: | Models of all kinds are important for testing solutions. Alignment agreement: The iterative process of testing the most promising solutions and modifying what is proposed on the basis of the test results leads to greater refinement and ultimately to an optimal solution.Alignment agreement: | |
Common Core State Standards - Math
-
Know the formulas for the area and circumference of a circle and use them to solve problems; give an informal derivation of the relationship between the circumference and area of a circle.
(Grade
7)
More Details
Do you agree with this alignment?
-
Construct and interpret scatter plots for bivariate measurement data to investigate patterns of association between two quantities. Describe patterns such as clustering, outliers, positive or negative association, linear association, and nonlinear association.
(Grade
8)
More Details
Do you agree with this alignment?
International Technology and Engineering Educators Association - Technology
-
Students will develop an understanding of the attributes of design.
(Grades
K -
12)
More Details
Do you agree with this alignment?
-
Apply the technology and engineering design process.
(Grades
6 -
8)
More Details
Do you agree with this alignment?
-
Illustrate how systems thinking involves considering relationships between every part, as well as how the system interacts with the environment in which it is used.
(Grades
6 -
8)
More Details
Do you agree with this alignment?
State Standards
Massachusetts - Math
-
Know the formulas for the area and circumference of a circle and use them to solve problems; give an informal derivation of the relationship between the circumference and area of a circle.
(Grade
7)
More Details
Do you agree with this alignment?
-
Construct and interpret scatter plots for bivariate measurement data to investigate patterns of association between two quantities. Describe patterns such as clustering, outliers, positive or negative association, linear association, and nonlinear association.
(Grade
8)
More Details
Do you agree with this alignment?
Massachusetts - Science
-
Describe and explain the purpose of a given prototype.
(Grades
6 -
8)
More Details
Do you agree with this alignment?
-
Explain how such design features as size, shape, weight, function, and cost limitations would affect the construction of a given prototype.
(Grades
6 -
8)
More Details
Do you agree with this alignment?
Materials List
- tissue paper
- napkins
- construction paper
- newspaper
- paper towels
- string
- tape
- weights (such as washers)
- measuring tape (to measure drop height)
- ruler (for measuring circle radius)
- stopwatch (for recording drop time)
Worksheets and Attachments
Visit [www.teachengineering.org/activities/view/design_a_parachute] to print or download.Introduction/Motivation
What is the purpose of a parachute? What is the role of a parachute in skydiving?
Imagine you are jumping out of a plane 10,000 feet in the air. What type of material would you want your parachute to be made of and what size would you want it to be?
The design of a parachute is very important, especially in an extreme sport such as skydiving because someone's life is dependent on the parachute functioning correctly. Engineers thoroughly test the materials and designs of parachutes to ensure that they open as intended and reliably, and are strong enough to withstand the air resistance needed to slow skydivers to safe landing speeds.
Procedure
Background
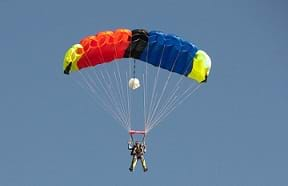
A parachute is an umbrella-shaped device of light fabric used especially for making a safe jump from aircraft. Due to the resistance of air, a drag force acts on a falling body (parachute) to slow down its motion. Without air resistance, or drag, objects would continue to increase speed until they hit the ground. The larger the object, the greater its air resistance. Parachutes use a large canopy to increase air resistance. This gives a slow fall and a soft landing.
Recommended resources:
A history of parachutes, plus good pictures: http://www.parachutehistory.com/
Explanation of free fall and air resistance with diagrams (Newton's second law): http://www.physicsclassroom.com/class/newtlaws/Lesson-3/Free-Fall-and-Air-Resistance
Explanation of forces on a falling object with air resistance: https://www.grc.nasa.gov/WWW/K-12/airplane/falling.html
With the Students
- Gather materials.
- Discuss with the class what a parachute is and how it works.
- Have student teams brainstorm characteristics of a good parachute, document their thoughts and sketch their design before construction begins.
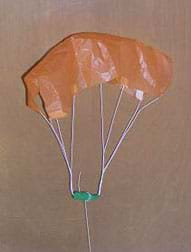
Parachute Construction
- Cut a circle from the chosen paper. Teachers can give a specified area (e.g., 75 sq. in.) and have students create a circle based on the area given.
- Make a hole in the center of the shape.
- Cut six pieces of equal length string and tape them at equal distances around the edge of the shape.
- Tape the other ends of the string to a weight.

Example model parachute made in activity. - Test the parachute. Go outside and drop it from a specific height to see if it flies slowly and lands gently. Record your observations.
- As time permits, repeat the process, modifying the variables of canopy material and shape. Record your observations.
- Scale the diameter of the parachutes by a common factor (e.g., double) and determine the affect on surface area.
- Lead a class discussion to compare results and draw conclusions.
- Assign students to recap their findings as a written journal entry that documents their design details and results, and answers the Investigating Questions..
Assessment
Calculate and Graph: Direct students to calculate the area of their parachutes (A=πr2). Create a graph showing area vs. drop time. Then, as a class, discuss how the area of the parachute affects its flight.
Rubric: Use the Rubric for Performance Assessment to assess student work.
Investigating Questions
- What type of paper is the best material to make a parachute? Why?
- What materials did not work well? Why?
- What changes could you make to improve your design?
Activity Extensions
Using the paper material that worked the best, do the same activity testing the parachute size. Have students test circles with different radii to find the optimal size.
Try parachutes with and without holes in the top, and different-sized holes.
Vary mass added to the parachute to compare mass (independent) vs. drop time (dependent).
Make parachutes using different materials, such as plastics, cotton and nylon.
Hold a competition to find a design that can land a toy vehicle most gently.
Subscribe
Get the inside scoop on all things TeachEngineering such as new site features, curriculum updates, video releases, and more by signing up for our newsletter!Copyright
© 2013 by Regents of the University of Colorado; original © 2005 Worcester Polytechnic InstituteSupporting Program
Center for Engineering Educational Outreach, Tufts UniversityLast modified: October 26, 2023


User Comments & Tips