Quick Look
Grade Level: 7 (6-8)
Time Required: 45 minutes
Expendable Cost/Group: US $0.00 This activity uses non-expendable (reusable) LEGO MINDSTORMS robots, gears and software; see the Materials List for details.
Group Size: 4
Activity Dependency: None
Subject Areas: Algebra, Measurement, Number and Operations
NGSS Performance Expectations:

| MS-ETS1-2 |
Summary
Students are introduced to gear transmissions and gear ratios using LEGO® MINDSTORMS® EV3 robots, gears and software. They discover how gears work and how they can be used to adjust a vehicle's power. Specifically, they learn how to build the transmission part of a vehicle by designing gear trains with different gear ratios. Students quickly recognize that some tasks require vehicle speed while others are more suited for vehicle power. They are introduced to torque, which is a twisting force, and to speed—the two traits of all rotating engines, including mobile robots using gears, bicycles and automobiles. Once students learn the principles behind gear ratios, they are put to the test in two simple design activities that illustrate the mechanical advantages of gear ratios. The "robot race" is better suited for a quicker robot while the "robot push" calls for a more powerful robot. A worksheet and post-activity quiz verify that students understand the concepts, including the trade-off between torque and speed.Engineering Connection
Students are introduced to gears and the mechanical advantages they provide, which are fundamental tools used by mechanical engineers as they design engines for all sorts of purposes. Students also get a taste of computer science by using the programmable robot. They develop mathematical and logic skills while solving gear train ratio problems that require them to determine gear ratios that are suitable for their robot challenges and the best arrangement of gears in transmissions.
Learning Objectives
After this activity, students should be able to:
- Describe what gears are and how gear ratios work.
- Design gear trains to produce speed or torque.
- Define torque and speed, and know which gear combinations are more suitable for each.
Educational Standards
Each TeachEngineering lesson or activity is correlated to one or more K-12 science,
technology, engineering or math (STEM) educational standards.
All 100,000+ K-12 STEM standards covered in TeachEngineering are collected, maintained and packaged by the Achievement Standards Network (ASN),
a project of D2L (www.achievementstandards.org).
In the ASN, standards are hierarchically structured: first by source; e.g., by state; within source by type; e.g., science or mathematics;
within type by subtype, then by grade, etc.
Each TeachEngineering lesson or activity is correlated to one or more K-12 science, technology, engineering or math (STEM) educational standards.
All 100,000+ K-12 STEM standards covered in TeachEngineering are collected, maintained and packaged by the Achievement Standards Network (ASN), a project of D2L (www.achievementstandards.org).
In the ASN, standards are hierarchically structured: first by source; e.g., by state; within source by type; e.g., science or mathematics; within type by subtype, then by grade, etc.
NGSS: Next Generation Science Standards - Science
| NGSS Performance Expectation | ||
|---|---|---|
|
MS-ETS1-2. Evaluate competing design solutions using a systematic process to determine how well they meet the criteria and constraints of the problem. (Grades 6 - 8) Do you agree with this alignment? |
||
| Click to view other curriculum aligned to this Performance Expectation | ||
| This activity focuses on the following Three Dimensional Learning aspects of NGSS: | ||
| Science & Engineering Practices | Disciplinary Core Ideas | Crosscutting Concepts |
| Evaluate competing design solutions based on jointly developed and agreed-upon design criteria. Alignment agreement: | There are systematic processes for evaluating solutions with respect to how well they meet the criteria and constraints of a problem. Alignment agreement: | |
Common Core State Standards - Math
-
Use ratio and rate reasoning to solve real-world and mathematical problems, e.g., by reasoning about tables of equivalent ratios, tape diagrams, double number line diagrams, or equations.
(Grade
6)
More Details
Do you agree with this alignment?
-
Fluently divide multi-digit numbers using the standard algorithm.
(Grade
6)
More Details
Do you agree with this alignment?
-
Understand ratio concepts and use ratio reasoning to solve problems.
(Grade
6)
More Details
Do you agree with this alignment?
International Technology and Engineering Educators Association - Technology
-
Students will develop an understanding of the relationships among technologies and the connections between technology and other fields of study.
(Grades
K -
12)
More Details
Do you agree with this alignment?
State Standards
New York - Math
-
Understand ratio concepts and use ratio reasoning to solve problems.
(Grade
6)
More Details
Do you agree with this alignment?
-
Fluently divide multi-digit numbers using the standard algorithm.
(Grade
6)
More Details
Do you agree with this alignment?
-
Use ratio and rate reasoning to solve real-world and mathematical problems, e.g., by reasoning about tables of equivalent ratios, tape diagrams, double number line diagrams, or equations.
(Grade
6)
More Details
Do you agree with this alignment?
-
Recognize that sequences are functions, sometimes defined recursively, whose domain is a subset of the integers.
(Grades
9 -
12)
More Details
Do you agree with this alignment?
New York - Science
-
Evaluate competing design solutions using a systematic process to determine how well they meet the criteria and constraints of the problem.
(Grades
6 -
8)
More Details
Do you agree with this alignment?
Materials List
Each group needs:
- LEGO MINDSTORMS EV3 robot, such as EV3 Core Set (5003400) at https://education.lego.com/en-us/products/lego-mindstorms-education-ev3-core-set/5003400#lego-mindstorms-education-ev3 (includes programmable EV3 intelligent brick; 3 2 interactive servo motors; sound, color, ultrasonic and 2 touch sensors; and many other components and instructions)
- LEGO MINDSTORMS Education EV3 Software 1.2.1
- computer, loaded with EV3 1.2.1 software, free online, you have to register a LEGO account first; at https://www.lego.com/en-us/mindstorms/downloads/download-software
- GetInGearProgram.ev3 program
- Get in Gear Worksheet, one per two students
- Get in Gear Pre-Activity Quiz, one per student
- Get in Gear Post-Activity Quiz, one per student
To share with the entire class:
- colored tape, to mark race lines on the floor
- a number of different sized books or notebooks, to serve as obstacles for the robots to push
Note: This activity can also be conducted with the older (and no longer sold) LEGO MINDSTORMS NXT set instead of EV3; see below for those supplies:
- LEGO NXT robot, gears and software, as provided in the LEGO MINDSTORMS NXT robot, such as the NXT Base Set
- LEGO MINDSTORMS Education NXT Software 2.1
- computer, loaded with NXT 2.1 software
- GetInGearProgram.rbt program
Worksheets and Attachments
Visit [www.teachengineering.org/activities/view/nyu_getingear_activity1] to print or download.Pre-Req Knowledge
Students should be able to perform division and have a basic knowledge of ratios and how to reduce fractions to their lowest terms.
Basic programming skills with LEGO MINDSTORMS EV3 software are helpful, but not required.
Introduction/Motivation
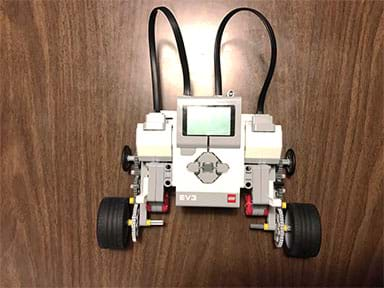
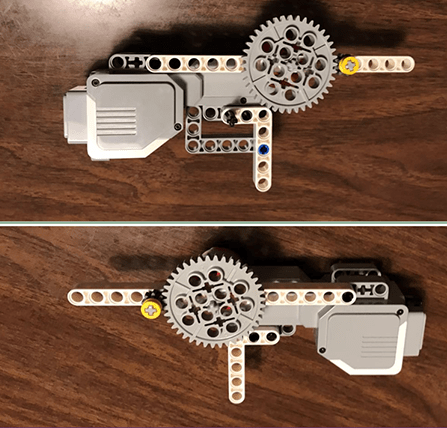
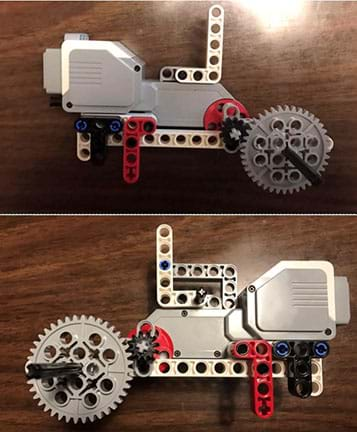
What is a gear? (Listen to student answers. A gear is a simple machine composed of a wheel and axle.) In which machines do we find gears? (Give students some time to ponder this question. If you see blank stares, provide some examples of machines that use gears, such as clocks, trucks, robots, etc.) How do gears work? (Answer: Gears transmit motion from motors to other parts of the machine. To help the students understand this, attach a LEGO gear to an axle and place another gear adjacent to it so that the teeth of the gears mesh, as shown in Figures 2, 6 and 7. Twist the axle to show that motion is transmitted from one gear to the next.)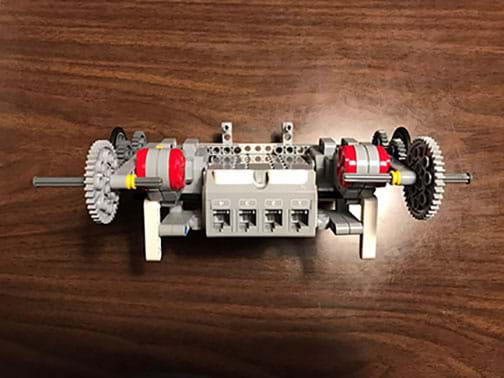
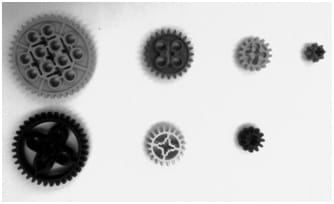
Now that we know that motion is transmitted along gears, how can it be used in vehicle transmission? What if we place two gears of exactly the same size next to each other? This strictly transmits motion, but in the reverse direction. We can further control the behavior of the transmitted motion by using gears of various sizes, or gear ratios. A gear ratio is the relationship between the "teeth" of two gears that are meshed together. The teeth of a gear are the pointed edges of the gear that you can count. (To see if students understand the concept, hand out a number of LEGO gears of different sizes and tell students to count the number of teeth and relay the answer back to you. Figure 3 displays examples of the different gear sizes provided in the LEGO EV3 core set, ranging from the smaller, 8-tooth gear to the larger, 40-tooth gear.)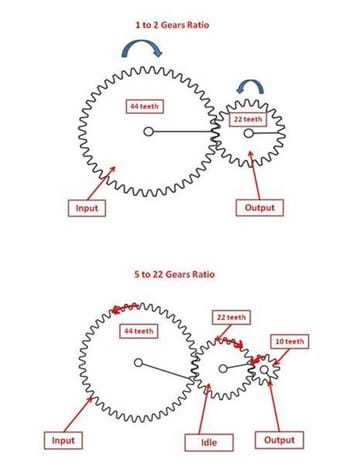
When we have two or more gears meshed together, the gear attached to the motor is called the input gear and the gear attached to the wheel is called the output gear. A gear ratio is computed as the ratio of the number of teeth on the output gear (the follower gear) versus the number of teeth on the input gear (the drive gear). (Use some LEGO gears and axles to show students some simple examples. The Figure 4 drawing illustrates examples of 1 to 2 and 5 to 22 gear ratios and shows the direction of motion for each gear.) Gear ratios can also be computed for complex gear trains using the same approach.
Depending upon the situation, gear ratios are very useful in real-world engineering applications. As we will soon see, certain traits of the machine (or vehicle or robot) are affected by using correct gear ratios. These two traits are torque and speed. What is torque? (Wait for an answer. If you do not get an answer or sense some confusion, say that they will soon have a better idea of torque following the activity. Answer: Torque is the twisting force that causes rotational acceleration. When two gears are connected, the input gear transmits torque to the output gear. Refer to the lever analogy shown in Figure 5; the amount of torque applied to a load depends on how far from the rotational center the force is applied, how hard you push down on the lever and how well you are pushing it in the correct direction.) What is the definition of speed? (Answer: Speed is the rate of change of distance. In other words, it is the length of distance covered divided by the time it took to travel that distance.) We will now see how torque and speed can be controlled using gear ratios.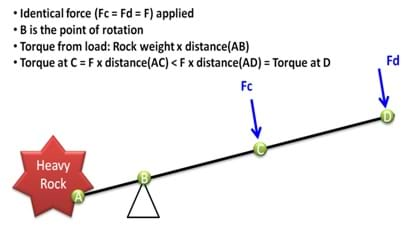
Procedure
Background

The combustion and electrical engines that power cars, trucks, trains and airplanes would not work without suitable gear systems to regulate engine power. For example, in a car transmission system, the driver (or an automated transmission mechanism) selects the appropriate gear ratio depending on the power required. On a flat road, a high gear ratio speeds up the vehicle, while climbing up a hill, a small gear ratio produces the necessary force to push the vehicle.
Engineers have developed all sorts of gear trains, which are sets of connected gears that produce force or speed, depending of their configurations. Figure 1 shows an example 4x4 wheels drive train on a LEGO EV3 robot. Figure 2 shows a LEGO EV3 5 Minute Bot setup in a speed gear transmission configuration. Gears aligned in certain configurations enable much faster speeds, such as those attained in race cars. In other settings, with the same gears arranged differently, larger torque can be produced, such as might be needed for a bulldozer.
During the course of the activity, expect students to gain an understanding of how the arrangement of the output and input gears in gear trains affects the gear ratios. If the number of teeth on the output gear equals X and the number of teeth on the input gear equals Y, the gear ratio is equal to X:Y. If X=Y, meaning both gears have the same number of teeth, the angular velocity of the output gear is equal to the angular velocity of the input gear, and therefore a vehicle would move at the same speed as if directly powered by the vehicle's motor. A gear ratio less than 1, which corresponds to the output gear having less teeth than the input gear (X<Y), increases speed. The factor in which the speed increases by is equal to Y/X, which is the inverse of the gear ratio. A gear ratio greater than 1 increases torque, but decreases speed; in this gear train, the output gear has more teeth than the input gear (X>Y). The gear ratio is equal to the mechanical advantage of the gear train. Additionally, if a gear is placed between the output and input gear, known as an idler, this gear does not affect the gear ratio but does reverse the direction of the output gear.
Before the Activity
- Gather materials. Double check that a good range of gears are present in the base sets, such as those shown in Figure 3, from which student groups will choose to create and test their gear trains.
- Make copies of the Get in Gear Pre-Activity Quiz and Get in Gear Post-Activity Quiz, one each per student, and the Get in Gear Worksheet, one for every two students.
- As a demonstration and advance testing model, construct and program a LEGO EV3 robot, as shown in Figures 6 and 7. Refer to the LEGO robot construction instructions included in the base set or the online 5 Minute Bot instructions at https://www.youtube.com/watch?v=Dhe2jXi3Fc4. Note that identical gear trains must be attached to the driving bases for both servo motors.
- Upload the GetInGearProgram.rbt onto all the EV3 intelligent bricks. The program consists of a simple move block to control the two motors. To replicate the program, drag and drop a move block, click on the move block and edit the parameters at the bottom of the window. Select ports A and B, where the motors are connected, set the power to 75 and the duration time to 5 seconds. While testing the program, if the robot moves backwards, invert the direction arrow.
- Arrange for enough computers so you have one for each student group. Make sure each computer has the LEGO software loaded.
With the Students
- Administer the quick, three-question pre-quiz. Collect and glance at the pre-quizzes. Then lead a class discussion about gears and transmissions, covering the answers to the quiz, as described in the Assessment section.
- Present students with the Introduction/Motivation content.
- Divide the class into groups of four students each.
- Provide each group with a LEGO EV3 core set complete with various gears, and access to a computer for the online build instructions and programming needs of the activity.
- Direct groups to each build a 5 Minute Bot, following the online instructions at https://www.youtube.com/watch?v=Dhe2jXi3Fc4.
- Once robots are constructed, hand out the worksheets. Throughout the activity, have students use the worksheet to document their gear ratios, hypotheses, observations and results.
- Robot Race: Introduce the first design challenge: To configure the gear train for speed.
- Ask the class: How would you normally make the robot go faster? (Answer: Increase the power level output of the motors.) How might we make the robot go faster if the motors are already at the maximum power level 100? (Answer: Use large gear ratios.)
- Direct groups to each design and build two-gear gear trains (installed like your demonstration model and the examples shown in Figures 6 and 7) with their choices of any two differently sized gears. (See Figure 2 for an example final assembly of a Five Minute Bot with its gear trains.) Have groups choose between placing the small or larger gear as the output gear on their robots, whatever arrangement they think will best configure the gear train for speed, and come up with hypotheses on what effect the gear ratio might make on the speed of their robots. Remind them to document their gear ratios and hypotheses on their worksheets.
- Organize a series of races between two robots' gear setups by measuring the distance travelled by each vehicle transmission setup. For each robot race pairing, select teams with different setups in terms of the small or large gear being the output gear. Have groups run their programs and prompt students to record their observations on their worksheets (for example, faster, slower, no change). If time permits, allow groups to modify their gear ratios and race again.
- Robot Push: Introduce the second design challenge: To configure the gear train for torque. Which robot will be the strongest? A robot push competition will determine the winning team.
- Direct groups to use LEGO pieces to construct front bumpers for their robots. Again, have groups discuss and then build two-gear gear trains to meet the challenge. Remind them to record their gear ratios on their worksheets.
- To see which robot is stronger in pushing various obstacles, organize a series of races between two robots at a time, matching up teams with different setups for the output gears. For each race, place equal heavy objects (such as stacks of books) on the floor to be pushed by the competing robots. Make sure the robots run on the same surface. Provide some guidance in choosing reasonably weighted objects to be pushed. As needed, adjust the obstacles for each race, changing from light to heavy books, or adding additional books. Have groups run their programs and remind students to record their observations on their worksheets. If time permits, allow groups to modify their gear ratios and compete again.
- Bring the class together for a final discussion to share observations, results, questions and conclusions. Ask students the "gear ratio rules" and "transmission mission" challenges described in the Assessment section.
- Conclude by administering the post-activity quiz.
Vocabulary/Definitions
gear train: Two or more gears connected together.
input gear: The gear attached to the motor. Also called the drive gear.
output gear: The gear attached to the wheel. The gear being rotated. Also called the follower gear or driven gear.
speed: The rate of change of distance with respect to time.
teeth: On a gear, the pointed edges around its perimeter.
torque: A measure of how hard something is twisted.
transmission: An assembly of gears by which power is transmitted from the engine to a driving axle.
Assessment
Pre-Activity Assessment
Pre-Activity Survey: Administer the three-question Get in Gear Pre-Activity Quiz. Review students' answers to gauge their baseline understanding about gears and transmissions.
Informal Discussion: Ask students some questions about gears and transmissions, including reviewing the answers to the pre-activity survey. Refer to the Get in Gear Pre-Activity Quiz Answer Key and the Vocabulary/Definitions section.
Activity Embedded Assessment
Worksheet Data and Analysis: During the activity, have students use the Get in Gear Worksheet to record their observations and data. Ask students to comment on what they observe while using a large-gear transmission ratio and while using a small-gear transmission ratio. Review students' answers to assess their comprehension. Refer to the Get in Gear Worksheet Answer Key.
Gear Ratio Rules: Challenge students to come up with three rules of gear ratios (equal to, less than, or greater than) and the value 1 when it comes to pairing different gear sizes. (Answer: A gear ratio is equal to 1 if the input gear and the output gear have the same number of teeth. A gear ratio is less than 1 if the input gear has more teeth than the output gear; this setup is preferred for increasing speed. A gear ratio is greater than 1 if the output gear has more teeth than the input gear; this setup is preferred for increasing torque.)
Transmission Mission: Challenge students to think about the role of transmissions in cars. Why is it more efficient to remain in first gear when driving up a steep mountain? What about using sixth gear when driving on the highway? Alternative idea: Ask these questions in the context of bicycle gears instead of car transmissions, which students may find easier to understand. (Example answers: First gear has the largest gear ratio, which means that it increases torque. The increased torque helps a car drive up a steep road by providing increased rotational force to overcome the downward force of gravity. While driving on a high-speed highway, cars need to go fast, but do not require as much torque. In this case, fifth or sixth gear is appropriate because they both have the lowest gear ratios and increase a car's speed.)
Post-Activity Assessment
Evaluation Quiz: At activity end, administer the Get in Gear Post-Activity Quiz, which asks students to define three vocabulary words, compute three gear ratios, and answer a two problem questions to test their understanding of gear assemblies to obtain high speed and high torque. The answers are provided in the Get in Gear Post-Activity Quiz Answer Key. Review their answers to gauge their mastery of the concepts.
Troubleshooting Tips
Verify that the equipment is set up correctly, the battery level is good and the motor is correctly connected to the EV3 brick ports.
Make sure the GetInGearProgram.ev3 program is running.
Subscribe
Get the inside scoop on all things Teach Engineering such as new site features, curriculum updates, video releases, and more by signing up for our newsletter!More Curriculum Like This

Students are introduced to an important engineering element—the gear. Different types of gears are used in many engineering devices, including wind-up toys, bicycles, cars and non-digital clocks. Students learn about various types of gears and how they work in machines.

Student teams are challenged to design a gear set that will lift a given load as quickly as possible. They test and refine their designs to find the ideal gear ratio, one that provides enough torque to lift the weight while still achieving the fastest speed possible.

Students work as engineers and learn to conduct controlled experiments by changing one experimental variable at a time to study its effect on the experiment outcome. Student groups assemble LEGO® MINDSTORMS® EV3 robots with variously sized gears in a gear train and then design programs using the EV...

Students are introduced to three of the six simple machines used by many engineers: lever, pulley, and wheel-and-axle. In general, engineers use the lever to magnify the force applied to an object, the pulley to lift heavy loads over a vertical path, and the wheel-and-axle to magnify the torque appl...
Copyright
© 2014 by Regents of the University of Colorado; original © 2009 Polytechnic Institute of New York UniversityContributors
Michael Hernandez, Violet MwaffoSupporting Program
AMPS GK-12 Program, Polytechnic Institute of New York UniversityAcknowledgements
This activity was developed by the Applying Mechatronics to Promote Science (AMPS) Program funded by National Science Foundation GK-12 grant no. 0741714. However, these contents do not necessarily represent the policies of the National Science Foundation, and you should not assume endorsement by the federal government.
Last modified: December 10, 2022


User Comments & Tips