Quick Look

Summary
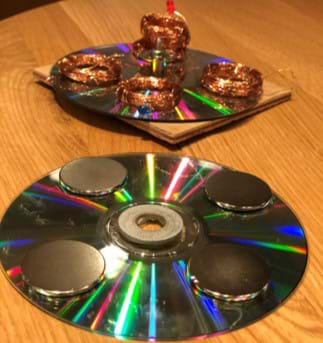
Exploring the phenomena of electromagnetism and current generation are great ways to help students gain an understanding of how these concepts are used in engineering design. This activity allows students to make sense of, design, and create their own magnetic field generator without the use of batteries. As they create their own generator, students learn how electricity can been created using circuits and magnetism—hence, discovering the phenomenon of electromagnetism! While thinking critically about how magnetic fields work, students develop a design for a generator using magnets, copper wire, discs, and LED indicator lights.Engineering Connection
Power and energy are used every day to generate electricity. However, the methods or sources used to create power can impact our environment. For example, non-renewable resources, such as fossil fuels, release greenhouse gases into the atmosphere. Although energy from the sun is available for use, it can become very costly to transition to solar products. Students can use more environmentally-friendly methods to generate electricity with household items. By doing so, students can also reduce costs and become more energy-efficient.
Learning Objectives
After this activity, students should be able to:
- Describe the flow of the current in a generator.
- Discuss the effects of magnetism in the context of their generator design.
- Solve problems involving voltage, current, and resistance.
- Think about, design, and improve a generator.
Educational Standards
Each TeachEngineering lesson or activity is correlated to one or more K-12 science,
technology, engineering or math (STEM) educational standards.
All 100,000+ K-12 STEM standards covered in TeachEngineering are collected, maintained and packaged by the Achievement Standards Network (ASN),
a project of D2L (www.achievementstandards.org).
In the ASN, standards are hierarchically structured: first by source; e.g., by state; within source by type; e.g., science or mathematics;
within type by subtype, then by grade, etc.
Each TeachEngineering lesson or activity is correlated to one or more K-12 science, technology, engineering or math (STEM) educational standards.
All 100,000+ K-12 STEM standards covered in TeachEngineering are collected, maintained and packaged by the Achievement Standards Network (ASN), a project of D2L (www.achievementstandards.org).
In the ASN, standards are hierarchically structured: first by source; e.g., by state; within source by type; e.g., science or mathematics; within type by subtype, then by grade, etc.
NGSS: Next Generation Science Standards - Science
| NGSS Performance Expectation | ||
|---|---|---|
|
HS-ETS1-2. Design a solution to a complex real-world problem by breaking it down into smaller, more manageable problems that can be solved through engineering. (Grades 9 - 12) Do you agree with this alignment? |
||
| Click to view other curriculum aligned to this Performance Expectation | ||
| This activity focuses on the following Three Dimensional Learning aspects of NGSS: | ||
| Science & Engineering Practices | Disciplinary Core Ideas | Crosscutting Concepts |
| Design a solution to a complex real-world problem, based on scientific knowledge, student-generated sources of evidence, prioritized criteria, and tradeoff considerations. Alignment agreement: | Criteria may need to be broken down into simpler ones that can be approached systematically, and decisions about the priority of certain criteria over others (trade-offs) may be needed. Alignment agreement: | |
| NGSS Performance Expectation | ||
|---|---|---|
|
HS-ETS1-3. Evaluate a solution to a complex real-world problem based on prioritized criteria and trade-offs that account for a range of constraints, including cost, safety, reliability, and aesthetics, as well as possible social, cultural, and environmental impacts. (Grades 9 - 12) Do you agree with this alignment? |
||
| Click to view other curriculum aligned to this Performance Expectation | ||
| This activity focuses on the following Three Dimensional Learning aspects of NGSS: | ||
| Science & Engineering Practices | Disciplinary Core Ideas | Crosscutting Concepts |
| Evaluate a solution to a complex real-world problem, based on scientific knowledge, student-generated sources of evidence, prioritized criteria, and tradeoff considerations. Alignment agreement: | When evaluating solutions it is important to take into account a range of constraints including cost, safety, reliability and aesthetics and to consider social, cultural and environmental impacts. Alignment agreement: | New technologies can have deep impacts on society and the environment, including some that were not anticipated. Analysis of costs and benefits is a critical aspect of decisions about technology. Alignment agreement: |
| NGSS Performance Expectation | ||
|---|---|---|
|
HS-PS3-3. Design, build, and refine a device that works within given constraints to convert one form of energy into another form of energy. (Grades 9 - 12) Do you agree with this alignment? |
||
| Click to view other curriculum aligned to this Performance Expectation | ||
| This activity focuses on the following Three Dimensional Learning aspects of NGSS: | ||
| Science & Engineering Practices | Disciplinary Core Ideas | Crosscutting Concepts |
| Design, evaluate, and/or refine a solution to a complex real-world problem, based on scientific knowledge, student-generated sources of evidence, prioritized criteria, and tradeoff considerations. Alignment agreement: | At the macroscopic scale, energy manifests itself in multiple ways, such as in motion, sound, light, and thermal energy. Alignment agreement: Although energy cannot be destroyed, it can be converted to less useful forms—for example, to thermal energy in the surrounding environment.Alignment agreement: Criteria and constraints also include satisfying any requirements set by society, such as taking issues of risk mitigation into account, and they should be quantified to the extent possible and stated in such a way that one can tell if a given design meets them.Alignment agreement: | Energy cannot be created or destroyed—it only moves between one place and another place, between objects and/or fields, or between systems. Alignment agreement: Modern civilization depends on major technological systems. Engineers continuously modify these technological systems by applying scientific knowledge and engineering design practices to increase benefits while decreasing costs and risks.Alignment agreement: |
| NGSS Performance Expectation | ||
|---|---|---|
|
HS-PS3-5. Develop and use a model of two objects interacting through electric or magnetic fields to illustrate the forces between objects and the changes in energy of the objects due to the interaction. (Grades 9 - 12) Do you agree with this alignment? |
||
| Click to view other curriculum aligned to this Performance Expectation | ||
| This activity focuses on the following Three Dimensional Learning aspects of NGSS: | ||
| Science & Engineering Practices | Disciplinary Core Ideas | Crosscutting Concepts |
| Develop and use a model based on evidence to illustrate the relationships between systems or between components of a system. Alignment agreement: | When two objects interacting through a field change relative position, the energy stored in the field is changed. Alignment agreement: | |
International Technology and Engineering Educators Association - Technology
-
Students will develop an understanding of the attributes of design.
(Grades
K -
12)
More Details
Do you agree with this alignment?
-
Students will develop an understanding of engineering design.
(Grades
K -
12)
More Details
Do you agree with this alignment?
-
Students will develop abilities to apply the design process.
(Grades
K -
12)
More Details
Do you agree with this alignment?
State Standards
Texas - Science
-
demonstrate that moving electric charges produce magnetic forces and moving magnets produce electric forces;
(Grades
9 -
10)
More Details
Do you agree with this alignment?
-
investigate and describe the relationship between electric and magnetic fields in applications such as generators, motors, and transformers; and
(Grades
9 -
12)
More Details
Do you agree with this alignment?
Materials List
Note: See link to materials examples in the Procedure below.
Each group needs:
- 4 neodymium disk magnets
- 4 LED indicator lights
- 2 blank CDs
- 12.7 cm x 12.7 cm (5’’ x 5”) wooden board
- superglue
- 2 nuts
- bolt
- 2 washers
- 2 small washers
- metal bobbin
- enameled copper wire, 25 gauge, 5 lb, available online (Note: use this you are if wrapping your own copper coils)
- PVC piping, 10 cm in length, or a film canister (Note: this is required for wrapping copper coil)
- copper magnetic levitation coil with iron core, available online (Note: use this if you want to use premade copper coil)
- bottle cap or lid
For the entire class to share:
- markers
- construction paper
For the teacher demo:
- 0.6 m (~2 ft) of 14-gauge copper wire
- AA battery
- 2 small neodymium magnets
Worksheets and Attachments
Visit [www.teachengineering.org/activities/view/rice2-2524-energy-innovator-generator-activity] to print or download.Pre-Req Knowledge
Students should be familiar with different forms of energy, including exposure to the term "electrical energy," the basics of matter, and the structure of an atom.
Introduction/Motivation
(Have the Energy Innovator PowerPoint Presentation ready to show the class.)
Currently, there are many different ways to generate energy and electricity. Can you tell me different ways energy and electricity can be generated? (Potential answers: oil, natural gas, coal, nuclear, sun, wind, water, geothermal.) Some of these sources are renewable which means they are not depleted when used. Examples would be solar, wind and water/hydro power sources. Some of the sources are nonrenewable, which means they are not infinite and they cannot be replenished. Sources like oil, natural gas, coal and nuclear energy are nonrenewable sources.
Besides only having a limited amount of nonrenewable resources, why else would nonrenewable sources of energy not be ideal to use? (Potential answers: environmental pollution, hazardous byproducts for humans and animals, radioactive waste, etc.) So why don’t we just use renewable sources for our energy? (Potential answers: expense, availability, geography, etc.) New renewable energy sources can be more expensive to develop, and they may not be available in certain geographic locations (that is, solar in a place that is often overcast, or wind energy in a calmer climate) There can be issues to effectively and efficiently store this energy, and some of these sources are not available everywhere.
Today, our goal is to be engineers and create a generator that can be reused and can reduce waste products.
We will start with a short demonstration and then we will break into teams of four to design, build and test your own electromagnetic generator prototypes.
Procedure
Background
How does the generator actually work? Copper coils are often used in generators since they are conductors, which allows for electricity to pass through the wire to its source more effectively. Magnets are used to create a stronger attraction, thus a stronger current flow within the generator. Using metal nuts and bolts also allow for a stronger conduction between the currents. This attraction (coupled with a battery) allows the small bulb to light up in a closed circuit! Unfortunately, a constant closed circuit is not feasible, as it can diminish the battery and light bulb’s life. Luckily, by creating a switch in our generator, we can turn on and off the light as needed. This switch can be accomplished by spinning our generator. The spin will power our closed circuit through the use of magnetic currents.
Use the following links as a guide to help understand the phenomenon exhibited in this activity:
- School for Champions - Electromagnetism - https://www.school-for champions.com/science/electromagnetism.htm#.YEa2amhKhaQ
- School for Champions - Magnetic Fields Moving Charge - https://www.school-for-champions.com/science/magnetic_field_moving_charges.htm#.YEa3KmhKhaQ
- School for Champions - Electric Current Generation - https://www.school-for-champions.com/science/electric_current_generation.htm#.YEa28mhKhaQ
Students may not necessarily be able to make the leap from the battery example to a generator; they may be able to form the connection knowing the relationship between moving charge and electromagnetic induction from the links above.
Therefore, consider explaining how the battery is supplying the energy required to do the work of spinning the wire. The hard leap will be knowing that they need to substitute a battery with the kinetic energy (their action of spinning the wheel). A leading or investigating question to ask might be "How do you get energy to flow without the battery?"
Using the teacher demo, show how the energy that exists in a battery is released to create the spinning of the wire. In the following student activity, allow them to explore how the design of the disk moves the charge along in the coils from the initial kinetic spin of the wheel.
Another (optional) resource from the U.S. Energy Information Administration: Electricity explained -https://www.eia.gov/energyexplained/electricity/how-electricity-is-generated.php
Before the Activity
- Gather, prepare, and set materials aside per group
- Make copies of the Energy Innovator Handout
- Watch Bang Hax’s Magic Trick with magnets – Part 1 – Homopolar motor; https://www.youtube.com/watch?v=dOAJfr8XLek from 2:05 to 3:20 for demo set up and execution.

Teacher Demonstration (watch Bang Hax’s Magic Trick with magnets – Part 1 – Homopolar motor; https://www.youtube.com/watch?v=dOAJfr8XLek)
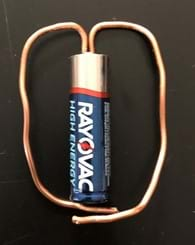
- Using 30 cm (1 ft) of the 14-gauge copper wire, fold the wire in half.
- Using pliers, from 3.8 cm (~1.5 in) from the middle of the fold, bend one end of the wire at a 90-degree angle. Do the same to the other side.
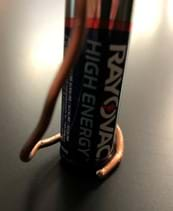
- Bend the wire again at a 90-degree angle. Ensure the wire is long enough that it will cover the length of a battery (AA) with at least an inch hanging off.
- At the ends of the wire, bend it in one direction to create a half circle. With the other end, bend the wire the other way to complete the circle.
- Place a magnet at the flat end of the battery. Insert the copper wire and allow it to completely touch the battery. The ends at the bottom will touch the magnets. Refer to Figure 2 for an example without magnets. The wire should start to spin around the battery and magnet.
- Discuss with students the importance of having magnetic fields.
- Have students observe and make comments about this model, first-generation generator. They should answer the questions in their Energy Innovator Handout.


With the Students
Note: In their designs, students should consider following the steps outlined in this video: Multiple Generator from Arvind Gupta: https://www.youtube.com/watch?v=S8BZQyIz97g.
Note: Materials list, visualized: http://www.arvindguptatoys.com/toys/multiplegenerator.html
- Divide the class into groups of 3 or 4.
- Allow the students to observe the model generator demonstration and take notes.
- Show students the materials they will be able to use.
- Allow the students to brainstorm and design a model.
- As they are designing, walk around the room to observe and help improve their design.
- Once students are ready, the teacher should initial/sign off on their design.
- Distribute the materials needed to each group.
- Have students build their models.
- After students build their model, they should test it.
- Compare the models with other groups.
- Allow students to rebuild if necessary.
- Students then promote their invention and create an advertisement for it. The advertisement must include the location (of where the product would be used), cost, and longevity of their product. They can also include troubleshooting tips.
Vocabulary/Definitions
coil: To wind into rings or spirals.
electromagnetism: The interaction of electric currents or fields and magnetic fields.
generator: A machine by which mechanical energy is changed into electrical energy.
magnetism: An ability to attract or charm.
Assessment
Pre-Activity Assessment
Brainstorming: Place the students in their respective groups. Encourage the students to be creative and positive. Ask students what types of generators or magnetic items they can think of as examples.
Quick poll: Can we create energy using magnetism and copper?
Activity Embedded Assessment
Worksheet: Have the students answer the questions on their Energy Innovator Student Handout, starting with the teacher demonstration. Guide the students along, paying particular attention to their budget and end goals.
Post-Activity Assessment
Problem solving: Have the class discuss why their generator did or did not work, what improvements could be made, and what adjustments could take place.
Troubleshooting Tips
Test both the demonstration and the generator before guiding the activity. Some students may not be able to build the generator without referencing the video, which is ok.
Subscribe
Get the inside scoop on all things Teach Engineering such as new site features, curriculum updates, video releases, and more by signing up for our newsletter!More Curriculum Like This

Students learn and discuss the advantages and disadvantages of renewable and non-renewable energy sources. They also learn about our nation's electric power grid and what it means for a residential home to be "off the grid."

Students get introduced to the real-world technical tool of a wind turbine propeller attachment. It’s a device that efficiently harvests wind energy, and in this activity they’ll build one of their own using a LEGO wind turbine, fan, and energy meter.

This lesson provides students with an overview of the electric power industry in the United States. Students also become familiar with the environmental impacts associated with a variety of energy sources.
References
Gupta, Arvind. Multiple Generator. April 19, 2010. ArvindGuptaToys: http://www.arvindguptatoys.com/toys/multiplegenerator.html
Bang Hax. Magic Tricks with Magnets – Part 1 – Homopolar Motor. February 21, 2017. BangHax: https://www.youtube.com/watch?v=dOAJfr8XLek
Copyright
© 2021 by Regents of the University of Colorado; original © 2020 Rice UniversityContributors
Hoang Anh Pham; Christina Crawford; Luis (Carlos) MoncadaSupporting Program
Engineering Research Center for Nanotechnology Enabled Water Treatment Systems (NEWT) RET, Rice UniversityAcknowledgements
This curriculum was based upon work supported by the National Science Foundation under Rice University Engineering Research Center for Nanotechnology Enabled Water Treatment Systems (NEWT) RET grant no.1449500. Any opinions, findings, and conclusions or recommendations expressed in this material are those of the authors and do not necessarily reflect the views of the National Science Foundation.
Last modified: March 26, 2021


User Comments & Tips