Quick Look
Grade Level: 8 (6-9)
Time Required: 1 hours 30 minutes
(can be split into two 45-minute sessions)
Expendable Cost/Group: US $0.00 This activity uses materials that are non-expendable and can be re-used many times; see the Materials List for details.
Group Size: 3
Activity Dependency: None
Subject Areas: Data Analysis and Probability, Measurement, Physical Science, Physics, Science and Technology
NGSS Performance Expectations:

| HS-ETS1-2 |
| HS-PS3-3 |

Summary
Working as engineering teams in this introductory pneumatics lab, students design and build working pneumatic (air-powered) systems. The goal is to create systems that launch balls into the air. They record and analyze data from their launches.Engineering Connection
Pneumatic systems, called circuits, are used extensively by engineers to power and control robotics. Engineers design pneumatic circuits to perform activities in manufacturing and other industrial applications that require repetition and consistency. One of the most common applications of pneumatics used by engineers is safely controlling a pneumatic cylinder to provide linear force.
Learning Objectives
After this activity, students should be able to:
- Design and build a pneumatic circuit.
- Graph two variables and reach a conclusion.
- Plan and conduct a controlled experiment.
- Understand the engineering design process.
Educational Standards
Each Teach Engineering lesson or activity is correlated to one or more K-12 science,
technology, engineering or math (STEM) educational standards.
All 100,000+ K-12 STEM standards covered in Teach Engineering are collected, maintained and packaged by the Achievement Standards Network (ASN),
a project of D2L (www.achievementstandards.org).
In the ASN, standards are hierarchically structured: first by source; e.g., by state; within source by type; e.g., science or mathematics;
within type by subtype, then by grade, etc.
Each Teach Engineering lesson or activity is correlated to one or more K-12 science, technology, engineering or math (STEM) educational standards.
All 100,000+ K-12 STEM standards covered in Teach Engineering are collected, maintained and packaged by the Achievement Standards Network (ASN), a project of D2L (www.achievementstandards.org).
In the ASN, standards are hierarchically structured: first by source; e.g., by state; within source by type; e.g., science or mathematics; within type by subtype, then by grade, etc.
NGSS: Next Generation Science Standards - Science
| NGSS Performance Expectation | ||
|---|---|---|
|
HS-ETS1-2. Design a solution to a complex real-world problem by breaking it down into smaller, more manageable problems that can be solved through engineering. (Grades 9 - 12) Do you agree with this alignment? |
||
| Click to view other curriculum aligned to this Performance Expectation | ||
| This activity focuses on the following Three Dimensional Learning aspects of NGSS: | ||
| Science & Engineering Practices | Disciplinary Core Ideas | Crosscutting Concepts |
| Design a solution to a complex real-world problem, based on scientific knowledge, student-generated sources of evidence, prioritized criteria, and tradeoff considerations. Alignment agreement: | Criteria may need to be broken down into simpler ones that can be approached systematically, and decisions about the priority of certain criteria over others (trade-offs) may be needed. Alignment agreement: | |
| NGSS Performance Expectation | ||
|---|---|---|
|
HS-PS3-3. Design, build, and refine a device that works within given constraints to convert one form of energy into another form of energy. (Grades 9 - 12) Do you agree with this alignment? |
||
| Click to view other curriculum aligned to this Performance Expectation | ||
| This activity focuses on the following Three Dimensional Learning aspects of NGSS: | ||
| Science & Engineering Practices | Disciplinary Core Ideas | Crosscutting Concepts |
| Design, evaluate, and/or refine a solution to a complex real-world problem, based on scientific knowledge, student-generated sources of evidence, prioritized criteria, and tradeoff considerations. Alignment agreement: | At the macroscopic scale, energy manifests itself in multiple ways, such as in motion, sound, light, and thermal energy. Alignment agreement: Although energy cannot be destroyed, it can be converted to less useful forms—for example, to thermal energy in the surrounding environment.Alignment agreement: Criteria and constraints also include satisfying any requirements set by society, such as taking issues of risk mitigation into account, and they should be quantified to the extent possible and stated in such a way that one can tell if a given design meets them.Alignment agreement: | Energy cannot be created or destroyed—it only moves between one place and another place, between objects and/or fields, or between systems. Alignment agreement: Modern civilization depends on major technological systems. Engineers continuously modify these technological systems by applying scientific knowledge and engineering design practices to increase benefits while decreasing costs and risks.Alignment agreement: |
Common Core State Standards - Math
-
Fit a function to the data; use functions fitted to data to solve problems in the context of the data.
(Grades
9 -
12)
More Details
Do you agree with this alignment?
International Technology and Engineering Educators Association - Technology
-
Apply the technology and engineering design process.
(Grades
6 -
8)
More Details
Do you agree with this alignment?
-
Evaluate final solutions and communicate observation, processes, and results of the entire design process, using verbal, graphic, quantitative, virtual, and written means, in addition to three-dimensional models.
(Grades
9 -
12)
More Details
Do you agree with this alignment?
-
Develop a plan that incorporates knowledge from science, mathematics, and other disciplines to design or improve a technological product or system.
(Grades
9 -
12)
More Details
Do you agree with this alignment?
State Standards
Minnesota - Math
-
Represent the relationship between two varying quantities with function rules, graphs and tables; translate between any two of these representations.
(Grade
6)
More Details
Do you agree with this alignment?
Minnesota - Science
-
Apply and document an engineering design process that includes identifying criteria and constraints, making representations, testing and evaluation, and refining the design as needed to construct a product or system that solves a problem.
(Grade
6)
More Details
Do you agree with this alignment?
-
Describe a system in terms of its subsystems and parts, as well as its inputs, processes and outputs.
(Grade
6)
More Details
Do you agree with this alignment?
-
Determine and use appropriate safe procedures, tools, measurements, graphs and mathematical analyses to describe and investigate natural and designed systems in a physical science context.
(Grade
6)
More Details
Do you agree with this alignment?
-
Plan and conduct a controlled experiment to test a hypothesis about a relationship between two variables, ensuring that one variable is systematically manipulated, the other is measured and recorded, and any other variables are kept the same (controlled).
(Grade
7)
More Details
Do you agree with this alignment?
-
Generate a scientific conclusion from an investigation, clearly distinguishing between results (evidence) and conclusions (explanation).
(Grade
7)
More Details
Do you agree with this alignment?
Materials List
Each group needs:
- 2.5 meters polyurethane green tubing, 5/32" X 3/32" (McMaster, 5648K233)
- air reservoir, 1-1/4" bore, 6" length, 8.7 cu inch, 1/8" NPT female, 250 psi (JH Foster, D-27715-A-6)
- relief valve, 60 psi, pull ring, ¼" NPT (Grainger, 5A707)
- pressure gauge, 0 to 60 psi, ½", 1/8" NPT, lower (Surplus Center, 21-1663-N)
- 1 control valve, hand-operated, 3-way 2-position, 1/8" NPT female ports (SMC, NVM130-N01-08)
- 1 cylinder, 7/16" bore, 2" stroke, single acting, spring return, nose-mounted (JH Foster, 012)
- fittings (McMaster): 1 tee, 5/32" tube, glass-filled nylon (SMC, KQ2T03-00); and 2 orange plugs, 5/32" (SMC, KQ2P-03)
- hex nipple, 1/8" NPT, brass, package of 10 (Grainger, 6MN96; use 2 of 10 for extension activity materials, listed below)
- tee, 1/8" NPT, brass, package 10 (Grainger, 6MN48)
- bushing adapter, 1/8" M to ¼" F NPT (Grainger, 6MN88)
- three 10-32 fender washers (McMaster, 91090A120)
- two 10-32 nuts (McMaster, 90480A195)
- two 10-32 lock nuts (McMaster, 90633A411)
- three10-32 wing nut (McMaster, 90866A111)
- two 3/8" washers (McMaster, 91090A112)
- plastic cap, fits 1-1/8" outer diameter, 19/32" inside height (McMaster, 9567K15)
- 2 fittings, 5/32" tube to 10-32 UNF male, glass-filled nylon (SMC, KQ2H03-32)
- 6 fittings, 5/32" tube to 1/8" NPT male pipe, glass-filled nylon (SMC, KQ2H03-34S)
- 1 fitting, 5/32" tube to 1/8" NPT female pipe, glass-filled nylon (SMC, KQ2F03-34)
- tire filling valve (Schrader valve), 1/8" NPT (Surplus Center, 455-NN-N)
- bicycle pump
- 1 gallon unlined paint can (no ears) with lid (Empty Paint Cans, 30WS1U)
- tennis ball (or any small ball)
- meter stick
- safety goggles, pair per person
To share with the entire class:
- drill with metal cutting bit to drill holes in paint cans
- Teflon tape
For the extension activity, each group needs:
- 1.5 meters polyurethane green tubing, 5/32" X 3/32" (McMaster, 5648K233)
- 1 control valve, hand-operated, 3-way 2-position, 1/8" NPT female ports (SMC, NVM130-N01-08)
- 1 cylinder, 7/16" bore, 2" stroke, single acting, spring return, nose-mounted (JH Foster, 012)
- fitting (McMaster): 1 tee, 5/32" tube, glass-filled nylon (SMC, KQ2T03-00)
- 16-oz white HDPE tub (Container & Packaging Supply, T013)
- support stand with post (Cynmar, 120-30358)
- right angle clamp (Cynmar, 120-30626)
- hex nipple, 1/8" NPT, brass, need 2 of package of 10 from materials listed above (Grainger, 6MN96)
- two 10-32 fender washers (McMaster, 91090A120)
- two 10-32 wing nuts (McMaster, 90866A111)
- 1 fitting, 5/32" tube to 1/8" NPT female pipe, glass-filled nylon (SMC, KQ2F03-34)
Suggested suppliers:
- Bimba: https://www.bimba.com/
- Container & Packaging Supply: https://www.containerandpackaging.com/
- Cynmar: http://www.cynmar.com
- Eaton: http://www.precisionfluidpower.com/c/Eaton/Eaton.html
- Fastenal: https://www.fastenal.com/
- Grainger: https://www.grainger.com/content?currenturl=%2FGrainger%2Fwwg%2Fstart.shtml
- JH Foster: http://www.jhf.com/
- McMaster: http://www.mcmaster.com/
- Parker Hydraulics: http://www.precisionfluidpower.com/c/Parker/Parker.html
- SMC: http://www.smcpneumatics.com/
- Surplus Center: https://www.surpluscenter.com/home.asp
Worksheets and Attachments
Visit [www.teachengineering.org/activities/view/umn_pneumatics_activity01] to print or download.Pre-Req Knowledge
Familiarity with metric measurement, creating data tables and graphs.
Introduction/Motivation
What do home construction, dentistry and organ playing have in common? (Don't expect a "correct" answer; we are just trying to get students thinking.)
What kinds of tools are used in constructing a home? What do you hear when dental tools start and stop? What creates the powerful sound in a pipe organ? (Now we are trying to get students to recognize that these are all examples of using air power).
Can you think of some other examples of how we use air power? (Possible answers: Air brakes on buses, trucks and trains; air compressors; air soft/BB guns; Nerf guns; jackhammer; nail gun; robots; etc.) All of these are examples of air power, called pneumatics. Pneumatics is the use of pressurized gas to control mechanical motion.
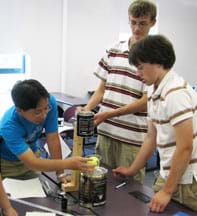
Today we are going to act as teams of engineers using pneumatics to design and build a ball launcher.
Procedure
Background
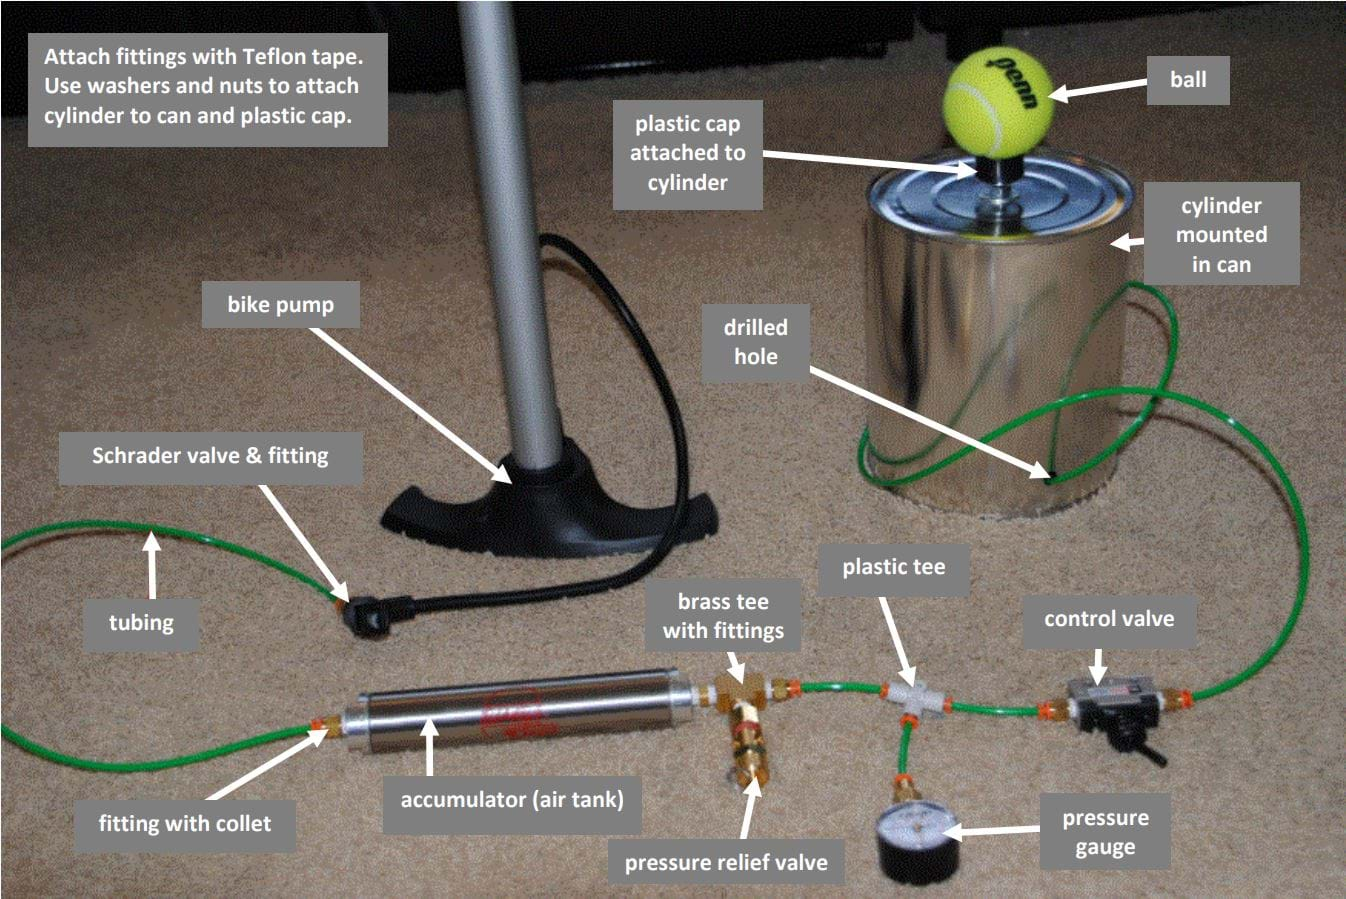
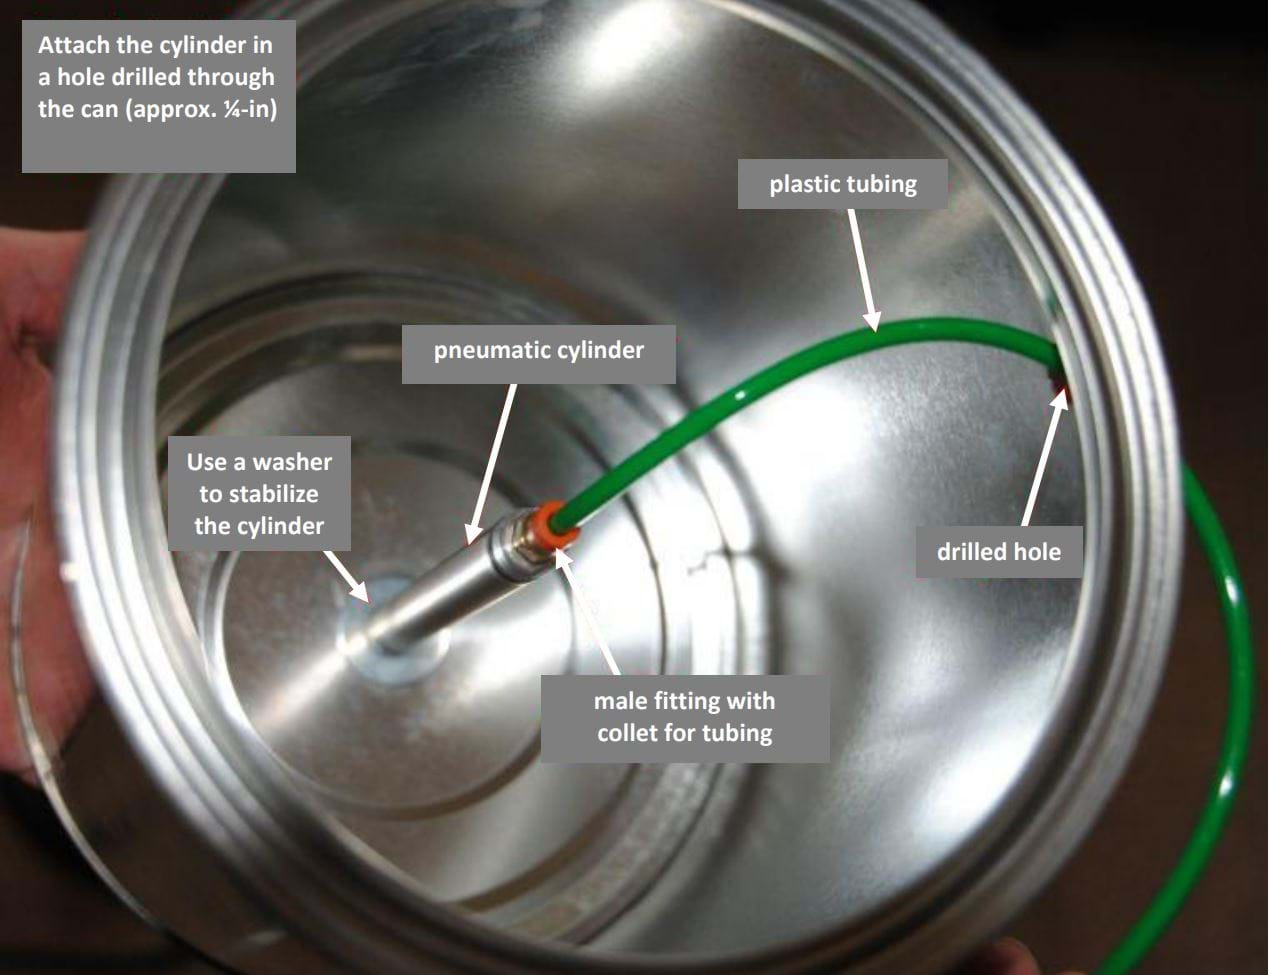
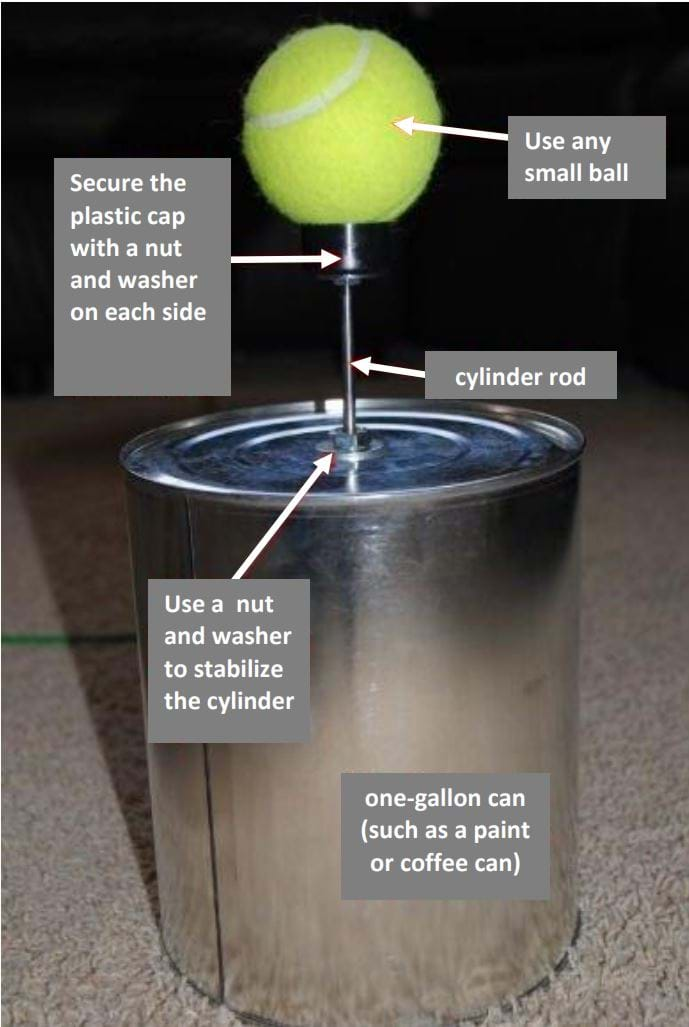
We suggest that the teacher create and familiarize him/herself with the components and the system in advance of conducting the activity with the students. Refer to the Pneumatics Lab Set-Up Photos attachment, which contains larger versions of Figures 1-3.


Before the Activity
- Gather components and lay out each team's "kit" on tables (omitting parts for the extension activity).
With the Students
- Divide the class into groups of three students each.
- Direct the teams to find a way to generate compressed air. (Expect students to locate the bike pump.)
- Direct the students to find a part to store the compressed air. (Expect students to locate the accumulator/tank.)
- Connect the bike pump to the tank and pump air through it.
- Direct the students to find a way of measuring the pressure in the system and connect it to the system. (Expect students to find the pressure gauge, tee connector and plug, and add this to the system.)
- Direct the students to find a component that would allow them to create motion with the stored air. (Expect students to find the cylinder that is attached to the paint can.)
- Have students attach the cylinder to the system and test it.
- Have students practice launching tennis balls with their designed systems.
- Have students maximize pressure within their systems.
- Have students create two-column data tables to record pressure vs. height data.
- Have students measure height of the tennis balls at different pressures and record data in their tables.
- After data collection, have students graph pressure vs. height.
- Ask students to extrapolate at a different psi, as described in the Assessment section.
- As time permits, conduct the extension activity.
Vocabulary/Definitions
accumulator: A tank that stores compressed air.
collet: A holding device that forms a collar around the tubing to secure it.
control valve: Used to turn air flow on or off.
pneumatic cylinder: A mechanical device that produces force as a result of compressed gas.
pneumatics: The use of pressurized gas to control mechanical motion.
pressure gauge: A device that measures the air pressure of a system.
relief valve: Used to control or limit the pressure in the system.
Assessment
Pre-Activity Assessment
Prediction: Ask students to predict the relationship between air pressure of the system and the height of the tennis ball after launched.
Activity Embedded Assessment
Engineering: Students should be able to demonstrate correctly-functioning pneumatic systems.
Post-Activity Assessment
Extrapolation: Using the graph created from their data, have students predict the height that could be achieved by 75 psi.
Investigating Questions
- Where might you use this type of technology? (Possible answers: Pneumatics are everywhere around us, including dental tools, automotive and carpentry tools, robotics, paintball guns, airsoft guns, jackhammers, tennis ball launchers, vehicle brakes, air compressors for nail guns, etc.)
- What was the relationship between pressure and height of the ball? (Answer: The height depends on the pressure; they are directly proportional.)
Safety Issues
- Preset the pressure relief valve at approximately 50-60 psi.
- Wear safety goggles to prevent eye injuries.
Troubleshooting Tips
To avoid leakage, securely insert tubing into the collet.
The switch has a right and a wrong way; make sure it is inserted according to arrows on the switch.
To stabilize the launcher, use washers on both sides of the plastic cap.
Activity Extensions
Discuss the engineering design process with students. The steps of the design process include: 1) define the problem, 2) come up with ideas [brainstorming], 3) select the most promising design, 4) communicate and plan the design, 5) create and test the design, and 6) evaluate and revise the design.
Have students use the extension materials to modify their original systems to not only launch a ball, but catch it as well. Have them follow the steps of the engineering design process to help them accomplish this task.
Activity Scaling
- For lower grades, omit the data collection and graphing and just concentrate on the design and discussion of the system.
- For upper grades, have students calculate the efficiency of the system by calculating energy changes of the system.
Subscribe
Get the inside scoop on all things Teach Engineering such as new site features, curriculum updates, video releases, and more by signing up for our newsletter!More Curriculum Like This

Students learn about the fundamental concepts important to fluid power, which includes both pneumatic (gas) and hydraulic (liquid) systems.
References
Center for Compact and Efficient Fluid Power. A National Science Foundation Engineering Research Center. Accessed December 29, 2009. http://ccefp.org/
Copyright
© 2013 by Regents of the University of Colorado; original © 2009 University of MinnesotaContributors
Will Durfee, Alyssa Burger, Jacob Givand, Jeffrey Schreifels, and Melissa SchreifelsSupporting Program
Center for Compact and Efficient Fluid Power RET and ERC, University of MinnesotaAcknowledgements
The authors gained experience and knowledge through an RET (Research Experience for Teachers) position at the Center for Compact and Efficient Fluid Power at the University of Minnesota. The contents of this digital library curriculum were developed under National Science Foundation grant no. EEC 0540834. However, these contents do not necessarily represent the policies of the National Science Foundation, and you should not assume endorsement by the federal government.
Last modified: December 10, 2022


User Comments & Tips