Quick Look
Grade Level: 1 (K-2)
Time Required: 4 hours 30 minutes
(45-minute periods over 6 days)
Expendable Cost/Group: US $7.00
Group Size: 4
Activity Dependency: None
Subject Areas: Physical Science, Problem Solving
NGSS Performance Expectations:

| K-2-ETS1-1 |
| K-2-ETS1-2 |
Summary
Why do some objects float while others sink? Students make sense of this phenomenon by engaging in the science and engineering practices of asking questions and defining problems, using models, and designing solutions. Students then apply what they discover to solve everyday situations, such as preventing a car from sinking. In this activity, students build a road out of Jell-O that is sturdy enough to drive a toy car across without sinking. Using the full engineering design process, students research and choose available ingredients that will support their car. After research, students investigate which ingredients will help make their Jell-O as strong as possible to protect their car from sinking in the “mud”. They test their prototype to see if the toy car will be able to drive across the Jell-O without sinking. The teams evaluate the process, improve the design, and recreate if needed. Students discuss their design, data, and final results in front of the class.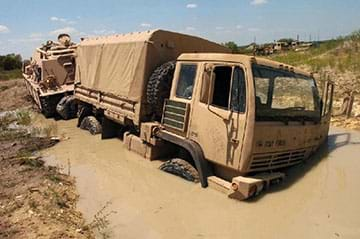
Engineering Connection
Engineers face problem solving situations every day and use the engineering design process to solve their problems. Engineers must understand the concept of density in relation to objects sinking or floating when designing engineering solutions. The engineering design process that takes place in the classroom during this activity is similar to what many engineers do in their profession.
Learning Objectives
After this activity, students should be able to:
- Make sense of why objects sink or float.
- Keep pictorial and written records of investigations.
- Ask questions, make observations, and gather information about a simple problem and solve it through the development of a new or improved object.
- Have a basic understanding of the engineering design process.
Educational Standards
Each Teach Engineering lesson or activity is correlated to one or more K-12 science,
technology, engineering or math (STEM) educational standards.
All 100,000+ K-12 STEM standards covered in Teach Engineering are collected, maintained and packaged by the Achievement Standards Network (ASN),
a project of D2L (www.achievementstandards.org).
In the ASN, standards are hierarchically structured: first by source; e.g., by state; within source by type; e.g., science or mathematics;
within type by subtype, then by grade, etc.
Each Teach Engineering lesson or activity is correlated to one or more K-12 science, technology, engineering or math (STEM) educational standards.
All 100,000+ K-12 STEM standards covered in Teach Engineering are collected, maintained and packaged by the Achievement Standards Network (ASN), a project of D2L (www.achievementstandards.org).
In the ASN, standards are hierarchically structured: first by source; e.g., by state; within source by type; e.g., science or mathematics; within type by subtype, then by grade, etc.
NGSS: Next Generation Science Standards - Science
By engaging in the science and engineering practices of asking questions and defining problems, developing and using models, and designing solutions, students make sense of density concepts and apply them to problem solve everyday situations using the engineering design process. Students explore the disciplinary core idea of engineering design while applying the crosscutting concept of structure and function.
| NGSS Performance Expectation | ||
|---|---|---|
|
K-2-ETS1-1. Ask questions, make observations, and gather information about a situation people want to change to define a simple problem that can be solved through the development of a new or improved object or tool. (Grades K - 2) Do you agree with this alignment? |
||
| Click to view other curriculum aligned to this Performance Expectation | ||
| This activity focuses on the following Three Dimensional Learning aspects of NGSS: | ||
| Science & Engineering Practices | Disciplinary Core Ideas | Crosscutting Concepts |
| Ask questions based on observations to find more information about the natural and/or designed world(s). Alignment agreement: Define a simple problem that can be solved through the development of a new or improved object or tool.Alignment agreement: | A situation that people want to change or create can be approached as a problem to be solved through engineering. Alignment agreement: Asking questions, making observations, and gathering information are helpful in thinking about problems.Alignment agreement: Before beginning to design a solution, it is important to clearly understand the problem.Alignment agreement: | |
| NGSS Performance Expectation | ||
|---|---|---|
|
K-2-ETS1-2. Develop a simple sketch, drawing, or physical model to illustrate how the shape of an object helps it function as needed to solve a given problem. (Grades K - 2) Do you agree with this alignment? |
||
| Click to view other curriculum aligned to this Performance Expectation | ||
| This activity focuses on the following Three Dimensional Learning aspects of NGSS: | ||
| Science & Engineering Practices | Disciplinary Core Ideas | Crosscutting Concepts |
| Develop a simple model based on evidence to represent a proposed object or tool. Alignment agreement: | Designs can be conveyed through sketches, drawings, or physical models. These representations are useful in communicating ideas for a problem's solutions to other people. Alignment agreement: | The shape and stability of structures of natural and designed objects are related to their function(s). Alignment agreement: |
International Technology and Engineering Educators Association - Technology
-
Students will develop an understanding of the attributes of design.
(Grades
K -
12)
More Details
Do you agree with this alignment?
-
Students will develop an understanding of engineering design.
(Grades
K -
12)
More Details
Do you agree with this alignment?
-
Students will develop abilities to apply the design process.
(Grades
K -
12)
More Details
Do you agree with this alignment?
State Standards
Florida - English
-
Participate in collaborative conversations with diverse partners about grade 2 topics and texts with peers and adults in small and larger groups.
- Follow agreed-upon rules for discussions (e.g., gaining the floor in respectful ways, listening to others with care, speaking one at a time about the topics and texts under discussion).
- Build on others' talk in conversations by linking their comments to the remarks of others.
- Ask for clarification and further explanation as needed about the topics and texts under discussion.
Do you agree with this alignment?
Florida - Science
-
Sort objects by observable properties, such as size, shape, color, temperature (hot or cold), weight (heavy or light), texture, and whether objects sink or float.
(Grade
1)
More Details
Do you agree with this alignment?
-
Keep records as appropriate, such as pictorial, written, or simple charts and graphs, of investigations conducted.
(Grade
3)
More Details
Do you agree with this alignment?
Materials List
Each group needs:
- toy jeep (such as a Matchbox or Hot Wheels brand)
- plastic container with lid (such as Rubbermaid TakeAlongs Deep Rectangular Food Storage Containers)
To share with the entire class:
- can of diet Coke
- can of regular Coke
- large plastic container (that can hold at least 19 L (20 quarts))
- assortment of objects for testing sink/float on Day 2. Examples: paper clips, Popsicle sticks, pennies, sticks, spoons, apples, plastic spoons, etc.
- box of gelatin packs (containing 36 packets), available online
- 2.3 kg (5 lb) sand (aquarium sand works well), available online
- 2.3 kg (5 lb) pebbles (aquarium gravel works well), available online
- 2.3 kg (5 lb) marbles (clear glass 13 mm (0.5-in) diameter marbles)
- assortment of less dense objects such as mini-marshmallow, mini corks, rice krispies, rubber bands, etc.
- progressive measuring cups (1/4 cup, 1/3 cup, 1/2 cup, 2/3 cup, 3/4 cup and 1 cup)
- access to a refrigerator (to make Jell-O)
- access to hot and cold water (to make Jell-O and for the whole group sink/float activity)
- laptop and screen to show class a PowerPoint presentation and video
- pictures of a set of keys, a rock, a beach ball, a car and a pumpkin (for the pre/post-quiz)
- Book “Sheep in a Jeep” by Nancy Shaw (alternative: read along video on YouTube)
Each student needs:
- lab notebook
- pencil
- tape or glue
- Materials Worksheet
Worksheets and Attachments
Visit [www.teachengineering.org/activities/view/uof-2498-engineering-solutions-sticky-situation-design] to print or download.Pre-Req Knowledge
Students should know how to keep a lab notebook by including the date, observations, and pictures, if necessary, in each entry.
Introduction/Motivation
For the next couple of days we will be figuring out what makes objects sink or float in water. First, I need to understand what you know so we are going to take a pre-quiz. (Pass out Pre/Post-Quiz and display a picture of each object for the class to see.)
Have students discuss their responses with their classmates. Why do you think objects float? Why do you think objects sink? (Ask students to answer these questions in their lab notebooks.)
Now show students the video of people floating in the Dead Sea: https://www.youtube.com/watch?v=WbWUsvKBlTw
Ask them after watching the video does it change their responses. Have students share their thoughts with one another. Students may now realize that it’s not the object’s mass that determines whether it sinks or floats, but the relationship between mass and volume: Density equals mass over (divided by) volume. or D=m/v.
Have students come up with questions they may have about the initial video.
Have you ever seen a car or truck stuck in the mud? What do you think happens if a car or truck tries to drive forward when they are stuck? (If students have not seen this before, show a picture to the class, such as the image at the header of this activity. Or, refer to the book below.)
Read the book “Sheep in a Jeep” by Nancy Shaw (alternative: read along video on YouTube) and discuss the jeep being stuck in the mud. Why do you think the jeep is stuck in the mud? How does being stuck relate to sinking or floating?
Say: “Many vehicles get stuck in the mud.” Show the class the container with the jeep getting stuck in the Jell-O. Ask: Is there something wrong with this situation? Is it the road or the jeep? How do you know? Say: “Think about how you can solve this problem.”
Explain the task: “Students will work in teams to create a Jell-O road by adding ingredients of their choice and the road will need to allow the toy jeep to travel across without getting stuck.”
For the next couple of days, you are going to build a Jell-O road that will allow a jeep to travel across without getting stuck or sinking. To do this, we need to know about the engineering design process.
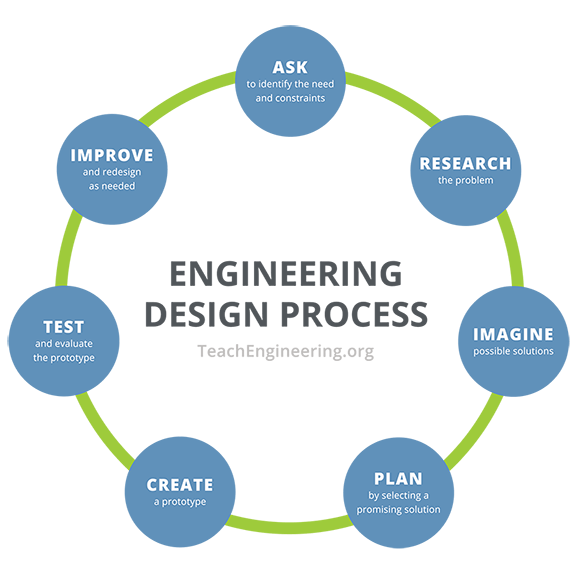
Explain that engineers ask critical questions about what they want to create or what specific problem they are trying to solve. These questions include: What are the project requirements (criteria)? What are the limitations (constraints)? This also requires conducting research on the problem. For example, engineers need to research different types of roads (dirt and gravel) and what happens to vehicles traveling on them during a heavy rainfall.
The engineering team then imagines possible solutions to the problem. This takes a lot of creative brainstorming! After making a list of solutions and some sketches of their ideas, the team of engineers plan and select their best idea.
Once the team decides on the details of the final design, they create the prototype and test it out! Prototypes are smaller models that are used by engineers to test a design. In the testing phase, the team pays attention to what needs to be changed to the model to make the product work better. The last step of the engineering design process is to improve (iterate) their design.
Tell students, “To create a road that will prevent vehicles from getting stuck, you will become engineers and use the engineering design process to research, imagine possible solutions/designs, plan, create your prototype, and test it!”
Activity Overview
Day 1: Conduct the Pre/Post-Quiz and the Introduction/Motivation and prepare for a whole group lesson with regular and diet Coke.
Day 2: Students test objects for sink/float and record their observations in their journal.
Day 3: Read the book, introduce the topic, state the problem, and research.
Day 4: (morning) teams create designs, teams build their design, (afternoon) after 4 hours have teams test design, ask follow up questions, and review if the design solved the problem.
Day 5: Recap, present, and redesign if time allows.
Procedure
Background
Objects are made of molecules which can be packed tightly together or spread out. The way these molecules are packed affect the density of the object. An object that has its molecules tightly packed in will be denser than objects whose molecules are spread out.
Density is important because it determines if an object will sink or float. Objects that are denser than water will sink and those objects that are less dense than water will float.
The purpose of this activity is for students to understand why objects sink or float in water. Students learn what causes objects to sink or float and students will learn about density. This activity provides students with hands-on activities to understand the difference between objects that sink or float.
Before Day 1
- Make copies of the Pre/Post-Quiz; cut out the individual quizzes so each student has a copy.
- Gather a regular Coke, diet Coke, and large plastic bin. Fill the plastic bin ¾ full with water.
- Draw a table on the board to organize students’ predictions and experiment outcomes. Label the rows “regular Coke” and “diet Coke” and label the columns “Sink” and “Float.”
With the Students Day 1
- Introduce students to the activity with the Introduction/Motivation section.
- Distribute the Pre/Post-Quiz and give students 5-10 minutes to circle their answers.
- Collect the quizzes and ask students to take out their lab notebooks.
- Show students the regular and diet Coke. In small groups, have the students discuss and predict whether each object will sink or float. Once they have agreed unanimously, have them share as a class and write the predictions on the board.
- Carefully drop each can into the water. Let students see if the objects sink or float and record the outcomes on the board.
- (Optional) Tell students to look about their homes and, with permission, bring in small objects that they think will sink or float.
Before Day 2
- Ensure the large plastic bin is ¾ full of water.
- Gather a selection of objects for students to test.
With the Students Day 2
- Tell students: Now it’s your turn to run the experiment! You’ll make predictions and record your ideas and findings about which objects sink or float.
- Have students write down which objects they are testing in their lab notebooks. Encourage them to create a chart to organize their ideas.
- Before testing their objects, have students make a prediction about whether or not the object will sink or float.
- Monitor students as they drop their objects into the water; have them record their findings in their lab notebooks. Check that each student has the chance to drop an object into the water.
- After students have finished testing their objects, bring the class together to discuss if there were any findings that were surprising.
Before Day 3
- Make Jell-O (1 hour before the start of activity) in a container to show the jeep getting stuck in the Jell-O.
- Gather materials: “Sheep in a Jeep” book, lab notebooks, and pens.
With the Students Day 3
- Gather students in a central area to read “Sheep in a Jeep.” Before reading to the students, ask introduction questions such as: Have you ever seen a car or truck stuck in the mud? Why do you think that happens?
- While reading, answer questions as needed. Ask the students questions such as: Why do you think the jeep is stuck in the mud? How does being stuck relate to sinking or floating?
- Introduce the problem:
Say: “Many vehicles get stuck in the mud.” Show the class the container with the jeep getting stuck in the Jell-O. Ask: Is there something wrong with this situation? Is it the road or the jeep? How do you know? Say: “Think about how you can solve this problem.”
- Explain the task: “Students will work in teams to create a Jell-O road by adding ingredients of their choice (sand, gravel, or pebbles) and the road will need to allow the toy jeep to travel across without getting stuck.”
- As a whole group, research different types of roads (dirt and gravel) and what happens to vehicles traveling on them during a heavy rainfall. Have students record their research in lab notebooks.
Before Day 4
- Make copies of the Materials Worksheet for materials.
- Make 8 cups of Jell-O. Make sure to time the mixture correctly so it does not sit longer than an hour before you use it in the activity or you can make it while the teams are designing their roads.
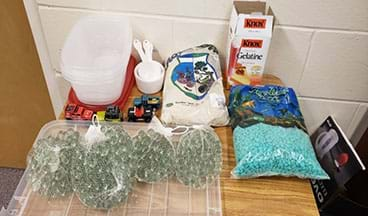
- Gather materials for the activity: premade Jell-O, toy jeeps, containers with lids, measuring cups, marbles, sand, pebbles, lab notebooks, pens.
With the Students Day 4 (AM)
- Divide the class into teams of 4 students.
- Give each student a Materials Worksheet and have students glue it in their lab notebooks.
- Have the teams create and draw a design for their road and fill out the materials chart.
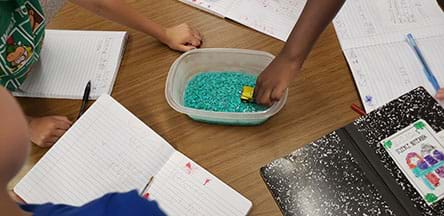
- Let the teams build the design using the materials they chose (sand, gravel, pebbles, mini-marshmallows, rice ) in their containers. [Note: When students fill out “how much used” on the Worksheet, specify how they are measuring the material (e.g., cups of material)] (see Figure 2)
- After each team has built their road, pour 1 cup of Jell-O in each container.
- Explain that you only let your Jell-O sit for 1 hour before and the jeep got stuck. Explain the directions and say to wait 4 hours to let the Jell-O harden. As a class, decide on a time frame for when they want to test their designs.
- Carefully put containers in the refrigerator.
With the Students Day 4 (PM)
- After 4 hours, (or as determined based on student level) have students test their design.
- Have students record their observations in their lab notebooks. Give guidance on how and what to record for observations (e.g. Is the road firm or soft? Can you see a lot or a small amount of objects in the Jell-O? Are the objects closely packed or spread out across the Jell-O? Are objects distributed evenly top to bottom in the Jell-O or are they all on the bottom or on top of the Jell-O, etc.? Get students to think about the density of objects in the Jell-O.
- Ask the Investigating Questions:
- “Did the jeep get stuck? Why or why not?”
- “What was different about your road from my road?”
- “Did your team’s design solve the problem? Why or why not?”
With the Students Day 5
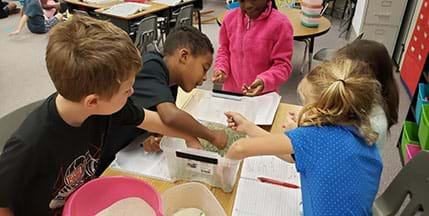
- In groups, have students discuss what happened with their prototype. As a class, have each team briefly present what they did and if it solved the problem of preventing the car from sinking.
- Ask each team: “Do you need to redesign and build your road again? What would you do differently? What would you keep the same?”
- In groups, have students discuss what they would do differently and share out their plans with the class.
- If time allows, let teams redesign their roads and tell students that engineers redesign things a lot when they solve problems.
Vocabulary/Definitions
density: The degree of compactness of a substance.
float: To rest or move on or near the surface of a liquid without sinking
molecule: A group of atoms bonded together.
sink: To go down below the surface of something, especially of a liquid; become submerged.
Assessment
Pre-Activity Assessment
Class Discussions: Ask the following Introduction questions:
- Have you ever seen a car or truck stuck in the mud? Why do you think that happens?
Pre-Quiz: Conduct the Pre/Post-Quiz to gauge student understanding.
Activity Embedded Assessment
Observations/Evaluation: Have students enter observations from each day; collect the lab notebooks to evaluate student understanding. (Students may write or draw their observations.)
Post-Activity Assessment
Post-Quiz: Have students re-take the Pre/Post-Quiz.
Team Presentations: Have each team present what they did and if it solved the problem. Ask each team “Do you need to redesign and build your road again? What would you do differently? What would you keep the same?”
Making Sense: Have students reflect on the science concepts they explored and/or the science and engineering skills they used by completing the Making Sense Assessment.
Investigating Questions
- “Did the jeep get stuck? Why or why not?” (Example answer: Yes, the jeep got stuck because the jeep is denser than the Jell-O and it sank.)
- “What was different about your road from my road?” (Example answer: My road used more pebbles than your road.)
- “Did your team’s design solve the problem? Why or why not?” (Example answer: Yes, the jeep didn’t sink because of all the pebbles in our road.”
Safety Issues
Keep hot water away from students when making the Jell-O.
Remind students that marbles, rocks and sand should not go in their mouths.
Activity Extensions
Students can choose other items to use to build their road or you can have them gather resources from around the school. Teams can research roads in the area that many vehicles do get stuck and write a letter to the county district on ways to improve the road.
Activity Scaling
For lower grades:
- The teacher can do this activity as a whole group instead of in teams.
- The teacher can have items already available for students to choose from for the sink/float activities instead of students finding them on their own.
For higher grades:
- Students can measure the tires sinking in the Jell-O before and after.
- Students can research their own different types of roads and choose other materials to make their road out of.
- Students can do this activity independently instead of in teams.
- Students can research how a ship, boat, yacht, canoe, etc. floats in water.
- Teachers can take the activity further by teaching about buoyancy.
Additional Multimedia Support
Book titled “Sheep in a Jeep” by Nancy E Shaw.
Subscribe
Get the inside scoop on all things Teach Engineering such as new site features, curriculum updates, video releases, and more by signing up for our newsletter!References
Shaw, Nancy, and Margot Apple. Sheep in a Jeep. Houghton Mifflin Harcourt, 2011.
Copyright
© 2020 by Regents of the University of Colorado; original © 2018 University of FloridaContributors
Rebekah PrevattSupporting Program
Multidisciplinary Research Experiences for Teachers of Elementary Grades, Herbert Wertheim College of Engineering, University of FloridaAcknowledgements
This curriculum was based upon work supported by the National Science Foundation under RET grant no. EEC 1711543— Engineering for Biology: Multidisciplinary Research Experiences for Teachers in Elementary Grades (MRET) through the College of Engineering at the University of Florida. Any opinions, findings, and conclusions or recommendations expressed in this material are those of the authors and do not necessarily reflect the views of the National Science Foundation.
Last modified: May 25, 2021


User Comments & Tips