
Quick Look
Grade Level: 1 (K-2)
Time Required: 1 hour
(This could be split up into two class periods)
Expendable Cost/Group: US $7.50
Group Size: 2
Activity Dependency: None
Subject Areas: Physical Science, Problem Solving, Reasoning and Proof
NGSS Performance Expectations:

| K-2-ETS1-1 |
| K-2-ETS1-2 |
Quick Look

- Grade Level:
- 1 (K – 2)
- Time Required:
- 1 hour
(This could be split up into two class periods)
- Group Size:
- 2
- Subject Areas:
-
Physical Science Problem Solving Reasoning and Proof -
NGSS Performance Expectations:
K-2-ETS1-1 K-2-ETS1-2
Summary
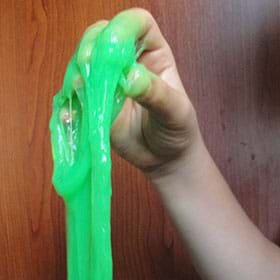
Who can engineer the best slime? Beginning with a preset recipe, students make slime, observe it, and then decide on what and how they want to improve it, such as making it stickier or less sticky. Students then make their updated slime by implementing the changes they want to make. They are introduced to product optimization, material science and polymer engineering.
Engineering Connection
Materials science engineers and polymer engineers use the engineering design process to design, develop and manufacture polymers, plastics, and even slime. Product optimization is one of the most important processes in engineering. Like real engineers, students design a product, run tests, make observations and implement changes accordingly.
Learning Objectives
After this activity, students should be able to:
- Describe the effects on the properties of slime due to changing the component proportions.
- Use their 5 senses to make relevant observations.
- Describe what “optimization” is and why it’s important in engineering.
Educational Standards
Each Teach Engineering lesson or activity is correlated to one or more K-12 science,
technology, engineering or math (STEM) educational standards.
All 100,000+ K-12 STEM standards covered in Teach Engineering are collected, maintained and packaged by the Achievement Standards Network (ASN),
a project of D2L (www.achievementstandards.org).
In the ASN, standards are hierarchically structured: first by source; e.g., by state; within source by type; e.g., science or mathematics;
within type by subtype, then by grade, etc.
Each Teach Engineering lesson or activity is correlated to one or more K-12 science, technology, engineering or math (STEM) educational standards.
All 100,000+ K-12 STEM standards covered in Teach Engineering are collected, maintained and packaged by the Achievement Standards Network (ASN), a project of D2L (www.achievementstandards.org).
In the ASN, standards are hierarchically structured: first by source; e.g., by state; within source by type; e.g., science or mathematics; within type by subtype, then by grade, etc.
NGSS: Next Generation Science Standards - Science
| NGSS Performance Expectation | ||
|---|---|---|
|
K-2-ETS1-1. Ask questions, make observations, and gather information about a situation people want to change to define a simple problem that can be solved through the development of a new or improved object or tool. (Grades K - 2) Do you agree with this alignment? |
||
| Click to view other curriculum aligned to this Performance Expectation | ||
| This activity focuses on the following Three Dimensional Learning aspects of NGSS: | ||
| Science & Engineering Practices | Disciplinary Core Ideas | Crosscutting Concepts |
| Ask questions based on observations to find more information about the natural and/or designed world(s). Alignment agreement: Define a simple problem that can be solved through the development of a new or improved object or tool.Alignment agreement: | A situation that people want to change or create can be approached as a problem to be solved through engineering. Alignment agreement: Asking questions, making observations, and gathering information are helpful in thinking about problems.Alignment agreement: Before beginning to design a solution, it is important to clearly understand the problem.Alignment agreement: | |
| NGSS Performance Expectation | ||
|---|---|---|
|
K-2-ETS1-2. Develop a simple sketch, drawing, or physical model to illustrate how the shape of an object helps it function as needed to solve a given problem. (Grades K - 2) Do you agree with this alignment? |
||
| Click to view other curriculum aligned to this Performance Expectation | ||
| This activity focuses on the following Three Dimensional Learning aspects of NGSS: | ||
| Science & Engineering Practices | Disciplinary Core Ideas | Crosscutting Concepts |
| Develop a simple model based on evidence to represent a proposed object or tool. Alignment agreement: | Designs can be conveyed through sketches, drawings, or physical models. These representations are useful in communicating ideas for a problem's solutions to other people. Alignment agreement: | The shape and stability of structures of natural and designed objects are related to their function(s). Alignment agreement: |
Common Core State Standards - English
-
Participate in shared research and writing projects (e.g., read a number of books on a single topic to produce a report; record science observations).
(Grade
2)
More Details
Do you agree with this alignment?
International Technology and Engineering Educators Association - Technology
-
Students will develop an understanding of the attributes of design.
(Grades
K -
12)
More Details
Do you agree with this alignment?
-
Students will develop an understanding of engineering design.
(Grades
K -
12)
More Details
Do you agree with this alignment?
State Standards
Florida - English
-
Participate in shared research and writing projects (e.g., read a number of books on a single topic to produce a report; record science observations).
(Grade
2)
More Details
Do you agree with this alignment?
Materials List
Each group needs:
- 6 x 120 mL (4 oz.) clear disposable containers (to use as mixing containers)
- 10 mL plastic syringes (for use as “pipettes”)
- 6 x mixing sticks
- 120 mL (4 oz.) Elmer’s glue (clear or white)
- 120 mL (4 oz.) slime activator bottles
- Note: the activator can be made up of a 2:1 ratio of contact solution and baking soda; or, there are options to buy premade activator, available online (see Troubleshooting Tips below)
- 120 mL (4 oz.) water
- food coloring (optional)
- Slime Engineering Journal, one for each student
- Slime SOP Worksheet, one for each group
- gloves for each student
For the class to share:
- masking tape
- sharpies (for labeling)
- paper towels (to clean the tips of the syringes)
Worksheets and Attachments
Visit [www.teachengineering.org/activities/view/uof-2509-super-slime-material-science-engineering] to print or download.Introduction/Motivation
Today, we are going to be learning about engineering. Does anyone know what an “engineer” is? (Expect answers like “people who fix problems” and “people who do math and science”).
Engineers are people who use math and science to help solve problems, invent new things and do all sorts of amazing things. Today, we are all going to be engineers and we are going to engineer the best slime. Can anyone tell me what slime is or what can we use slime for? (Expect answers like “slime is a toy that’s really squishy and sticky and fun to play with”). All these answers are right. Slime is a toy that we are all probably familiar with. It is fun to play with because it looks pretty and it feels nice in our hands.
There are many kinds of slime, some are squishier, and some are more flowy, or wet, or bouncy. We call these things “properties.” Properties describe what something looks like, feels like, smells like, etc. and we use our five senses to distinguish properties. Who can tell me what the five senses are? (Touch, sight, hearing, smell and taste). Engineers use their five senses to help them make observations and figure out the properties. Something really cool about properties is that as engineers we get to use math and science to control the properties of various things. If I want my slime to be more “soft” or “hard” or “flowy”, I can change the recipe to make that happen, which is what we are going to be doing today.
The reason we are doing this activity today is that I need your help as engineers to solve a problem I have. I want to open a slime store but first I must figure out the best way to make slime. I came up with a recipe for slime, but I am not sure it is the best recipe. I need your help to figure out how we can make the recipe better to engineer the best slime in the world. Making something better is something engineers do all the time and in science words, it is called “optimization.” When we optimize something, we figure out ways to improve it.
Procedure
Background
According to the Law of Definite Proportions, mixing the same components in the same proportions/ratios gives the same properties. Likewise, changing those proportions changes the properties of the chemical compound.
In this activity, slime is our chemical compound and the components are water, glue, and a slime activator. We call this type of compound a polymer. Thus, mixing these three in different proportions or amounts makes slime with different properties. These properties can be carefully measured and quantified with precise tools. Additionally, useful qualitative observations can be made with our senses. Since water, glue and slime have unique functions in the make-up of slime, changing each component has unique effects on the slime. Let us examine each component in more detail:
- Glue: glue forms the main body of the slime. It is the base polymer in slime. It is also responsible for giving the slime its characteristic adhesive quality. Adding too much glue makes the slime “stickier” and more likely to self-adhere or adhere to your hands and other surfaces.
- Slime Activator: slime activator is the “crosslinker.” In other words, it forms the bonds that hold the polymer (glue) together. It is what makers slime “slimy”. It brings the slime together and helps it hold its shape. Controlling the quantity of the slime activator in the mixture controls the consistency of the slime—how stretchy it is. More slime activator equates to rubbery, jelly-like consistency (more “squishy”). The less slime activator that is added to the mixture, the less the slime can hold its shape and the less stretchy it is.
- Water: adding water to slime helps the polymer chains slide past each other. The more polymer chain sliding happens the more flowy the “mixture is.” Less water added makes the slime more rigid and less watery (drier). The more water added, the waterier, runny and the slime is.
Before the Activity
- Purchase materials. Obtain enough syringes and mixing sticks for each group to have one plus a few extras. Purchase enough plastic containers for each group to have five plus a few extras in case of an accident. For the slime ingredients, provide enough such that each group has around 120 mL (4 oz.) of each water, slime activator and glue.
- Pour water, glue and slime activator into the 120 mL (4 oz.) containers. Prepare enough for each group to have one of each (and two empty containers). Optional: Add different food coloring to each slime to distinguish between the groups.
- Print copies of the Slime Engineering Journal (one per group).
- Read over the Slime SOP Worksheet and become familiar enough with the procedure to guide the students through it.
With the Students
- Divide students into groups (2 students per group).
- For the first iteration of this experiment, have the students make slime using the Slime SOP Worksheet provided. Show the students what to do step by step and have them follow along and make their own slime using the recipe provided—this is the “control” slime.
- Note: When making the slime using the recipe provided, make sure to describe the function of each ingredient as it is being used so that the student knows how changing each component affects the slime. This enables the students to make more informed decisions about getting the result they want when they modify the slime.
- For ease, pour some glue, slime activator, and water into three separate plastic containers as shown in Figure 1.

- Grab a syringe. Put the tip of the syringe into the water container and pull the handle on the back of the syringe all the way, up until the black seal reaches the 10 mL mark (see Figure 2). This enables the syringe to suck up the water.

- Dispense the water into a separate, empty plastic container. This will be the slime container.
- Using the same syringe put the tip of the syringe in the glue container and pull the handle on the back of the syringe to draw the glue up as shown in Figure 3. Dispense into the slime container as shown in Figure 4. Repeat this step 3 more times.
- Note: because glue is so sticky, it is going to get all over the tip of the syringe. Keep extra paper towels handy to clean off the tip of the syringe before using it again to avoid “cross contamination.”


- Use the same syringe to draw from the activator container and dispense into the slime container.
- At this point, your slime container should look like Figure 5:

- Using the wooden stick, mix the contents of the slime container thoroughly until the slime forms. When the liquid is completely gone and all that is left in the container is sticky slime, you can stop mixing (see Figure 6). It usually takes about 30 seconds of mixing for the slime to completely form.

- When the slime is fully formed, students can touch it with their hands and feel the slime. Have them make observations using their sense of touch about the slime.
- Instruct the students to use their senses of sight and touch to observe the slime and describe its properties.
- Following their observations, the students then decide in their groups how they want to improve the slime (make it “more flowy”, “more squishy”, “less wet”, etc.). Then the students decide on what tweaks they want to make their optimization happen.
- For example, if it is desired for the slime to be more “flowy” (less viscous), add more water. If it is desired for it to be more squishy and rubbery, then add more Slime Activator.
- Once they discuss the change that they want to make with their group, have the students fill out the Slime Engineering Journal provided. Read each question aloud to the class and have each group circle the desired answer. Explain that good engineers write down their plan and take good notes when doing the experiment, which is exactly what they are doing when they fill out the slime journal.
- Students then remake the slime with the changes they decide on. This is the “experimental” slime.
- Once their optimized slime is made, have the students use their senses again to make observations noting the differences between the “control” slime and the “experimental” slime.
- Have the students present their design to the class. Have them discuss how they thought they could improve the original slime, how they decided to do it, and what the outcome was. Have them pass the slime around to the class so everyone can get a chance to make their observations.
Vocabulary/Definitions
engineer: Someone who uses math and science to find solutions to problems.
observations: Words we use to describe the properties of something.
optimization: Selection of a ‘best’ element.
properties: Words we use to describe what something looks like, feels like, smells like, etc.
senses: Hearing, touch, sight, taste and smell.
SOP: Acronym for “standard operating procedure.”
Assessment
Pre-Activity Assessment
Thought Experiment: Before the activity, ask the students to come up with words to describe the best slime. What does it look like? What does it feel like? What makes it the best slime compared to other slime available?
Activity Embedded Assessment
Brainstorming: After making the control slime using the SOP provided and observing it, have the students “critique” it. Ask them to discuss in groups what they think would make the slime more enjoyable to play with. What “property” can they change using the materials they have? How are they going to change it? In groups, ask them to fill out the Slime SOP Worksheet.
Post-Activity Assessment
Final Presentation: After the activity, have each group come up to the front of the class and tell everyone what they did. Have them answer the following questions in their presentations:
- What did you think needed to be changed in the original slime and why?
- What ingredient did you choose to change to make that happen? How much more/less of that ingredient did you add?
- Did adding more/less of [ingredient] have the change you thought it would?
Making Sense: Have students reflect on the science concepts they explored and/or the science and engineering skills they used by completing the Making Sense Assessment.
Safety Issues
- While all the materials used in this lab are non-toxic and can be handled with bare hands, glue and slime activator are chemicals that are toxic when ingested, therefore, it is important to warn students not to put anything from this activity in their mouths, eyes, etc.
Troubleshooting Tips
Arm & Hammer has an online slime tutorial: https://www.armandhammer.com/articles/kid-friendly-slime.
Activity Extensions
- Now that they have more experience, have the students individually come up with a “next step” plan detailing what they would do differently next time. Have them think of other outside ingredients they could possibly use to make their ideal slime.
- At the end of the activity, have the class conduct a “blind test” to vote on which slime is best to “sell in your slime store”. Lay out each group’s slime on a table and have the students come up and play with each one and vote on their favorite one. The winning team with the best slime gets a special treat (stickers, candy, etc.).
Activity Scaling
- For lower grades, instead of each group making their own “optimized” slime from scratch, have them decide on what ingredient they want to add directly to the original mixture to change its property.
Subscribe
Get the inside scoop on all things Teach Engineering such as new site features, curriculum updates, video releases, and more by signing up for our newsletter!More Curriculum Like This

Students learn about linear programming (also called linear optimization) to solve engineering design problems. They apply this information to solve two practice engineering design problems related to optimizing materials and cost by graphing inequalities, determining coordinates and equations from ...

Students become materials engineers tasked with designing and optimizing a functional polymer-based material (i.e., slime) through systematic testing and iteration. They begin by making a control slime and collecting quantitative and qualitative data on key material properties, including stretch len...

An exploration of an engineering brief from a mock toy company leads students to explore a new slime with a unique set of characteristics. Using simple directions, students create five different types of slime and classify their slime properties against the criteria provided by the mock toy company....
Students learn about nondestructive testing, the use of the finite element method (systems of equations) and real-world impacts, and then conduct mini-activities to apply Maxwell’s equations, generate currents, create magnetic fields and solve a system of equations. They see the value of NDE and FEM...
Copyright
© 2020 by Regents of the University of Colorado; original © 2019 University of FloridaContributors
Marah MukhtarSupporting Program
Multidisciplinary Research Experiences for Teachers of Elementary Grades, Herbert Wertheim College of Engineering, University of FloridaAcknowledgements
This curriculum was based upon work supported by the National Science Foundation under RET grant no. EEC 1711543— Engineering for Biology: Multidisciplinary Research Experiences for Teachers in Elementary Grades (MRET) through the College of Engineering at the University of Florida. Any opinions, findings, and conclusions or recommendations expressed in this material are those of the authors and do not necessarily reflect the views of the National Science Foundation.
Last modified: May 13, 2022
User Comments & Tips