Quick Look
Grade Level: Middle school; also scalable for elementary and high school
Time Required: 2 hours (wild guess!)
Subject Areas: Science and Technology

Maker Challenge Recap
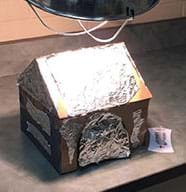
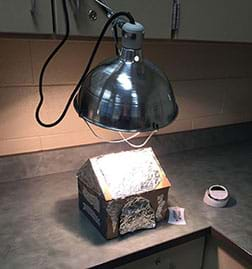
Students are given the engineering challenge to design and build doghouses that shelter a (toy) puppy from the heat—and to create them within material, size and cost constraints. This requires them to apply what they know (or research) about light energy and how it does (or does not) travel through various materials, as well as how a material’s color affects its light absorption and reflection properties. They work through the engineering design process as they build their doghouse designs and test them by taking thermometer readings under hot lamps, and then think of ways to improve their designs. This is a great project for learning about light and heat: energy transfer, absorption, insulation and material properties, and easily scales up/down for size and materials.
Maker Materials & Supplies
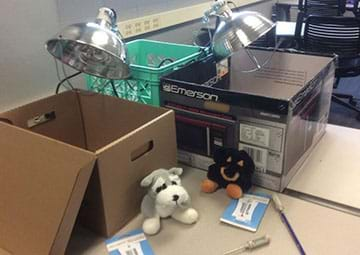
- 1 toy dog that represents the “found puppy” for the class, such as a 6 x 6-inch stuffed or plastic toy, to which students refer when designing, measuring, “buying” supplies, constructing the doghouse; note that a bigger “puppy” size increases the amount of project supplies needed
- markers, crayons, colored pencils, colored paper
- assortment of building supplies, such as Styrofoam, aluminum foil, paper, saran wrap, plastic bottles, cardboard, construction paper, straws, bubble wrap, felt squares, toilet paper rolls, foam plates and cups, foam squares, foam board, newspaper, craft sticks, mylar, etc.
- assortment of adhesives and tools, such as white glue, hot glue, tape, scissors
- light/heat sources for testing, one for each doghouse, such as a 250-watt full spectrum heat lamp that is UL approved; example bulb: https://www.ruralking.com/heat-lamp-bulb-250w-clear-2pack
- (optional) bigger boxes, into which the doghouses are placed, to help concentrate the heat
- numerous room thermometers; each doghouse test requires 2 thermometers (inside/outside doghouse)
- timer, to time 30 minutes
Worksheets and Attachments
Visit [www.teachengineering.org/makerchallenges/view/uod-1906-cool-puppy-doghouse-design-heat] to print or download.Subscribe
Get the inside scoop on all things Teach Engineering such as new site features, curriculum updates, video releases, and more by signing up for our newsletter!More Curriculum Like This

With the help of simple, teacher-led demonstration activities, students learn the basic physics of heat transfer by means of conduction, convection and radiation. They also learn about examples of heating and cooling devices, from stove tops to car radiators, that they encounter in their homes, scho...

Students learn about the nature of thermal energy, temperature and how materials store thermal energy. They discuss the difference between conduction, convection and radiation of thermal energy, and complete activities in which they investigate the difference between temperature, thermal energy and ...
Kickoff
One day after school, you went for a walk around your neighborhood and found a lost puppy! The puppy had no collar or tag, so you decided to take matters into your own hands. You rescued this lost puppy from the side of the road, but your mom is not willing to have your puppy in the house. The weather prediction is for a record-setting heat wave and you are worried about your puppy being outside in the heat, so you decide to build a doghouse to protect your puppy from the thermal energy of the sun. The Supplies4U Store is full of supplies that you can buy; now you just have to choose what materials you want to use to design and build the coolest doghouse for your puppy! From your saved allowances, you have $12 to spend. (Teacher: Adjust the amount and materials, as appropriate.) Now you must carefully spend your savings to buy materials to create this doghouse!
Constraints
- All supplies used must be purchased within your $12 budget.
- A budget tracking report must be provided prior to testing.
- The doghouse must protect the puppy from the outside heat.
- The dog must fit completely inside the doghouse.
- The doghouse temperature must stay under 32 ℃ (90 ℉) when out in the “sun” for 30 minutes.
- The dog must be able to exit doghouse for access to a water dish!
- The doghouse must be a self-supporting structure.
Background
Light energy can be absorbed or reflected. Dark surfaces and objects absorb light and convert that light to heat energy, making the temperature of that object feel warmer. Shiny surfaces and light-colored surfaces reflect light, making those objects feel cooler. White reflects all colors of light and black absorbs all colors of light. We see colors because of the light that is reflected back to our eyes. For example, an object that appears red to our eyes is reflecting red light and absorbing all the other colors of light.
Heat energy travels from places with the warmest temperature to places with the coolest temperature. Insulating materials can slow down the transfer of energy. Some materials slow down this transfer of energy because they contain trapped air. Air is a very good insulator, meaning it can slow down heat transfer. For example, double-paned glass windows are used in houses because the air gap between the panes of glass slows down heat transfer either into the house on a hot day, or out of the house on cold day. Fiberglass insulation in house walls and attics contains trapped air, which slows down the transfer of heat energy.
It is a misconception that cold air can be trapped inside a structure. Cold does not transfer; only heat transfers. The goal of our doghouses is to prevent as much heat transfer as possible in order to keep our puppy cool. By keeping the heat out, we are making the inside cooler.
Resources
- Refer to the Engineering Design Process hub on TeachEngineering to guide your students through the challenge.
- Consider showing students the 50-second YouTube video by Grizzlyndnaul, “Frying and Egg on the Sidewalk,” to emphasize the importance of building a good, thermally insulated doghouse and prompt students to consider how materials make a difference when dealing with heat: What is causing the egg to fry? From where is the heat coming? Would the egg fry like this if you put it on the grass? Or on the hood of car?
- Provide students with the Cool Puppy! Worksheet to help them organize their ideas, record testing temperatures, and reflect on their designs.
- Provide students with a budget and the Supplies4U Price List, which is a price list of materials you make available for their designs; modify the items and prices as desired.
Maker Time
- Review with the class the hypothetical situation, the found puppy (toy), available materials, constraints, procedure, steps of the engineering design process, and the budget sheet—most of which are provided on the worksheet.
- Give students/teams 30 to 45 minutes to discuss/plan and construct their doghouses.
- Place the doghouses in a testing area with one thermometer inside each doghouse, and one thermometer outside each doghouse.


- Have students record the beginning temperatures inside and outside of the doghouse.
- Set the timer to 30 minutes.
- Turn on the light/lamp and begin the timer.
- Watch the doghouses/test area carefully. If the temperature approaches the thermometer maximum, turn off the light to maintain a safe temperature for the 30 minutes.
- After 30 minutes, turn off the light.
- Have students record the temperatures inside and outside of their doghouses.
- Also have students place their hands inside and outside the doghouses to feel the temperature difference (assuming the doghouse sizes and testing area setup permits this to be done safely!).
Wrap Up
As a class, have students share, compare and reflect on their doghouse designs:
- If you were to redesign your doghouse, what changes would you make and why? (Many possible answers. Example: Make the doghouse white or add reflective materials to its outer surface.)
- Once the lamp (“sun”) was turned on, what happened to the temperature inside your doghouse and why? (Answer: Expect that the temperature inside the doghouses increases because the bulb provided heat.)
- How does a light bulb heat the house? (Answer: The light energy from the light bulb transforms to heat energy that heats the doghouse.)
Tips
- Place one thermometer inside the doghouse to gather data. Place another thermometer outside the doghouse to make sure that the doghouse is exposed to temperatures above 90 ℉.
- Ideally, use 250-watt heat lamps, one per doghouse, placed equal distances from each doghouse.
- To simulate outside temperatures greater than 32 ⁰C/90 ⁰F, place student created doghouses inside a larger cardboard box in order to concentrate the heat to the testing area.
- Be careful! The hot glue gun and light source have the potential to burn skin.
Copyright
© 2017 by Regents of the University of Colorado; original © 2016 Universities of Central State, Dayton, and Wright StateContributors
Cynthia Dickman; Brett Doudican; Raseena Jacob; Linda GillumSupporting Program
Collaborative RET Program, Universities of Central State, Dayton, and Wright State in OhioAcknowledgements
This material is based upon work supported by the National Science Foundation under grant no. EEC 1405869—a collaborative Research Experience for Teachers Program titled, “Inspiring Next Generation High-Skilled Workforce in Advanced Manufacturing and Materials,” at the University of Dayton, Central State University and Wright State University in Ohio. Any opinions, findings, and conclusions or recommendations expressed in this material are those of the authors and do not necessarily reflect the views of the National Science Foundation.
Last modified: March 21, 2023


User Comments & Tips