
Power of Water: A Water Wheel Challenge (en español)
Students design and build water wheels.
Each group needs:
- 1 wooden dowel, ¼" diameter (0.6 cm) x ~16" (40 cm) long
- 12 index cards
- thread or string, 3.5 ft. (1.2 m) length
- scissors
- paper cup
- 2-liter plastic bottle with cap
- 1 sheet blank paper
- duct tape, ~12" (30 cm) length
For the entire class to share:
- craft drill with a 3/8" drill bit
- empty 1-gallon jug
- funnel
- access to water
- large tub or access to a sink (or, if weather permits, conduct testing outdoors)
- 50 pennies, to use as weight
Civil, geotechnical, environmental, mechanical and electrical engineers collaborate to design and construct dams that generate electricity from the flow of water. When engineers design these dams, called hydroelectric power plants, they calculate the amount of power that can be generated by the plant. Knowing the dam's potential power generation, they can further estimate the maximum rural or urban region that can be supplied with electricity generated from the dam.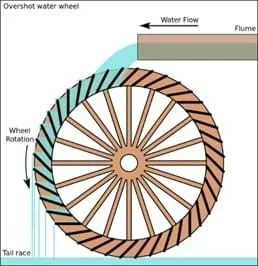 A water wheel.Copyright 2007 Daniel M. Short, Wikimedia Commons https://commons.wikimedia.org/wiki/File:Overshot_water_wheel_schematic.svg
Procedures Overview
Groups design and build water wheels, test their ability to lift weight, and then redesign them to increase the amount of weight that can be lifted.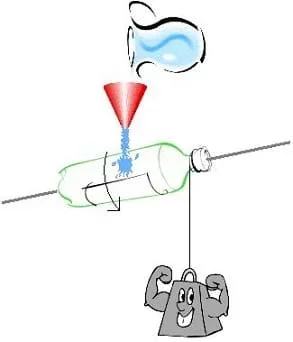 The activity setup (before fins are added).Copyright (clipart) Microsoft Corporation 1983-2001; (drawing) 2004 Chris Yakacki, ITL Program, College of Engineering, University of Colorado Boulder
Procedure
- Organize students into groups of three.
- Explain to students that the goal is to use the provided materials to build a water wheel that lifts as much weight as possible, with the only source of power from a gallon jug of water.
- Hand out a sheet of blank paper to each group. (Note: Do not pass out the rest of the supplies yet.)
- Give students five minutes to brainstorm ideas for how to build their water wheel devices; have them sketch out their designs on the paper. (Note: If students are struggling with their designs, steer them towards the basic concept behind water wheels: the force of water rotates a large wheel, which in turn creates power to do something.)
- Tell students that they need to consider how many index cards to use on their water wheels, and where to place the cards.
- Pass out materials to each group.
- The first step, for all groups, is to drill a hole in the center of the cap and the bottom of the bottle. Supervise this part. (Note: To save time, drill each bottle in advance.)
- Instruct students to thread the dowel through the bottle cap hole, through the bottle and out the bottom hole.
- Give students time to build their machines.
- In this challenge, students need their water wheel to lift weight. To perform this task, they can tie the string to a paper cup and tie that to the bottle neck so that when the bottle spins from the force of the water, the string will wrap around the bottle neck and lift the cup.
- They can test their devices as many times as they like; remind students that their index cards may not hold up between trials though.
- Make sure students pour the water over a sink, large tub or outside.
- One trial consists of pouring of one gallon of water. (Note: Use the funnel to ensure the water comes out at the same rate for each group; hold the funnel 2-3 in. above the water wheel for each group's test.)
- At the end of testing, have groups compare their designs and how much weight each was able to lift. Record the information on the classroom board so that students can compare results.
Wrap Up - Thought Questions
- Which designs worked well? Why?
- Which designs did not work well? Why not?
- What are some benefits of using a water wheel to generate energy? What are some disadvantages?
This resource was modified from Power, Work and the Waterwheel to create a shorter, more streamlined version suitable for informal learning settings.
This resource is also available in Spanish.
Copyright
2004 by Regents of the University of Colorado