Quick Look
Grade Level: Middle school
Time Required: 45 minutes
Expendable Cost: US $2.00
Group Size: 2
Subject Areas: Physical Science, Problem Solving, Reasoning and Proof, Science and Technology
Introduction
Bolded words are vocabulary and concepts to highlight with students during the activity.
The study of electromagnetism is the foundation of electrical engineering. In addition, it finds wide application in other engineering disciplines. Amazingly, electromagnets are used to make speakers! A sound is produced when a vibrating object moves the air particles around it, which in turn moves the air particles around them. A speaker takes an electrical signal and translates it into physical vibrations to create sound waves. Traditional speakers do this with an electromagnet and a permanent magnet: the electromagnet is under the influence of a constant magnetic field created by a permanent magnet. These two magnets interact with each other in the usual way: the positive end of the electromagnet is attracted to the negative pole of the permanent magnet and repelled by its positive pole. A stereo signal constantly reverses the flow of electricity, switching the north and south ends of the electromagnet. In this way, the alternating current constantly reverses the magnetic forces between the voice coil and the permanent magnet, rapidly pushing the coil back and forth. When the coil moves, it pushes and pulls on the speaker cone. This vibrates the air around the speaker and creates sound waves, which is what you hear!
Supplies
Each group needs:
- 1 ~8 oz. plastic cup or yogurt cup container (emptied and rinsed)
- 1 round magnet
- wire, coated 20 gauge, 10 ft. (3 m)
- electrical tape, 12" (30 cm)
- C-cell battery
- 3 paperclips
- sandpaper
For the class to share:
- radio/stereo with detachable speakers
Subscribe
Get the inside scoop on all things Teach Engineering such as new site features, curriculum updates, video releases, and more by signing up for our newsletter!Procedure
Procedures Overview
Student pairs build electromagnets, study their interactions with permanent magnets, and then use this knowledge to build working speakers.
Procedure
- Organize students into groups of two.
- Ask students if any of them know how and why speakers work. After some discussion, describe to them how they work (refer to the Introduction section).
- Explain to students the difference between electromagnets and permanent magnets.
- Inform groups that their challenge is to build an electromagnet and explore its properties through the creation of a speaker. Show them the available supplies.
- Hand out the supplies to the teams.
Making the Electromagnet
To make the electromagnets, have students proceed with the following steps. (Note: Work through each step with them.)
- Have students wind the wire around the C battery, leaving two inches hanging free at each end.
- Have them carefully remove the wire from the battery, preserving its coiled shape. If needed, secure it with a small piece of tape.
- Sand the enamel off of the wire on the two free ends, removing about an inch of insulation.
- Have students hold the wire so that each end of the wire touches the two ends of the battery—they now have an electromagnet.
- To understand its capabilities, instruct groups to put the electromagnet near the permanent magnet to see how it reacts.
Making and Testing a Speaker
Next, students make speakers using their electromagnets.
- Instruct students to tape the permanent magnet to the inside bottom of the yogurt container/plastic cup.
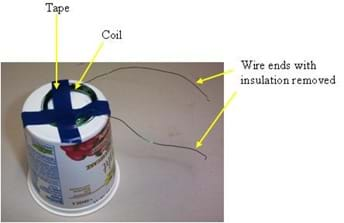
- Then, tape the electromagnet to the outside bottom of the cup (see Figure 1) so they are as close together as possible.
- Have students check that the permanent and electromagnets are secured to the cups with tape. Once confirmed, they are ready to test the speakers.
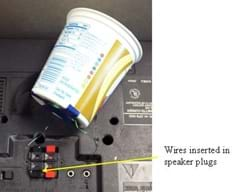
- One at a time, have groups test their speakers (see Figure 2). Attach one end of the free wires to each of the speaker wire connectors on the back of the radio. (Note: Use caution because the wires get very hot if the radio volume is turned to high for too long.)

Figure 2. The yogurt cup speaker in action after it is hooked up to the radio/stereo.
Wrap Up - Thought Questions
- Why might an engineer use an electromagnet rather than a permanent magnet?
- Would making more coils in your electromagnet change its power?
More Curriculum Like This

Students investigate the properties of magnets and how engineers use magnets in technology. Specifically, students learn about magnetic memory storage, which is the reading and writing of data information using magnets, such as in computer hard drives, zip disks and flash drives.

Students are briefly introduced to Maxwell's equations and their significance to phenomena associated with electricity and magnetism. Basic concepts such as current, electricity and field lines are covered and reinforced. Through multiple topics and activities, students see how electricity and magne...

Students induce EMF in a coil of wire using magnetic fields. Students review the cross product with respect to magnetic force and introduce magnetic flux, Faraday's law of Induction, Lenz's law, eddy currents, motional EMF and Induced EMF.

Students are introduced to the role of electricity and magnetism as they build speakers. They also explore the properties of magnets, create electromagnets, and determine the directions of magnetic fields.
Copyright
© 2013 by Regents of the University of ColoradoLast modified: May 12, 2022


User Comments & Tips