
Quick Look
Grade Level: 10 (9-11)
Time Required: 45 minutes
Expendable Cost/Group: US $2.00
Group Size: 4
Activity Dependency: None
Subject Areas: Algebra, Geometry, Measurement, Science and Technology
NGSS Performance Expectations:

| HS-ETS1-2 |
Quick Look

- Grade Level:
- 10 (9 – 11)
- Time Required:
- 45 minutes
- Group Size:
- 4
- Subject Areas:
-
Algebra Geometry Measurement Science and Technology -
NGSS Performance Expectations:
HS-ETS1-2

Summary
A box company wants its new corporate headquarters designed so it looks like boxes stacked in a spiral shape. To do this, they need to know the shape of the boxes that will form each floor and where to place the elevator shaft so that any box (or “floor”) can be reached from the ground floor. Students design and build a model of the proposed building out of spiraling ISO 216 A-series paper boxes and figure out where to place the elevator shaft in a spiraling box design.Engineering Connection
Structural or civil engineers design and plan the construction of new buildings and bridges. They also design and plan modifications and expansions of existing buildings and bridges. In the course of their work, structural engineers have to think about how to solve difficult problems introduced by an architectural vision. They need to figure out the placement of elevator shafts, support columns, and stairs. Structural or civil engineers might work with a variety of other engineers to make these design ideas come to life.
Learning Objectives
After this activity, students should be able to:
- Find where the spiraling rectangles converge.
- Explore a structural design based on spiraling paper.
Educational Standards
Each Teach Engineering lesson or activity is correlated to one or more K-12 science,
technology, engineering or math (STEM) educational standards.
All 100,000+ K-12 STEM standards covered in Teach Engineering are collected, maintained and packaged by the Achievement Standards Network (ASN),
a project of D2L (www.achievementstandards.org).
In the ASN, standards are hierarchically structured: first by source; e.g., by state; within source by type; e.g., science or mathematics;
within type by subtype, then by grade, etc.
Each Teach Engineering lesson or activity is correlated to one or more K-12 science, technology, engineering or math (STEM) educational standards.
All 100,000+ K-12 STEM standards covered in Teach Engineering are collected, maintained and packaged by the Achievement Standards Network (ASN), a project of D2L (www.achievementstandards.org).
In the ASN, standards are hierarchically structured: first by source; e.g., by state; within source by type; e.g., science or mathematics; within type by subtype, then by grade, etc.
NGSS: Next Generation Science Standards - Science
| NGSS Performance Expectation | ||
|---|---|---|
|
HS-ETS1-2. Design a solution to a complex real-world problem by breaking it down into smaller, more manageable problems that can be solved through engineering. (Grades 9 - 12) Do you agree with this alignment? |
||
| Click to view other curriculum aligned to this Performance Expectation | ||
| This activity focuses on the following Three Dimensional Learning aspects of NGSS: | ||
| Science & Engineering Practices | Disciplinary Core Ideas | Crosscutting Concepts |
| Design a solution to a complex real-world problem, based on scientific knowledge, student-generated sources of evidence, prioritized criteria, and tradeoff considerations. Alignment agreement: | Criteria may need to be broken down into simpler ones that can be approached systematically, and decisions about the priority of certain criteria over others (trade-offs) may be needed. Alignment agreement: | |
Common Core State Standards - English
-
Integrate and evaluate multiple sources of information presented in diverse formats and media (e.g., visually, quantitatively, as well as in words) in order to address a question or solve a problem.
(Grades
11 -
12)
More Details
Do you agree with this alignment?
-
Synthesize information from a range of sources (e.g., texts, experiments, simulations) into a coherent understanding of a process, phenomenon, or concept, resolving conflicting information when possible.
(Grades
11 -
12)
More Details
Do you agree with this alignment?
-
Conduct short as well as more sustained research projects to answer a question (including a self-generated question) or solve a problem; narrow or broaden the inquiry when appropriate; synthesize multiple sources on the subject, demonstrating understanding of the subject under investigation.
(Grades
11 -
12)
More Details
Do you agree with this alignment?
Common Core State Standards - Math
-
Reason abstractly and quantitatively.
(Grades
K -
12)
More Details
Do you agree with this alignment?
-
Solve real-world and mathematical problems involving area, volume and surface area of two- and three-dimensional objects composed of triangles, quadrilaterals, polygons, cubes, and right prisms.
(Grade
7)
More Details
Do you agree with this alignment?
-
Use geometric shapes, their measures, and their properties to describe objects (e.g., modeling a tree trunk or a human torso as a cylinder).
(Grades
9 -
12)
More Details
Do you agree with this alignment?
-
Use units as a way to understand problems and to guide the solution of multi-step problems; choose and interpret units consistently in formulas; choose and interpret the scale and the origin in graphs and data displays.
(Grades
9 -
12)
More Details
Do you agree with this alignment?
-
Define appropriate quantities for the purpose of descriptive modeling.
(Grades
9 -
12)
More Details
Do you agree with this alignment?
-
Choose a level of accuracy appropriate to limitations on measurement when reporting quantities.
(Grades
9 -
12)
More Details
Do you agree with this alignment?
-
Understand that the graph of an equation in two variables is the set of all its solutions plotted in the coordinate plane, often forming a curve (which could be a line).
(Grades
9 -
12)
More Details
Do you agree with this alignment?
-
Graph functions expressed symbolically and show key features of the graph, by hand in simple cases and using technology for more complicated cases.
(Grades
9 -
12)
More Details
Do you agree with this alignment?
International Technology and Engineering Educators Association - Technology
-
Students will develop an understanding of engineering design.
(Grades
K -
12)
More Details
Do you agree with this alignment?
-
Students will develop an understanding of the attributes of design.
(Grades
K -
12)
More Details
Do you agree with this alignment?
-
Evaluate the design solution using conceptual, physical, and mathematical models at various intervals of the design process in order to check for proper design and to note areas where improvements are needed.
(Grades
9 -
12)
More Details
Do you agree with this alignment?
-
Evaluate final solutions and communicate observation, processes, and results of the entire design process, using verbal, graphic, quantitative, virtual, and written means, in addition to three-dimensional models.
(Grades
9 -
12)
More Details
Do you agree with this alignment?
-
Use computers and calculators to access, retrieve, organize, process, maintain, interpret, and evaluate data and information in order to communicate.
(Grades
9 -
12)
More Details
Do you agree with this alignment?
-
Apply a broad range of design skills to their design process.
(Grades
9 -
12)
More Details
Do you agree with this alignment?
-
Use various approaches to communicate processes and procedures for using, maintaining, and assessing technological products and systems.
(Grades
9 -
12)
More Details
Do you agree with this alignment?
-
Develop a plan that incorporates knowledge from science, mathematics, and other disciplines to design or improve a technological product or system.
(Grades
9 -
12)
More Details
Do you agree with this alignment?
State Standards
Michigan - Science
-
Design a solution to a complex real-world problem by breaking it down into smaller, more manageable problems that can be solved through engineering.
(Grades
9 -
12)
More Details
Do you agree with this alignment?
Materials List
Each group needs:
- 6 sheets of thick A3 cardstock (have extra A3 cardstock on hand for mistakes and redesigns)
- masking tape
- 2 bone folders (dull-edged hand tools used to fold and crease materials, available online)
- 2 straight edges or rulers
- scissors
- pencils
- hole punch or penknife (for creating the elevator shaft)
- scratch paper for brainstorming
Worksheets and Attachments
Visit [www.teachengineering.org/activities/view/cmu-2539-paper-spiral-elevator-design] to print or download.Pre-Req Knowledge
Students should understand similar triangles and how to use their sides in a proportion. They need to know how to assign variables to geometric objects, like the length of an edge. They also need to be familiar with rational and irrational numbers. Finally, knowledge of how to find where lines and circles intersect is useful for this activity.
Introduction/Motivation
Spirals occur throughout nature in a wide variety of sizes, ranging from nautilus shells to typhoons, or even spiral-shaped galaxies! Spirals are often used in art and architectural and engineering designs. For example, structural engineers might need to take spiral geometry into account to make decisions about stability and placement of fixtures like elevators and support columns.
In this project, you will all become structural engineers and explore a structural design based on spiraling ISO 216 A-series paper boxes. A box company has come to your engineering firm and wants you to design new corporate headquarters for them out of stacked boxes in a spiral shape.
As you design and build your models, you will need to decide where on the ground floor the elevator shaft will be built so that it can reach any “floor” regardless of how many boxes are stacked. Other questions to think about will be how much material will be needed to build the structure and how high will the structure be? Let’s get started!

Procedure
Background
A spiral is a curved pattern that gradually widens (or tightens) around a center point. Spirals are found in nature, art and architecture. In nature, spirals come in a variety of sizes from nautilus shells, pine cones, and pineapples to hurricanes and typhoons and even to entire galaxies.
Sometimes structural engineers need to use spirals in their designing and planning when placing fixtures like elevators and support columns. In this project students explore a structural design based on spiraling ISO 216 A-series paper boxes. The advantage of this particular paper type is that folding a piece of this paper in half, such as A3 paper, results in two smaller halves whose sides are the same ratio, namely the square-root of two to one (that is, √(2):1 ratio). In this case, two pieces of A4 paper result from chopping a piece of A3 in half. Boxes can be made from these and these can be stacked to form a spiral building if three corners of the half-rectangle touch three sides of the larger rectangle.
The overarching question for the students of such a building is where on the ground floor should the elevator shaft be built so that it can reach any section regardless of how many boxes are stacked? Other questions for the students might be how much material is needed to build the structure and how high will the structure rise?
Here’s a short video titled “A4 Tower Project Instructions for Teachers” that demonstrates the construction process: https://youtu.be/yDVlLSGuRAU.
To place the elevator shaft, consider Figure 1 below:

Figure 1 shows a top-down and flattened view of the tower made up of 8 levels. (Note: 8 is an arbitrary number; there can be any number of levels). The lowest (and largest) level is a rectangle in a √(2):1 ratio. The elevator must be located at the pole of a logarithmic spiral through corresponding vertices of the nested higher levels. This point is located 1/3 of the way right and up from the lower left corner.
Since one way of looking at the project is stacking similar triangles, the shape that is induced is a logarithmic spiral. In other words, when one rectangle is nested in another rectangle a triangle is formed like the one with the right angle at the origin in Figure 1.
(Optional: A pre-activity assessment could be done where students create similar triangles and stack them to see what happens. As long as they see spirals then mission accomplished. It would help them understand what is happening with the nested rectangles in the project.)
What happens if the aspect ratio was improperly set on the paper? It turns out that if the fold number is the square root of the aspect ratio; then everything comes into alignment. This is exactly the case with A-series paper. Folding in half (n = 2) is the square root of the aspect ratio (r = √ (2)).
A similar thing would happen if the paper was 2 by 1 (r = 2) and you folded into quarters (n = 4). But what if the fold number “n” is not the square of the aspect ratio “r”? This is precisely the case if you fold American paper (11 x 8.5 in; 215.9 x 279.4 mm) with aspect ratio r = 11/8.5 = 22/17 in half (n = 2). In this case folding in half produces two rectangles in a different aspect ratio which is now 8.5/(11/2) = 17/11. Folding these again results in going back to r = 22/17 like the original.
Each folding causes alternation between these two aspect ratios. The resulting tower now has eight logarithmic spirals instead of four. There are two sets of four where one set of four goes through the odd numbered rectangles and the other set of four goes through the even numbered ones.
Before the Activity
Acquire A3 cardstock, rolls of masking tape, straight edges, bone folders, scissors, pencils and scratch paper.
With the Students
- Have a class discussion about why the rectangle should be in the aspect ratio √(2)/1 using similar triangles. [Answer: Since one way of looking at the project is stacking similar triangles (when one rectangle is nested in another a triangle is formed like the one with the right angle at the origin in Figure 1.), the shape that is induced is a logarithmic spiral. It is like what is happening in Figure 2.]

- Discuss how many pieces of cardstock would be needed to build the tower all the way up if A4 size is used to make the first block. [Answer: If your cardstock is A4 (or any type of A-series European paper) then each building/group need six pieces: three for the largest block (the lowest level of the tower) and three for all the rest.]
- Ask the class to estimate how high they might be able to build their tower based on A3 cardstock blocks.
- Explain why the A-series of paper is being used and why it’s a good idea. [Answer: A-series paper has the property that if you fold it in half along the long edge you get two halves that are in the exact same aspect ratio (√(2):1) as the original. If you create an image or word processing document you don’t need to alter anything except the size in order to reproduce on smaller paper. This is why the Europeans made it their standard.]
- Break students up into groups of four.
- Give each group six pieces of A3 cardstock along with straight-edges or rulers, bone folders, scissors, pencils and a roll of masking tape.
- Show them how the bone folder works. Note: A bone folder is a dull-edged hand tool used to fold and crease materials.
- Let students brainstorm and design their tower.
- Once they have a plan, have the students start to build their tower. The goal is to find where the elevator should go. (Hint for students: There is a constant angle to follow when building and stacking their towers. This is a consequence of how the boxes are arranged.) The idea is to have the vertices of the smaller rectangle touch three sides of the next large one. Since the ratio of adjacent rectangle areas is constant and they are all the same shape (aspect ratio) then corresponding triangles are all similar. Therefore, corresponding angles are all congruent. The essential part is making sure three vertices of a smaller rectangle touch three edges of the next large one in a consistent way as shown in Figure 1. The spiral is formed by connected corresponding vertices of the nested rectangles. There are four such spirals that all meet at the common pole located at (1/3, √(2)/3).

Vocabulary/Definitions
aspect ratio: Ratio of the large side of a rectangle to the short side.
geometric progression: Sequence of numbers that change by a common ratio.
polygonal spiral: Spiral formed by stacking similar shapes in a geometric progression.
similar triangles: Triangles with corresponding angles congruent and corresponding sides proportional.
spiral: Gradually widening (or tightening) curve around a central point on a flat plane or about an axis so as to form a cone.
Assessment
Pre-Activity Assessment
The nature of spirals: Have students brainstorm about the shapes being induced by the construction. Have them try and define what a spiral is and where they occur in nature. (Potential answers: plants, shells, weather, galaxies, etc.)
Activity Embedded Assessment
Assess: Have students write about what would happen if the aspect ratio was improperly set on the paper. [Answer: It turns out that if the fold number is the square of the aspect ratio then everything comes into alignment. This is exactly the case with A-series paper. Folding the paper in half (n = 2) is the square of the aspect ratio (r = √(2)). A similar thing would happen if the paper was 2 by 1 (r = 2) and you folded into quarters (n = 4).]
But what if the fold number “n” is not the square of the aspect ratio “r”? This is precisely the case if you fold American paper with aspect ratio r = 11/8.5 = 22/17 in half (n = 2). In that case folding in half produces two rectangles in a different aspect ratio which is now 8.5/(11/2) = 17/11. Folding these again results in going back to r = 22/17 like the original. Each fold causes alternation between these two aspect ratios. The resulting tower now has eight logarithmic spirals instead of four. There are two sets of four spirals where one set of four goes through the odd numbered rectangles and the other set of four spirals goes through the even numbered ones. Figure 3 shows what the tower would look like from the top down using American paper:

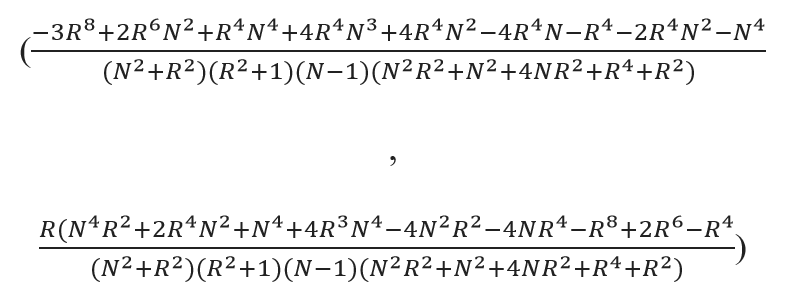
If you put in the American paper numbers N = 2 and R = 22/17 the pole is:

This isn’t too far off what it would be with A4 paper (the closest European equivalent). In other words, for American paper the pole of the spirals is 32.01% of the small side right of the lower left corner and 35.44% of the long side up from the lower left corner. In A-series paper it would be 33.33% right and 33.33% up.
Post-Activity Assessment
Understanding of spirals and simple limits: Have students complete the Tower Height, Surface Area and Volume Quiz where they need to find another spiral in the system not investigated previously.
Also, questions would be asked about the volume of the tower and/or the surface area. For example,
Q1: Assuming the first block has dimensions 1 by 1 by √(2) what is its volume and surface area?
A1: Volume = √(2)*(1)^2 = √(2) and SA = 2 + 5/2 √(2) (the bottom is not included nor is the part of the top covered by the next box)
Q2: Find the volumes for the next 5 blocks.
A2: 1/2, √(2)/8, 1/16, √(2)/64, 1/128
Q3: Is there a pattern to the progression?
A3: Geometric with a common ratio of 1/(2sqrt(2))
Q4: What about surface area?
A4: Geometric with common ratio 1/2
This questions lead into the idea of summing geometric series. The quiz proceeds off of these kinds of investigations to find limiting tower height, surface area, and volume.
Alternatively, have students write a reflection of their thoughts on these questions.
Troubleshooting Tips
Students may make mistakes while folding/cutting the cardstock. Plan to have extra cardstock on hand in case groups need more than six sheets.
Activity Extensions
It would be possible to do this project with other folds rather than folding in half. For example, if you use ⅓ of the rectangle for the fold, then you must start with paper/cardstock in the ratio √(3):1.
Activity Scaling
- For lower grades, skip the finding of the pole of the spirals analytically, just do it through brute-force empiricism with A4 paper.
- For higher grades, have the students research what logarithmic spirals are and how they are related to stacking triangles with the common point of similarity. They could find the arc length of the spirals out to the corners of the main rectangle.
Additional Multimedia Support
A short video titled “A4 Tower Project Instructions for Teachers” demonstrating the construction process: https://youtu.be/yDVlLSGuRAU
Subscribe
Get the inside scoop on all things Teach Engineering such as new site features, curriculum updates, video releases, and more by signing up for our newsletter!Copyright
© 2020 by Regents of the University of Colorado; original © 2019 Central Michigan UniversityContributors
Matthew BarcoSupporting Program
Research Experience for Teachers, College of Science & Engineering , Central Michigan UniversityAcknowledgements
This activity was developed during the Research Experience for Teachers (RET) program hosted by the College of Engineering & Technology at Central Michigan University. This is made possible through funding from the National Science Foundation.
Last modified: September 30, 2020
User Comments & Tips