Summary
Students imagine they are stranded on an island and must create the brightest light possible with the meager supplies they have on hand in order to gain the attention of a rescue airplane. In small groups, students create circuits using items in their "survival kits" to create maximum voltage, measured with a multimeter and two LED lights. To complete the activity, students act as engineers by using the given materials to create circuits that produces the highest voltage and light up the most LED lights. They apply their knowledge of how voltage differs in a series circuit and a parallel circuit to design their solutions.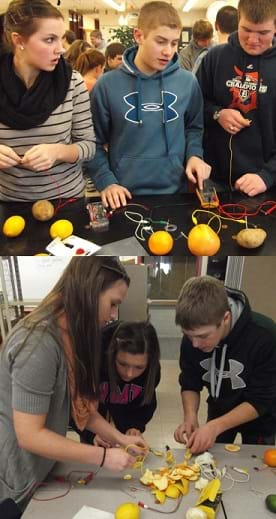
Engineering Connection
Electrical engineers apply their knowledge of electrical circuits to design solutions (such as creating lights) to defined problems (such as alerting a rescue airplane). Engineers must completely understand the difference between series and parallel circuits as well as the behavior of many other components that can be put into circuits, such as resistors, diodes and capacitors. An example of this is a cell phone, for which an electrical engineer must create a tiny circuit on a computer chip. In the chip are many components that manipulate the current in many ways to cause the phone to do certain things when the buttons are pushed. The same is true for a touch screen phone except sensors are used to detect the location you are touching. Electrical engineers also manipulate the voltage coming out of a wall (electrical) outlet so that the correct amount of voltage is released without burning up (or overheating) whatever is plugged into the socket—such as cell phone chargers. This is accomplished with a circuit and electrical components organized inside of the charger. Often, when designing new products, such as in this activity, engineers are limited by the materials available.
Learning Objectives
After this activity, students should be able to:
- Explain the difference between resistors in parallel and series to maximize voltage.
- Use engineering techniques to select materials to create a circuit that is able to light LEDs.
- Explain what a diode is and that it is one directional.
Educational Standards
Each Teach Engineering lesson or activity is correlated to one or more K-12 science,
technology, engineering or math (STEM) educational standards.
All 100,000+ K-12 STEM standards covered in Teach Engineering are collected, maintained and packaged by the Achievement Standards Network (ASN),
a project of D2L (www.achievementstandards.org).
In the ASN, standards are hierarchically structured: first by source; e.g., by state; within source by type; e.g., science or mathematics;
within type by subtype, then by grade, etc.
Each Teach Engineering lesson or activity is correlated to one or more K-12 science, technology, engineering or math (STEM) educational standards.
All 100,000+ K-12 STEM standards covered in Teach Engineering are collected, maintained and packaged by the Achievement Standards Network (ASN), a project of D2L (www.achievementstandards.org).
In the ASN, standards are hierarchically structured: first by source; e.g., by state; within source by type; e.g., science or mathematics; within type by subtype, then by grade, etc.
NGSS: Next Generation Science Standards - Science
| NGSS Performance Expectation | ||
|---|---|---|
|
HS-ETS1-2. Design a solution to a complex real-world problem by breaking it down into smaller, more manageable problems that can be solved through engineering. (Grades 9 - 12) Do you agree with this alignment? |
||
| Click to view other curriculum aligned to this Performance Expectation | ||
| This activity focuses on the following Three Dimensional Learning aspects of NGSS: | ||
| Science & Engineering Practices | Disciplinary Core Ideas | Crosscutting Concepts |
| Design a solution to a complex real-world problem, based on scientific knowledge, student-generated sources of evidence, prioritized criteria, and tradeoff considerations. Alignment agreement: | Criteria may need to be broken down into simpler ones that can be approached systematically, and decisions about the priority of certain criteria over others (trade-offs) may be needed. Alignment agreement: | |
| NGSS Performance Expectation | ||
|---|---|---|
|
HS-PS2-6. Communicate scientific and technical information about why the molecular-level structure is important in the functioning of designed materials. (Grades 9 - 12) Do you agree with this alignment? |
||
| Click to view other curriculum aligned to this Performance Expectation | ||
| This activity focuses on the following Three Dimensional Learning aspects of NGSS: | ||
| Science & Engineering Practices | Disciplinary Core Ideas | Crosscutting Concepts |
| Communicate scientific and technical information (e.g. about the process of development and the design and performance of a proposed process or system) in multiple formats (including orally, graphically, textually, and mathematically). Alignment agreement: | Attraction and repulsion between electric charges at the atomic scale explain the structure, properties, and transformations of matter, as well as the contact forces between material objects. Alignment agreement: | Investigating or designing new systems or structures requires a detailed examination of the properties of different materials, the structures of different components, and connections of components to reveal its function and/or solve a problem. Alignment agreement: |
International Technology and Engineering Educators Association - Technology
-
Students will develop an understanding of the attributes of design.
(Grades
K -
12)
More Details
Do you agree with this alignment?
-
Students will develop an understanding of engineering design.
(Grades
K -
12)
More Details
Do you agree with this alignment?
-
Students will develop an understanding of the relationships among technologies and the connections between technology and other fields of study.
(Grades
K -
12)
More Details
Do you agree with this alignment?
-
A prototype is a working model used to test a design concept by making actual observations and necessary adjustments.
(Grades
9 -
12)
More Details
Do you agree with this alignment?
-
Technological problems must be researched before they can be solved.
(Grades
9 -
12)
More Details
Do you agree with this alignment?
-
Illustrate principles, elements, and factors of design.
(Grades
9 -
12)
More Details
Do you agree with this alignment?
-
Conduct research to inform intentional inventions and innovations that address specific needs and wants.
(Grades
9 -
12)
More Details
Do you agree with this alignment?
State Standards
Michigan - Science
-
Describe a reason for a given conclusion using evidence from an investigation.
(Grades
9 -
12)
More Details
Do you agree with this alignment?
-
Discriminate between voltage, resistance, and current as they apply to an electric circuit.
(Grades
9 -
12)
More Details
Do you agree with this alignment?
-
Communicate scientific and technical information about why the molecular-level structure is important in the functioning of designed materials.
(Grades
9 -
12)
More Details
Do you agree with this alignment?
-
Design a solution to a complex real-world problem by breaking it down into smaller, more manageable problems that can be solved through engineering.
(Grades
9 -
12)
More Details
Do you agree with this alignment?
Materials List
Each group needs:
- Pre-Activity Reading and Food Circuits Worksheet, one each per student
- 2 oranges
- 2 potatoes
- 2 lemons
- 2 limes
- 2 grapefruits
- 6 Styrofoam cups (more or less depending on how many liquid options are available)
- 15-20 wires with alligator clips on both ends
- 6 LED lights (an option is to buy diodes with their positive and negative ends color coded)
- 10+ pennies
- 10+ nickels
- 10+ paper clips
- 1 foot of copper wire
- 10+ galvanized nails
- clear tape
- multimeter
- safety glasses
- assorted other wires
Note: Adding other assorted materials provides additional opportunities for experimentation.
To share with the entire class
- 5 oz. (~150 ml) of bleach
- 5 oz. (~150 ml) of 4-5 types of sodas (Coke™, Sprite™, orange, Mountain Dew™, etc.)
- 5 oz. (~150 ml) of vinegar
- extra materials that did not split evenly between groups (for example, any extra fruits or potatoes)
Worksheets and Attachments
Visit [www.teachengineering.org/activities/view/cmu_fruit_activity1] to print or download.Pre-Req Knowledge
Students should understand the difference between parallel and series circuits (see Figure 1) in regard to how to build them and the behavior of voltage though each, including:
- The parts of a series circuit are connected in succession, and total voltage of the circuit is equal to the sum of the voltage across each part of the circuit. A parallel circuit has its parts connected with two wires entering and two wires exiting each part. In a parallel circuit, the same voltage is applied to each part of the circuit.
- In a series circuit, current does not have to split among components, and thus, the current through each component in the circuit is equal. In a parallel circuit, current splits at each new component and then returns at the end of each split. The total current in a parallel circuit is equal to the sum of the current through each component of the circuit. In parallel circuit, the voltage splits among the "ladder" of resistors.
Note to teacher: In this activity, each LED acts as a resistor in the fruit circuits. Expect students to discover the following based on their fruit battery prototypes and application of the Pre-Requisite Knowledge:
- If the lights are in series, the current across each LED will be equal to the circuit's total current.
- When the LEDs are in parallel, the current is split among the pathways in the circuit, thus each light has a smaller current passing through it in a parallel circuit as opposed to a series circuit.
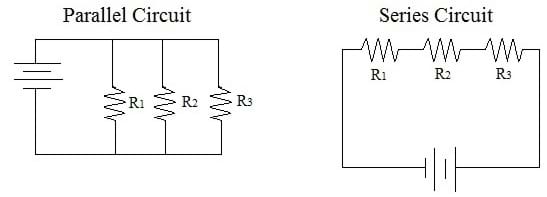
Figure 1. Schematic illustration of a parallel circuit (left) and a series circuit (right).
Introduction/Motivation
We are engineers flying back from our first international field trip and have become stranded on an island. Fortunately, we are all safe, but we wonder how we are going to get back home. Our friends and relatives will call for help when they realize our plane does not return home. So, we need to gain the attention of a rescuer who will mostly likely fly overhead. We realize that we need to make something to alert our possible rescuers of our whereabouts. We look through all the supplies that were packed for our experiments and the food and drinks that were provided for our stay and find that we have enough materials to build an electrical circuit to light as many lights as possible. Doing this will bring attention to our island location and be visible to rescuers in the sky! This is very good news for us.
As a class, we need to work together in small groups to solve this safety challenge using the engineering design process—our survival depends on it! Does anyone have any helpful hints for building the circuits? (Let students brainstorm thoughts and ideas with each other. Let them know that this is step 3 of the engineering design process: imagine possible solutions.)
Excellent brainstorming! Now, let's review what we know about batteries and electric circuits before we begin working. If you recall, batteries work by electrons that are conducted between their positive and negative metal terminals through a conductive liquid, called battery acid. Not all batteries are the same. A more powerful battery has a higher voltage. A higher voltage creates a higher current, measured in amperes (amps).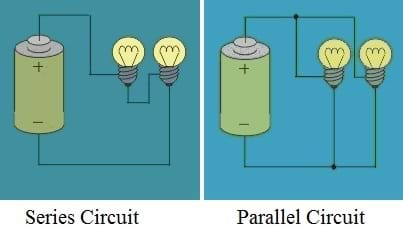
What is the difference between series and parallel circuits? (Give students some time to answer and share with the class. Show students Figure 2.) A series circuit has its parts connected in succession. In a series circuit, only one path exists for current to flow. A parallel circuit is like a ladder, and each of its components has two wires entering and two wires exiting. This creates multiple pathways for current to flow through the parallel circuit.
How do current and voltage behave in both circuit types? (Give students time to answer and share with the class.) Current flows through the only pathway, going through each circuit component, and thus the voltage is additive. This means that the total voltage of the series circuit is equal to the sum of the voltage through each component in the circuit. The voltage across each component in a parallel circuit is equal, and the total current is equal to the sum of the current through each of the components in the parallel circuit.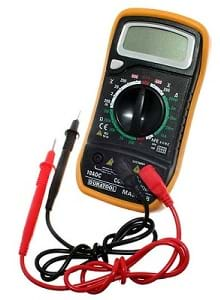
Today we will use a multimeter to test voltage. (Show students Figure 3 and tell them this is an example multimeter). When you use the multimeter, put the dial on V, indicating you wish to measure voltage. If you see V options with straight lines and squiggly lines, choose the straight line. A straight line under the V indicates direct—or DC—voltage, and a squiggly line represents alternating—or AC—voltage. Put the black lead in the COM spot, and the red lead in the V spot on the multimeter. To test the voltage, put the black lead on the negative side of your circuit and the red lead on the positive side (to remember this, think: red is hot, or positive). When you test for voltage in a circuit, test voltage in the entire circuit as well as the voltage through any given fruit or numbers of fruit.
Procedure
Background
Students construct and test circuits using various materials, including fruits, potatoes and sodas, to light the maximum number of light bulbs possible. To measure the success of each circuit constructed, students record both qualitative data (how bright the light bulbs are) and quantitative data (the voltage across the full circuit as well across each component and how many light bulbs light up).
The fruit circuits are able to light up LEDs due to the current (flow of electrons) caused by the dissolution of metal ions in the given material (fruit, potato, soda or bleach), caused when two different metals (such as a galvanized [zinc] nail and a copper penny or copper wire), acting as electrodes, are placed in that material. The material should be an electrolyte solution so that it can conduct electricity. An electrolyte solution is a solution that contains ions, charged atoms or molecules, allowing for the conduction of electricity. Electrolytes include salts, strong acids, and strong bases because they readily dissolve (ionize) in a solution, such as water.
Before the Activity
- Decide how to divide the class into groups composed of students with varying skill levels.
- Gather the materials, and portion them equally for each group.
- Make copies of The Power of Food Pre-Activity Reading and Food Circuits Worksheet, one each per student.
With the Students
- Tell teams that their challenge is to create a battery that is as powerful as possible from fruit, potatoes and assorted liquids. Give students two of each type of food and 5 cups to test different liquids.
- Pass out the worksheet, and give students time and assistance in completing the first page.
- Divide the class into groups and have them read the pre-activity reading. Direct students to refer to the reading when setting up their circuits. They must use the metal materials (pennies, nickels, paper clips and galvanized nails) to place inside the fruit, potato, soda or bleach, and then connect these metal materials in the circuit using wire and alligator clips. Have one student in each group, wearing safety glasses, handle putting the metal in the liquid items.
- Have students brainstorm ideas and write an initial strategy for their circuits. Check in with each group during this time period to ensure they are on task.
- Once each group has put together a plan, remind them that they just completed step 4 of the engineering design process: plan by selecting a promising solution.
- Give teams adequate time to use the provided materials to create and test their circuits which is step 5 of the design process.
- As they try different things, direct students to take careful notes in their engineering journals of their findings, so they can remember what worked well and what did not.
- Circulate the room to ensure students are building, or attempting to build, viable circuits. (Note: series circuits work better than parallel circuits.) Also, be sure that the students are correctly placing the orientation of negative and positive ends of the fruits (see Figure 4). If students are having difficulty with their circuits, refer to the Troubleshooting Tips section for suggestions.
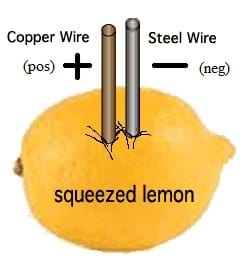
Figure 4. In a lemon battery cell, the copper wire is the positive electrode and the steel wire is the negative electrode. - After about 30 minutes, have students come together as a class and share their ideas. Have each group explain its initial strategy and the maximum voltage reached and the total number of lights lit. (Note: In tests, groups generated 1-12 volts, with 1-7 LEDs lit. It may be necessary to lower the lights in the room to see the LEDs lit at a dim level. Be aware that one LED lit brightly is equivalent to many lit very dimly; however, do not tell students this; let them get very excited about lighting more lights even at dim levels. The fact that they are still generating the same voltage as a brightly lit light is a good post-activity discussion topic.)
- Give students a new challenge: create the most voltage possible from one single food. (Note: In tests, students were able to generate 1-9 volts and could light 1-5 LEDs.)
- After about 30 minutes, have students come together as a class. Have each group explain its strategy, the maximum voltage reached and the number of lights lit.
- Ask the remainder of the questions provided in the Post-Activity Assessment section. If time permits, ask the Investigating Questions.
NOTE: With regard to size, the lime produces the greatest voltage; however, it drops in capabilities the fastest because it is the smallest. The grapefruit also produces a high voltage and lasts longer because it is larger. See the Investigating Questions for an explanation of why this is true. It is recommended that students measure the voltage across each component and the circuit as a whole.
Vocabulary/Definitions
amperes: Measurement of the amount of electrical current passing a point over a given times. Current is measured in amperes (amps).
current: The flow of electrons in a system. The system can be anything that acts as a conductor.
diode: A device that contains a negative (anode) and a positive (cathode) component. Because of the positive and negative sides, a diode only conducts current in one direction. An LED is an example of a diode that is used in this activity.
LED: An LED is a diode; therefore current can only pass through it in one direction. As the current passes through an LED in the correct direction (positive to negative), it emits visible light.
parallel circuit: A closed electrical circuit in which the current is divided into two or more paths and then returns via a common path to complete the circuit.
series circuit: A circuit having its parts connected in successive parts.
voltage: The difference in electrical potential between two points; a measurement of 10 volts means that the two points measured have a difference of electrical potential equal to 10 volts.
Assessment
Pre-Activity Assessment
Show and Tell Discussion: Ask students to write what they remember about the differences between parallel and series circuits and how that voltage behaves in each circuit example. Have students share their answers with the class.
Activity Embedded Assessment
Group Check: As groups brainstorm and develop their strategies for the activity, circulate the room to check in with each group and have students explain their ideas, plan and reasons behind their strategies.
- While students are constructing and testing their circuits, ask them what they are learning about their experiences and are finding in the different parts of the building process. What is working and not working?
Post-Activity Assessment
Worksheet: Have students complete the Food Circuits Worksheet, which includes drawing a diagram of their most successful circuit setup, as well as recording the maximum voltage measured and the maximum number of LEDs lit.
Discussion Questions: At activity end, have students share their experiences with the entire class. Students may notice that fruit creates less voltage as time goes on. Ask students:
- What did you notice about the voltage of the fruit as time passed? (Answer: It decreased.)
- Explain your answer? (Answer: Just like a battery, as the internal chemical reaction continues, the electrolytes are used up, which lowers the reaction intensity, and the voltage output.)
- What is going on inside the fruit? (Answer: The negative and positive charges are orientating themselves on opposite sides of the fruit: negative to the positive side and positive to the negative side.)
Investigating Questions
To further review the concepts in this activity and assess student understanding, ask students the following questions:
- What is the difference between a series and parallel circuit? (Answer: A series circuit has its parts connected in succession. A parallel circuit has its parts connected like a ladder. In a series circuit, current has only one path to flow through and therefore does not split. Thus, the current through each component in a series circuit is equal. The total voltage in a series circuit is equal to the sum of the voltage across each component in the circuit. In a parallel circuit, a ladder-like arrangement, current splits through the multiple pathways. Thus the sum of the current through each component is equal to the total current in the parallel circuit. Also, in a parallel circuit, the voltage across each component is equal. Each LED acts as a resistor in our fruit circuits. If the lights are in series, each LED gets the full current flow. When the LEDs are in parallel, the current is split among the different pathways, and thus each light has a smaller current as compared to each light in a series circuit.)
- What is a diode? (Answer: A diode is a device that contains a negative [anode] and a positive [cathode] component. Because of the positive and negative sides, a diode only conducts current in one direction. An LED is an example of a diode that is used in this experiment.)
Safety Issues
- Handle bleach, fruit juice and vinegar with care, so that the liquids do not get in anyone's eyes. Make sure that just one student per group puts metal objects into the liquid, and enforce the wearing of safety glasses by these students.
- The potential danger of shock exists during the activity, although the shock would be minimal due to the low voltage of the circuits.
Troubleshooting Tips
If students get a negative reading for voltage at any point in the activity, it means they have the leads backwards and simply need to switch them.
Common mistakes to be looking for if circuits are not working:
- Must be positive to negative to positive, to negative, etc. As shown in Figure 4 (and the Pre-Activity Reading), the negative end is the nail or paperclip, and the positive end is the penny or copper wire.
- The orientation of the LED (diode) can be confusing because it has both a negative and positive end. The positive end is the longer end of the diode wires. The positive and negative ends must be orientated the same way as the positive and negative terminals of every other component.
- The amount of voltage in the circuit is important; too much voltage may cause the circuit to blow the LED.
Subscribe
Get the inside scoop on all things Teach Engineering such as new site features, curriculum updates, video releases, and more by signing up for our newsletter!More Curriculum Like This

Students are introduced to several key concepts of electronic circuits. They learn about some of the physics behind circuits, the key components in a circuit and their pervasiveness in our homes and everyday lives.

Students learn that charge movement through a circuit depends on the resistance and arrangement of the circuit components. In one associated hands-on activity, students build and investigate the characteristics of series circuits. In another activity, students design and build flashlights.

Students explore the composition and practical application of parallel circuitry, compared to series circuitry. Students design and build parallel circuits and investigate their characteristics, and apply Ohm's law.
Copyright
© 2013 by Regents of the University of Colorado; original © 2012 Central Michigan UniversityContributors
Jackie Swanson; Janet YowellSupporting Program
RET Site on Multidisciplinary Engineering Research for Rural Michigan's Future, Central Michigan UniversityAcknowledgements
This curriculum was developed under National Science Foundation Research Experience for Teachers grant no. EEC 1201095. However, these contents do not necessarily represent the policies of the National Science Foundation, and you should not assume endorsement by the federal government.
Last modified: August 13, 2020


User Comments & Tips