Quick Look
Grade Level: Elementary school
Time Required: 45 minutes
Expendable Cost: US $4.50
Group Size: 3
Subject Areas: Algebra, Physical Science
Introduction
Bolded words are vocabulary and concepts to highlight with students during the activity.
What does it mean to be conductive? A conductive material is one that permits electric current, made of moving electrons, to flow through it. Not all materials can conduct electricity. Today, students discover which materials can and cannot conduct electricity. Knowing this is important because it enables engineers to design circuit boards that serve as the "brains" of the computers, toys, cars, planes and appliances that we use every day. It also helps people to be able handle electricity and electric components safely – for example wearing rubber gloves (a good insulator) to prevent electric shock.
Supplies
Each group needs:
- 1 AA battery
- 2" x 2" (5 cm x 5 cm) piece of sandpaper
- 2" x 12" (5 cm x 30 cm) strip of aluminum foil
- Will It Conduct? Worksheet
- 1 D battery
- light bulb holder with bulb
- wire cutters
- 3 6" (15 cm) pieces of wire
For the class to share (for testing solutions prepared by the instructor):
- assortment of solid test objects: nails or screws (of various metals), wooden dowel, cardboard, rubber eraser, rubber shoe sole, plastic utensil, old metal utensil, brass key, cork, copper wire, chalk, aluminum foil, graphite (from a mechanical pencil), plastic pen, feathers, Styrofoam, etc.
- 4 plastic ~12 oz. cups
- access to warm water (~24 oz.)
- 1/4 cup each of salt, sugar, baking soda
- masking tape
- 1 cup vinegar
- marker
Worksheets and Attachments
Visit [www.teachengineering.org/sprinkles/view/cub_conduct] to print or download.Subscribe
Get the inside scoop on all things TeachEngineering such as new site features, curriculum updates, video releases, and more by signing up for our newsletter!Procedure
Procedures Overview
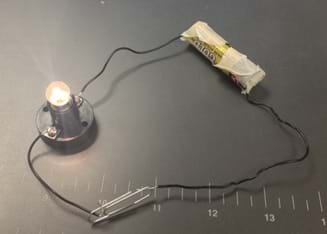
Students work in teams of three. The conductivity tester that they make is very simple, but it enables them to determine an important property of different materials—if the materials conduct electricity. Students make an incomplete circuit containing a battery and a light bulb, and try to complete the circuit using a variety of materials. The materials that complete the circuit and let current flow will make the bulb glow! A material that completes the circuit is called a conductor while a material that does not is an insulator.
Making a Conductivity Tester
While students are completing the following steps, prepare the solutions, as it works best if the ions have more time to dissolve. Fill three separate cups with warm water. Add enough salt to one cup to saturate the solution (~2 tbsp.); repeat with the sugar and the baking soda. Fill one cup with distilled vinegar. Label the cups. Expect the salt, baking soda, and vinegar solutions to conduct, since they contain ions. Expect the sugar solution not to conduct, since sugar molecules are not ions.
- Hand out the supplies and worksheets to the groups. Explain that they will be making conductivity testers.
- Have students use sandpaper to remove the insulation off the wire ends (~¾", or 2 cm from end).
- Have students use masking tape to connect a piece of wire to each terminal of the AA battery. Then have them connect one battery terminal wire to a screw on the light bulb holder.
- Instruct students to complete the circuit by touching the two free "testing" wire ends together; if the bulb lights up, the tester is ready to go!
Testing the Conductivity of Solids
- Have students put their testers aside and look at the solid materials that they are going to test; on the worksheet, have students complete numbers 1-4. Have them also pick a couple of classroom items to test.
- After groups have made their predictions, instruct students to test the conductivity of the various materials. To test conductivity, they touch the testing ends of the wire to the object. If the bulb lights up, the material is a conductor. Have them answer worksheet question 5 as they do this.
- Have students double check that their wires are touching the battery terminals. If a bulb does not light up, the material is acting as an insulator. Remind students to check their connections again; also, it helps to hold the wires tight against the terminals of the batteries while testing.
- Have students answer worksheet questions 6 and 7.
Testing the Conductivity of Solutions
- Students now modify their testers to be able to test the conductivity of solutions.
- Help students cut the wire between the battery and the light bulb in half. Again, have them sand off the insulation at these newly created ends, as instructed above.
- Instruct students to attach the D battery between the new wire ends: the AA and D batteries are now connected in series.
Note: For the next step, instruct students to only complete the circuit briefly because the high voltage from the two batteries will burn out the bulb fairly quickly.
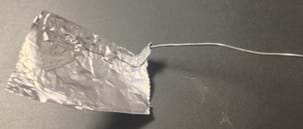
- Have students attach aluminum foil to the testing ends of the wires:

- Tear off a 2" x 2" square for each testing end and flatten it out on a desktop.
- Then, wrap the piece of foil snugly around the end of each testing wire, wrapping about half of the length of foil and letting the other half remain unfolded.
- Then, gently bend the wire that is under the foil to be sure the foil is tight against the wire.
- When done, have students touch the two pieces of foil together and see if the bulb lights up; if it does, they are ready to proceed.
- Show students the four solutions and inform them that they are solutions of salt, sugar, baking soda and vinegar. Remind them that current is caused by the movement of electrons. Have them complete worksheet questions 8 and 9.
- To test a solution's conductivity, have them stick both foil-covered ends in the solution (without letting them touch) and see if the bulb lights up. If it does not, instruct them to briefly touch the foil pieces together in the solution to double check that their wires are still properly connected to the battery.
- Have students use new pieces of foil for each solution so that they do not cross-contaminate. Or, if time is short, have each group test a different solution in front of the class.
- As they test the solutions, have students answer worksheet question 10.
Wrap Up - Thought Questions
- What properties make a solid a good conductor?
- What properties make a solution a good conductor?
- Were you surprised by any of your results?
- Why did we need two batteries to test the solutions but only one to test the solids?
More Curriculum Like This

Student groups make simple conductivity testers each using a battery and light bulb. They learn the difference between conductors and insulators of electrical energy as they test a variety of materials for their ability to conduct electricity.

Students build their own simple conductivity tester and explore whether given solid materials and solutions of liquids are good conductors of electricity.

Students gain an understanding of the difference between electrical conductors and insulators, and experience recognizing a conductor by its material properties. In a hands-on activity, students build a conductivity tester to determine whether different objects are conductors or insulators.

Students are introduced to the concept of electricity by identifying it as an unseen, but pervasive and important presence in their lives. They compare conductors and insulators based on their capabilities for electron flow. Then water and electrical systems are compared as an analogy to electrical ...
Copyright
© 2013 by Regents of the University of ColoradoLast modified: May 12, 2022


User Comments & Tips