Quick Look
Grade Level: 10 (9-11)
Time Required: 7 hours 30 minutes
(depending on class period length, expect this activity to take about seven 60-minute class periods or five 90-minute class periods)
Expendable Cost/Group: US $1.25
Group Size: 3
Activity Dependency: None
Subject Areas: Algebra, Measurement, Physics, Problem Solving, Science and Technology
NGSS Performance Expectations:

| HS-ETS1-1 |
| HS-ETS1-2 |
| HS-ETS1-3 |
Summary
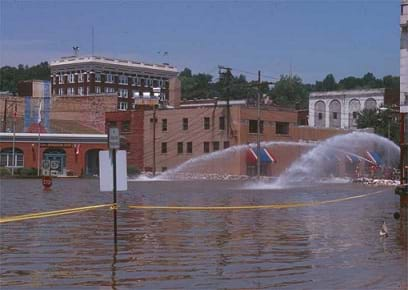
Pumps are used to get drinking water to our houses every day! And in disaster situations, pumps are essential to keep flood water out. In this hands-on activity, student groups design, build, test and improve devices to pump water as if they were engineers helping a rural village meet their drinking water supply. Students keep track of their materials costs, and calculate power and cost efficiencies of the prototype pumps. They also learn about different types of pumps, how they work and useful applications.Engineering Connection
We often take for granted the dependable supply of clean drinking water and dry homes, thanks to the hard work of civil engineering and pumps. Pumps play a major part in supplying us with drinking water and they also play a large role in mitigating floods, especially when natural disasters strike. Civil engineers must have a detailed understanding about how pumps work in order to choose the right pump for the job in drinking water plants and disaster relief. In the U.S., most pumps that supply drinking water are operated by large electrical motors, while in less-developed countries and extremely remote areas, many hardworking pumps are simple hand-operated devices.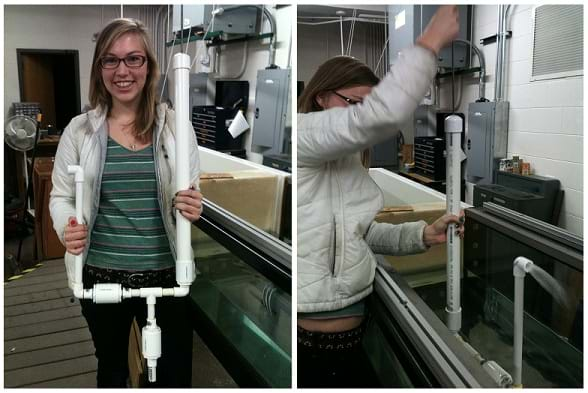
Learning Objectives
After this activity, students should be able to:
- Explain how a centrifugal pump works and how a displacement pump works.
- Calculate the power output of a pump.
- Convert lb-ft/s into watts and horsepower.
Educational Standards
Each Teach Engineering lesson or activity is correlated to one or more K-12 science,
technology, engineering or math (STEM) educational standards.
All 100,000+ K-12 STEM standards covered in Teach Engineering are collected, maintained and packaged by the Achievement Standards Network (ASN),
a project of D2L (www.achievementstandards.org).
In the ASN, standards are hierarchically structured: first by source; e.g., by state; within source by type; e.g., science or mathematics;
within type by subtype, then by grade, etc.
Each Teach Engineering lesson or activity is correlated to one or more K-12 science, technology, engineering or math (STEM) educational standards.
All 100,000+ K-12 STEM standards covered in Teach Engineering are collected, maintained and packaged by the Achievement Standards Network (ASN), a project of D2L (www.achievementstandards.org).
In the ASN, standards are hierarchically structured: first by source; e.g., by state; within source by type; e.g., science or mathematics; within type by subtype, then by grade, etc.
NGSS: Next Generation Science Standards - Science
| NGSS Performance Expectation | ||
|---|---|---|
|
HS-ETS1-1. Analyze a major global challenge to specify qualitative and quantitative criteria and constraints for solutions that account for societal needs and wants. (Grades 9 - 12) Do you agree with this alignment? |
||
| Click to view other curriculum aligned to this Performance Expectation | ||
| This activity focuses on the following Three Dimensional Learning aspects of NGSS: | ||
| Science & Engineering Practices | Disciplinary Core Ideas | Crosscutting Concepts |
| Analyze complex real-world problems by specifying criteria and constraints for successful solutions. Alignment agreement: | Criteria and constraints also include satisfying any requirements set by society, such as taking issues of risk mitigation into account, and they should be quantified to the extent possible and stated in such a way that one can tell if a given design meets them. Alignment agreement: Humanity faces major global challenges today, such as the need for supplies of clean water and food or for energy sources that minimize pollution, which can be addressed through engineering. These global challenges also may have manifestations in local communities.Alignment agreement: | New technologies can have deep impacts on society and the environment, including some that were not anticipated. Analysis of costs and benefits is a critical aspect of decisions about technology. Alignment agreement: |
| NGSS Performance Expectation | ||
|---|---|---|
|
HS-ETS1-2. Design a solution to a complex real-world problem by breaking it down into smaller, more manageable problems that can be solved through engineering. (Grades 9 - 12) Do you agree with this alignment? |
||
| Click to view other curriculum aligned to this Performance Expectation | ||
| This activity focuses on the following Three Dimensional Learning aspects of NGSS: | ||
| Science & Engineering Practices | Disciplinary Core Ideas | Crosscutting Concepts |
| Design a solution to a complex real-world problem, based on scientific knowledge, student-generated sources of evidence, prioritized criteria, and tradeoff considerations. Alignment agreement: | Criteria may need to be broken down into simpler ones that can be approached systematically, and decisions about the priority of certain criteria over others (trade-offs) may be needed. Alignment agreement: | |
| NGSS Performance Expectation | ||
|---|---|---|
|
HS-ETS1-3. Evaluate a solution to a complex real-world problem based on prioritized criteria and trade-offs that account for a range of constraints, including cost, safety, reliability, and aesthetics, as well as possible social, cultural, and environmental impacts. (Grades 9 - 12) Do you agree with this alignment? |
||
| Click to view other curriculum aligned to this Performance Expectation | ||
| This activity focuses on the following Three Dimensional Learning aspects of NGSS: | ||
| Science & Engineering Practices | Disciplinary Core Ideas | Crosscutting Concepts |
| Evaluate a solution to a complex real-world problem, based on scientific knowledge, student-generated sources of evidence, prioritized criteria, and tradeoff considerations. Alignment agreement: | When evaluating solutions it is important to take into account a range of constraints including cost, safety, reliability and aesthetics and to consider social, cultural and environmental impacts. Alignment agreement: | New technologies can have deep impacts on society and the environment, including some that were not anticipated. Analysis of costs and benefits is a critical aspect of decisions about technology. Alignment agreement: |
Common Core State Standards - Math
-
Reason abstractly and quantitatively.
(Grades
K -
12)
More Details
Do you agree with this alignment?
-
Make sense of problems and persevere in solving them.
(Grades
K -
12)
More Details
Do you agree with this alignment?
-
Solve linear equations and inequalities in one variable, including equations with coefficients represented by letters.
(Grades
9 -
12)
More Details
Do you agree with this alignment?
-
Use units as a way to understand problems and to guide the solution of multi-step problems; choose and interpret units consistently in formulas; choose and interpret the scale and the origin in graphs and data displays.
(Grades
9 -
12)
More Details
Do you agree with this alignment?
-
Reason quantitatively and use units to solve problems.
(Grades
9 -
12)
More Details
Do you agree with this alignment?
-
Rearrange formulas to highlight a quantity of interest, using the same reasoning as in solving equations.
(Grades
9 -
12)
More Details
Do you agree with this alignment?
International Technology and Engineering Educators Association - Technology
-
Students will develop an understanding of the attributes of design.
(Grades
K -
12)
More Details
Do you agree with this alignment?
-
Students will develop an understanding of engineering design.
(Grades
K -
12)
More Details
Do you agree with this alignment?
-
Students will develop an understanding of the role of troubleshooting, research and development, invention and innovation, and experimentation in problem solving.
(Grades
K -
12)
More Details
Do you agree with this alignment?
-
Students will develop abilities to apply the design process.
(Grades
K -
12)
More Details
Do you agree with this alignment?
-
The design needs to be continually checked and critiqued, and the ideas of the design must be redefined and improved.
(Grades
9 -
12)
More Details
Do you agree with this alignment?
-
A prototype is a working model used to test a design concept by making actual observations and necessary adjustments.
(Grades
9 -
12)
More Details
Do you agree with this alignment?
-
Illustrate principles, elements, and factors of design.
(Grades
9 -
12)
More Details
Do you agree with this alignment?
-
Design an appropriate technology for use in a different culture.
(Grades
9 -
12)
More Details
Do you agree with this alignment?
-
Apply a broad range of design skills to their design process.
(Grades
9 -
12)
More Details
Do you agree with this alignment?
State Standards
Colorado - Math
-
Solve linear equations and inequalities in one variable, including equations with coefficients represented by letters.
(Grades
9 -
12)
More Details
Do you agree with this alignment?
-
Choose and interpret units consistently in formulas.
(Grades
9 -
12)
More Details
Do you agree with this alignment?
-
Rearrange formulas to highlight a quantity of interest, using the same reasoning as in solving equations.
(Grades
9 -
12)
More Details
Do you agree with this alignment?
-
Reason quantitatively and use units to solve problems.
(Grades
9 -
12)
More Details
Do you agree with this alignment?
Colorado - Science
-
Use appropriate measurements, equations and graphs to gather, analyze, and interpret data on the quantity of energy in a system or an object
(Grades
9 -
12)
More Details
Do you agree with this alignment?
Materials List
Each group needs:
- duct tape (1 roll for every 4 groups)
- Budget Worksheet
- Cost Efficiency Worksheet, one per student
To share with the entire class:
- (optional, as a demo) the pumping mechanism from a hand soap dispenser (see Figure 2)
- hacksaw
- cordless drill with various sized bits
- ruler or tape measure
- stopwatch
- permanent marker
- a sink or other access to water
- 2 five-gallon buckets
- PVC pipe of various lengths and diameters; note: ¼", ½", 1 ½" and 2" schedule 80 PVC pipe form nice telescoping pairs; lengths such as 1", 6", and 1 ft are nice to work with; plan for three of each size per group
- various PVC pipe joints: elbows, Ts, and joiners matching the PVC sizes selected are useful; 3-4 per group
- various sized rubber washers. Sizes that match the PVC diameters are useful (1/4", ½", 1 ½" and 2")
- threaded rods and nuts: 1/4-20 threaded rod is a nice standard size; consider pre-cutting into 1-2 ft lengths for students; plan for up to one rod per group, with up to 6 ¼-20 nuts per group
- assorted small springs: allow for 2-3 springs per group
- scrap wood: assorted sizes and lengths
- assorted wood screws
Materials notes: These materials are available in the plumbing and hardware sections of hardware stores. Feel free to incorporate other materials as well, to encourage creative design. Many communities have re-used building supply stores, and old machinery parts or other odd parts make great additions.
Worksheets and Attachments
Visit [www.teachengineering.org/activities/view/cub_pumpit_activity1] to print or download.Pre-Req Knowledge
Students should be comfortable using their algebraic skills, including re-arranging simple multiplicative equations and performing unit conversions.
Introduction/Motivation
Have you ever seen pumps in action? Many, many types of pumps exist in our world—all designed for different purposes. Today we'll explore two different types of pumps: displacement pumps and centrifugal pumps.
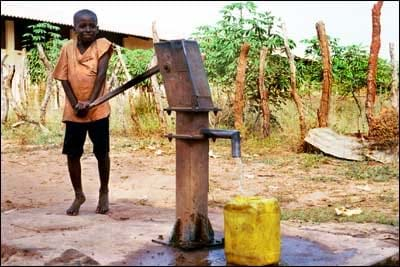
Displacement pumps push water by displacing it with something else. Look at this example (show students Figure 1) in which a small child uses a pump that displaces water using a piston to pump water out of a well.
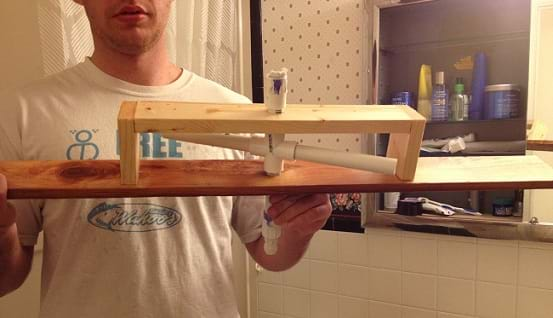
To understand how a displacement pump works, examine the pumping mechanism from a soap dispenser (show students an actual soap dispenser or Figure 2). The pump has three main parts: a one-way valve, a fluid chamber, and a plunger or piston. When the piston is pressed, it decreases the volume in the chamber. The fluid, which cannot escape back through the one-way valve, is forced to move up through the pipe. When the piston is raised again, new fluid fills the chamber through the one-way valve, and the process is repeated.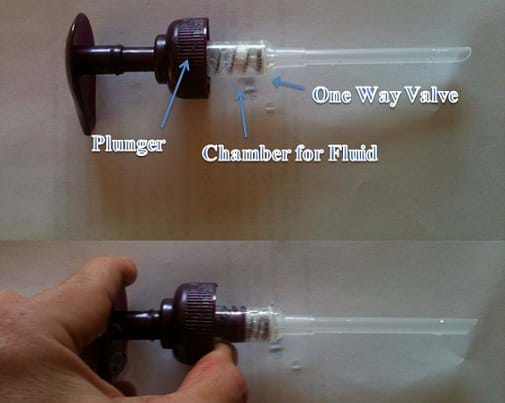
Another type of pump is a centrifugal pump. Centrifugal pumps add energy to water with the use of a spinning impeller, which is a bladed object that exerts force on a fluid. Look at this example of a centrifugal pump (show students Figure 3) in which children spinning a playground toy spins an impeller that pumps water. 
To understand how a centrifugal pump works, consider a tractor sprinkler (show students Figure 4.) Have you ever seen one of these working? The water flowing out of the sprinkler exerts a force on the nozzles, causing them to spin. An impeller pump operates on the inverse of this principle: If instead you spin the nozzles, the nozzles will exert a force on the fluid causing it to flow! (For an example of how a centrifugal pump works, show students a 28-second animation at YouTube: https://www.youtube.com/watch?v=V3aPHmZ97yM.)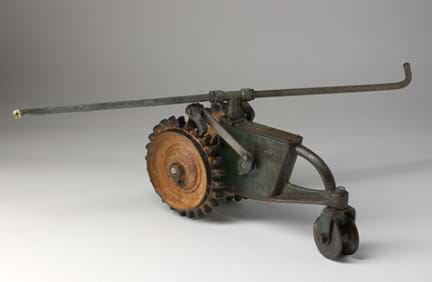
Engineers design pumps for a variety of uses, including obtaining access to drinking water and moving water from flooded areas. The two key aspects engineers must take into account when designing pumps are pump head (how high and how far the pump must pump water) and flow rate (how much water the pump is designed to move).
If engineers are designing a pump to help the people in a village in Africa get clean drinking water, they may have to design the pump to transport a small amount of water (enough for one villager using the pump) over a very long distance. In this case, the engineer designs a pump to overcome high pump head and low flow. For a different application, say if engineers need to pump water from a flood out of a town, they may need to pump a lot of water over a very short distance over a floodwall. This type of pump has low pump head and high flow.
The next thing an engineer must consider is energy efficiency. In less-developed countries, very remote areas and disaster situations, access to electrical power might be limited, so the amount of energy a pump requires must be available or easily accessible, and alternative sources of energy must be considered.
In physics, work describes a force applied over a distance. Work done over time is described as power. We can measure the power it takes to move a fluid in metric units of watts, or in English units of horsepower. To calculate the power done by moving water, we use the equation:
Where Po is the power output of the pump, γ is the unit weight of water (9.8 kN/m3 or 62.4 lbs/ft3), Q is the flow rate (in m3/s or ft3) and Hp is the pump head (in m or ft). The resulting power will be in units of kilowatts (metric) or lb–ft / s (English). In order to convert to horsepower in English units, we can multiply by:
In this activity, you are going to use the engineering design process as if you were engineers designing a pump prototype to supply a rural African village with clean drinking water. You can choose whether you want your pump to be a displacement type pump or a centrifugal pump, but either way, you must be able to pump water from a 5 gallon bucket into another bucket located on a table. Pumps will be judged on design creativity, materials cost, and power usage.
Procedure
Before the Activity
- Prepare one 5-gallon bucket with graduated marking every half-gallon to be used for measuring flow, and place it on a table. Position the other 5-gallon bucket, filled with water, on the classroom floor below the first bucket. Leave this set-up for students to test and iterate over the course of the activity.
- Make copies of the Budget Worksheet and the Cost Efficiency Worksheet.
- Gather the suggested materials. Consider providing additional materials to encourage a wider variety of creative designs. If additional materials are provided, list them and their costs on the budget sheet.
Day 1: Brainstorming and Design Planning
- As students embark on this engineering challenge, remind them of the basic steps of the engineering design process: ask: identify need and constraints, research the problem, imagine possible solutions, plan by selecting the best design to fit the circumstances and constraints, create a prototype, test and evaluate the prototype, and improve. This is a cyclical process that requires engineers to test and redesign prototype devices as often as it takes so they end up with reliable finished products. The people of an African village will depend on your pump design to supply them with clean drinking water!
- Give students time to brainstorm pump designs. While they are brainstorming, hand out the worksheets and roam the classroom inquiring about students' potential designs.
- Have each group select a favorite design from their brainstorming session. Have students sketch their chosen design, labeling dimensions and materials.
Days 2-3: Build, Test, Iterate
- Give students time to build their designs using the provided materials, keeping track of their costs.
- Encourage groups to test frequently and think critically about their designs, and rebuild as needed.
- If students need more or different supplies, encourage them to do so, remembering to update their budget worksheets.
Day 4: Final Test
- Fill a 5-gallon bucket with water (from which students will pump) and place it on the floor near a table. Place the other 5 gallon bucket with the markings on top of the table. Arrange the bucket on the table as close to directly over the bucket on the floor as possible.
- Assign one student to be the timekeeper to time each group as they test.
- Have students measure the vertical distance between the two buckets, from the top of the lower bucket to the top of the upper bucket. Record this value as HP on the worksheet.
- Measure the volume of water a group can pump in 2 minutes (120 seconds). Have the group record this volume, and the stopwatch time on the cost efficiency worksheet.
Day 5: Wrap Up Calculations
- Have students complete the cost efficiency worksheet, helping them to calculate the power and cost efficiency.
a. Power output is calculated in watts using the equation:
However, direct students to try to convert the units themselves using the attached worksheet. If necessary, go over unit conversion briefly with the class. Example: A student's pump moves 1.5 gallons a vertical distance of 3 ft in 123 seconds. The power output of the pump is:
b. The cost efficiency is calculated using the equation:
In the previous example, if the device costs $43 to build, the cost efficiency is $43/0.415 watts = $103.60 dollars per watt.
- Lead a class discussion to compare worksheet results and conclusions, as described in the Assessment section.
Day 6: Presentations
- Have groups create presentations about their pumps, describing key strengths and weaknesses of the designs.
- Pick a winner for the most creative and most cost efficient (least $/watt) pump design. Have the class celebrate these designs.
- If you wish to re-use the material components, have students disassemble the devices.
Vocabulary/Definitions
centrifugal pump: A pump that moves water through a spinning impeller.
displacement pump: A pump that moves water by pushing it out of the way with a piston or a plunger.
flow rate: The volume of water per time that a pump can move.
pump head: The amount of vertical distance a pump can move a fluid.
Assessment
Pre-Activity Assessment
Discussion Questions: Solicit, integrate and summarize student responses. Ask the students:
- In most areas of the U.S., water is pumped from water treatment plants to elevated tanks (water towers) where it stored until we turn on our faucets. How much energy do you think it takes to pump this water? How much energy do you think it takes to pump a bucket of water from the floor to a tabletop?
Tell students that in this activity, they will learn about the energy involved in pumping water as they design their own pumps. General discussion points: Students may struggle with the concept of power, but encourage them to think about their parents' energy bills. Students will most likely think of power in terms of "kilowatt hours" which is a kilowatt of power over an hour of time. An example: running a 60-watt light bulb for 2 hours uses 120 watt-hours (0.12 kwh). Filling a bucket may use as little as 0.5 watts, however, inefficient pumps could easily use much more. For example, the average American uses 176 gallons of water per day. If an average town with 100,000 people has a water tower 60 feet high, this requires (at a minimum) 138 kw over a 24 hour period each day!
Activity Embedded Assessment
Worksheet: Have students keep track of their materials expenses on the Budget Worksheet, and use guidance provided on the Cost Efficiency Worksheet to determine how much power their pumps used, and the cost efficiency of their pump designs.
Discussion Questions: As a class, compare worksheet results. Compare and discuss the different costs of the pumps. What were some of the less expensive materials that resulted in powerful pumps? What materials were not good choices? Which designs were based on centrifugal pumps or displacement pumps? Did your team work through each step of the engineering design process?
Post-Activity Assessment
Class Presentation: Have student groups present their pump designs to the rest of the class and discuss the strengths and weaknesses of the pumps. Evaluate the designs based on their creativity, materials cost, and power usage.
Safety Issues
- Avoid pumping near electrical sources. Water may damage electronics, and spilled or sprayed water could create electrical hazards.
Troubleshooting Tips
A one-way valve can easily be created using a marble and a hole slightly smaller than the marble. As flow moves one direction, it pushes the marble out of the way, but the marble seals the hole if flow moves the opposite direction, or by using a rubber washer and a spring. This prevents water from siphoning through the system from the upper bucket to the lower bucket.
Many simple pump designs can be found on YouTube.
Activity Extensions
Consider encouraging students to design their pumps using real motors. An impeller type pump might be the easiest to contextualize, but also suggest "gear pumps" as a way to move the fluid. Measure the wattage used by the motor, and compare that wattage to the power output of the pump.
Activity Scaling
- For lower grades, simplify the mathematical analysis involved with the pump creation. Instead of calculating power output, compare the time required to pump a fixed volume or take time readings at multiple set volumes (such as at ½ gallon, 1 gallon, etc.) and graph the results.
- For upper grades, have students design their pumps using real motors. Measure the wattage used by the motor, and compare that wattage to the power output of the pump.
Subscribe
Get the inside scoop on all things Teach Engineering such as new site features, curriculum updates, video releases, and more by signing up for our newsletter!More Curriculum Like This

Students learn about the fundamental concepts important to fluid power, which includes both pneumatic (gas) and hydraulic (liquid) systems.

This lesson describes how the circulatory system works, including the heart, blood vessels and blood. Students learn about the chambers and valves of the heart, the difference between veins and arteries, and the different components of blood.

Students learn how healthy human heart valves function and the different diseases that can affect heart valves. They also learn about devices and procedures that biomedical engineers have designed to help people with damaged or diseased heart valves.
Copyright
© 2013 by Regents of the University of ColoradoContributors
Michael A. Soltys, Malinda Schaefer ZarskeSupporting Program
Integrated Teaching and Learning Program, College of Engineering, University of Colorado BoulderAcknowledgements
The contents of these digital library curricula were developed by the Integrated Teaching and Learning Program under National Science Foundation GK-12 grant no. 0338326. However, these contents do not necessarily represent the policies of the National Science Foundation, and you should not assume endorsement by the federal government.
Last modified: January 8, 2021


User Comments & Tips