Summary
In this design challenge, students learn about the Vikings from an engineering point-of-view. While investigating the history and anatomy of Viking ships, they learn how engineering solutions are shaped by the surrounding environment and availability of resources. Students apply this knowledge to design, build and test their own model Viking ships.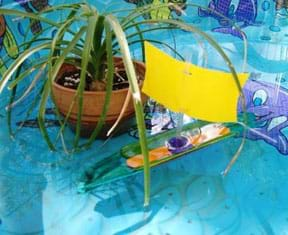
Engineering Connection
In addition to their reputation as barbaric warriors, the Vikings were clever engineers, especially at sea. This nomadic group of sailors understood how engineering solutions are shaped by the availability of resources and the surrounding environment. It is incredible that the ship design created by Vikings more than 1,000 years ago is still used today! Today, engineers gain valuable knowledge by studying designs and technologies that have been successful over time.
Learning Objectives
After this activity, students should be able to:
- Describe how engineering solutions are influenced and shaped by the surrounding environment and available resources.
- Describe the basic components of a ship and how its parts function together as a system.
- Describe their experience using the engineering design process to solve a problem.
Educational Standards
Each TeachEngineering lesson or activity is correlated to one or more K-12 science,
technology, engineering or math (STEM) educational standards.
All 100,000+ K-12 STEM standards covered in TeachEngineering are collected, maintained and packaged by the Achievement Standards Network (ASN),
a project of D2L (www.achievementstandards.org).
In the ASN, standards are hierarchically structured: first by source; e.g., by state; within source by type; e.g., science or mathematics;
within type by subtype, then by grade, etc.
Each TeachEngineering lesson or activity is correlated to one or more K-12 science, technology, engineering or math (STEM) educational standards.
All 100,000+ K-12 STEM standards covered in TeachEngineering are collected, maintained and packaged by the Achievement Standards Network (ASN), a project of D2L (www.achievementstandards.org).
In the ASN, standards are hierarchically structured: first by source; e.g., by state; within source by type; e.g., science or mathematics; within type by subtype, then by grade, etc.
NGSS: Next Generation Science Standards - Science
| NGSS Performance Expectation | ||
|---|---|---|
|
MS-ETS1-1. Define the criteria and constraints of a design problem with sufficient precision to ensure a successful solution, taking into account relevant scientific principles and potential impacts on people and the natural environment that may limit possible solutions. (Grades 6 - 8) Do you agree with this alignment? |
||
| Click to view other curriculum aligned to this Performance Expectation | ||
| This activity focuses on the following Three Dimensional Learning aspects of NGSS: | ||
| Science & Engineering Practices | Disciplinary Core Ideas | Crosscutting Concepts |
| Define a design problem that can be solved through the development of an object, tool, process or system and includes multiple criteria and constraints, including scientific knowledge that may limit possible solutions. Alignment agreement: | The more precisely a design task's criteria and constraints can be defined, the more likely it is that the designed solution will be successful. Specification of constraints includes consideration of scientific principles and other relevant knowledge that is likely to limit possible solutions. Alignment agreement: | All human activity draws on natural resources and has both short and long-term consequences, positive as well as negative, for the health of people and the natural environment. Alignment agreement: The uses of technologies and any limitations on their use are driven by individual or societal needs, desires, and values; by the findings of scientific research; and by differences in such factors as climate, natural resources, and economic conditions.Alignment agreement: |
| NGSS Performance Expectation | ||
|---|---|---|
|
MS-ETS1-2. Evaluate competing design solutions using a systematic process to determine how well they meet the criteria and constraints of the problem. (Grades 6 - 8) Do you agree with this alignment? |
||
| Click to view other curriculum aligned to this Performance Expectation | ||
| This activity focuses on the following Three Dimensional Learning aspects of NGSS: | ||
| Science & Engineering Practices | Disciplinary Core Ideas | Crosscutting Concepts |
| Evaluate competing design solutions based on jointly developed and agreed-upon design criteria. Alignment agreement: | There are systematic processes for evaluating solutions with respect to how well they meet the criteria and constraints of a problem. Alignment agreement: | |
| NGSS Performance Expectation | ||
|---|---|---|
|
MS-ETS1-4. Develop a model to generate data for iterative testing and modification of a proposed object, tool, or process such that an optimal design can be achieved. (Grades 6 - 8) Do you agree with this alignment? |
||
| Click to view other curriculum aligned to this Performance Expectation | ||
| This activity focuses on the following Three Dimensional Learning aspects of NGSS: | ||
| Science & Engineering Practices | Disciplinary Core Ideas | Crosscutting Concepts |
| Develop a model to generate data to test ideas about designed systems, including those representing inputs and outputs. Alignment agreement: | Models of all kinds are important for testing solutions. Alignment agreement: The iterative process of testing the most promising solutions and modifying what is proposed on the basis of the test results leads to greater refinement and ultimately to an optimal solution.Alignment agreement: | |
Common Core State Standards - Math
-
Summarize numerical data sets in relation to their context, such as by:
(Grade
6)
More Details
Do you agree with this alignment?
-
Reporting the number of observations.
(Grade
6)
More Details
Do you agree with this alignment?
-
Describing the nature of the attribute under investigation, including how it was measured and its units of measurement.
(Grade
6)
More Details
Do you agree with this alignment?
-
Display numerical data in plots on a number line, including dot plots, histograms, and box plots.
(Grade
6)
More Details
Do you agree with this alignment?
-
Construct and interpret scatter plots for bivariate measurement data to investigate patterns of association between two quantities. Describe patterns such as clustering, outliers, positive or negative association, linear association, and nonlinear association.
(Grade
8)
More Details
Do you agree with this alignment?
International Technology and Engineering Educators Association - Technology
-
Make two-dimensional and three-dimensional representations of the designed solution.
(Grades
6 -
8)
More Details
Do you agree with this alignment?
-
Apply the technology and engineering design process.
(Grades
6 -
8)
More Details
Do you agree with this alignment?
State Standards
Colorado - Math
-
Display numerical data in plots on a number line, including dot plots, histograms, and box plots.
(Grade
6)
More Details
Do you agree with this alignment?
Materials List
Each group needs:
- Viking Ship Anatomy Worksheet, one per person
- 1 sheet blank copy paper for drawing
- ruler (for drawing model to scale)
- pencil or pen
- 8 Popsicle sticks
- 2 drinking straws
- 1 sheet of card stock or heavy construction paper
- 2 strips of duct tape
- 1 small stick of modeling clay
- hot glue
- scissors
- markers, paint or other decorating materials
- Race Results Worksheet, one per person
- Race Course Results Sheet, one per teacher
For the entire class to share:
- Who Were the Vikings? Reading
- race course (set up a pool of water, such as a plastic backyard wading pool)
- race course obstacles, such as plants and posts
- scale, such as a triple beam balance or small electronic scale
- meter or yard stick (for measuring travel distance in the pool)
- hair dryer or fan (to simulate wind)
Worksheets and Attachments
Visit [www.teachengineering.org/activities/view/cub_viking_ship_lesson01] to print or download.Introduction/Motivation
To motivate the activity and provide some historical background about the Vikings and their ships, read the following eight paragraphs aloud to the students, or have different students read each paragraph aloud to the class [print out and cut up the attached Who Were the Vikings? Reading]. Use the questions in the reading to encourage discussion.
Who Were the Vikings?
(1) When we think of the Vikings, we might think of wild barbarians. The Vikings lived 1,000 years ago, mostly on ships that sailed across the seas of Northern Europe, waging war upon people living in nearby villages and towns. The Vikings are famous for the way they launched surprise attacks — raiding, plundering and invading the lands of their more peaceful neighbors.
(2) The Vikings were dangerous and strong, and they were very clever engineers, especially at sea! In fact, the Vikings invented a boat design that is still used today. Because the Vikings were known for stealing and plundering, it makes sense that they designed their boats for surprise attacks and battles. What features might a good surprise-attack ship have? (Gather suggestions from the students. Possible answers: Speed, maneuverability, ability to withstand attacks, ability to hide).
(3) One important engineering feature of a Viking ships was its long, lean, and narrow hull. The hull of a boat is the body. It provides the buoyancy that keeps the boat from sinking. Why do you think Viking ships were built with narrow hulls? (Listen to student ideas. Possible answers: To enable ships to move quickly and access the narrowest inland waterways.)
(4) It was important that the hulls of Viking ships be narrow so that they could turn, move quickly, and sail up small canals and waterways to launch sneaky attacks and escape other ships. Viking ships also had single sails and masts. What advantages might boats with single sails and masts have? (Answer: A single mast and sail keeps a boat lightweight, which allows it to travel fast. Also, boats with a single mast and sail can hide more easily).
(5) Ships with only one sail and mast are more lightweight, allowing them to travel quickly. Also, having a single sail and mast makes it easy to take down the sail. Thus, Viking ships could lower their sails quickly if they needed to hide! Vikings ships were best at sailing down wind. However, they often needed to sail across the water in battle or attack. Can you imagine what feature the Vikings engineered to steer their ships across the wind?
(6) Clever Vikings! They designed a rudder for the back of their ships to enable them to steer across wind. A rudder is a small oar attached to the right-hand side of the boat near the back. By adjusting the position of the rudder, the Vikings could steer their ships in the desired direction. They also used human power — rowing — to keep the ship moving when there was little or no wind, or when the wind was working against them.
(7) It is amazing that the Vikings crafted such a powerful ship 1,000 years ago — a time before there was even electricity! The Vikings understood how engineering solutions are shaped by the available resources, the environment, and the world around us. They creatively used what resources they had (wood, fabric, metal) sparingly to create simple yet strong ships.
(8) Viking ships were engineered to withstand stormy seas and surprise battles. We certainly can learn a lot about engineering by studying designs that have been successful over time!
Wow! Although the Vikings were barbaric fighters, they were remarkable engineers! In modern days, mechanical and materials engineers design, test and build ships and other watercraft. Mechanical engineers apply principles of physics to analyze, design and manufacture mechanical systems, including ships. Materials engineers study the properties of matter. By investigating the relation between the structure of materials and their properties, materials engineers select and design the best combination of materials for various kinds of boats and ships.
Our challenge today is to design, test and build our own watercraft. We will examine our environment and use only a limited amount of resources to create a (model or miniature) ship — just like the Vikings and engineers!
Procedure
Background Information
History of the Vikings: Mentioning the word "Vikings" brings to mind images of wild, barbaric sailors, ravaging their more peaceful neighbors with fire, sword and brute force. The Vikings originated in Scandinavia and are infamous for their long, swift ships with which they raided the coasts of Britain, Ireland and mainland Europe. During their peak, from 800 to 1100 AD, the Vikings swept across oceans and land to pillage, steal, destroy and colonize armies and civilians.
Often overlooked is the fact that the Vikings were more than wild barbarians. Their culture valued strong family bonds; strict community law and order; a society in which women had more freedom than other European communities of the time; a farming tradition that encouraged self-sufficiency; and a love for poetry, art, craftsmanship, and oral "sagas." And — they were also innovative engineers, especially at sea!
The Vikings were a nomadic people from an area with sparse open water and no seashore; however, this environment did not stop them from inventing a boat design that became popular throughout Europe for several centuries. The Vikings did not always have an abundance of materials to use when building or repairing their ships, so they were creative and efficient in their use of resources.
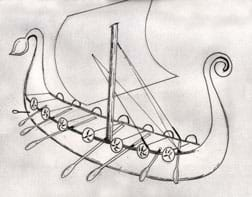
Characteristics of Viking Ships: The Vikings designed fast ships that could travel using only the power of the wind. Many Viking ships were built for raiding, plundering and battling. Their hulls were typically long, lean and flexible, which enabled the ships to invade the narrowest inland waterways. The ships were built to be as lightweight as possible so as to move swiftly. Traditionally, Viking ships were constructed with a single sail and mast. This kept the boats lightweight and reduced the amount of time required to take down the mast and sail if the need arose to hide quickly.
With their single sails and masts, Viking ships could largely sail only downwind, but evidence from ship replicas indicates that they could travel across the wind as well. Steering was accomplished by an oar-like rudder called a "styri," secured to the right-hand side of the ship near the stern. The Vikings called this side of the ship "stjornbordi," which is where the term "starboard" originated. (The left side of a boat is traditionally called the "port side"). The Vikings adjusted the rudder to move the ship along a certain course.
Most Vikings sails were rectangular in shape. Square-shaped sails were not used because they can make a ship top-heavy, and they catch wind up high in the sail, which can push the stern into the water, increasing the drag on the hull. By contrast, rectangular sails helped to make the ships highly maneuverable. Also, the matching bow and stern that characterized Viking ships allowed the ships to travel in either direction.
Engineering Design Process: Engineers follow a design, build and test loop as they apply scientific and mathematical principles to creative and practical ends such as the design, manufacture and operation of efficient and economical structures, machines, processes and systems. The steps of the engineering design process include: 1) Define the problem, 2) Come up with ideas [brainstorming], 3) Select the most promising design, 4) Analyze and plan the design, 5) Create and test the design, and 6) Evaluate and revise the design. As part of defining the problem, engineers determine the purpose and requirements of the project. And, they work within given constraints that may include materials, resources, time, funds, environmental and social impact, and other limitations.
Before the Activity
- Review the background material.
- Gather materials. Suggestion: In advance, use plastic bags to organize the materials allotted to each team, so each group is equally restricted in its resources.
- Make copies of the Viking Ship Anatomy Worksheet, Race Results Worksheet, and Race Course Results Sheet.
- Build a model Viking ship as an example for the class.
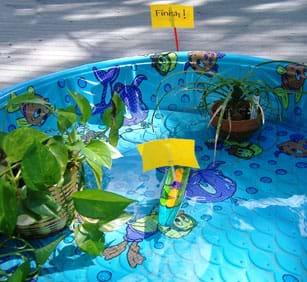
- Set up and test the race course (see Figure 1). Use a pool of water with plants or other objects placed to create inlets or serve as obstacles. Note the start and finish points on the course. Use a fan or hair dryer to simulate wind.
With the Students
- Introduce the activity to the class using text provided in the Introduction/Motivation section.
- Divide the class into groups of two students each.
- Show the students the "race course" (pool of water with obstacles) and explain that working as Viking engineers, they will design and build a Viking ship that can travel through the race course and be as lightweight as possible.
- Discuss the engineering design challenge for the activity. As a class, define the problem, including developing lists of requirements and constraints for this Viking ship design challenge (write lists on the board). The physical requirements might include making the ship watertight, sturdy, lightweight, fast, able to maneuver obstacles and shorelines, and able to travel in a straight line using wind power; as well as social impacts, such as helping to instill fear and intimidate their victims. Constraints might include environmental and resource limitations, such as being limited to the use of available materials to create ships, and planning attacks within given environmental obstacles and conditions. Show students an example of a model/miniature Viking ship.
- Pass out the Viking Ship Anatomy Worksheets. Have students complete the worksheets to become familiar with basic ship anatomy, ship component terms and the importance of a system of parts. (See instructions provided in the Assessment section.)
- Discuss the engineering design process with the students. The engineering design process is a series of steps engineers follow when they are devising a product, system, component or process to meet desired needs. In this activity, you will complete specific steps of the engineering design process (brainstorm, design, analyze, build and test) to generate a final product — your model Viking ship. (Draw the steps, with arrows, on the board, and review the process with the class.)
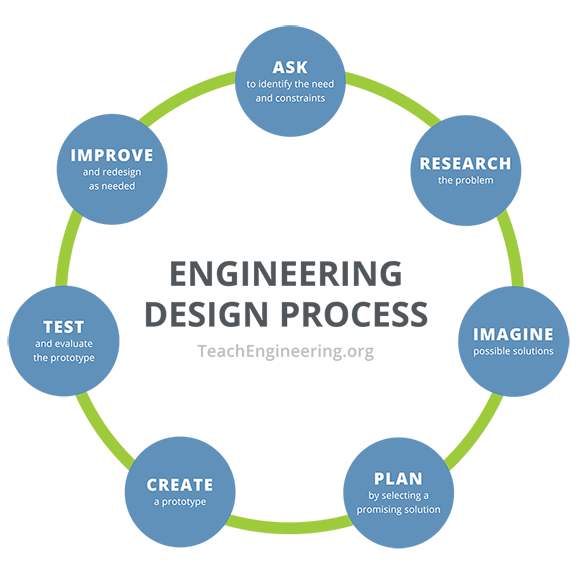
- Step 1: Working in your teams, brainstorm and create your design for a model Viking ship.
- Step 2: Once you have analyzed the design by considering all the different circumstances that might cause your ship to fail, build your ship.
- Step 3: Your final step is to test your ship to evaluate its performance. What you learn from testing determines any modifications you need to make so your ship meets the stated design requirements (as decided earlier by the class, for example, lightweight and can travel straight using wind power). If changes are needed, you'll step through the design process again, in a continuous improvement cycle.
- The Vikings did not always have an abundance of materials to use when building or repairing their ships. So, just like the Viking engineers, you must be creative and think resourcefully when designing your ship. Pass out materials. Each team receives: Popsicle sticks, straws, card stock, duct tape strips, modeling clay, hot glue, scissors and decorating materials (see Materials List for details).
- On blank paper, have students draw their Viking ship design. Direct them to label the parts of their design with the materials they will use for those parts. Have them draw their design to scale, measuring the length of the Popsicle sticks and other materials, in order to make a drawing that is one-half the size of the final model.
- Have students think about (analyze) their design and make a list of all the possible circumstances that might cause their ship to fail (for example, heavy load [weight], high winds, water leaks in the hull, etc.) What will they reinforce on their ship to make sure it can withstand these conditions?
- Once students have analyzed the design, direct them to build their ships using only the provided materials. The following tips may help:
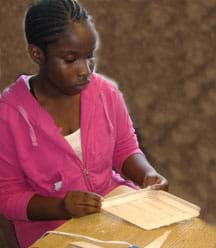
- Hull: Begin by building the long and narrow hull of the boat using Popsicle sticks and hot glue (see Figure 2). Make the bow (forward part of the hull) tall enough so that water does not wash over the top of it. And remember that Vikings matched the size and shape of the bow and stern so they could efficiently use the ships in either direction.
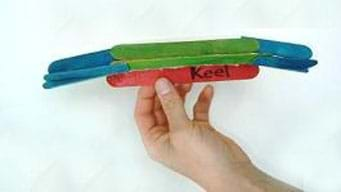
- Keel: To provide for steering, encourage students to design a keel for the underside of the hull. Keels use the forward motion of the boat to generate lift to counteract the lateral (side-to-side) force from the sails. Running down the middle of the bottom of the ship, from bow to stern, keels provide ballast to stabilize the boat. After completing the hull and keel (see Figure 3), and before proceeding, place the ship in a pool of water to make sure it stays upright.
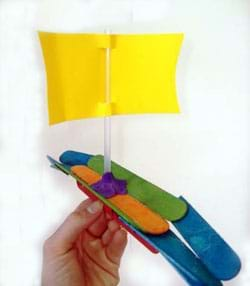
- Mast and Sail: After creating a floating hull and keel, create a single mast and sail for the ship. Attach it to the hull using modeling clay or glue (see Figure 4).
- Ballast: Once a mast and sail are in place, test the ship for uprightness before moving on. As necessary, make material adjustments or add ballast if it starts to sink once placed in water. Use small amounts of modeling clay as counterweight to stabilize the ship.
- Rudder: Once the ship is stable, use a fan or hair drier to test the natural course of the ship in the pool of water. Since most ships tend to veer off to one side, design a rudder to help steer the boat straight. Make a rudder using part of a straw or Popsicle stick. Attach the rudder to the boat hull using hot glue, duct tape or modeling clay. Once the rudder is secure, place the ship in the pool of water and use the fan or hair drier to see how the rudder affects the ship's direction. You might need to adjust the rudder several times until it works to steer the ship correctly.
- Help teams test their ships in the water as they proceed through the building process. Remind students that ships should be tested and adjusted several times before it is considered finished (sea worthy!). Guide students in removing excess material from their ships to keep them lightweight. Assist teams whose ships are not staying upright in the water (see Troubleshooting Tips).
- Once teams have had sufficient time to build and test their ships, and they are sea worthy, facilitate a race course challenge (see details in the Assessment section) in which each team races their ship (comparing weights and distance traveled) and identifies its best engineering feature.
- Have each team present their Viking ship to the class, making sure that they show and describe their design and its engineering features. Encourage students to pose questions to each other about their different designs and engineering solutions. After the presentations, have each team test their ship, one at a time (see Figure 5).
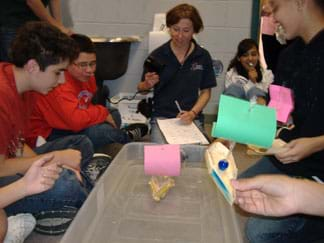
- Hand out the Race Results Worksheet. As each team steps up to race, weigh the ship (using a triple beam balance or small electronic scale) and record its mass. Have all students record the measured mass and distance traveled on their sheets. Then have the team place its ship in the water before turning on a fan or hair dryer to simulate wind conditions. Record the distance traveled by the ship using a meter stick placed alongside the course. Give each team two or three tries to race their ship, weighing it before each trial to see if has taken on any water. The winning ship is the lightest ship that traveled the greatest distance. Take note of all teams trials on the Race Course Results Sheet to be able to compare all results later.
- Review results. Lead the students in a discussion of how well the Viking ships performed based on the measurements recorded.
- Conclude the activity by holding a class discussion (see the Assessment section for details). Have each team describe the most successful engineering feature of their Viking ship. See the Investigating Questions section for additional discussion topics.
Vocabulary/Definitions
ballast: Used in sailboats to provide weight to resist the lateral forces of the sail. Ballast can be as simple as the weight of boat passengers or as technical as the insertion of high-density materials into a ship's keel or hull.
bow: The forward part of a ship or boat. The shape of bow is usually designed to reduce the resistance of the hull as it cuts through the water. It should also be tall enough to prevent water from washing over the top of it.
buoyancy: The ability to float or rise in a fluid.
drag: Sometimes called "resistance," drag is the force that resists the movement of a solid though a fluid (a liquid or gas). Drag is caused by friction and pressure forces acting to slow the motion of the object.
hull: The body of a ship or boat, which provides the buoyancy to keep the vessel from sinking.
keel: A structural member that runs centered in the middle of the bottom of a ship, from bow to stern, providing ballast to stabilize the boat.
model: (noun) A representation of something, sometimes on a smaller scale. (verb) To simulate, make or construct something to help visualize or learn about something else (such as a product, structure, process or system).
oar: A long, thin, often wooden pole with a wider, flattened blade at one end, used as a lever to move or steer a boat in water.
rudder: Vertical blade at the stern of a ship that can be turned horizontally to change the ship's direction while the boat is in motion.
sail: A piece of canvas or other fabric used to "catch" the energy of the wind in such a way as to transmit the wind's energy and propel a vessel.
stern: The rear part of a ship or boat.
Assessment
Pre-Activity Assessment
Reading and Discussion: History of the Vikings: Print a copy of the attached Who Were the Vikings? Reading. Cut apart each paragraph to create reading slips. Have eight students take turns reading each paragraph out loud to the class. Pause at each question to allow time for response and discussion. Alternatively, have the teacher read the eight paragraphs to the class.
Activity Embedded Assessment
Viking Ship Anatomy Worksheet: Show or have students complete the Viking Ship Anatomy Worksheet. Write the associated vocabulary words on the board (rudder, sail, hull, mast, drag, stern, oars, keel and bow). Have students fill in the spaces on the ship diagram with the appropriate terms. Next, cross out one term from the diagram and ask the students how the ship would perform without this component. For example, without a sail, the ship could not use the energy of the wind for propulsion. Use this activity as a way to explain that the performance of a complex system, such as a sailboat, is dependent on the proper functioning of all the system's components. Review their answers to gauge their mastery of the subject.
Race Course Challenge: Once the model ships are sea worthy, have each team present their Viking ship to the class and facilitate the competition. Before the race, ask each team to show and describe their design. Encourage students to pose questions to each other about their different designs. After the presentations, have each team test their ship, one at a time. First, weigh the ship and record its mass on the Race Results Worksheet. Second, have the team place its ship in the water before turning on a fan or hair drier to simulate wind conditions. Record the distance traveled by the ship using a meter stick place along the course. Give each team two or three tries to race their ship, weighing it before each trial to see if has taken on any water. The winning ship is the lightest ship that traveled the greatest distance.
Class Results: As a class, on the board or overhead, create a scatter plot relating mass vs. distance for the various groups. As a class, discuss what effect mass has on the distance the ship travels!
Post-Activity Assessment
Class Discussion: Once the winning ship(s) has been decided by the class using the measurements on the Race Course Results Sheet, lead a class discussion or journal writing session to wrap up the activity. Ask the students:
- How was your design shaped by the environment, the available resources, and the world around them?
- How do the different components of your ship work together to enable the ship to function as a system?
- Do you think that the engineering design process (design, build and test) is a good way to solve a real-world problem?
Investigating Questions
- Viking ships, built for raiding and plundering, were engineered to be long, lean, lightweight, and maneuverable. If you were designing a ship to be slow, steady and safe (like a casual, sightseeing sailboat), how would the engineering features of this vessel differ from those of a Viking ship? (Answer: Engineers who design ships meant for sightseeing are most concerned about the passenger safety and comfort. Features might include a wider hull to improve buoyancy, a heavier keel to provide more ballast and, because a sightseeing ship is probably not worried about being seen by others, more than one mast and sail for better control).
- How can the performance of a complex system, such as a sailboat, be affected by the functioning of its parts? (Answer: A sailboat depends on all of its components to work properly. If one component is removed, it affects the performance of the entire ship. For example, without a keel, the ship loses ballast. Without a rudder, the ship loses maneuverability). What other systems can you think of that depend on all the parts working?
- How are engineering solutions and creations shaped by the environment, available resources, and the world around us? (Answer: Engineers must always consider the environment, the available resources, and the world around them when designing anything. In the case of ship design, the environment (especially the weather and climate) influence design. A rugged, sturdy ship would be optimal for rough and stormy water, whereas a long boat with a shallow hull would be best for smooth, calm water. Engineers are also always limited by the availability of resources. They must design and create within a given budget, and sometimes they are constrained to using materials that are available nearby. We should always pay attention to the world around us when designing something. In the harsh world of the Vikings, they depended on pillaging and plundering to survive. Their pirate lifestyle dictated the way they designed their ships. Now that people sail more for fun, engineers focus on designing competitive and sporty sailboats that have different objectives and requirements.)
Safety Issues
- Advise caution in using the hot glue gun.
- Watch that floors don't get slippery with spilled water.
Troubleshooting Tips
Some students may struggle getting their ships to remain upright in the water. Tippy ships can be caused by uneven hulls or hulls that are too small and/or narrow to support the weight of the mast and sail. Also, having a sail too high up on the mast can cause the boat to tip. Help students straighten and broaden the ship's hull, or lower the sail to keep the boat upright.
If the boat stays upright while still in the water but tips or nosedives once it is subjected to wind, the problem is probably the bow (front of hull) or the sail. Have students check to see that the bow is tall enough to prevent water from washing over it. Also, look at the shape of the sail — a square sail can make a ship top-heavy, whereas a rectangular sail can still catch wind while remaining low on the mast.
Activity Extensions
Engineering Redesign: After students have designed, built, and tested their Viking ship, give them a chance to do a re-design. This might mean making modifications to their existing ship, or starting again on a new ship. Ask the students whose designs were successful to enhance their ships' best engineering features. Another extension idea is to change the race course by repositioning the obstacles. Ask the students to respond by modifying their ships (such as the rudder) to sail the new course.
Engineering Modern Boats: How are the lessons learned from successful Viking ship design applied to modern watercraft? Assign student teams different modern ships and boats to research. Class reports should describe the design objectives of that specific watercraft as well as the engineering features to meet those requirements. How have some boats been influenced by their environment and nearby resources? Require a sketch that shows the important components. Example types of watercraft: Cruise ship, racing shell (rowing boat), gondola, dinghy, coracle, kayak, raft, sail boat, speed boat, jet ski, fishing boat, hydrofoil, junk, dhow, windsurfer, surfboard, canoe, barge, catamaran, yacht.
Activity Scaling
- For younger students, pre-assemble some of the ship components (such as the hull and keel, mast and sail). Then have the students put the ships together and design one main component, such as the sail.
- For older students, relax the material constraints so students design their ships using a wider variety of supplies. Keeping some type of design constraint is still recommended. For example, impose a budget or size constraint, or a requirement that all materials must be scavenged from around the classroom.
Subscribe
Get the inside scoop on all things Teach Engineering such as new site features, curriculum updates, video releases, and more by signing up for our newsletter!References
Hadingham, Evan. The Vikings: Secrets of Norse Ships. Updated November 2000. NOVA Online. Accessed January 23, 2008. http://www.pbs.org/wgbh/nova/vikings/ships.html
Ship.Wikipedia, The Free Encyclopedia. Updated January 23, 2008. Wikimedia Foundation, Inc. Accessed January 29, 2008. http://en.wikipedia.org/w/index.php?title=Ship&oldid=186243461
Copyright
© 2007 by Regents of the University of Colorado.Contributors
Lauren Cooper; Malinda Schaefer Zarske; Denise W. CarlsonSupporting Program
Integrated Teaching and Learning Program, College of Engineering, University of Colorado BoulderAcknowledgements
The contents of these digital library curricula were developed by the Integrated Teaching and Learning Program under National Science Foundation GK-12 grant no. 0338326. However, these contents do not necessarily represent the policies of the National Science Foundation, and you should not assume endorsement by the federal government.
Last modified: March 21, 2020


User Comments & Tips