Quick Look
Grade Level: 11 (9-12)
Time Required: 1 hours 15 minutes
Expendable Cost/Group: US $0.00 This activity uses many non-expendable (reusable) items see the Materials List.
Group Size: 4
Activity Dependency: None
Subject Areas: Algebra, Measurement, Problem Solving, Reasoning and Proof, Science and Technology
Summary
Does the real-world application of science depend on mathematics? In this activity, students answer this question as they experience a real-world application of systems of equations. Given a system of linear equations that mathematically models a specific circuit—students start by solving a system of three equations for the currents. After becoming familiar with the parts of a breadboard, groups use a breadboard, resistors and jumper wires to each build the same (physical) electric circuit from the provided circuit diagram. Then they use voltmeters to measure the current flow across each resistor and calculate the current using Ohm’s law. They compare the mathematically derived current values to the measured values, and calculate the percentage difference of their results. This leads students to conclude that real-world applications of science do indeed depend on mathematics! Students make posters to communicate their results and conclusions. A pre/post-activity quiz and student worksheet are provided. Adjustable for math- or science-focused classrooms.
Engineering Connection
Are all circuits the same? When you flip a switch that controls a circuit, is it only turning it on and off? The answer to this question depends on what the circuit is designed to do. The power portion of the electric circuit simply powers machines with electric current flow, whereas an electronic circuit can interpret signals, give commands and/or perform tasks. Engineers use both circuit types in most of the sophisticated devices we depend on daily such as cell phones, computers, lamps, washers and dryers, cars and many more. This activity shows students how the myriad electronic circuits so essential in our lives can be understood as and defined as systems of equations.
Learning Objectives
After this activity, students should be able to:
- Apply the concepts of systems of equations to real-world situations.
- Explain the importance of systems of equations in engineering.
- Construct a circuit using a breadboard, resistors, voltage source and wires.
- Use a voltmeter to measure voltages in a circuit.
- Compare measured and calculated values by calculating the percentage difference.
- Explain how they are impacted by this real-world experience and its connection with mathematics.
Educational Standards
Each TeachEngineering lesson or activity is correlated to one or more K-12 science,
technology, engineering or math (STEM) educational standards.
All 100,000+ K-12 STEM standards covered in TeachEngineering are collected, maintained and packaged by the Achievement Standards Network (ASN),
a project of D2L (www.achievementstandards.org).
In the ASN, standards are hierarchically structured: first by source; e.g., by state; within source by type; e.g., science or mathematics;
within type by subtype, then by grade, etc.
Each TeachEngineering lesson or activity is correlated to one or more K-12 science, technology, engineering or math (STEM) educational standards.
All 100,000+ K-12 STEM standards covered in TeachEngineering are collected, maintained and packaged by the Achievement Standards Network (ASN), a project of D2L (www.achievementstandards.org).
In the ASN, standards are hierarchically structured: first by source; e.g., by state; within source by type; e.g., science or mathematics; within type by subtype, then by grade, etc.
NGSS: Next Generation Science Standards - Science
-
Models (e.g., physical, mathematical, computer models) can be used to simulate systems and interactions—including energy, matter, and information flows—within and between systems at different scales.
(Grades 9 - 12)
More Details
Do you agree with this alignment?
-
Use mathematical representations of phenomena to describe explanations.
(Grades 9 - 12)
More Details
Do you agree with this alignment?
-
Analyze data using tools, technologies, and/or models (e.g., computational, mathematical) in order to make valid and reliable scientific claims or determine an optimal design solution.
(Grades 9 - 12)
More Details
Do you agree with this alignment?
Common Core State Standards - Math
-
Make sense of problems and persevere in solving them.
(Grades
K -
12)
More Details
Do you agree with this alignment?
-
Reason abstractly and quantitatively.
(Grades
K -
12)
More Details
Do you agree with this alignment?
-
Model with mathematics.
(Grades
K -
12)
More Details
Do you agree with this alignment?
-
(+) Represent a system of linear equations as a single matrix equation in a vector variable.
(Grades
9 -
12)
More Details
Do you agree with this alignment?
-
Solve linear equations and inequalities in one variable, including equations with coefficients represented by letters.
(Grades
9 -
12)
More Details
Do you agree with this alignment?
-
Prove that, given a system of two equations in two variables, replacing one equation by the sum of that equation and a multiple of the other produces a system with the same solutions.
(Grades
9 -
12)
More Details
Do you agree with this alignment?
-
Solve systems of linear equations exactly and approximately (e.g., with graphs), focusing on pairs of linear equations in two variables.
(Grades
9 -
12)
More Details
Do you agree with this alignment?
-
Interpret the parameters in a linear or exponential function in terms of a context.
(Grades
9 -
12)
More Details
Do you agree with this alignment?
-
Solve systems of equations
(Grades
9 -
12)
More Details
Do you agree with this alignment?
International Technology and Engineering Educators Association - Technology
-
Students will develop an understanding of the relationships among technologies and the connections between technology and other fields of study.
(Grades
K -
12)
More Details
Do you agree with this alignment?
-
Students will develop an understanding of the role of society in the development and use of technology.
(Grades
K -
12)
More Details
Do you agree with this alignment?
State Standards
Michigan - Math
-
Model with mathematics.
(Grades
K -
12)
More Details
Do you agree with this alignment?
-
Make sense of problems and persevere in solving them.
(Grades
K -
12)
More Details
Do you agree with this alignment?
-
Reason abstractly and quantitatively.
(Grades
K -
12)
More Details
Do you agree with this alignment?
-
(+) Represent a system of linear equations as a single matrix equation in a vector variable.
(Grades
9 -
12)
More Details
Do you agree with this alignment?
-
Solve linear equations and inequalities in one variable, including equations with coefficients represented by letters.
(Grades
9 -
12)
More Details
Do you agree with this alignment?
-
Prove that, given a system of two equations in two variables, replacing one equation by the sum of that equation and a multiple of the other produces a system with the same solutions.
(Grades
9 -
12)
More Details
Do you agree with this alignment?
-
Solve systems of linear equations exactly and approximately (e.g., with graphs), focusing on pairs of linear equations in two variables.
(Grades
9 -
12)
More Details
Do you agree with this alignment?
-
Interpret the parameters in a linear or exponential function in terms of a context.
(Grades
9 -
12)
More Details
Do you agree with this alignment?
-
Solve systems of equations
(Grades
9 -
12)
More Details
Do you agree with this alignment?
Materials List
Each group needs:
- breadboard
- K2 power supply, such as this breadboard power supply module at Amazon
- 9V DC batter power cable barrel T-type connector, such as available at Amazon
- 9V battery
- 5 resistors: 52.3 kOhms, 28 kOhms, 10.5 kOhms, 12.1 kOhms, 14.7 kOhms; such as from a pack of 525 for $11 at Amazon (Elegoo 17 values 1% resistor kit assortment, 0 ohm-1M ohm)
- 3-5 wires
- voltmeter
- access to computer with Internet access, to look up vocabulary word definitions
- Electronic Circuit Worksheet, one per student
- (optional) calculator, preferably Ti-Nspire
- (optional) Breadboard Visual Aid
Worksheets and Attachments
Visit [www.teachengineering.org/activities/view/mis-1616-electronic-circuit-applications-systems-of-equations] to print or download.Pre-Req Knowledge
Students must be able to solve systems of three equations either by substitution or elimination. They also must be familiar with percentage difference. See the Procedure > Background section for instructions on these math procedures. It is recommended that the associated lesson be conducted prior to this activity.
Introduction/Motivation
Can you live without your cell phone? If not, why? (Listen to some student explanations.) Phones are one example of the many engineered devices that we depend on every day. What are some other everyday technologies that are so common that we take them for granted? (Listen to some student ideas.)
What are these technologies made of? What are their components? (Make a list of student responses, which might include components such as computer chips, switches and antennas.)
How do they work? (Expect this question to lead students to mention the different forms of energy that drive the various everyday technologies and devices, for example, cars, cell phones and calculators use gas, batteries charged by electric current and/or solar-charged batteries, respectively.)
Have you ever wondered what happens when you flip a switch to turn on a light, TV or computer? What does this action do in the device? (Listen to student explanations.) In all of these cases, the act of flipping a switch or pushing a button completes an electric circuit, which permits the current to flow and turn on the light, TV or computer.
Circuit diagrams are a pictorial way of describing circuits. Electricians and engineers draw circuit diagrams as they design the circuits. These diagrams show in detail how all the components connect together to make the circuits that drive the many technologies we use that are driven by electricity. The electronic devices you use—including PCs, TVs, stereos, phones, iPods, ovens, microwaves—have thousands of resistors in them. We will be using one of these diagrams.
In this activity, you will see that we depend on the electrical components that make operational so many of the devices and appliances that we rely on every day. You will also see how the electronic circuit can be understood as and defined as a system of equations. Let’s get started!
Procedure
Background
Note that in the associated lesson students worked with a teacher-built circuit to focus on learning the math calculations and become familiar with a real-world systems of equations problem. In this activity, student groups dig a little deeper by building their own circuits, which they test and compare to their math calculations, which gives them practice in hands-on circuit-building and measurement-taking.
As necessary, review with students the information provided below.
How to solve a system of equations by elimination: 1) eliminate one variable by the addition of two equations, 2) use a different pair of equations and eliminate the same variable, leaving a new system of two equations with two unknowns, 3) solve the system of two equations by addition or substitution, then 4) plug the results into the other equations to find all the variables. Follow the example below from Wallace (2010; see References for link to public domain textbook).

- Eliminate y: add two equations together.
![Adding two equations together to eliminate y: [3x+2y-z=-1] – [2x-2y+3z=5] = [x+2z=4]. Adding two equations together to eliminate y: [3x+2y-z=-1] – [2x-2y+3z=5] = [x+2z=4].](/content/mis_/activities/mis-1616-electronic-circuit/mis-1616-electronic-circuit-equation2.png)
- Eliminate y from another pair of equations.
![Adding two equations together to eliminate y: [-2x-2y+3z=5] + [5x+2y-z=3] = [3x+2z=8]. Adding two equations together to eliminate y: [-2x-2y+3z=5] + [5x+2y-z=3] = [3x+2z=8].](/content/mis_/activities/mis-1616-electronic-circuit/mis-1616-electronic-circuit-equation3.png)
- Solve the new system of equations.
![Solve a system of two equations for x: [3x+2z=8] – [(x+2z)=-4] = [2x=4]. Solve a system of two equations for x: [3x+2z=8] – [(x+2z)=-4] = [2x=4].](/content/mis_/activities/mis-1616-electronic-circuit/mis-1616-electronic-circuit-equation4.png)
- Plug in the results to find the remaining unknown variables.


How to solve a system of three equations by substitution: 1) solve one equation for one of the variables, 2) substitute this value into another equation and solve for another one of the variables, 3) substitute the value from the two variables solved for previously into the final equation and solve for the last remaining variable, then 4) plug in the value of the variable into the other equations.
Alternatively, students may combine the substitution and elimination methods by eliminating one variable, then using substitution to solve the remaining system of two equations.
How to calculate percentage difference: Use theoretical values from mathematical calculations and experimental values from voltmeter measurements, as in the equation below:

Before the Activity
- Make copies of the Electronic Circuit Worksheet and Breadboard Visual Aid.
- Gather and make sets of the Materials List items (breadboards, resistors, wires, etc.), enough for one set per group. See the Activity Scaling section for alternative setups.
With the Students—Introduction
- Administer the pre-activity quiz.
- Present to the class the Introduction/Motivation content.
- Then organize the class into groups of four or five students each.
- Ask the class: What are electrical circuits? How are they used? Are all circuits the same? When you flip a switch that controls a circuit, is it only turning it on or off? (Listen to student answers.) Answer: It depends on whether the switch is an electric circuit or an electronic circuit.
- Direct the groups to research and write down definitions for the vocabulary words: electric current, electrical resistance, electronic circuit, Ohm’s law and voltage.
- Lead a class discussion, starting with the definitions, guiding students to realize that an electric circuit simply powers machines with electric current, whereas, an electronic circuit can interpret signals, give commands and/or perform tasks. These circuits are in nearly all the electronic-based devices and engineered products that we depend on daily such as cell phones, computers, cars, washers and dryers and many more.
- Hand out the worksheet and read through the instructions as a class.
- Ask students to repeat what they are supposed to do. Make sure they know that the diagram on the worksheet (same as Figure 1) is the circuit that they are going to build and use. As necessary, provide further explanation or images to support any challenging concepts or clarifications your students might need.

With the Students—Part 1: The Mathematical Model of the Circuit
In their groups, students solve a system of three equations by hand (analytically) or by using a calculator such as the Ti-Nspire. On the worksheet, they are given three equations—the required values for the two given voltages, V, the five resistances, R—and asked to solve for the three unknown currents. Oversee groups as they complete the following steps:
- Have students rewrite each equation with the correct values for the voltages and resistances.
- Tell students to solve the system to determine the values for I1, I2 and I3.
- Direct students to move on to construct the physical circuit (Part 2).
With the Students—Part 2: Building/Measuring the Physical Circuit
Groups each build the physical circuit according to the provided circuit diagram and then measure voltages across the resistors. They compare their mathematically derived data to their measured data.
- Hand out (or have groups gather) the circuit-building materials.
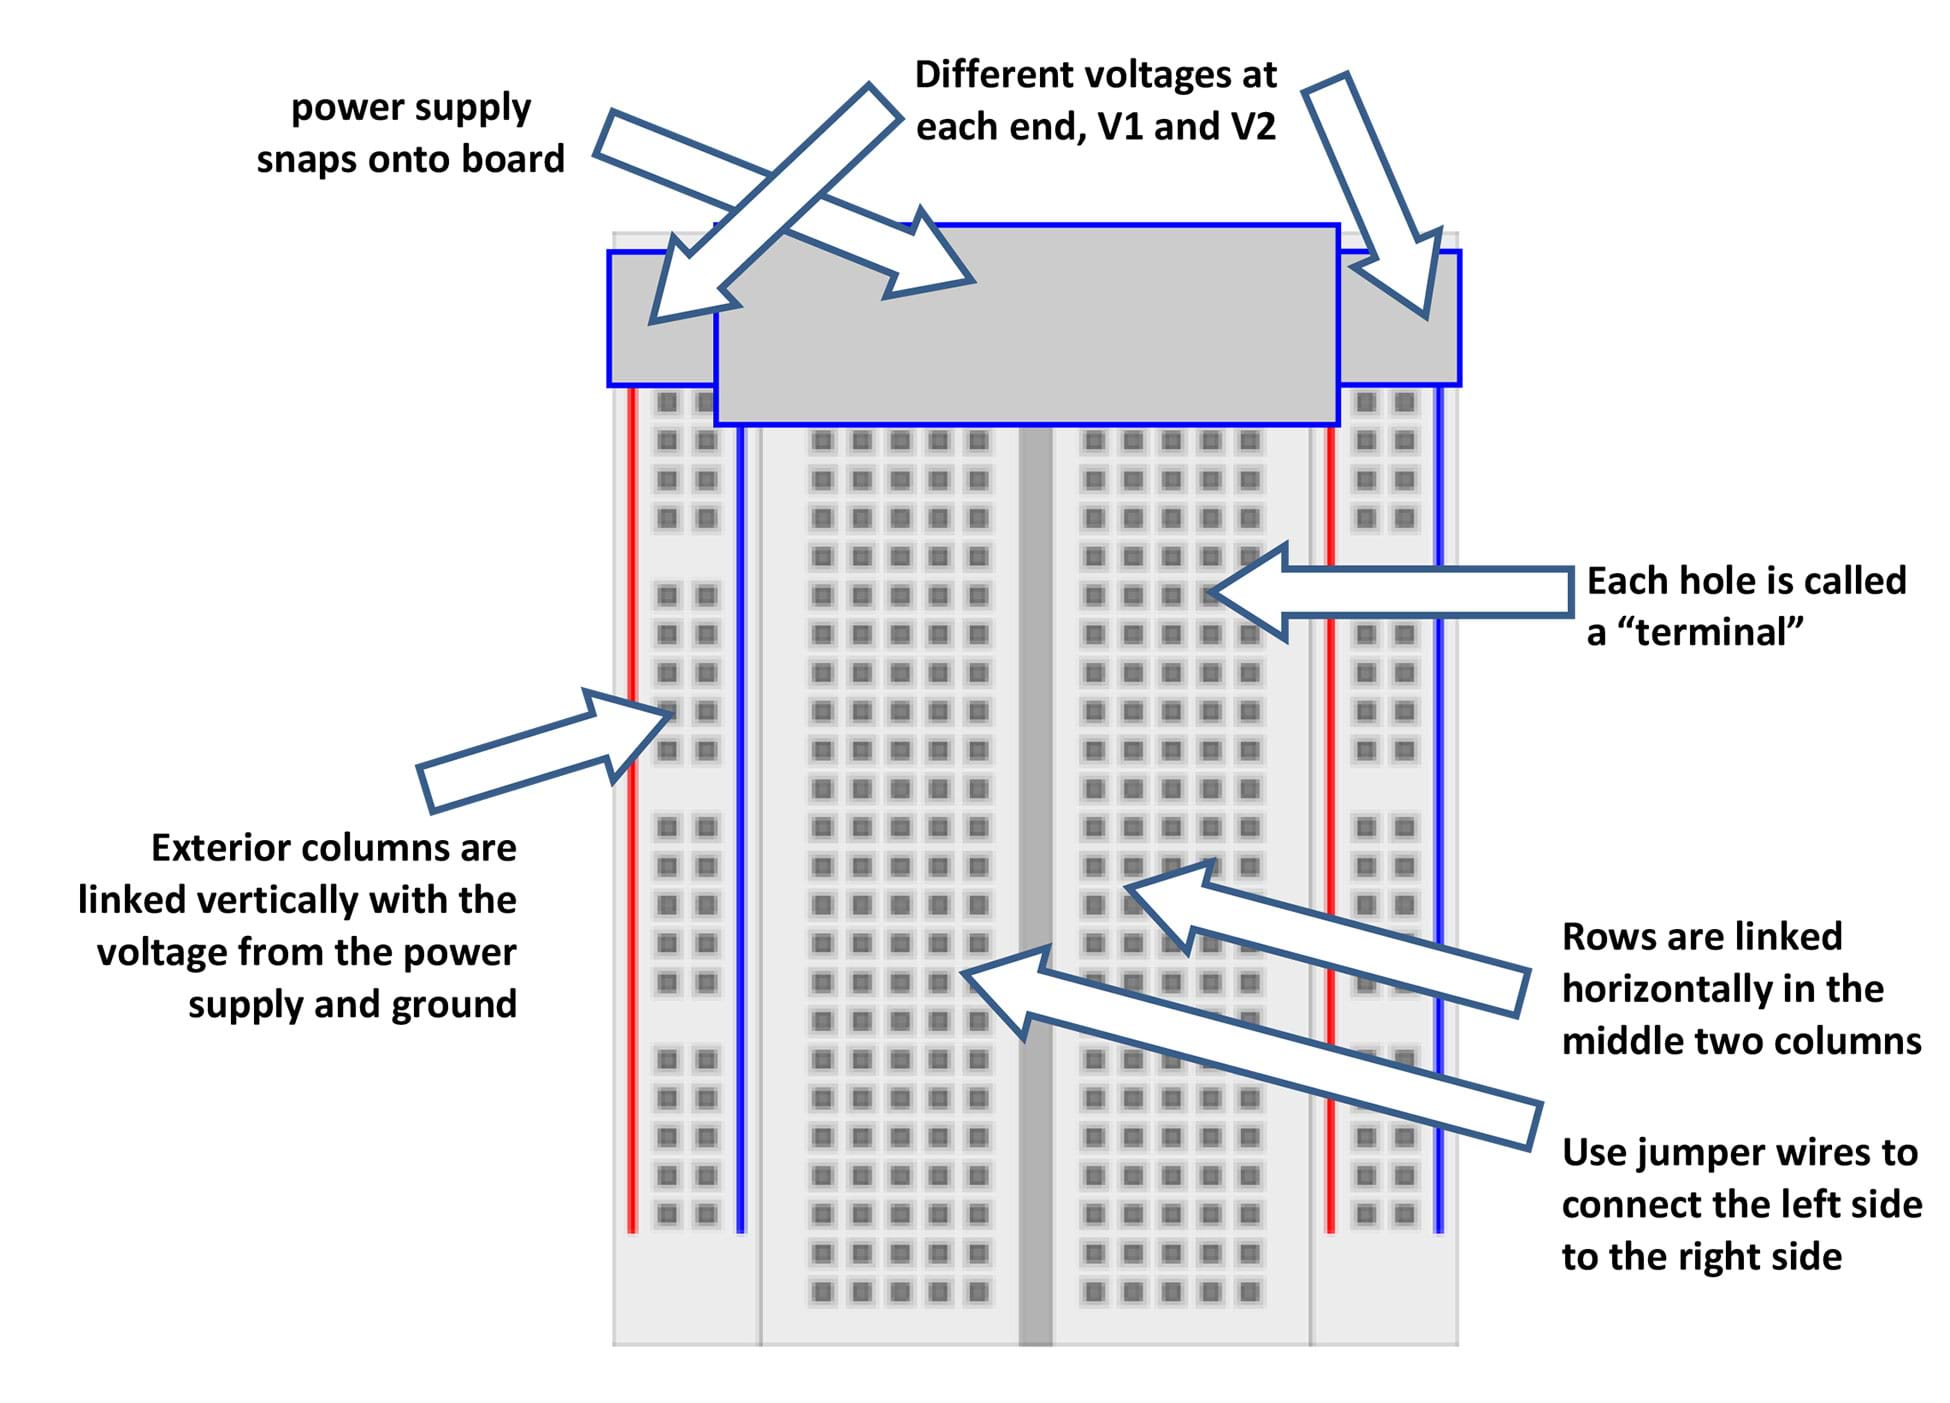
- Inform students that the (Figure 1) circuit diagram shown on their worksheets can be physically created using a breadboard, resistors and some jumper wires. The jumper wires hop over the gap that runs between the exterior and interior columns and the gap down the middle of the breadboard, and connects the respective columns.
- Breadboard Orientation: Familiarize students with the circuit-building materials. If necessary, hand out the visual aid (same as Figure 2). Explain how each breadboard column and row are linked, as follows:
- Each hole is called a terminal.
- The exterior columns are linked both horizontally and vertically with the voltage located at the top of each column.
- Rows are linked horizontally in the middle two columns. You must use a jumper wire to connect a left-side row to a right-side row, over any of the gaps.
- When we add resistors and create a continuous circuit (a loop), we create a current.

- Circuit-Building Instructions: Encourage students to examine the resistors and wires to see what they look like. Then refer to the circuit diagram/schematic and help groups put together the circuit with as much (or little) guidance as they require. Suggest that they start with the left side of the schematic and follow these steps:
- First, locate each resistor by its ohms value and order them 1-5.
- Add resistor R1. Insert one end of the resistor into any terminal in the exterior column for the first voltage source on the left side. Then, pick a row, staying the same horizontally, in the middle columns and insert the other end into a terminal.
- Then continue with R3. Add one end of this resistor in the same row as the previous resistor into a terminal and then insert the other end into a terminal in the same row but in the column to the right of the gap. This connects the two sides of the middle two columns.
- Next, add R5, similar to how we connected R1. Add one end of this resistor to a terminal to the right of R3 and the other to the right exterior column, connecting it to the second voltage source.
- Now add the remaining two resistors R2 and R4. One end of each of these must be inserted into the same row as the other three resistors, with the remaining ends inserted into rows several spaces below. Place R4 on the right side of the middle gap and R2 to the left.
- Finally, use the jumper wire to make the circuit continuous. From a new row below, insert one end of a jumper wire into the voltage terminal in the right exterior column. Do the same for the left side. Then add one to connect the right and left side of the middle columns over the gap.
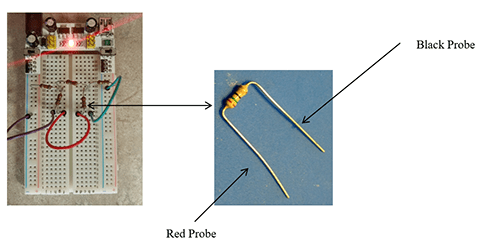
- Tip: If students struggle, refer them to Photos 1 and 2 on their worksheets (same as Figure 3) and have them build what they see. Walk around and make sure that the circuits are correct.

- After the circuits are built, direct students to continue on, guided by the worksheet’s explicit instructions.
- Next, groups use voltmeters to measure voltages, V1, V2 and V3 across the resistors R1, R2 and R3 and calculate the current using the Ohm’s law. As explained on the worksheet, they follow these steps:
- Transform Ohm’s equation and solve for I.
- Next, measure the voltage across each resistor and use it to calculate the current. Tip: It is important to use the voltage meter the same way every time. So, advise students to orient the resistor so that “it faces you” as in Photo 2 on the worksheet (same as Figure 3).
- Once the circuit is ready, with the power on, place the red probe on the left side and the black probe on the right—and then take the reading. Do this the same way for R1, R2 and R3.
- Use the values given for R1, R2 and R3 and the value just measured for V1, V2 and V3 and calculate the currents I1, I2, and I3.
With the Students—Part 3: Comparing Results
- The final activity step is to compare the current values from Part 1 to Part 2 and calculate the percentage difference in their results.
- To conclude, assign students to reflect on what they learned and create posters of their results. Then administer the post-activity quiz.
Vocabulary/Definitions
electric current: A flow of electric charge. The rate at which charge flows past a given point in an electric circuit. Measured in amperes.
electrical resistance: A measurement of the difficulty encountered by a power source in forcing electric current through an electrical circuit, and hence the amount of power dissipated in the circuit. Measured in ohms.
electronic circuit: A composition of individual electronic components, such as resistors, transistors, capacitors, inductors and diodes, connected by conductive wires or traces through which electric current can flow. Electronic circuits perform various simple and complex operations such as interpret/amplify a signal, make a computation, move data, give a command and/or perform a task.
Ohm’s law: The current through a conductor between two points is directly proportional to the voltage across the two points.
voltage: A quantitative expression of the force pushing current between two points in an electric circuit. Also called electromotive force. Measured in volts.
Assessment
Pre-Activity Assessment
Pre-Activity Quiz: Administer the two-question Applications of Systems Pre/Post-Quiz. Review students’ answers to gauge their baseline ability to solve systems of equations.
Activity Embedded Assessment
Queries: As students are completing the Procedure Parts 1-3 in their teams, walk around and ask questions to gauge their understanding of the mathematical, build, measurement and analysis work. Examine their completed Electronic Circuit Worksheets to assess their depth of understanding.
Post-Activity Assessment
Final Poster Project: Have students, in teams or individually, each create a poster of their results. The poster content reveals the depth and accuracy of their comprehension.
Post-Activity Quiz: Administer the Applications of Systems Pre/Post-Quiz again. Compare students’ pre and post scores to assess their learning gains.
Safety Issues
The resistors are sharp so alert students to be careful when handling them.
Activity Scaling
This activity can be scaled up or down, as well as adjusted for math- or science-focused classrooms.
- For lower grades, provide more teacher guidance, such as by building one circuit in advance that is used as a teacher demonstration instead of each group constructing its own circuit.
- For lower grades in which each group makes its own circuit, lead an entire-class group building process.
- Increase the challenge by providing very little teacher support as groups independently build the circuit; let teams discover how to do it themselves as the instructor walks around the classroom to observe and assist only as necessary.
- Make the activity more challenging by increasing the number of resistors and the number of equations used. Find equations in most high school physics books or at the Physics Classroom website.
- To adjust for a science class, make sure that circuits have already been discussed and then have students build the circuit independently when given the Figure 1 schematic/worksheet.
Subscribe
Get the inside scoop on all things TeachEngineering such as new site features, curriculum updates, video releases, and more by signing up for our newsletter!More Curriculum Like This

Students learn about nondestructive testing, the use of the finite element method (systems of equations) and real-world impacts, and then conduct mini-activities to apply Maxwell’s equations, generate currents, create magnetic fields and solve a system of equations. They see the value of NDE and FEM...

Students are introduced to several key concepts of electronic circuits. They learn about some of the physics behind circuits, the key components in a circuit and their pervasiveness in our homes and everyday lives.

Students learn that charge movement through a circuit depends on the resistance and arrangement of the circuit components. In one associated hands-on activity, students build and investigate the characteristics of series circuits. In another activity, students design and build flashlights.
References
Circuit Symbols and Circuit Diagrams. July 2016. Lesson 4, Circuit Connections, Current Electricity, The Physics Classroom. http://www.physicsclassroom.com/class/circuits/Lesson-4/Circuit-Symbols-and-Circuit-Diagrams
Wallace, Tyler. Beginning and Intermediate Algebra: An Open Source Textbook. 2010. CC BY-SA 3.0. ISBN #978-1-4583-7768-5. http://www.wallace.ccfaculty.org/book/Beginning_and_Intermediate_Algebra.pdf
Copyright
© 2017 by Regents of the University of Colorado; original © 2016 Michigan State UniversityContributors
Marianne LivezeySupporting Program
Smart Sensors and Sensing Systems RET, College of Engineering, Michigan State UniversityAcknowledgements
This curriculum was developed through the Smart Sensors and Sensing Systems research experience for teachers under National Science Foundation RET grant no. CNS 1609339. However, these contents do not necessarily represent the policies of the NSF, and you should not assume endorsement by the federal government.
Last modified: April 19, 2023


User Comments & Tips