Quick Look
Grade Level: 9 (9-10)
Time Required: 5 hours 45 minutes
250-500 minutes (5 to 10 50-minute class periods)
Expendable Cost/Group: US $0.00
Group Size: 3
Activity Dependency: None
Subject Areas: Geometry, Measurement, Problem Solving, Reasoning and Proof, Science and Technology
NGSS Performance Expectations:

| HS-ETS1-2 |

Summary
Students focus on the engineering design process to ask, research, imagine, plan, create, and improve a prototype for a solution of a problem they wish to solve. Students perform each step of engineering design to better understand how engineers approach problem solving. At the planning stage, students will not only manually draft their prototypes but also use CAD software (e.g., Tinkercad), which is an important engineering tool during the design process. Finally, students create their idea according to their own design specifications using the materials provided. As they learn more about prototyping and the engineering design process, students will develop a better understanding of the concepts and importance of drafting and CAD.Engineering Connection
The concepts presented in this activity and the steps students use in their prototyping directly pertain to real-world engineering. By giving students the opportunity to experience the engineering design process and to delve into CAD software for drafting, students experience engineering firsthand and gain a better understanding of how engineers solve problems.
Learning Objectives
After this activity students should be able to:
- Explain the purpose of the engineering design process.
- Describe the steps of the engineering design process.
- Describe the concepts of manual drafting and CAD.
- Create and outline designs for their own prototypes for engineering solutions.
Educational Standards
Each TeachEngineering lesson or activity is correlated to one or more K-12 science,
technology, engineering or math (STEM) educational standards.
All 100,000+ K-12 STEM standards covered in TeachEngineering are collected, maintained and packaged by the Achievement Standards Network (ASN),
a project of D2L (www.achievementstandards.org).
In the ASN, standards are hierarchically structured: first by source; e.g., by state; within source by type; e.g., science or mathematics;
within type by subtype, then by grade, etc.
Each TeachEngineering lesson or activity is correlated to one or more K-12 science, technology, engineering or math (STEM) educational standards.
All 100,000+ K-12 STEM standards covered in TeachEngineering are collected, maintained and packaged by the Achievement Standards Network (ASN), a project of D2L (www.achievementstandards.org).
In the ASN, standards are hierarchically structured: first by source; e.g., by state; within source by type; e.g., science or mathematics; within type by subtype, then by grade, etc.
NGSS: Next Generation Science Standards - Science
-
DCI.ETS1.A.9-12.3.
Humanity faces major global challenges today, such as the need for supplies of clean water and food or for energy sources that minimize pollution, which can be addressed through engineering. These global challenges also may have manifestations in local communities.
(Grades 9 - 12)
More Details
Do you agree with this alignment?
-
DCI.ETS1.B.9-12.12.
Both physical models and computers can be used in various ways to aid in the engineering design process. Computers are useful for a variety of purposes, such as running simulations to test different ways of solving a problem or to see which one is most efficient or economical; and in making a persuasive presentation to a client about how a given design will meet his or her needs.
(Grades 9 - 12)
More Details
Do you agree with this alignment?
| NGSS Performance Expectation | ||
|---|---|---|
|
HS-ETS1-2. Design a solution to a complex real-world problem by breaking it down into smaller, more manageable problems that can be solved through engineering. (Grades 9 - 12) Do you agree with this alignment? |
||
| Click to view other curriculum aligned to this Performance Expectation | ||
| This activity focuses on the following Three Dimensional Learning aspects of NGSS: | ||
| Science & Engineering Practices | Disciplinary Core Ideas | Crosscutting Concepts |
| Design a solution to a complex real-world problem, based on scientific knowledge, student-generated sources of evidence, prioritized criteria, and tradeoff considerations. Alignment agreement: | Criteria may need to be broken down into simpler ones that can be approached systematically, and decisions about the priority of certain criteria over others (trade-offs) may be needed. Alignment agreement: | |
Common Core State Standards - Math
-
Use geometric shapes, their measures, and their properties to describe objects (e.g., modeling a tree trunk or a human torso as a cylinder).
(Grades
9 -
12)
More Details
Do you agree with this alignment?
-
Apply geometric methods to solve design problems (e.g., designing an object or structure to satisfy physical constraints or minimize cost; working with typographic grid systems based on ratios).
(Grades
9 -
12)
More Details
Do you agree with this alignment?
Materials List
Each student needs:
- Research Sheet
- pen or pencil
Each group need:
- 1 laptop computer
- access to Tinkercad, SOLIDWORKS, or some other CAD software
- 1 ruler
- 1 pair of scissors
- 1 box knife
- 1 hot glue gun
- 2 sheets of Styrofoam
- 2 pieces of balsa wood
- 3 sheets of graphing paper
- 3 sheets of blank paper
- 1 pencil
- 1 eraser
- (optional) students can bring in recyclable materials from home, such as plastic bottles or plastics, cardboard, paper, etc.
Worksheets and Attachments
Visit [www.teachengineering.org/activities/view/uoh-2830-prototyping-engineering-solutions-cad] to print or download.Introduction/Motivation
Today we are going to become engineers. Engineers utilize a systematic, iterative method to develop functional products or solutions. This process is called the engineering design process, and this activity is all about the engineering design process!
What is the engineering design process? It begins with identifying a problem or need, followed by thorough research and defining specific criteria and constraints. Engineers then brainstorm and evaluate potential solutions, selecting the most promising one for detailed design and prototyping. This prototype is tested and refined through multiple iterations, incorporating feedback and solving any issues that arise. The process culminates in a final product that meets the original requirements and constraints, ready for implementation or production. This method ensures that the solutions are efficient, effective, and practical.
We are going to start by asking questions and deciding what problems need to be solved. After your team chooses a problem, you will research your problem, its current solutions, and potential solutions. You will then brainstorm and imagine how to solve your problem, and ultimately plan a model with your team. You will manually draft (sketch/draw) your solution, and then draft your solution using CAD (computer aided design) software to create a 3D representation of your solution. These drafts are very important because they give specific measurements for the parts and objects needed to create your solution. We’ll do this by hand, and then using CAD, so you can see what current engineers use in their day-to-day drafting. (CAD is the replacement for manual drafting, and most engineers in industry use some kind of CAD software.)
After your team’s planning and design, you will us recycled materials to great a prototype of your solution idea. Each team will then present their prototype to the class, describing how their prototype solves a problem and what they did to create their prototype.
Procedure
Background
Throughout this activity students will work through the steps of the engineering design process. Students will ask questions based upon what they would like to create; perform research on their idea and how it could help a community; imagine a design of that idea; plan to create a model by manually drafting their idea and using CAD software to create a 3D representation of that idea; and create a prototype of their idea. Design thinking is a process that people in any industry use to think of and create solutions to problems. Design thinking allows students to prepare a skill that they can use later within the workplace to solve problems or issues that may arise. Manual drafting is the practice of creating drawings by hand. Engineers use drafts, which outline specific measurements for parts and objects, to create those objects or parts. Computer-aided design (CAD) is the process engineers use to draft out their ideas. CAD is the replacement for manual drafting, and most designers at the industry level have used CAD software. For this lesson, students can use Tinkercad, but any CAD software can be used for this activity (SOLIDWORKS, AutoCAD, Sketchup, On Shape, etc.)
Before the Activity
- Gather materials and make copies of the Research Sheet (one for each student.)
- Think about how to best divide the class into groups of 3 or 4 students.
- Read through the engineering design process.
- Familiarize yourself with whichever CAD software your students will use
- Familiarize yourself with orthographic projection.
- Familiarize yourself with design thinking.
During the Activity
Part 1: Ask & Research (~50-100 minutes; depends on depth of student research required by teacher)
- Divide the class into groups of 3 or 4.
- Lead students in a discussion (~10-15 minutes) about current problems and/or events on the international, national, regional and/or local level. Given that this activity focuses on utilizing CAD in the plan/design step, after talking about big problems that need solutions, perhaps try to direct students toward more simple problems that need solving around their school, home, and/or the community.
- If students have a hard time coming up with ideas, review the following (or similar) websites for ideas:
- https://www.engineeringchallenges.org/challenges.aspx
- https://www.nshss.org/resources/blog/blog-posts/5-engineering-design-challenges-for-high-school-students/
- https://blog.collegevine.com/engineering-academic-competitions-for-high-schoolers#competitions
- Other ideas/problems students can explore include mitigating/preventing soil or coastal erosion, cleaning up oil spills, improving urban design challenges, growing food during droughts or floods, creating solar ovens, creating/accessing/maintaining clean water, improving the lives of those with disabilities, creating zero-energy housing, improving project packaging, improving recycling sorting, creating a Rube Goldberg machine, etc.
- Ask students in their groups to think about a current event or problem (as discussed in the previous brainstorming session) that their group would like to research.
- Give students ~5 minutes to determine a topic/problem their group wants to work on.
- Have students start to fill out the Ask section of the Research Sheet with their groups.
- Give student groups the remaining time to research their topic/problem. Groups should decide how they want to split up the research to maximize their time. (This can also be assigned as homework, if more time is needed.)
- Have students fill out the Research section of their Research Sheet.
- While students research their topic, have them also fill out the vocabulary subsection in the Research section of the Research Sheet.
Part 2: Imagine/Plan (~50-100 minutes; depends on how long teacher wants to spend on this step)
- Give students 15-20 minutes to individually brainstorm and sketch 4-5 ideas in the Imagine section of their Research Sheet. Remind students that during the Imagine step of the engineering design process, no ideas are too crazy or out there. If anything, students should be thinking outside the box during this step.
- Separate the class into their groups.
- Give the groups 15-20 minutes to share their brainstormed ideas with each other. Note: This is not much time, so remind students to stay on task (e.g., suggest they split the time up into 3-5 minutes per group member.)
- After ALL of the brainstormed ideas have been shared, have each group agree on ONE solution to try. This can be a brainstormed idea from a group member, or a combination of multiple ideas.
- Give students 5-10 minutes to sketch the group’s chosen solution. Each team member should sketch their group’s chosen idea in the Plan section of the Research Sheet. Remind students that they should label parts and materials they would like to use. Note: Everyone in the group should have essentially the same sketch, since this is their group’s idea.

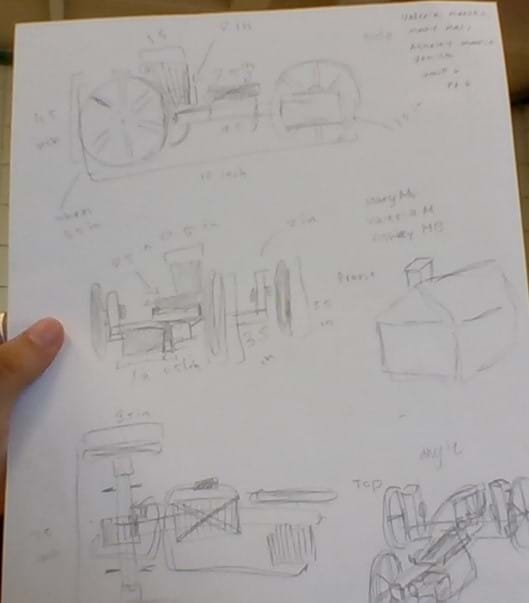
One group’s representation of their prototype (manual draft). - Observe students as they sketch their group’s idea and ask questions that would help with their design. (Suggested questions: How big will dimensions be? Is the sketch drawn to scale? What materials will students want to use?
Part 3: Plan Using CAD (~50-150 minutes; depends on students’ experience with CAD software used)
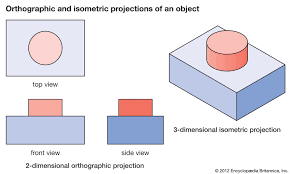
- Have students create an orthographic projection of their idea (i.e., top view, front view, rear view, side view, and bottom view.) They can put these sketches in the Research Sheet.

Visual representation of an orthographic projection. - Review students’ orthographic projection sketches when they are finished.
- Optional: Walk students through the CAD software they will be using.
- Have students recreate their manual drafts within their CAD software program.

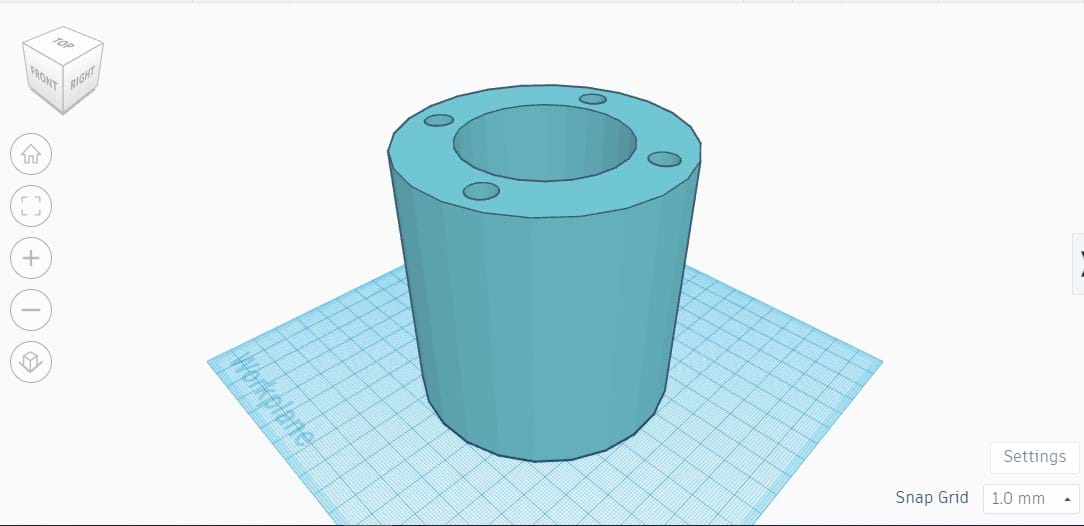
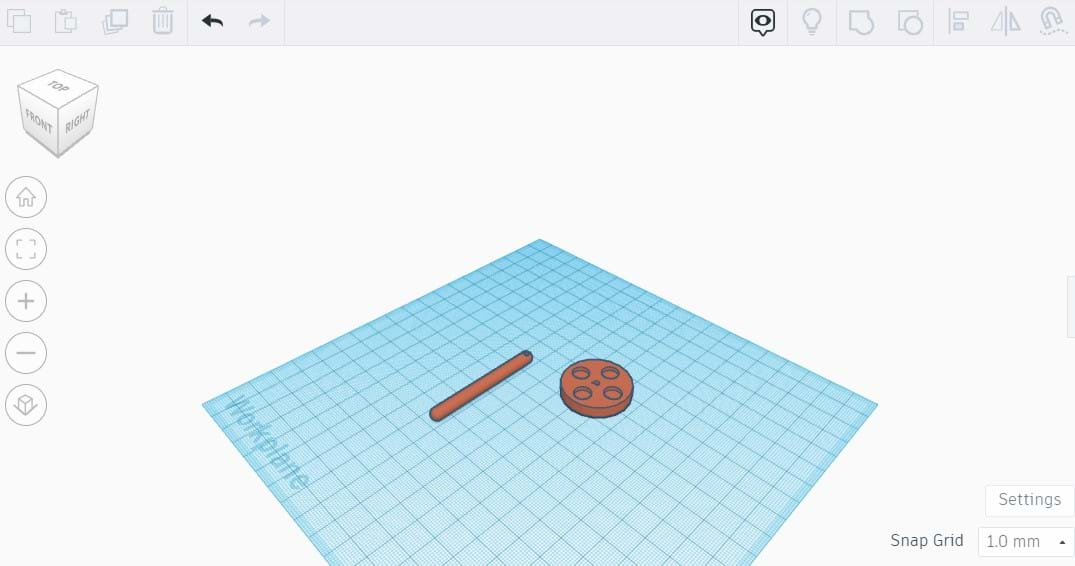
Example of a student-made draft in Tinkercad. 
Example of a student-made draft in Tinkercad. - Review students’ CAD replication of their idea.
Part 4: Create (~50-100 minutes; depends on teacher’s preference)
- Give students time to prototype their idea using the materials provided or by using recycled materials brought from home.
- Review students’ prototypes as they finish, checking to see if their prototype matches their manual draft and CAD design.
Part 5: Reflection/Iteration (~50 minutes)
- Ask students to complete their Research Sheet.
- Ask students what they would do differently or improve about their prototype.
- Give students time to create a presentation of their prototype for the class. (This can also be done outside of class or as homework.)
Part 6: Present (50 minutes)
- Give each student group 5-10 minutes to present their group work to the class.
Vocabulary/Definitions
CAD: Computer-aided design; the use of computers to assist in the creation, modification, analysis, or optimization of a design.
design thinking: A process of thinking used by designers to create innovative solutions to problems or issues people, or the world faces.
document: To prove or support (something) by documentary evidence.
manual drafting: Handmade drawings that are used to outline and explain design ideas.
orthographic projection: Multiple 2D drawings from different angles that are used to model a 3D object (e.g., top view, bottom view, back view, front view, side view).
prototype: The first model of an idea or solution that will be improved upon.
research: Diligent and systematic inquiry or investigation into a subject in order to discover or revise facts, theories, applications, etc.
Assessment
Pre-Activity Assessment:
Discussion: Teacher-led discussion on current events/problems
- What are some current events/problems?
- Are there any current events/problems affecting our community?
- How are the events/problems affecting our community?
- What could be solutions to these events/problems?
- What are some existing engineering solutions related to the events/problems?
- How can we build upon those solutions to improve effectiveness?
Activity Embedded (Summative) Assessment
Research Sheet: The Research Sheet walks students through the engineering design process to create their prototype.
Post-Activity (Summative) Assessment
Group Presentations: Students will present a recap to the class of their work throughout the activity.
Making Sense Assessment: Have students reflect on the science and engineering skills they used by completing the Making Sense Assessment.
Safety Issues
- Use caution while creating prototype with cutting materials (scissors or box knives).
- Properly supervise students throughout the use of cutting materials.
Troubleshooting Tips
Please consider student grouping before the activity to ensure the best environment for each individual student when it comes to work. Also, actively monitor students’ participation within their group and encourage student learning.
Activity Extensions
Have students use different CAD software to create a 3D representation of their idea. This will allow students to gain more familiarity with various CAD software platforms and allow students the opportunity to work with CAD at the industry level.
Activity Scaling
More advanced students can use more complex CAD software to complete their CAD activity. Software ranges from industry level (SOLIDWORKS & AutoCAD) to hobbyist level (On Shape & Sketchup).
Additional Multimedia Support
- Tinkercad Tutorials: https://www.youtube.com/playlist?list=PL90LC6zq_Lzf9tHyFPzX_9OA35BFTfEBs
- Orthographic Projection Explanation: https://www.youtube.com/watch?v=Rz4WWtDX2Kc
Subscribe
Get the inside scoop on all things Teach Engineering such as new site features, curriculum updates, video releases, and more by signing up for our newsletter!References
Dictionary.com, Lexico Publishing Group, LLC. Accessed July 25 , 2023. (Source of some
vocabulary definitions, with some adaptation) https://www.dictionary.com/browse/research
oed.com, Oxford University Press. Accessed July 25, 2023. . (Source of some
vocabulary definitions, with some adaptation) https://www.oed.com/search/dictionary/?scope=Entries&q=document
Copyright
© 2024 by Regents of the University of Colorado; original © 2023 University of HoustonContributors
Khalfani MonmouthSupporting Program
Research Experience for Teachers in Design and Manufacturing (RET), University of HoustonAcknowledgements
This curriculum was developed under National Science Foundation RET grant Number (0742296). Any opinions, findings, and conclusions or recommendations expressed in this material are those of the authors and do not necessarily reflect the views of the National Science Foundation.
Last modified: September 4, 2024


User Comments & Tips