Quick Look
Grade Level: 6 (6-8)
Time Required: 45 minutes
Expendable Cost/Group: US $2.00
Group Size: 3
Activity Dependency:
Subject Areas: Earth and Space, Science and Technology

Summary
Students use the robot paths they documented during the associated Robots on Ice Engineering Challenge activity to learn about and then make artwork. During the previous activity, students recorded the path of their robots through a maze in order to collect data during a remote research simulation. Now, they take a new look at the robot paths, seeing them from an art perspective as continuous line drawings. Students learn about Picasso’s famous works of art that used the same technique. Then they learn the artistic definition of a line and see examples of how it is used in different art pieces; they practice making continuous line drawings and then create sculptures of their drawings using colorful wire. A PowerPoint® presentation is provided to guide the activity.Engineering Connection
In the previous activity, students completed an engineering simulation involving robots and technology—acting like real scientists and engineers while getting their robots to explore an unseen maze. In this next activity, students use the results of their simulations to create art. Engineers not only require traditional technical knowledge and skillsets, they must also be highly creative and attuned to the aesthetics of their designs. In this activity, students experience the intersection of engineering and art, as they create art from their continuous line robot maze navigations.
Learning Objectives
After this activity, students should be able to:
- Define a line.
- Create continuous line drawings.
- Provide facts about Pablo Picasso and his artwork.
Educational Standards
Each Teach Engineering lesson or activity is correlated to one or more K-12 science,
technology, engineering or math (STEM) educational standards.
All 100,000+ K-12 STEM standards covered in Teach Engineering are collected, maintained and packaged by the Achievement Standards Network (ASN),
a project of D2L (www.achievementstandards.org).
In the ASN, standards are hierarchically structured: first by source; e.g., by state; within source by type; e.g., science or mathematics;
within type by subtype, then by grade, etc.
Each Teach Engineering lesson or activity is correlated to one or more K-12 science, technology, engineering or math (STEM) educational standards.
All 100,000+ K-12 STEM standards covered in Teach Engineering are collected, maintained and packaged by the Achievement Standards Network (ASN), a project of D2L (www.achievementstandards.org).
In the ASN, standards are hierarchically structured: first by source; e.g., by state; within source by type; e.g., science or mathematics; within type by subtype, then by grade, etc.
International Technology and Engineering Educators Association - Technology
-
Create solutions to problems by identifying and applying human factors in design.
(Grades
6 -
8)
More Details
Do you agree with this alignment?
State Standards
Georgia - The Arts
-
Incorporates an understanding of the language of art (elements and principles of design) to develop and organize own ideas, resolve specific visual arts problems, and create works of art.
(Grade
6)
More Details
Do you agree with this alignment?
Materials List
Each group needs:
- its completed robot maze map in a plastic sheet protector, as created in the associated Robots on Ice Engineering Challenge activity
- paper and pencil, for each person
- 30-inch Twisteez wires, 2 per person; such as from a $32 bulk package of 200 pieces of 30-inch wire from Blick at http://www.dickblick.com/products/twisteez/
To share with the entire class:
- computer with projector and Internet access, to show the Continuous Line Robots Presentation, a PowerPoint® file, and an online video
- tape
Worksheets and Attachments
Visit [www.teachengineering.org/activities/view/gat_robots_lesson01_activity2] to print or download.Pre-Req Knowledge
Students should have completed the Robots on Ice Engineering Challenge activity and the Robots on Ice lesson.
Introduction/Motivation
(Be ready to show the 25-slide Continuous Line Robots Presentation, a PowerPoint® file, and follow the suggested script below for each slide.)
(Slide 2) An acrostic is a word puzzle in which you pick a word and then make a description of that word by using the letters that spell that word. Here is an example using DONUT.
(Slide 3) This acrostic does a good job in describing the experience of eating donuts from an impressionistic point of view. That means that it expresses a person’s feelings or thoughts rather than specific knowledge or facts. Example: Delectable goOd Nom nom delicioUs tasTy.
(Slide 4) Here is another one that describes donuts using known information and facts. Example: frieD dOugh rouNd sUgar pasTry.
(Slide 5) Now, you try it! On your paper, write what you know about Europa by make an acrostic using the letters EUROPA. (After students are done, ask a few to share their answers. Then show them an example on slide 6.)
(Slide 7) Lead a class discussion using the questions on the slide.
- How do we know all of this information about Europa? (Answer: From space research by scientists, and engineers who work at organizations like NASA and invent telescopes, space probes, sensors, spacecraft, etc.)
- What else do we want to know about Europa? (Possible answers: Does life exist on Europa? What is the composition of the planet below its surface?)
- Do you think we will find life? (Listen to student opinions.)
(Slide 8) Lead a class discussion using the questions on the slide. Tell me about the robot activity we’ve been doing. What did we do during the activity? Why did we do the robot activity? (We modeled what real engineers are doing!)
Procedure
Teacher Background
As a reminder and to provide an example of the continuous line drawings that students should have already created via their maze maps during the previous associated activity, review steps 1-3 below:
Step 1: During the previous activity, students started with a blank maze outline as part of a simulation of what it might be like to explore an unknown and remote location like Europa. During the activity, as the robot explored the maze, they documented on that paper maze outline the path of the robot, any obstacles or landforms encountered, and the locations where they found signs of alien life.
Step 2: At the end of the activity, each team slipped its final paper maze map into a clear plastic protector and used a dry erase marker to trace the robot path on the page protector.
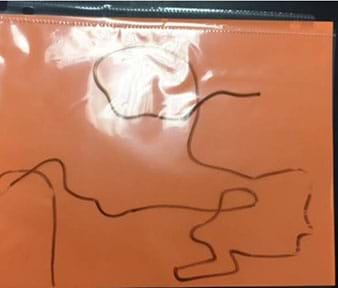
Step 3: When the paper maze map is removed from the plastic sheet protector (as part of this activity, described below), what remains on the plastic sheet is a squiggly line made with the marker (see Figure 1)—a continuous line drawing!
- Gather materials.
- Project the Continuous Line Robots Presentation, a PowerPoint® file, for the entire class to see. Go through the slides to guide the activity, using the suggested script, which provides background information and then leads students to make continuous line drawings and sculptures.
- Distribute to the groups the maps from the previous associated activity, Robots on Ice Engineering Challenge.
With the Students
- Present to the class the Introduction/Motivation content, which transitions students from the previous associated activity by having them create acrostics using what they know about Europa. Then continue on with the suggested script below for the rest of the slides and activity.
- (Slide 9) In the previous activity, you navigated a maze to find alien life, just like the Icefin robot might do one day on Europa. Did you know that you also made a piece of art?
- Hand out to groups (the same teams as in the previous associated activity) their copies of the maze maps they created during the previous activity that were slipped into clear plastic page protectors. (If they haven’t done so already, have them use a dry erase marker to trace onto the plastic the robot’s path through the maze.) Direct them to remove the map outline paper from the page protector, leaving a plastic page protector with a black marker line of the robot’s path.
- Now look at the art created by your robot! When the maze outline, obstacles and aliens are removed, you are left with only the path of the robot. Look at the picture your robot made as if you were looking for recognizable images in the clouds in the sky. Can you see any images in it?
- While your line is simple, it is a type of art! It is a technique called a continuous line drawing.
- (Slide 10) The Curiosity Rover on Mars sends data back to Earth about its location and where it has traveled. Scientists use this information to help create a map of Mars and gather data on the mission. Look at the continuous line of the rover’s path on Mars.
- (Slides 11-12) What does it mean to be continuous? What is a line? In math, a line is the connection of two points. In art, the definition of a line is a point moving through space. The robot created a continuous line as it traversed the maze.
- (Slide 13) Is this a line ------? (yes)
- (Slide 14) What about this ~~~? (yes) A line does not have to be a straight line. It can curve and change directions, too!
- (Slide 15) Let’s watch this short video to learn more about how we define lines in visual arts. (Show the KQED Art School’s Elements of Art: Line video [3:25 minutes] at http://viewpure.com/BDePyEFT1gQ.) A line is one of the seven elements of art.
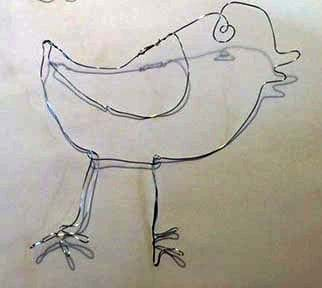
- (Slides 16-19) Picasso’s continuous line drawings are a famous collection of art. Pablo Picasso is a well-known Spanish artist who lived from 1881-1973. He was talented in many art forms, including painting, sculpture and writing. He created more than 20,000 works of art in his lifetime! You might recognize some of them: The Old Guitarist, The Weeping Woman, and Three Musicians (also see Figure 2).

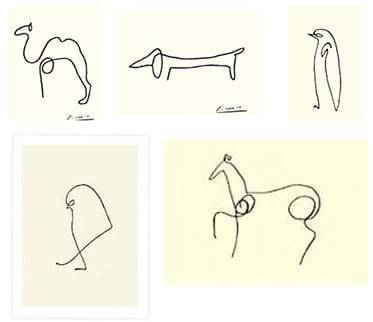
- (Slides 20-21) Take a look at these examples of some of Picasso’s continuous line drawings (camel, dog, penguin, bird, horse; also shown in Figure 3) In these seemingly simple works of art, Picasso used one line to capture images of animals, people and abstract pictures. He never lifted his drawing utensil while making the images. It seems easy to draw an image with just one pen stroke, but it’s not as simple as it looks.

- (Slide 22) While the pictures are simplistic, making them is challenging. On your paper, try to replicate one of these images. Practice it a few times! Think of it like writing in cursive. Keep in mind that right now, you are copying images that have already been created, which is much different than coming up with your own!
- (Slide 23) Now make a different image, this time using your opposite hand!
- Was it easy or challenging to make the images? How similar are yours to Picasso’s? Have you ever used an Etch a Sketch? Those fun toys make continuous line drawings too!
- Picasso’s continuous line drawings are great pieces of art. They are fun and whimsical. Notice that the lines have movement to them, especially where he made loops or changed directions.
- (Slide 24) Now, create your own continuous line drawing on your paper. When you are happy with it, use the flexible, Twisteez wire to make a sculpture of it. Tape one end of the wire to the starting point of your drawing. Using your drawing as a guide, trace the drawing by bending the wire along with the direction of the line. Please do not use the wire as a poking device. Even though the wire is coated in plastic and is not sharp, please use it only for its intended purpose. Remember, to make it continuous, do not break the line! Don’t lift your pencil! That means your wire sculpture will also be continuous! (Optional idea: Have students create second sculptures using their robot-created continuous line drawings.)
- (Slide 25) Let’s reflect!
- Define a line. (Answer: A point moving through space.)
- Who was Pablo Picasso? (Answer: An artist from the 1900s who created many famous works of art, from paintings to sculptures.)
- Do you think this art lesson connected to the robot activity? Why or why not? (Student opinions will vary. Expect them to see a connection between the lines that were created in the robot maze maps and the lines created in continuous line drawings.)
- How does engineering relate to art and aesthetics?
- In what other earth science topic do you think we could connect the idea of continuous line drawings?
- What stuck with you today, or made you think?
- Did you like today’s activity? Why or why not?
Vocabulary/Definitions
continuous line drawing: Artwork created by making shapes and images using a single, unbroken line.
Europa (moon): One of Jupiter’s moons that is believed to have more water than Earth.
line: A point moving through space.
Assessment
Pre-Activity Assessment
Discussion: Engage the class in the discussion and questions posed in slides 1-8 of the Continuous Line Robots Presentation, which asks students to make acrostics with the word Europa to prompt them to use their knowledge about Jupiter’s moon, and asks questions about Europa and the previously completed associated robot activity.
Activity Embedded Assessment
Discussion: Engage the class in the discussion and questions posed in slides 9-23 about lines, continuous lines and continuous line drawings, as made by the robots in the associated robot activity maze as well as the continuous line drawings by Pablo Picasso. Then students make their own continuous line drawings, which they animate into 3D sculptures by recreating them with wire.
Post-Activity Assessment
Reflection: Review the covered activity content with students by leading a discussion (or assign as individual writing homework) as prompted by the seven reflection questions listed on slide 25 (and in the Procedure section).
Safety Issues
Watch that students do not poke themselves or others with the wires.
Subscribe
Get the inside scoop on all things Teach Engineering such as new site features, curriculum updates, video releases, and more by signing up for our newsletter!More Curriculum Like This

Students learn about humankind’s search for life in outer space and how it connects to robotics and engineering. This lesson provides students with intriguing information about far off (distance and time!) space missions and field robotics, and also sets up two associated robotics and arts integrati...

In a simulation of potential future space missions to Europa, one of Jupiter’s moons, student teams are challenged to direct a robot placed in an enclosed maze to search for and find the most “alien life.” The student teams compete as if they are space agencies creating their own exploratory systems...
Copyright
© 2016 by Regents of the University of Colorado; original © 2015 Georgia Institute of TechnologyContributors
Carrie Beth Rykowski; Ayanna Howard, Georgia Tech; Anthony Spears, Georgia TechSupporting Program
PRIME RET and CEISMC GIFT Programs, Georgia Tech Research Institute, Georgia TechAcknowledgements
This work was carried out by the author as part her PRIME GIFT (Georgia Intern Fellowship for Teachers) summer internship at the Bioengineering Division of Georgia Institute of Technology. Thank you to Ayanna Howard for letting me observe in your lab to learn more about robots. Thank you to Anthony Spears and GTRI (Georgia Tech Research Institute) for sharing your Icefin resources, experiences and expertise. Thank you to Jamila Cola for making the CEISMC (Center for Education Integrating Science, Math and Computing) summer program possible.
This activity was developed by the Partnerships for Research, Innovation and Multi-Scale Engineering (PRIME) Research Experience for Teachers (RET) Program at Georgia Institute of Technology, funded by National Science Foundation RET grant no. EEC 140718. However, these contents do not necessarily represent the policies of the NSF, and you should not assume endorsement by the federal government.
Last modified: January 14, 2026


User Comments & Tips