Quick Look
Grade Level: 5 (3-5)
Time Required: 1 hours 45 minutes
(two 50-minute classes)
Expendable Cost/Group: US $3.00
Group Size: 4
Activity Dependency:
Subject Areas: Biology, Life Science, Measurement, Problem Solving
NGSS Performance Expectations:

| 3-5-ETS1-1 |
| 3-5-ETS1-2 |
| 3-5-ETS1-3 |
Summary
Students build small-sized prototypes of mountain rescue litters—rescue baskets for use in hard-to-get-to places, such as mountainous terrain—to evacuate an injured person (modeled by a potato) from the backcountry. Groups design their litters within constraints: they must be stable, lightweight, low-cost, portable and quick to assemble. Students demonstrate their designs in a timed test during which they assemble the litter and transport the rescued person (potato) over a set distance.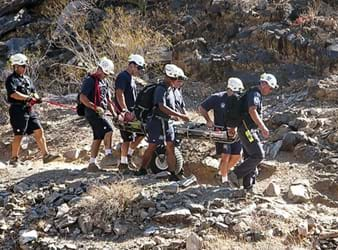
Engineering Connection
Biomedical engineers design solutions for medical and health-related challenges. Students practice being biomedical engineers as they design and build small-sized rescue litter prototypes. In addition, students practice the essential engineering skill of designing within constraints, which are specified for this challenge as device weight, cost, stability, portability and ease of assembly.
Learning Objectives
After this activity, students should be able to:
- Explain the purpose of a rescue litter.
- Describe that the purpose of a rescue litter's stability is to avoid spinal cord injury, which could result in victim paralysis.
- Apply the engineering design process to design engineering solutions within specified constraints.
Educational Standards
Each TeachEngineering lesson or activity is correlated to one or more K-12 science,
technology, engineering or math (STEM) educational standards.
All 100,000+ K-12 STEM standards covered in TeachEngineering are collected, maintained and packaged by the Achievement Standards Network (ASN),
a project of D2L (www.achievementstandards.org).
In the ASN, standards are hierarchically structured: first by source; e.g., by state; within source by type; e.g., science or mathematics;
within type by subtype, then by grade, etc.
Each TeachEngineering lesson or activity is correlated to one or more K-12 science, technology, engineering or math (STEM) educational standards.
All 100,000+ K-12 STEM standards covered in TeachEngineering are collected, maintained and packaged by the Achievement Standards Network (ASN), a project of D2L (www.achievementstandards.org).
In the ASN, standards are hierarchically structured: first by source; e.g., by state; within source by type; e.g., science or mathematics; within type by subtype, then by grade, etc.
NGSS: Next Generation Science Standards - Science
| NGSS Performance Expectation | ||
|---|---|---|
|
3-5-ETS1-1. Define a simple design problem reflecting a need or a want that includes specified criteria for success and constraints on materials, time, or cost. (Grades 3 - 5) Do you agree with this alignment? |
||
| Click to view other curriculum aligned to this Performance Expectation | ||
| This activity focuses on the following Three Dimensional Learning aspects of NGSS: | ||
| Science & Engineering Practices | Disciplinary Core Ideas | Crosscutting Concepts |
| Define a simple design problem that can be solved through the development of an object, tool, process, or system and includes several criteria for success and constraints on materials, time, or cost. Alignment agreement: | Possible solutions to a problem are limited by available materials and resources (constraints). The success of a designed solution is determined by considering the desired features of a solution (criteria). Different proposals for solutions can be compared on the basis of how well each one meets the specified criteria for success or how well each takes the constraints into account. Alignment agreement: | People's needs and wants change over time, as do their demands for new and improved technologies. Alignment agreement: |
| NGSS Performance Expectation | ||
|---|---|---|
|
3-5-ETS1-2. Generate and compare multiple possible solutions to a problem based on how well each is likely to meet the criteria and constraints of the problem. (Grades 3 - 5) Do you agree with this alignment? |
||
| Click to view other curriculum aligned to this Performance Expectation | ||
| This activity focuses on the following Three Dimensional Learning aspects of NGSS: | ||
| Science & Engineering Practices | Disciplinary Core Ideas | Crosscutting Concepts |
| Generate and compare multiple solutions to a problem based on how well they meet the criteria and constraints of the design problem. Alignment agreement: | Research on a problem should be carried out before beginning to design a solution. Testing a solution involves investigating how well it performs under a range of likely conditions. Alignment agreement: At whatever stage, communicating with peers about proposed solutions is an important part of the design process, and shared ideas can lead to improved designs.Alignment agreement: | Engineers improve existing technologies or develop new ones to increase their benefits, to decrease known risks, and to meet societal demands. Alignment agreement: |
| NGSS Performance Expectation | ||
|---|---|---|
|
3-5-ETS1-3. Plan and carry out fair tests in which variables are controlled and failure points are considered to identify aspects of a model or prototype that can be improved. (Grades 3 - 5) Do you agree with this alignment? |
||
| Click to view other curriculum aligned to this Performance Expectation | ||
| This activity focuses on the following Three Dimensional Learning aspects of NGSS: | ||
| Science & Engineering Practices | Disciplinary Core Ideas | Crosscutting Concepts |
| Plan and conduct an investigation collaboratively to produce data to serve as the basis for evidence, using fair tests in which variables are controlled and the number of trials considered. Alignment agreement: | Tests are often designed to identify failure points or difficulties, which suggest the elements of the design that need to be improved. Alignment agreement: Different solutions need to be tested in order to determine which of them best solves the problem, given the criteria and the constraints.Alignment agreement: | |
International Technology and Engineering Educators Association - Technology
-
Students will develop an understanding of the attributes of design.
(Grades
K -
12)
More Details
Do you agree with this alignment?
-
Students will develop an understanding of engineering design.
(Grades
K -
12)
More Details
Do you agree with this alignment?
-
Models are used to communicate and test design ideas and processes.
(Grades
3 -
5)
More Details
Do you agree with this alignment?
-
Apply the technology and engineering design process.
(Grades
3 -
5)
More Details
Do you agree with this alignment?
-
Evaluate designs based on criteria, constraints, and standards.
(Grades
3 -
5)
More Details
Do you agree with this alignment?
State Standards
Colorado - Science
-
Assess further scientific explanations regarding basic human body system functions
(Grade
5)
More Details
Do you agree with this alignment?
Materials List
Each group needs:
- 1 potato (approximately the same size as the shared/class potato)
- 1 zipper or fold-over sandwich bag
- 1-2 sheets of blank paper
- 1 pencil
- Litter Design Worksheet, one per student
For groups to share (can use alternate supplies as desired):
- toothpicks
- paper towels
- popsicle sticks
- straws
- paper (recycled is fine)
- aluminum foil, 12" x 12" square (30 cm x 30 cm)
- sponges, cut into lengthwise thin sections
To share with the entire class:
- (optional) triple beam balance or weighing instrument
- 1 potato that no group has used in the design process
Worksheets and Attachments
Visit [www.teachengineering.org/activities/view/cub_human_lesson06_activity3] to print or download.Introduction/Motivation
What would you do if your friend or family member suffered a serious or life-threatening injury and needed medical attention right away? You would call 9-1-1. An ambulance would arrive in a few minutes, and then emergency medical technicians would place the person on a stretcher, put him or her in an ambulance and drive to the hospital.
But what happens when a person is very hurt and needs to go to the hospital, but is far from any roads? For example, imagine that a person has hiked many miles on a trail, a great distance from any homes or businesses, and became injured. In many places where people explore the wilderness, there are no roads on which an ambulance could drive. Sometimes helicopters can evacuate injured people from remote areas, but helicopters cannot land in forests or if the weather is too windy or snowy. When a person needs urgent medical attention but cannot be reached by an ambulance or helicopter, rescuers must carry the hurt person out of the area to an ambulance waiting at the nearest road. 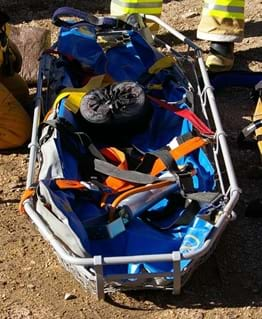
Procedure
Background
Rescuers cannot just pick up an injured person and carry him or her out of the backcountry. First of all, people are heavy, especially when they are unable to help support their own weight. Carrying a person over steep and rocky trails requires the helping hands of many people, sometimes as many as six or eight. Second, it is very important to protect the hurt person's head, neck and back, especially if these body regions are injured. To understand why, let's talk about the function of the spinal cord.
Nerves travel up and down the spinal cord between the brain and the rest of the body. These nerves contain neurons, special cells that transmit chemical and electrical signals to communicate between the brain and muscles. Sensory information is sent from the muscles to the brain by nerves traveling up, and motor commands travel to muscles from the brain by nerves heading down. The spine acts like a cage around the spinal cord, protecting it from injury. Injury to the vertebrae that make up the spine can also cause spinal cord injury. 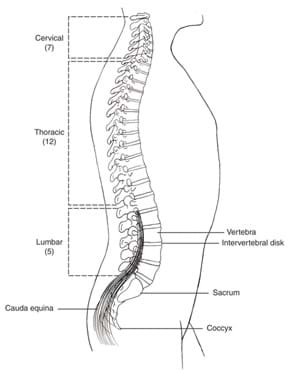
When the spinal cord is injured, parts of the body lower than the injury are affected. This means that if the spinal cord is injured at the level of the cervical vertebrae (C1-C7; see Figure 2), paralysis and weakness may result in both arms and legs (tetraplegia) as well as the torso. This kind of injury can also cause breathing problems, bowel and bladder problems. If the spinal injury is at the thoracic vertebrae (T1-T12), paralysis or weakness in the legs (paraplegia) can result, as well as bowel or bladder dysfunction. Nerves going to the muscles of the back and abdomen also travel through this region, so weakness and loss of sensation in these areas can also happen with thoracic spinal injury. This kind of injury is usually too low to affect the nerves going to the hands or arms. The next group of bones in the spine is the lumbar vertebrae (L1-L5). Spinal injuries at the lumbar level can also cause paralysis or weakness of the legs, bowel and bladder dysfunction, and weakness in the lower back. Spinal injuries to the sacral vertebrae (S1-S5), the lower end of the spine, cause weakness or paralysis of the hips and legs, and loss of bowel and bladder function. Spinal cord injuries can be complete or incomplete. Complete means that no sensory or motor function exists below the level of injury. Incomplete injury means that some sensation and movement is possible below the level of injury; that is, the function of the injured nerves is not completely lost. 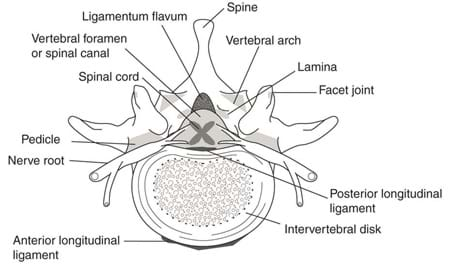
The spinal cord is very sensitive and easy to injure. Part of the purpose of the spine is to protect the spinal cord from injury (see Figure 3). When a person injures his spine, a spinal cord injury is feared. When rescuers reach a person who has hurt his neck or back, they immediately check for spinal cord injury. Even if the rescuers are not sure if the spinal cord is damaged, they want to be very careful. If they bounce or roll the person during the evacuation, it might worsen any spinal injury. They do not want to risk the person becoming paralyzed because of being carelessly moved.
For these reasons, rescuers use a rescue litter to carry the injured person. A litter is flat, stiff and provides handholds for many people to assist in carrying it. What would you use to make a rescue litter? How should it be carried from the road to the hurt person who might be many miles away? (Permit some class discussion.) Litters must be very light, because the rescuers carry them all the way from the road to the injured person and then back again (heavier with the person on board). It is also best if litters are easy to disassemble and reassemble. Often, multiple rescuers each carry a piece of the litter and then put it together when they reach the accident site. This spreads out the weight of the empty litter across several people, so the rescuers can save their strength for carrying the loaded litter to the ambulance. A lightweight, stable, easy-to-carry and easy-to-assemble litter is also important for saving time in the evacuation. With life and death injuries, every minute counts.
The purpose of rescue litters is to evacuate victims quickly and safely. Engineers usually design under the constraints of a particular problem. What are the constraints that we need to keep in mind when designing a litter? (Group discussion, leading to: lightweight, stable, portable, easy to assemble, strong, could be other requirements and limitations as well). In this activity, your engineering team will design and make a rescue litter to evacuate an injured person. We'll make the prototype devices smaller than full size. We will model the victim using something much smaller—such as a potato! In this way, we can make and test a prototype requiring fewer materials. Also, if our litter does not work or breaks during testing, only the potato will fall on the floor—and not a person.
Before the Activity
- Gather supplies and make copies of the Litter Design Worksheet.
- Locate an area for a testing station. Set up two chairs or tables, one representing the location of an injured person [a potato] in the backcountry, the other representing the location of the ambulance. Place the two chairs far enough apart that students need to carefully coordinate their rescue effort.
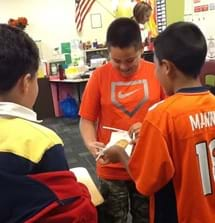
Figure 4. A student-designed litter being used to rescue a potato.
With the Students
Procedure
Day 1:
- Introduce the activity with the Introduction/Motivation and Background content (20 minutes).
- Instruct students on how to carefully use the triple beam balance.
- Introduce students to the testing procedure that will be used to evaluate designs. At the start of a timed test, students begin at the ambulance (chair/table #1), walk with the litter in the rescue bag to the victim (chair/table #2), assemble the litter, and work together to transport the litter and injured person (potato) back to the ambulance (chair/table #1).
- Require at least two students to work together to carry the litter. Hands must be on the edges of the litter and not under it. Optional: Tell groups that the litter-assembler will be randomly chosen by you at testing time; this prompts the groups to be prepared with each group member being adept at fully understanding the design and being able to assemble the litter quickly.
- Assign students to teams of four.
- Show students the available materials, noting that each comes with a "cost" (for example, toothpicks $1 each, popsicle sticks and straws $2 each, sponges and foil $3 each, etc.), as listed on page 2 of the worksheet (Part 2). Tell students that the cost of materials is considered a constraint.
- Then, direct teams to brainstorm and decide on their litter designs, creating labeled engineering drawings, as indicated on page 1 of the worksheet (Part 1). As the engineering drawings are completed, teams show them to the teacher for review and approval.
- Have students complete Part 3 of the worksheet at this time, writing paragraphs that explain how their designs meet the design challenge constraints.
- After a drawing has been approved by the teacher, teams receive their specified design materials. In addition, each team gets a potato and a sandwich bag to construct the litter. The potato is the model "victim." The sandwich bag is the "rescue backpack." The entire litter, whether folded or in parts, must fit into the rescue backpack (this is another constraint). Give teams 30 minutes for design and construction of the rescue litter prototypes.
Day 2:
- If necessary, provide a few minutes for groups to finish constructing their mountain rescue litter prototypes from Day 1.
- Set up the two chairs for testing, and remind students of the testing procedure (Day 1 - Step 3).
- Inform the engineering teams that during testing, their litters will be compared with other litters on the following criteria: mass of litter, cost of litter, time to rescue and litter stability. If any confusion, review what the criteria mean.
- Begin testing. For testing, use an extra potato that no group has designed their litter for; this is done because potatoes, like people, come in all shapes and sizes! The best design is generalizable—works for a wide range of users. Each group starts at the "ambulance" location with the rescue backpack. (Optional: Pick one student in the team to be the assembler, if you previously indicated that this would be done.) When timing starts, the team must walk to the victim, assemble the litter, pick up the potato, and transport to the other chair. If the potato rolls around or falls off of the rescue litter, mark the test as UNSTABLE in the "Stability" column of the table on page 3 of the worksheet (Part 4).
- After testing, have each group use the triple beam balance to find the mass of its litter.
- As each group returns to its desks, have students fill out the table entries for the litter mass, cost, time to rescue and stability on the worksheet (Part 4).
- After each group has tested, lead a class discussion about the data and results, as described in the post-activity instructions in the Assessment section.
Vocabulary/Definitions
cervical vertebrae: The top seven vertebrae in the spine. Injury to the spinal cord at this level can cause quadriplegia.
litter: A stretcher designed for use in stabilizing and moving an injured person over challenging terrain. (See Figure 1.)
lumbar vertebrae: The next five vertebrae in the spine after the thoracic vertebrae. Injury to the spinal cord at this level can cause paraplegia.
nerve: A cable-like bundle of axons from many neurons.
neuron: Nerve cells, which are composed of the cell body, the axon and dendrites (nerve endings).
paraplegia: Partial or total loss of leg movement.
sacral vertebrae: The last five vertebrae in the spine. Injury to the spinal cord here can cause paraplegia.
spinal cord: The thick, whitish cord of nerve tissue that extends from the medulla oblongata down through the spinal column and from which the spinal nerves branch off to various parts of the body.
tetradriplegia: Partial or total loss of movement in all four limbs and the torso.
thoracic vertebrae: The next 12 vertebrae in the spine after the cervical vertebrae. Injury to the spinal cord at this level can cause tetraplegia or paraplegia.
vertebra: The bones that make up the spine and protect the spinal cord.
Assessment
Pre-Activity Assessment
Brainstorming: Have students brainstorm what factors are important in litter design for good patient outcomes. Expect students to mention litter stability (to avoid spinal cord injury), as well as requirements that the device be lightweight and easy/fast to assemble and use so that rescuers can reach and evaluate injured persons as quickly as possible.
Activity Embedded Assessment
Engineering Drawings: Require student-drawn designs to identify the materials used as well as a brief (sentence or two) description of how the design satisfies the design constraints (stable, lightweight, easy and fast to assemble and use). Review Parts 1 and 2 of the Litter Design Worksheet to assess students' comprehension of this portion of the design process.
Post-Activity Assessment
Redesign: If time allows, have students make improvements to their designs and re-test.
Ask-the-Class Results Discussion: Looking at the testing data from all the engineering teams (on the worksheets or written on the classroom board), ask students the following questions/prompts to review the test results and draw some conclusions:
- Which were the best rescue litters? (Answer: Stable, fastest time to rescue.)
- If we had a really fast time for a litter that was not stable, would that still be an acceptable design? (Answer: No, the injured person could end up with a spinal cord injury because of an unstable litter. Not all constraints are of equal importance.)
- Which specific designs performed the best? Compare and discuss their design approaches, construction details, mass and cost.
Graphing & Further Results Analysis: Assign groups (or individuals) to create charts of Mass vs. Time to Rescue, and Cost vs. Time to Rescue using the data from all teams. Then lead a class discussion: Did it matter if litters were heavy or light? What about inexpensive or expensive? Expect the influence of these variables on litter performance to change from class to class. Help students interpret the trends seen in their data. Also ask the class to discuss what other factors besides device mass and cost might influence performance (for example, material choices, how materials are used, design details, construction quality, team coordination).
Making Sense: Have students reflect about the science phenomena they explored and/or the science and engineering skills they used by completing the Making Sense Assessment.
Troubleshooting Tips
Make sure the balance or scale is sensitive enough for the mass of a rescue litter (5-7 ounces or 150-200 grams). A typical bathroom scale is not sensitive enough.
Activity Extensions
To better mirror the real-world, have teams switch designs for testing because the product end users are usually not the original design engineers. Doing this provides a more thorough evaluation of the product ease of assembly and use requirements.
As a further real-world extension, have teams experience the iterative process of design, whereby they modify and improve their designs after testing, and then test again.
Activity Scaling
- If time is limited or if working with younger grades, consider dropping some of the design constraints. For example, calculate a cost for the litter but not a mass.
- For higher grades, have students use the graphed data (Mass or Cost vs. Time to Rescue) to estimate time-to-rescue for litters of specific costs and masses.
Subscribe
Get the inside scoop on all things Teach Engineering such as new site features, curriculum updates, video releases, and more by signing up for our newsletter!More Curriculum Like This

Students learn about the function and components of the human nervous system, which helps them understand the purpose of our brains, spinal cords, nerves and five senses. In addition, how the nervous system is affected during spaceflight is also discussed.

Students further their understanding of the engineering design process (EDP) while applying researched information on transportation technology, materials science and bioengineering. Students are given a fictional client statement (engineering challenge) and directed to follow the steps of the EDP t...
References
Dafny, Nachum. Chapter 3: Anatomy of the Spinal Cord. Neuroscience Online: An Electronic Textbook for the Neuroscience, UTHealth Medical School, the University of Texas Health Sciences Center at Houston. Accessed July 2015. http://neuroscience.uth.tmc.edu/s2/chapter03.html
Litter (rescue basket). Last updated May 16, 2015. Wikipedia, The Free Encyclopedia. Accessed July 2015. http://en.wikipedia.org/wiki/Litter_%28rescue_basket%29
Spinal Cord Injury (SCI): Condition Information. Last updated 7/30/3013. National Institute of Child Health and Human Development, National Institutes of Health. Accessed July 2015. http://www.nichd.nih.gov/health/topics/spinalinjury/conditioninfo/Pages/default.aspx
Copyright
© 2013 by Regents of the University of ColoradoContributors
Chelsea HeveranSupporting Program
Integrated Teaching and Learning Program, College of Engineering, University of Colorado BoulderAcknowledgements
This digital library content was developed by the Integrated Teaching and Learning Program under National Science Foundation GK-12 grant no. DGE 0338326. However, these contents do not necessarily represent the policies of the NSF, and you should not assume endorsement by the federal government.
Last modified: October 20, 2020


User Comments & Tips