Summary
Students learn about weight and drag forces by making paper helicopters and measuring how adding more weight affects the time it takes for the helicopters to fall to the ground.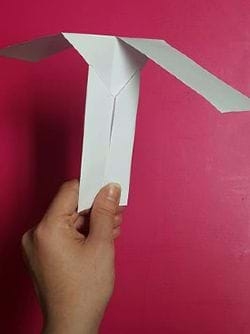
Engineering Connection
For safety, speed and fuel efficiency, when designing recreation and transportation vehicles, engineers take into account all forces acting on the object. Engineers consider drag forces when they design land, air and water vehicles. When prototyping objects such as wings, windshields, propellers, helmets, sports equipment, or even an athlete's position, engineers use a wind tunnel to see the drag forces that are created around an object when air moves by, and they adjust their designs to minimize the amount of drag.
Learning Objectives
After this activity, students should be able to:
- Define drag and explain how this force depends upon factors such as the shape of a helicopter blade.
- Explain that weight is a force that increases by adding mass.
- Collect data, make graphs and calculate averages.
- Think of ideas for how engineers might re-design a helicopter for different purposes.
Educational Standards
Each TeachEngineering lesson or activity is correlated to one or more K-12 science,
technology, engineering or math (STEM) educational standards.
All 100,000+ K-12 STEM standards covered in TeachEngineering are collected, maintained and packaged by the Achievement Standards Network (ASN),
a project of D2L (www.achievementstandards.org).
In the ASN, standards are hierarchically structured: first by source; e.g., by state; within source by type; e.g., science or mathematics;
within type by subtype, then by grade, etc.
Each TeachEngineering lesson or activity is correlated to one or more K-12 science, technology, engineering or math (STEM) educational standards.
All 100,000+ K-12 STEM standards covered in TeachEngineering are collected, maintained and packaged by the Achievement Standards Network (ASN), a project of D2L (www.achievementstandards.org).
In the ASN, standards are hierarchically structured: first by source; e.g., by state; within source by type; e.g., science or mathematics; within type by subtype, then by grade, etc.
NGSS: Next Generation Science Standards - Science
| NGSS Performance Expectation | ||
|---|---|---|
|
MS-ETS1-4. Develop a model to generate data for iterative testing and modification of a proposed object, tool, or process such that an optimal design can be achieved. (Grades 6 - 8) Do you agree with this alignment? |
||
| Click to view other curriculum aligned to this Performance Expectation | ||
| This activity focuses on the following Three Dimensional Learning aspects of NGSS: | ||
| Science & Engineering Practices | Disciplinary Core Ideas | Crosscutting Concepts |
| Develop a model to generate data to test ideas about designed systems, including those representing inputs and outputs. Alignment agreement: | Models of all kinds are important for testing solutions. Alignment agreement: The iterative process of testing the most promising solutions and modifying what is proposed on the basis of the test results leads to greater refinement and ultimately to an optimal solution.Alignment agreement: | |
| NGSS Performance Expectation | ||
|---|---|---|
|
MS-PS2-2. Plan an investigation to provide evidence that the change in an object's motion depends on the sum of the forces on the object and the mass of the object. (Grades 6 - 8) Do you agree with this alignment? |
||
| Click to view other curriculum aligned to this Performance Expectation | ||
| This activity focuses on the following Three Dimensional Learning aspects of NGSS: | ||
| Science & Engineering Practices | Disciplinary Core Ideas | Crosscutting Concepts |
| Plan an investigation individually and collaboratively, and in the design: identify independent and dependent variables and controls, what tools are needed to do the gathering, how measurements will be recorded, and how many data are needed to support a claim. Alignment agreement: Science knowledge is based upon logical and conceptual connections between evidence and explanations.Alignment agreement: | The motion of an object is determined by the sum of the forces acting on it; if the total force on the object is not zero, its motion will change. The greater the mass of the object, the greater the force needed to achieve the same change in motion. For any given object, a larger force causes a larger change in motion. Alignment agreement: All positions of objects and the directions of forces and motions must be described in an arbitrarily chosen reference frame and arbitrarily chosen units of size. In order to share information with other people, these choices must also be shared.Alignment agreement: | Explanations of stability and change in natural or designed systems can be constructed by examining the changes over time and forces at different scales. Alignment agreement: |
Common Core State Standards - Math
-
Construct and interpret scatter plots for bivariate measurement data to investigate patterns of association between two quantities. Describe patterns such as clustering, outliers, positive or negative association, linear association, and nonlinear association.
(Grade
8)
More Details
Do you agree with this alignment?
-
Use the equation of a linear model to solve problems in the context of bivariate measurement data, interpreting the slope and intercept.
(Grade
8)
More Details
Do you agree with this alignment?
-
Know that straight lines are widely used to model relationships between two quantitative variables. For scatter plots that suggest a linear association, informally fit a straight line, and informally assess the model fit by judging the closeness of the data points to the line.
(Grade
8)
More Details
Do you agree with this alignment?
-
Represent data on two quantitative variables on a scatter plot, and describe how the variables are related.
(Grades
9 -
12)
More Details
Do you agree with this alignment?
International Technology and Engineering Educators Association - Technology
-
Explain how knowledge gained from other content areas affects the development of technological products and systems.
(Grades
6 -
8)
More Details
Do you agree with this alignment?
State Standards
Colorado - Science
-
Predict and evaluate the movement of an object by examining the forces applied to it
(Grade
8)
More Details
Do you agree with this alignment?
Materials List
Each group needs:
- notebook paper, 8.5 x 11-inch size
- 10 paperclips
- pencil
- ruler
- scissors
- Helicopter Instructions Diagram, one per group
- Heavy Helicopters Worksheet, one per student
- measuring tape
- stopwatch, such as smartphone or online stopwatch
Worksheets and Attachments
Visit [www.teachengineering.org/activities/view/cub_mechanics_lesson01_activity1] to print or download.Introduction/Motivation
When skydivers jump out of airplanes, the force that prevents them from accelerating towards the Earth in an uncontrolled way is drag. Drag acts in the direction opposite to motion. This opposing force slows down anything moving through the air.
You can feel drag if you stick your hand out a car window while the car is moving. It feels like a pressure pushing your hand backwards. The amount of drag that your hand creates depends on factors such as the size of your hand, the speed of the car and the density of the air. If you were to slow down, you would notice that the drag on your hand would decrease. If you change the position of your hand, you can increase or decrease drag by changing the amount of surface area facing the direction of movement.
The drag force generally increases for objects with large surface areas. For example, the large surface of a parachute helps a skydiver create more air resistance. We see many examples of drag reduction when we watch sporting competitions in the Olympics. Championship skiers, speed skaters and bicyclists squeeze down into a tight crouch. By making themselves "smaller," they decrease the drag they create, which enables them to move faster.
Drag exists because of the motion between a fluid (even air!) and an object. It doesn't matter if the object is stationary and the fluid is moving, or if the fluid is still and the object is moving through it. What really matters is the difference in speeds between the object and the fluid. This is why wind tunnels (an enclosed space with a stationary object surrounded by moving air) can be used to study the aerodynamics of objects—the drag forces are the same as if the object was moving and the fluid was still.
Procedure
Before the Activity
- Gather materials and make copies of the Helicopter Instructions Diagram and Heavy Helicopters Worksheet.
- Choose appropriate locations for students to drop their helicopters.
With the Students
Helicopter Model Instructions (refer to the Helicopter Instructions Diagram)
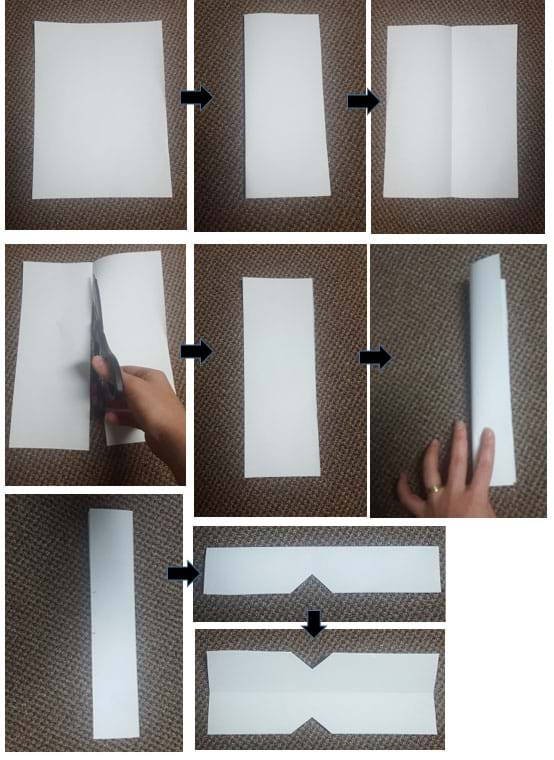
- Fold one sheet of paper in half lengthwise. (See steps 1-2 in Figure 1.)
- Open the fold (step 3 in Figure 1) and cut along the folded line. (Step 4 in Figure 1.)
- Take one of the halves and again fold it in half lengthwise. (Steps 5-6 in Figure 1.) Note: The other long half sheet does not get used, so it is available if students make a mistake with the first half.
- Use a ruler to measure 4 inches from the left edge of the paper towards the center (as shown in the diagram). Then measure 2 inches after the 4 inches for the triangle and draw a triangle along the unfolded edge of the paper, as shown in the diagram.
- Cut out the triangle. Be sure to cut through both layers of the paper (the top and bottom sides) (see steps 7-8 in Figure 1).
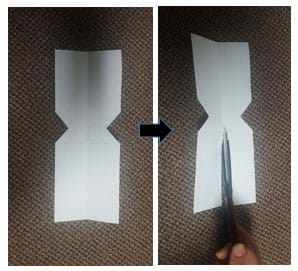
- Open the paper (step 9 in Figure 1) and cut down the center of the paper from one edge of the paper to the starting point of the triangle. See pattern in the diagram and Figure 2.
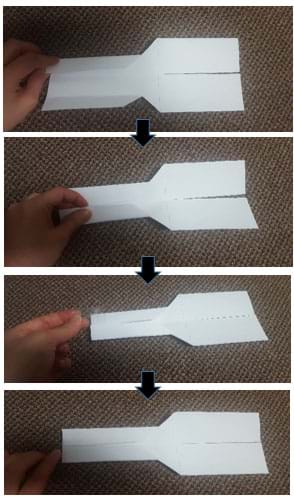
- Fold the tabs toward the center, as shown in Figure 3. Use a small piece of tape to secure the tabs. This serves as the helicopter base.
- Now fold the blades along the dotted centered lines in opposite 90 degree directions, as shown in Figure 4. Doing this creates the helicopter propeller.
- Test the helicopter to make sure it works.
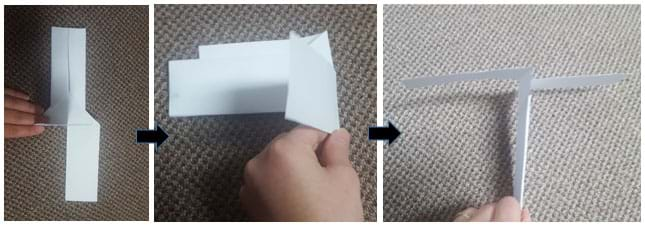
Helicopter Building and Testing Activity (including Data Collection)
- Organize the students into pairs to work together. Hand out the worksheets and instruction diagrams. Direct each student team create one helicopter from the instructions and predict the times for helicopters to fall and record their predictions on the classroom board. Suggest student team roles: one student releases the helicopter while a second student times the helicopter's descent and records the time.
- As a class, decide a height from which to drop the helicopter. Then, discuss a method for dropping the helicopter. Require everyone to use the same method of dropping the helicopter. How can the timer best see when the helicopter hits the floor? Agree on a method for timing and review how to use the stopwatches (and practice).
- Have students determine where to hold the helicopter to drop it from the agreed-upon height. Each group must determine this position for each member. They should stand on a chair and use a measuring tape to make sure that they are dropping the helicopter from the correct height. Some students may need to hold the helicopter above their heads.
- Have students drop their helicopters from the agreed-upon height and record the time of landing, in seconds, on their worksheets.
- Have students repeat step 4 by adding 1, 5 and 10 paperclips to the bottom of the helicopter.
- Have groups return to their desks and create a second helicopter, this time making any design changes so the helicopter moves SLOWER. Tell them that this is what engineers do when coming up with the perfect design for an invention or product─they test an original design and modify it in some way.
- As teams are working on their "new design," brainstorm with them. What can we do to work with forces? Do parachutes/helicopters with larger surface areas go faster or slower? (Answer: Slower) Which force is this taking advantage of? (Answer: Drag) What if we add weight? (Answer: It will fall faster.) Could we make a parachute with a large area and a large weight that falls at the same rate as a small area and a small weight? (Answer: Yes)
- Have students switch roles (from step 1) and repeat steps 3, 4 and 5 with the new helicopter design.
- Give the pairs time to complete the worksheets. Revisit the predictions on the board and assess accuracy (meaning, do the answers come close to each other?).
- Have the class answer the post-activity questions provided in the Assessment section.
Concluding Class Math Activity
- After teams finish recording their data and calculating their average values, bring everyone back together into one group.
- Have each team write its average value on the board for each trial. As a class, calculate the average time for each helicopter trial. Then, make graphs showing time as a function of the number of paperclips attached to the helicopter.
- Using the class graph, have students predict how long it would take the helicopter to fall to the ground with seven paperclips, 15, 20, etc. (Answer: It should fall faster.)
Assessment
Pre-Activity Assessment
Predictions:Ask students to predict the time it will take for helicopters to fall and record their predictions on the classroom board.
Activity Embedded Assessment
Worksheet: Have students record their observations on the Heavy Helicopters Worksheet. Review their answers to gauge their mastery of the subject.
Brainstorming: In small groups, have the students engage in open discussion. Remind students that no idea or suggestion is "silly." All ideas should be respectfully heard.
- What can we do to alter the impact of forces? Do parachutes/helicopters with larger surface areas go faster or slower? (Answer: Slower)
- Which force is this taking advantage of? (Answer: Drag)
- What if we add weight? (Answer: It will fall faster.)
- Could we make a parachute with a large area and a large weight that falls at the same rate as a small area and a small weight? (Answer: Yes)
Post-Activity Assessment
Question/Answer: Ask the students and discuss as a class:
- What is the force that pulls the helicopter/parachute to the ground? (Answer: Weight)
- What force is acting in the opposite direction to the force of gravity when you drop the helicopter/parachute? (Answer: Drag)
- What happened to the descent time for the helicopter as you added paperclips? (Answer: The descent time decreased as the weight of the helicopter increased.)
Discussion Question: Solicit, integrate and summarize student responses.
- Describe how the paperclips affected the landing of the helicopter.
Writing: Have students answer the following questions in a short paragraph.
- How could you design your helicopter/parachute to make it more effective?
- What do you think your design would accomplish that this helicopter design did not accomplish?
- Would your observations for this activity change with your new model helicopter?
Safety Issues
Watch that students are careful when when dropping their helicopters from high locations.
Troubleshooting Tips
It is important that all teams follow the same procedures for dropping the helicopter, otherwise, for comparison purposes and compiling class data, the data will be inconsistent.
It may be easier to create a bar graph with the descent time on the y-axis and the number of paperclips on the x-axis.
Activity Extensions
Have students explore the history of helicopters at: http://www.helis.com/ and http://www.helicoptermuseum.org/.
Have students make posters showing the basic principles of how hang gliders, parachutes, airplanes or helicopters work: http://howstuffworks.com/.
Subscribe
Get the inside scoop on all things Teach Engineering such as new site features, curriculum updates, video releases, and more by signing up for our newsletter!More Curriculum Like This

Students learn about the drag force on airplanes and are introduced to the concept of conservation of energy and how it relates to drag. They learn the difference between friction drag, form drag and induced drag, and how thrust is involved. They explore the relationship between drag and the shape, ...

Students are introduced to the concepts of force, inertia and Newton's first law of motion: objects at rest stay at rest and objects in motion stay in motion unless acted upon by an unbalanced force. Students learn the difference between speed, velocity and acceleration, and come to see that the cha...

Students begin to explore the idea of a force. To further their understanding of drag, gravity and weight, they conduct activities that model the behavior of parachutes and helicopters.

Students learn about friction and drag — two different forces that convert energy of motion to heat. Both forces can act on a moving object and decrease its velocity. Students learn examples of friction and drag, and suggest ways to reduce the impact of these forces.
References
Rodriguez, Leticia. Biology/Chemistry – Gravity Lesson. June 12, 2003. Science and Mathematics Initiative for Learning Enhancement, Illinois Institute of Technology. October 20, 2003. http://www.iit.edu/~smile/phma1700.htm
Copyright
© 2004 by Regents of the University of ColoradoContributors
Sabre Duren; Ben Heavner; Malinda Schaefer Zarske; Denise W. CarlsonSupporting Program
Integrated Teaching and Learning Program, College of Engineering, University of Colorado BoulderAcknowledgements
The contents of this digital library curriculum were developed under grants from the Fund for the Improvement of Postsecondary Education (FIPSE), U.S. Department of Education, and National Science Foundation (GK-12 grant no 0338326). However, these contents do not necessarily represent the policies of the Department of Education or National Science Foundation, and you should not assume endorsement by the federal government.
Last modified: June 30, 2020


User Comments & Tips