Quick Look
Grade Level: 9 (9-12)
Time Required: 16 hours 45 minutes
This project works well as the final design project of an introductory high school engineering course, taking about twenty 50-minute time periods over five weeks.
Expendable Cost/Group: US $13.00 Costs vary widely, depending on the list of materials generated by student designs and teacher constraints. Rough estimate $10-15 per group.
Group Size: 4
Activity Dependency: None
Subject Areas: Problem Solving, Science and Technology
NGSS Performance Expectations:

| HS-ETS1-2 |
| HS-ETS1-3 |

Summary
In this service-learning engineering project, students follow the steps of the engineering design process to design an assistive eating device for a client. More specifically, they design a prototype device to help a young girl who has a medical condition that restricts the motion of her joints. Her wish is to eat her favorite food, pizza, without getting her nose wet. Students learn about arthrogryposis and how it affects the human body as they act as engineers to find a solution to this open-ended design challenge and build a working prototype. This project works even better if you arrange for a client in your own community.Engineering Connection
Engineers work with people and their communities to improve our quality of life. Engineering projects range from roads and bridges that bring people together for family and commerce, to water-purifying devices that provide people in developing countries with clean water. This project is a service-based engineering design project that is intended to show how engineers, in this case, biomedical engineers, can directly impact the life of someone in their community. As part of their design work, engineers create prototypes and make technical presentations.
Learning Objectives
After this activity, students should be able to:
- Explain what arthrogryposis is and how it affects the human body.
- Describe what biomedical engineers do and the types of projects they work on.
- Explain how engineers help the community.
Educational Standards
Each Teach Engineering lesson or activity is correlated to one or more K-12 science,
technology, engineering or math (STEM) educational standards.
All 100,000+ K-12 STEM standards covered in Teach Engineering are collected, maintained and packaged by the Achievement Standards Network (ASN),
a project of D2L (www.achievementstandards.org).
In the ASN, standards are hierarchically structured: first by source; e.g., by state; within source by type; e.g., science or mathematics;
within type by subtype, then by grade, etc.
Each Teach Engineering lesson or activity is correlated to one or more K-12 science, technology, engineering or math (STEM) educational standards.
All 100,000+ K-12 STEM standards covered in Teach Engineering are collected, maintained and packaged by the Achievement Standards Network (ASN), a project of D2L (www.achievementstandards.org).
In the ASN, standards are hierarchically structured: first by source; e.g., by state; within source by type; e.g., science or mathematics; within type by subtype, then by grade, etc.
NGSS: Next Generation Science Standards - Science
| NGSS Performance Expectation | ||
|---|---|---|
|
HS-ETS1-2. Design a solution to a complex real-world problem by breaking it down into smaller, more manageable problems that can be solved through engineering. (Grades 9 - 12) Do you agree with this alignment? |
||
| Click to view other curriculum aligned to this Performance Expectation | ||
| This activity focuses on the following Three Dimensional Learning aspects of NGSS: | ||
| Science & Engineering Practices | Disciplinary Core Ideas | Crosscutting Concepts |
| Design a solution to a complex real-world problem, based on scientific knowledge, student-generated sources of evidence, prioritized criteria, and tradeoff considerations. Alignment agreement: | Criteria may need to be broken down into simpler ones that can be approached systematically, and decisions about the priority of certain criteria over others (trade-offs) may be needed. Alignment agreement: | |
| NGSS Performance Expectation | ||
|---|---|---|
|
HS-ETS1-3. Evaluate a solution to a complex real-world problem based on prioritized criteria and trade-offs that account for a range of constraints, including cost, safety, reliability, and aesthetics, as well as possible social, cultural, and environmental impacts. (Grades 9 - 12) Do you agree with this alignment? |
||
| Click to view other curriculum aligned to this Performance Expectation | ||
| This activity focuses on the following Three Dimensional Learning aspects of NGSS: | ||
| Science & Engineering Practices | Disciplinary Core Ideas | Crosscutting Concepts |
| Evaluate a solution to a complex real-world problem, based on scientific knowledge, student-generated sources of evidence, prioritized criteria, and tradeoff considerations. Alignment agreement: | When evaluating solutions it is important to take into account a range of constraints including cost, safety, reliability and aesthetics and to consider social, cultural and environmental impacts. Alignment agreement: | New technologies can have deep impacts on society and the environment, including some that were not anticipated. Analysis of costs and benefits is a critical aspect of decisions about technology. Alignment agreement: |
International Technology and Engineering Educators Association - Technology
-
Students will develop an understanding of the attributes of design.
(Grades
K -
12)
More Details
Do you agree with this alignment?
-
Students will develop an understanding of engineering design.
(Grades
K -
12)
More Details
Do you agree with this alignment?
-
Illustrate principles, elements, and factors of design.
(Grades
9 -
12)
More Details
Do you agree with this alignment?
-
Develop a plan that incorporates knowledge from science, mathematics, and other disciplines to design or improve a technological product or system.
(Grades
9 -
12)
More Details
Do you agree with this alignment?
Materials List
Since this is an open-ended project, the list of materials will vary depending on students' designs. Each group might need:
- basic wood cuts, such as boards, dowels and beams
- PVC pipes and joints
- aluminum sheets
- nails and screws
- wood glue
- duct tape
- other common items available at any hardware store
Tools are also necessary for students to build working prototypes. Tools to share with the entire class might include:
- hacksaw
- power drill
- drill bits, including a hole saw
- screw drivers
- hammer
For all students:
- Research Handout, one per student
- Presentation Peer Review Form, one per student X number of groups
For the teacher:
- (optional) Evaluation/Grading Rubric, one per team
- protractor
Worksheets and Attachments
Visit [www.teachengineering.org/activities/view/cub_service_activity01] to print or download.Pre-Req Knowledge
Students should be familiar with the engineering design process and preferably have completed an engineering design project prior to this activity. It is helpful to go through a smaller-scale project first, such as that described in TeachEngineering's Creative Engineering Design unit.
Introduction/Motivation
Engineers work extensively with our communities and play an important role in our health, happiness and safety. Can anyone think of the types of projects engineers work on that improve our health (air quality controls, water filtration, artificial hearts), increase our happiness (video games, music players, cameras), or maximize safety (seat belts, earthquake-safe buildings, levees)?
One type of engineer who works to increase our quality of life is a biomedical engineer. Biomedical engineers design devices ranging from artificial hearts and pacemakers, to wheelchairs that can climb stairs, to prosthetics that enable people with missing legs and feet to run marathons. The number of ways that biomedical engineers can positively affect people's lives is truly endless!
One way biomedical engineers make a difference in people's lives is by designing devices that help people with physically-handicapping diseases. One such condition is a rare birth defect known as arthrogryposis, which limits or eliminates the motion available from a person's joints. We often take it for granted, but our joints and the muscles, and the tendons that are attached to them. give us our full range of motion. Imagine how different your life would be if you could not bend your elbows! How would simple tasks such as brushing your teeth or feeding yourself change? The effects of arthrogryposis vary from person to person, but the condition often leads to muscle weakness and deformity.
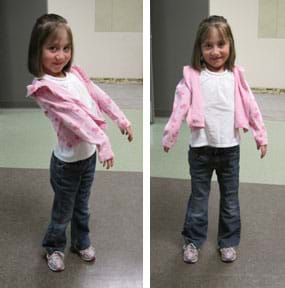
While we know of no cure for arthrogryposis, we have found ways to make life more comfortable. Because the condition varies from person to person, let's focus on a first-grade girl in our community (see Figure 1). She cannot move her wrists or elbows and has limited range from her shoulders. (The extent of her range can be seen in Figure 1.) This girl wants to be able to feed herself without getting her nose wet. Right now, if she wants to feed herself she has to bend at her waist and put her face down to the plate. It is easy to imagine that her nose gets food on it most of the time.

(This is a great opportunity to do a fun little exercise. Bring in some sort of snack [or pretend] and ask students to try to eat without bending their elbows. It helps to tape rulers to their straightened arms to keep them from bending their elbows.) What is the extent of our client's range of motion? Holding her arms out in front of her as far as she can is about 30° from her body. Holding her straight arms out to the sides of her body as far as she can is about 15° from her body. This makes it very difficult for her to feed herself.
To increase a person's quality of life, biomedical engineers design devices to fulfill needs like this one. Can you imagine the happiness it would bring to this little girl if she could gain some independence by being able to feed herself?
This is why being an engineer is so cool! We have the ability to help her by designing a device that she can operate to feed herself. Since her favorite food is pizza, our goal is to build something that will enable her to feed herself pizza. Being engineers, we want to follow the engineering design process because it helps us create the best possible device for her. We've already done the first step, which is to identify the need. Next, we will research the problem, then brainstorm possible solutions, construct a prototype, and finally evaluate/manufacture the final product.
Procedure
Background
Biomedical engineers study the workings of the human body and collaborate with medical practitioners and clients to design medical solutions to improve health and address disorders. This may take the form of devices, implants, machines, medicines and technologies (diagnostic equipment, pacemakers, artificial limbs, surgical techniques, hearing aids, laser eye surgery, ultrasound, amniocentesis, in-vitro fertilization, pain medicine, etc.). As part of their design work, engineers create prototypes and make technical presentations, to learn, test and communicate their work.
Service-based projects often take more time to prepare, especially if you arrange for an actual client. However, we have noticed that students of both genders and all ethnicities tend to respond with more enthusiasm and interest in these projects. The project has the most impact with a real client from your own community.
This project does not have one solution or one clear path to take, and this might be difficult for some students. Also, not having one specific design solution means that materials will vary and you might have to make multiple trips to the store to get everything the students' request.
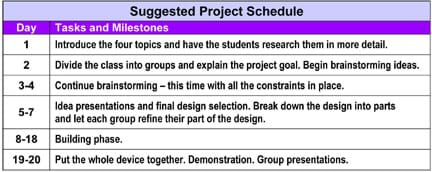
See Figure 2 for a suggested project schedule, a summary of the steps described in more detail in the With the Students section.

Use the attached Evaluation / Grading Rubric to help with grading.
Before the Activity
- Gather all materials and tools for use by the entire class.
- Make copies of the Research Handout, Presentation Peer Review Form and Evaluation / Grading Rubric (optional).
- Take a walk inside your local hardware store to see what different materials are available and how much they cost.
With the Students
1. Introduce the students to service-based engineering, arthrogryposis, biomedical engineering, and the young girl with arthrogryposis, as provided in the Introduction/Motivation section. (15 minutes)
2. Have students research arthrogryposis and biomedical engineering in more detail. Give them the research handout to complete. (35 minutes)
3. Divide the class into groups of three or four students each. Explain the project: To design and build a prototype that enables the young girl to eat pizza on her own without getting her nose wet. (15 minutes)
4. Make sure students are aware of all the information necessary to begin brainstorming ideas. This includes describing the extent of the young girl's range of motion: She has no movement in her elbows, wrists, hands, feet, ankles or knees. Holding her arms out in front of her as far as she can is about 30° from her body. Holding her straight arms out to the sides as far as she can is about 15° from her body. Then have the groups begin brainstorming and roughly sketch each idea they come up with. Encourage wild ideas. (35 minutes)
5. At this point, add all necessary project constraints and requirements, which include: costs, feasibility (this depends on the amount of time and tools available), ease of repair, ease of cleaning, and safety. Have students continue brainstorming ideas and then pick their best idea. (100 minutes)
6. Have each group present their best idea or two to the class. Require that the presentations describe how their ideas satisfy all the constraints and requirements. (30 minutes)
7. With the class' help, select the best design or combination of designs. (At this point, take charge and make sure they do not pick a design that is overly ambitions. See the Troubleshooting Tips section.) (20 minutes)
8. Before the next class, break down the selected final design into parts that can be reasonably handled by groups of three to four students. When having different groups work on interconnected parts of one design, make sure you assign one person per group to keep in contact with all the other groups, or take on that role yourself. This way, when the groups finish their designs, all the parts work together.
9. Assign a portion of the final design to each group. Have them finalize their designs by sketching them out and making materials lists (what they need to build them). Make sure they know that all the supplies they request must be available at the local hardware store. Once you have approved their designs, collect their materials lists. (100 minutes)
10. Before the next class, buy the supplies students requested.
11. Have the groups begin building their part of the prototype. (10 x 50-minute class periods = 500 minutes)
- At some point before or during this step, have each group present a progress report to the class, as outlined in the Assessment section. This helps keep the groups on task.
- It is almost certain that some groups will finish before the others. Just be alert for some work they can do to help another group, or have ready another task or activity to keep them occupied.
12. When all the groups have finished building their parts, have one member of each group join together to put the whole project together. While this is going on, have the other members prepare their presentation, as described in the Assessments section. (50 minutes)
13. Have the class demonstrate their completed assistive device (to the client, if possible) and have each group give their presentation to the class. (50 minutes)
Vocabulary/Definitions
arthrogryposis: A rare congenital disorder that is characterized by multiple joint contractures and can include muscle weakness and fibrosis.
contractures: A condition of shortening and hardening of muscles, tendons or other tissue, often leading to deformity and rigidity of joints.
Assessment
Pre-Activity Assessment
Class Discussion: Review the engineering design process. Ask the students: What are the steps of the engineering design process? What do you do during each step?
Class Discussion: Introduce the idea of service-based engineering. Ask the students: How do engineers increase the health, happiness and safety of people in your community?
Activity Embedded Assessment
Design Review: Have student teams give short presentations to the class making sure they describe their specific design, how it fits with the other parts, and what problems they have encountered or challenges they expect to run into. Have students use the attached Presentation Peer Review Form.
Post-Activity Assessment
Final Presentation: Have the groups present their final product, making sure to include how it works, how and why their design changed from their original ideas, what they would do differently if they had the time and supplies, and whether or not they think the client would be able to easily use their part of the design. Have students use the attached Presentation Peer Review Form.
Writing Reflection: Give each student a half sheet of paper and ask him or her to write down how s/he feels service-based engineering impacts the community.
Making Sense: Have students reflect about the science phenomena they explored and/or the science and engineering skills they used by completing the Making Sense Assessment.
Safety Issues
The use of power tools and sharp blades are necessary to complete this project. Make sure students know how to use the tools safely and actively supervise them.
Troubleshooting Tips
Open-ended design projects can be difficult for students because no clear path to one solution exists. Because it is easy to get stuck wasting too much time brainstorming or building designs that are unrealistic, it is important for the teacher to keep students on task and working on a feasible design.
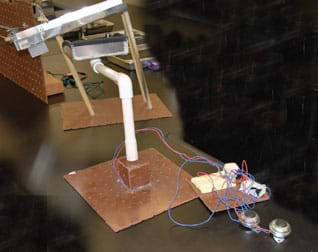
Students will probably think of ideas that require electricity, such as a battery-powered motor to transport the food (see Figure 3). Electrical devices add a great deal of complexity and usually make the final product less reliable and harder to repair. Unless you are really comfortable working with electrical devices, avoid this design path by challenging the students to think of other, non-motorized ways to accomplish the same thing.

Activity Extensions
Brainstorm other ideas for engineering designs that benefit your community or a specific person in your community.
Activity Scaling
For more advanced students, have them further test the prototype and make a more refined product that is robust and safe enough for the client to regularly use. Write a user's manual that describes maintenance and replacement part specifications. Present to the client.
Additional Multimedia Support
For more information on high school engineering design process activities and projects, see TeachEngineering's Creative Engineering Design unit.
Learn more about the engineering design process at https://www.teachengineering.org/engrdesignprocess.php
Subscribe
Get the inside scoop on all things Teach Engineering such as new site features, curriculum updates, video releases, and more by signing up for our newsletter!More Curriculum Like This

This lesson covers the topic of human bones and joints. Students learn about the skeleton, the number of and types of bones in the body, and how outer space affects astronauts' bones. Students also learn how to take care of their bones here on Earth to prevent osteoporosis ─ or weakening of the bone...

Students extend their knowledge of the skeletal system to biomedical engineering design, specifically the concept of artificial limbs and joints. Students relate the skeleton as a structural system, focusing on the leg as structural necessity. They learn about the design considerations involved in t...
Copyright
© 2009 by Regents of the University of Colorado.Contributors
Jonathan MacNeil; M. Travis O'Hair; Malinda Zarske; Eszter Horanyi; Stephanie Rivale, Brandi Briggs (This activity was taught at Skyline High School in Longmont, CO. A special thanks to Sarah Delaney and Jordian Summers for their help in developing this activity.)Supporting Program
Integrated Teaching and Learning Program, College of Engineering, University of Colorado BoulderAcknowledgements
The contents of this digital library curriculum were developed under a grant from the Fund for the Improvement of Postsecondary Education (FIPSE), U.S. Department of Education, and National Science Foundation GK-12 grant no 0338326. However, these contents do not necessarily represent the policies of the Department of Education or National Science Foundation, and you should not assume endorsement by the federal government.
Last modified: October 23, 2020


User Comments & Tips